
You are using an out of date browser. It may not display this or other websites correctly.
You should upgrade or use an alternative browser.
You should upgrade or use an alternative browser.
Looking for some AL welding critque
- Thread starter 600SL
- Start date
alexb2000
Well-known member
Unfortunately I dont have one at the moment but its on my wish list.
How are you sharpening now?
IF you can keep a dedicated grinder it works fine, most of us end of grinding other **** and then contaminating the tungsten.
This is the chemsharp I was talking about...
I just sharpen a whole box of tungstens in one sitting and then I have them ready to go.
Some improved results today. I got my SS brush and it did seem to respond very well. Not perfect but the last couple of welds were not too bad.
First weld went real bad as I instantly blew a hole in the material and blew the tip of the tungsten of when I started the weld and found no argon flow. Found my twist lock flow through connector was not fully engaged.
Fixed that and resharpened. Was able to get the puddle to form and did a couple of relatively poor welds. Found the problem to be a lack of straight line vision to the puddle. Raised my chair about 6 inches and significant improvement.
Then the welder stopped working. No arc start. Tried to clean the points with compressed air the way Lincoln says to do. Still no start. Then I pulled the points out and dressed them with a surface grinder (what Lincoln says not to do). I put them back in and had to scratch the first time to start but after that all worked well.
I dressed the tungsten and found that it seamed the welder was working better after servicing the points and performing 1 scratch start. Not sure if the points had any thing to do with it or was I just getting better at it but all welds performed after this service looked like welds I wouldn't be embarrassed to charge money for.
So in the attached pictures the first pic shows the first weld I did where the Dinse connector was loose. Once I fixed the points I went over it with the SS wire brush was able to fill in the gaping hole as dirty as it was. Moving on past the hole area the the rest of the weld was completed and looks good.
The next two pictures show some of the welds performed prior to fixing the points. They are still pretty bad. The last few pictured were performed after dressing the points. Not sure if the points had anything to do with it or was I just getting better.
The last picture shows what I have planed for next week when I get some new torch parts in. Next week I will experiment with and without the SS brush. It does seam like its made a big difference but Im not sure if its just me getting better. Stay tuned.
First weld went real bad as I instantly blew a hole in the material and blew the tip of the tungsten of when I started the weld and found no argon flow. Found my twist lock flow through connector was not fully engaged.
Fixed that and resharpened. Was able to get the puddle to form and did a couple of relatively poor welds. Found the problem to be a lack of straight line vision to the puddle. Raised my chair about 6 inches and significant improvement.
Then the welder stopped working. No arc start. Tried to clean the points with compressed air the way Lincoln says to do. Still no start. Then I pulled the points out and dressed them with a surface grinder (what Lincoln says not to do). I put them back in and had to scratch the first time to start but after that all worked well.
I dressed the tungsten and found that it seamed the welder was working better after servicing the points and performing 1 scratch start. Not sure if the points had any thing to do with it or was I just getting better at it but all welds performed after this service looked like welds I wouldn't be embarrassed to charge money for.
So in the attached pictures the first pic shows the first weld I did where the Dinse connector was loose. Once I fixed the points I went over it with the SS wire brush was able to fill in the gaping hole as dirty as it was. Moving on past the hole area the the rest of the weld was completed and looks good.
The next two pictures show some of the welds performed prior to fixing the points. They are still pretty bad. The last few pictured were performed after dressing the points. Not sure if the points had anything to do with it or was I just getting better.
The last picture shows what I have planed for next week when I get some new torch parts in. Next week I will experiment with and without the SS brush. It does seam like its made a big difference but Im not sure if its just me getting better. Stay tuned.
Attachments
-
![IMG_20160925_220814621[1].jpg](/forum/data/attachments/458/458264-c1c20b30f0cad89542604c8039f332df.jpg) IMG_20160925_220814621[1].jpg147 KB · Views: 45
IMG_20160925_220814621[1].jpg147 KB · Views: 45 -
![IMG_20160925_220837889[1].jpg](/forum/data/attachments/458/458300-27979e15ae6bf69a14765293200ca125.jpg) IMG_20160925_220837889[1].jpg143.9 KB · Views: 45
IMG_20160925_220837889[1].jpg143.9 KB · Views: 45 -
![IMG_20160925_220946372[1].jpg](/forum/data/attachments/458/458344-c513f2a9a90a2967d7001eccbe32f65f.jpg) IMG_20160925_220946372[1].jpg144.6 KB · Views: 48
IMG_20160925_220946372[1].jpg144.6 KB · Views: 48 -
![IMG_20160925_220919105[1].jpg](/forum/data/attachments/458/458385-573c3212827cfaae94599edf1f529e84.jpg) IMG_20160925_220919105[1].jpg135.7 KB · Views: 50
IMG_20160925_220919105[1].jpg135.7 KB · Views: 50 -
![IMG_20160925_220923652[1].jpg](/forum/data/attachments/458/458412-04de2c489ff421bb95ee11c4fcd6444d.jpg) IMG_20160925_220923652[1].jpg142.8 KB · Views: 54
IMG_20160925_220923652[1].jpg142.8 KB · Views: 54 -
![IMG_20160925_221246539[1].jpg](/forum/data/attachments/458/458455-a62af33e8636bbcd93da40a9fee7afaa.jpg) IMG_20160925_221246539[1].jpg144.4 KB · Views: 52
IMG_20160925_221246539[1].jpg144.4 KB · Views: 52
How are you sharpening now?
IF you can keep a dedicated grinder it works fine, most of us end of grinding other **** and then contaminating the tungsten.
This is the chemsharp I was talking about...
I just sharpen a whole box of tungstens in one sitting and then I have them ready to go.
I actually have the chemsharp. I tried it a few years ago and didn't like it. I will probably pick up a small bench grinder soon.
That is typically what I do is sharpen a box before I get started. But for the past week I couldn't do that because I broke my long back cap and didn't want to cut all my tungsten's for the medium length cap. That's one of the parts I have coming in.
A little bit of experiment and I found the problem.
This will be a multi part post to show all the pictures.
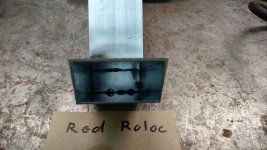
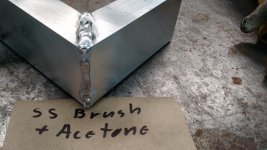
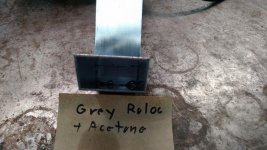
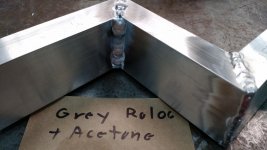
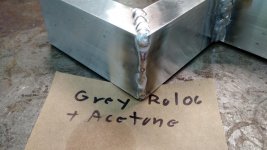
After taking the advice of the group and other sources I got all the necessary materials SS wire brush, Grey Roloc disks and performed a series of welds using different cleaning techniques.
All welding was performed with a Lincoln SW175 set to 110 amps AC TIG mode. 1/16" pure green tungsten #5 cup (non GL) flowing 15 CFM.
Prior to cleaning all parts were just wiped off after saw cut with water based band saw coolant.
I tried to following cleaning methods:
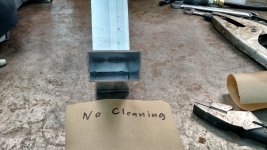
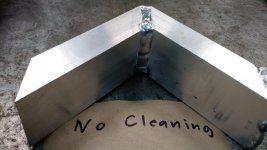
1) No cleaning at all just the wiped after saw cut.
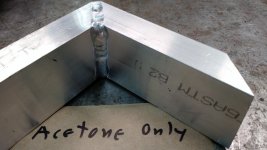
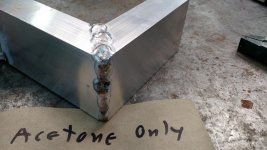
2) Acetone only
3) SS wire brush followed by Acetone wipe.
4) Maroon Roloc wheel
5) Grey Roloc wheel
6 Grey Roloc wheel with Acetone wipe
Conclusion: The Maroon Roloc wheels make what appear to be the cleanest material but produce the ugliest welds by far. Much worse that no cleaning at all. Maroon Roloc was the biggest problem causing the ugly welding at the beginning of this thread.
No cleaning at all I found that I could weld it but there were a few areas that were slightly challenging to complete.
Acetone only was a significant improvement over no cleaning but still had a challenge in some places.
The gold standard according to this thread SS wire brush followed by alcohol wipe worked well as expected.
Maroon Roloc wheels. These defiantly made the situation bad.
Grey Roloc wheels. After trying the Maroon I was considering not even trying these but they worked well about equal to the SS brush with Acetone.
Grey Roloc with Acetone. Worked well.
At this point my feeling is that the SS wire brush with Acetone, the grey Roloc and Grey Roloc wheels with Acetone were all about the same. These three configurations all made a puddle that I could get started and move along. At my current level of welding skill Its hard for me to discern which is superior.
Attached to this reply are the pictures of the welds with no cleaning and with Acetone wipe only.
More to come in the next few replies.
This will be a multi part post to show all the pictures.
After taking the advice of the group and other sources I got all the necessary materials SS wire brush, Grey Roloc disks and performed a series of welds using different cleaning techniques.
All welding was performed with a Lincoln SW175 set to 110 amps AC TIG mode. 1/16" pure green tungsten #5 cup (non GL) flowing 15 CFM.
Prior to cleaning all parts were just wiped off after saw cut with water based band saw coolant.
I tried to following cleaning methods:
1) No cleaning at all just the wiped after saw cut.
2) Acetone only
3) SS wire brush followed by Acetone wipe.
4) Maroon Roloc wheel
5) Grey Roloc wheel
6 Grey Roloc wheel with Acetone wipe
Conclusion: The Maroon Roloc wheels make what appear to be the cleanest material but produce the ugliest welds by far. Much worse that no cleaning at all. Maroon Roloc was the biggest problem causing the ugly welding at the beginning of this thread.
No cleaning at all I found that I could weld it but there were a few areas that were slightly challenging to complete.
Acetone only was a significant improvement over no cleaning but still had a challenge in some places.
The gold standard according to this thread SS wire brush followed by alcohol wipe worked well as expected.
Maroon Roloc wheels. These defiantly made the situation bad.
Grey Roloc wheels. After trying the Maroon I was considering not even trying these but they worked well about equal to the SS brush with Acetone.
Grey Roloc with Acetone. Worked well.
At this point my feeling is that the SS wire brush with Acetone, the grey Roloc and Grey Roloc wheels with Acetone were all about the same. These three configurations all made a puddle that I could get started and move along. At my current level of welding skill Its hard for me to discern which is superior.
Attached to this reply are the pictures of the welds with no cleaning and with Acetone wipe only.
More to come in the next few replies.
Attachments






dr_clyde
Well-known member
I honestly don't think the roloc discs have that much to do with it. Most people with little aluminum experience tend to blame the prep and the material more than their technique.
It doesn't matter what you grind your tungsten on. It really doesn't. I usually do mine on the belt sander, but I have been known to use a bench grinder, angle grinder, chemsharp, whatever is handy. What's important is you don't have any base metal on the tungsten to burn off when it gets hot. The shape makes little difference on AC, and whatever contamination that comes from your grinding wheel burns off so quick you won't even notice.
You just need more practice. Most of what I can see from your welds is you dunk your tungsten and could possibly have some shielding issues. The most common issues welding aluminum are heat management and sheilding. Yeah, its important to be clean and have good joint prep, but without good heat management and gas coverage, you're chasing your tail.
Most of the time I do no prep at all. The only prep I do is when the metal has coolant scum or a bunch of dirt or oil. Then I'll wipe it down with lacquer thinner.
It doesn't matter what you grind your tungsten on. It really doesn't. I usually do mine on the belt sander, but I have been known to use a bench grinder, angle grinder, chemsharp, whatever is handy. What's important is you don't have any base metal on the tungsten to burn off when it gets hot. The shape makes little difference on AC, and whatever contamination that comes from your grinding wheel burns off so quick you won't even notice.
You just need more practice. Most of what I can see from your welds is you dunk your tungsten and could possibly have some shielding issues. The most common issues welding aluminum are heat management and sheilding. Yeah, its important to be clean and have good joint prep, but without good heat management and gas coverage, you're chasing your tail.
Most of the time I do no prep at all. The only prep I do is when the metal has coolant scum or a bunch of dirt or oil. Then I'll wipe it down with lacquer thinner.
dr_clyde
Well-known member
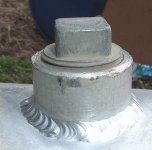
These pictures are a good representation of what I'm saying. The tubes are fairly dirty. These are production parts, and getting them done fast is more important than looks.
I only wiped the coolant off the caps from the lathe. The bottom tube is fairly thin wall, like .063". I didn't grind, wire brush, acetone wipe or anything. Just jam em together and weld.
These get powder coated, so getting the "stack of dimes" doesn't matter too much, as you won't really see it. If it was super important the welds not have any sort of contamination, I might give them a quick rub with some scotchbrite or emery cloth first to knock off any crusties.


My tungsten was sharpened on the shop belt sander, and who knows what else was sanded before the electrode.
As you can see, the welds are clean, consistent and have the appropriate bead shape.
I'm not trying to brag, I weld for a living, so they better be good or my customer will be mad. What I'm trying to say is the prep of the base metal and tungsten has far less to do with the end result than most beginners realize. Its all about heat management and gas coverage. I was running a 3/32" ceriated electrode with a #6 cup on a gas lens. Machine is a Syncrowave 350 LX set to 150 amps, balance set to 70% EN.
I only wiped the coolant off the caps from the lathe. The bottom tube is fairly thin wall, like .063". I didn't grind, wire brush, acetone wipe or anything. Just jam em together and weld.
These get powder coated, so getting the "stack of dimes" doesn't matter too much, as you won't really see it. If it was super important the welds not have any sort of contamination, I might give them a quick rub with some scotchbrite or emery cloth first to knock off any crusties.
My tungsten was sharpened on the shop belt sander, and who knows what else was sanded before the electrode.
As you can see, the welds are clean, consistent and have the appropriate bead shape.
I'm not trying to brag, I weld for a living, so they better be good or my customer will be mad. What I'm trying to say is the prep of the base metal and tungsten has far less to do with the end result than most beginners realize. Its all about heat management and gas coverage. I was running a 3/32" ceriated electrode with a #6 cup on a gas lens. Machine is a Syncrowave 350 LX set to 150 amps, balance set to 70% EN.
I honestly don't think the roloc discs have that much to do with it. Most people with little aluminum experience tend to blame the prep and the material more than their technique.
It doesn't matter what you grind your tungsten on. It really doesn't. I usually do mine on the belt sander, but I have been known to use a bench grinder, angle grinder, chemsharp, whatever is handy. What's important is you don't have any base metal on the tungsten to burn off when it gets hot. The shape makes little difference on AC, and whatever contamination that comes from your grinding wheel burns off so quick you won't even notice.
You just need more practice. Most of what I can see from your welds is you dunk your tungsten and could possibly have some shielding issues. The most common issues welding aluminum are heat management and sheilding. Yeah, its important to be clean and have good joint prep, but without good heat management and gas coverage, you're chasing your tail.
Most of the time I do no prep at all. The only prep I do is when the metal has coolant scum or a bunch of dirt or oil. Then I'll wipe it down with lacquer thinner.
Of course I need practice but finally being able to get a puddle started makes practice possible. I'm pretty convinced that the red Rolocs ****. The metal just balls up and refuses to flow together. It has been the common denominator for getting the puddle to start. And sure I will dip the tungsten every now and then but that will hopefully get under control with practice. Tomorrow I will try the red again just to make sure I wasn't having an off day but I'm not too optimistic as my no prep weld looked somewhat reasonable the Red Roloc looked bad and I had difficulty getting the AL to flow together on all 4 sides.
sberry
Banned
These pictures are a good representation of what I'm saying. The tubes are fairly dirty. These are production parts, and getting them done fast is more important than looks.
I only wiped the coolant off the caps from the lathe. The bottom tube is fairly thin wall, like .063". I didn't grind, wire brush, acetone wipe or anything. Just jam em together and weld.
These get powder coated, so getting the "stack of dimes" doesn't matter too much, as you won't really see it. If it was super important the welds not have any sort of contamination, I might give them a quick rub with some scotchbrite or emery cloth first to knock off any crusties.
My tungsten was sharpened on the shop belt sander, and who knows what else was sanded before the electrode.
As you can see, the welds are clean, consistent and have the appropriate bead shape.
I'm not trying to brag, I weld for a living, so they better be good or my customer will be mad. What I'm trying to say is the prep of the base metal and tungsten has far less to do with the end result than most beginners realize. Its all about heat management and gas coverage. I was running a 3/32" ceriated electrode with a #6 cup on a gas lens. Machine is a Syncrowave 350 LX set to 150 amps, balance set to 70% EN.
The welds look good but I invite you to try a red Roloc disk with no Acetone wipe and report back. 150 Amps, 3/32" ceriated on #6 Cup for 0.063 AL sounds steep.
Thanks for the reply.
OK I take back what I said about the red rolocs. I just went out an did it again and got very good results. I had also changed tungsten to Zirconium. I'm not sure if the tungsten had any thing to do with it but I certainly liked it a'lot better.. Maybe I will try it again with the pure tungsten to see if I can still weld with the red Rolocs.
Attachments
![IMG_20160930_215604249[1].jpg](/forum/data/attachments/485/485177-74fdfe241e01f2cd075eb8249a82260a.jpg)
![IMG_20160930_215613308[1].jpg](/forum/data/attachments/485/485218-d0a0a7ccfc1f31b4abe3f7ac58f3c257.jpg)
dr_clyde
Well-known member
The welds look good but I invite you to try a red Roloc disk with no Acetone wipe and report back. 150 Amps, 3/32" ceriated on #6 Cup for 0.063 AL sounds steep.
Thanks for the reply.
Why would I jerk you around on my settings? I set the machine at 150. Not saying I had it floored, that's just what I had the dial at.
I have used about every surface prep you can figure. All the different rolocs, wire wheels, sanding discs, brushes, solvents, it really makes no never mind.
I think your heat and heat management is all over the place... Aluminum is tough, consistency is a must... I'm no pro but still learning...
Yes. I'm finding that once I establish a puddle I start to move fast and then back off the current to slow down. Usually I back off too much and it freezes. Will be concentration on smoothing that transition out a bit.
Superbec
Well-known member
you need more power , welding aluminium should be fast and hot,
FASTER THAN THE SPEED OF HEAT
if you understand that you'll weld aluminium
you don't need to clean new stock if it doesn't have oil or some other stuff on it, just weld it .
also, the black stuff is either where you dipped your tungsten in the puddle or the tungsten balled up so badly it blew up (tung too small, amp too high for the tung , wrong selection, too much cleaning balance ... etc)
If I wore you i'd take some community college welding class, you lack basic welding knowledge .
I also think the pedal is more trouble in the begging than anything else, do it like real weldors without a pedal Then you need to know some welding parameters ...
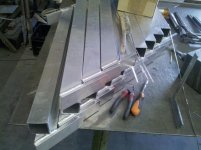
some alu I've done, and a pipe root and cap freehand.
FASTER THAN THE SPEED OF HEAT
if you understand that you'll weld aluminium
you don't need to clean new stock if it doesn't have oil or some other stuff on it, just weld it .
also, the black stuff is either where you dipped your tungsten in the puddle or the tungsten balled up so badly it blew up (tung too small, amp too high for the tung , wrong selection, too much cleaning balance ... etc)
If I wore you i'd take some community college welding class, you lack basic welding knowledge .
I also think the pedal is more trouble in the begging than anything else, do it like real weldors without a pedal
Then you need to know some welding parameters ...some alu I've done, and a pipe root and cap freehand.
Attachments


Last edited:
you need more power , welding aluminium should be fast and hot,
FASTER THAN THE SPEED OF HEAT
if you understand that you'll weld aluminium
you don't need to clean new stock if it doesn't have oil or some other stuff on it, just weld it .
also, the black stuff is either where you dipped your tungsten in the puddle or the tungsten balled up so badly it blew up (tung too small, amp too high for the tung , wrong selection, too much cleaning balance ... etc)
If I wore you i'd take some community college welding class, you lack basic welding knowledge .
I also think the pedal is more trouble in the begging than anything else, do it like real weldors without a pedal
some alu I've done, and a pipe root and cap freehand.
Thanks for the reply
I have noticed that faster is better and if I just go in a straight line and push the filler in as I go it all works very well. But to dip I need to slow down just a matter of practice.
I was in a community collage class but they only focused on large steel for D1 certification. I will definitely go back if I can find a coarse that does AL or thin stainless.
Yes the black is where I dip the tungsten. At this point I have it down to a dip every other weld joint. For now I do continue to weld after dipping the tungsten as long as I can maintain the puddle. It does seem to clean up itself quickly as long as the tungsten is still in a ball form and not blown off like a mushroom. The Zirconiated tungstens seam to be a huge improvement over the pure. They form a ball and the ball stays small. The pure tungstens seem to grow the ball over time.
I have actually thought about getting rid of the pedal it is such a cumbersome PIA and sometimes impossible to use and I never know where my amperage is at. I would love a wireless pedal but even those have issues.
Superbec
Well-known member
I hate the zirconiated tungsten, it's garbage.
The green (pure) is garbage also, it works only for aluminium and ONLY ON TRANSFORMER machines !!!
You want Lanthanated or Ceriated in available percentages , they will handle more amps and ball at higher amps too, balling is actually melting the tungsten at the tip, if the ball get's too big it will explode and contaminate your work piece .
Never weld with a dipped tungsten ! it's a health hazzard(vaporizing who knows what metals and nasty **** that never occur in nature ) and it will make for a cold(er) weld (will not transfer as much curent ) it's like turning down the amps ~20% or so. Then you get all the problems coming with low amps.
you can feed the filler in the puddle there's no problem if the weld is not stack'o'dimes NO PROBLEM AT ALL !
Also outside corners ... they are not easy I know, instead of cleaning with 7 kinds of abrasives acetone and holy water just take the grinder and dull the corner , take about 3 mm out , it will weld much easier .
Well.. steel is a different animal
I would read weldingweb a few months and also weldingtipsandtricks.com but cold info is just that .
The green (pure) is garbage also, it works only for aluminium and ONLY ON TRANSFORMER machines !!!
You want Lanthanated or Ceriated in available percentages , they will handle more amps and ball at higher amps too, balling is actually melting the tungsten at the tip, if the ball get's too big it will explode and contaminate your work piece .
Never weld with a dipped tungsten ! it's a health hazzard(vaporizing who knows what metals and nasty **** that never occur in nature ) and it will make for a cold(er) weld (will not transfer as much curent ) it's like turning down the amps ~20% or so. Then you get all the problems coming with low amps.
you can feed the filler in the puddle there's no problem if the weld is not stack'o'dimes NO PROBLEM AT ALL !
Also outside corners ... they are not easy I know, instead of cleaning with 7 kinds of abrasives acetone and holy water just take the grinder and dull the corner , take about 3 mm out , it will weld much easier .
Well.. steel is a different animal
I would read weldingweb a few months and also weldingtipsandtricks.com but cold info is just that .
I hate the zirconiated tungsten, it's garbage.
The green (pure) is garbage also, it works only for aluminium and ONLY ON TRANSFORMER machines !!!
You want Lanthanated or Ceriated in available percentages , they will handle more amps and ball at higher amps too, balling is actually melting the tungsten at the tip, if the ball get's too big it will explode and contaminate your work piece .
Never weld with a dipped tungsten ! it's a health hazzard(vaporizing who knows what metals and nasty **** that never occur in nature ) and it will make for a cold(er) weld (will not transfer as much curent ) it's like turning down the amps ~20% or so. Then you get all the problems coming with low amps.
you can feed the filler in the puddle there's no problem if the weld is not stack'o'dimes NO PROBLEM AT ALL !
Also outside corners ... they are not easy I know, instead of cleaning with 7 kinds of abrasives acetone and holy water just take the grinder and dull the corner , take about 3 mm out , it will weld much easier .
Well.. steel is a different animal
I would read weldingweb a few months and also weldingtipsandtricks.com but cold info is just that .
Well I only have a transformer machine at the moment. Will the Lanthanated or Ceriated work with that? Also my machine is auto balance and cannot be adjusted 18 year old Lincoln SW175. Thinking of upgrading to a Lincoln SW200 inverter machine but that wont be this year.
I have only heard bad things about dipping tungsten's but never as a health hazard. Believe me I'm trying to keep it in check. Some times I go 5 seconds without dipping then sometimes I will go 10 min. With steel on rare occasions I might go all day without dipping.
In any case I did some more trials today.
Today I tried a piece of 063" wall 6061 T6 AL tube that had given me all sorts of trouble a few years ago. In fact I had one short piece left over from that very job. It had about 10 years of oxidation on it laying around in my shop. when I tried this years ago I couldn't even get a tack weld on it.
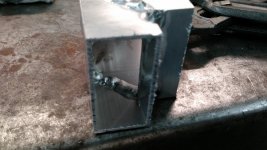
Today I had a little more success tack welded one side then blew a hole in it on the opposite side tack weld. Placed another tack on it and welded around the whole tube covering the hole I made during the second tack. Not pretty but it was one piece and might even actually hold water.
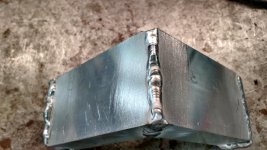
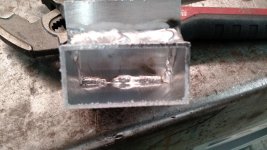
Note on the inside view the lack of penetration and where it did penetrate there looks to be a crack in it. This was also true on the rectangular tubes welded previously.In hopes to address that I tried running a back purge. Things were better but still ugly. I was running my purge st about 8 CFM.
Attachments
-
 IMG_20161001_113521058_HDR.jpg145.4 KB · Views: 32
 -
 IMG_20161001_110011759_HDR.jpg146.8 KB · Views: 33
 -
 IMG_20161001_095904528.jpg144.5 KB · Views: 32
 -
 IMG_20161001_095300358.jpg145.8 KB · Views: 27
 -
 IMG_20161001_093602385.jpg150.8 KB · Views: 27
 -
 IMG_20161001_113940356.jpg148.9 KB · Views: 30
 -
 IMG_20161001_113959767.jpg146.2 KB · Views: 30
Last edited:

Superbec
Well-known member
While everyone is posting there welding **** I though I would post mine. I claim the last 1" of my fillet weld is pornographic.
great, now do a few hundreds just like that one
duwem
Well-known member
The balling of the tip has to do more with the welder settings, if it happens, its not necessarily a bad thing.
As everyone has said clean is key. Dip the tungsten: break and regrind.
If your marginal at welding steel, aluminum is gona be a real pita.
As everyone has said clean is key. Dip the tungsten: break and regrind.
If your marginal at welding steel, aluminum is gona be a real pita.
Well I'm kind of done with this for the moment.
Here's what I got out of this.
Cleaning:
Cleaning is not the end all to all of this especially on new Al but it will make things easier. Tried several different cleaning methods including:
No cleaning at all
Acetone only
SS brush followed by Acetone
Red Roloc wheel
Grey Roloc wheel
Red Roloc followe by Acetone
Grey Roloc followed by Acetone
Sand blasting with **** Blast
Bottom line use whatever you got.
Outside corner welding:
This is just a ***** no mater how clean or how many time you change or sharpen your tungsten.
Tried a number of things:
All the cleaning methods mentioned above.
Grinding the corner down to flatten it per Superbec suggestion. This made the material too thin and I had issues with blowing through.
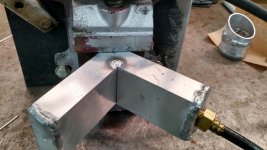
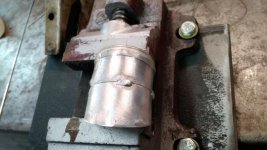
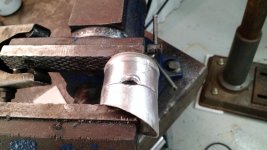
Welding the corner shut first using no filler and just pulsing the welder with a foot pedal. Then going over it with filler to build it up. This worked really well I just tried it this morning. See pictures. In some cases small holes were left behind but very easy to fill.
Inside Corner weld:
Very difficult to get started need high current at the corners.
Tried these techniques:
Start from center and work to corners. Worked well but leaves a discontinuity in the weld at the center.
Tack each corner first then weld from tack to tack. Workes well but alot of work especially if you have to rotate the part to tack both sides of the corner.
Trying to get a small bead in the fillet. This seems impossible with a balled tungsten. There were suggestions for Lantonated and Ceriated Tungstens. I just ordered some E3 tungstens. Opinions on Tungsten performance vary from user to user and also weather or not your machine is inverter or transformer. I have a transformer machine. Some people recommend sharpening the tungsten when using an inverter machine.Most of the welding done here was performed with Zirconiated tungstens. The Zirconiated worked much better that the pure because the balled tip would not grow.
*** cracks on the inside:
Although a weld may look good from the outside does not mean it is perfect. The inside crack or cold fold was reduced a little with back purge but not significantly.
Carbide Burr Clogging:
The single cut carbide burrs with the wax stick work very well.
Things I still need to work on.
1) Not dipping the tungsten
2) Feeding the filler. AL filler consumes much faster than steel.
3) Conquering the *** crack problem.
4) Conquering the fillet weld
5) Getting around corners without first tacking the corner
Pictures included:
First picture shoes the 4 corners tack welded.
Second and third picture show the 2 pass no-filler/filler corner welds.
4th and 5th picture show a good looking weld on the outside with an *** crack on the inside. 6th picture shows a single cut burr recommended to cut Aluminum without clogging. 7th picture shows all the new cleaning brushes, carbide burs and bur wax I purchased during the coarse of this exercise.
Many thanks to all who participated in this thread.
Here's what I got out of this.
Cleaning:
Cleaning is not the end all to all of this especially on new Al but it will make things easier. Tried several different cleaning methods including:
No cleaning at all
Acetone only
SS brush followed by Acetone
Red Roloc wheel
Grey Roloc wheel
Red Roloc followe by Acetone
Grey Roloc followed by Acetone
Sand blasting with **** Blast
Bottom line use whatever you got.
Outside corner welding:
This is just a ***** no mater how clean or how many time you change or sharpen your tungsten.
Tried a number of things:
All the cleaning methods mentioned above.
Grinding the corner down to flatten it per Superbec suggestion. This made the material too thin and I had issues with blowing through.
Welding the corner shut first using no filler and just pulsing the welder with a foot pedal. Then going over it with filler to build it up. This worked really well I just tried it this morning. See pictures. In some cases small holes were left behind but very easy to fill.
Inside Corner weld:
Very difficult to get started need high current at the corners.
Tried these techniques:
Start from center and work to corners. Worked well but leaves a discontinuity in the weld at the center.
Tack each corner first then weld from tack to tack. Workes well but alot of work especially if you have to rotate the part to tack both sides of the corner.
Trying to get a small bead in the fillet. This seems impossible with a balled tungsten. There were suggestions for Lantonated and Ceriated Tungstens. I just ordered some E3 tungstens. Opinions on Tungsten performance vary from user to user and also weather or not your machine is inverter or transformer. I have a transformer machine. Some people recommend sharpening the tungsten when using an inverter machine.Most of the welding done here was performed with Zirconiated tungstens. The Zirconiated worked much better that the pure because the balled tip would not grow.
*** cracks on the inside:
Although a weld may look good from the outside does not mean it is perfect. The inside crack or cold fold was reduced a little with back purge but not significantly.
Carbide Burr Clogging:
The single cut carbide burrs with the wax stick work very well.
Things I still need to work on.
1) Not dipping the tungsten
2) Feeding the filler. AL filler consumes much faster than steel.
3) Conquering the *** crack problem.
4) Conquering the fillet weld
5) Getting around corners without first tacking the corner
Pictures included:
First picture shoes the 4 corners tack welded.
Second and third picture show the 2 pass no-filler/filler corner welds.
4th and 5th picture show a good looking weld on the outside with an *** crack on the inside. 6th picture shows a single cut burr recommended to cut Aluminum without clogging. 7th picture shows all the new cleaning brushes, carbide burs and bur wax I purchased during the coarse of this exercise.
Many thanks to all who participated in this thread.
Attachments
-
![IMG_20161002_105932064[1].jpg](/forum/data/attachments/492/492909-a6f2b516d5ae3dea2777ae1d15757289.jpg) IMG_20161002_105932064[1].jpg145.9 KB · Views: 59
IMG_20161002_105932064[1].jpg145.9 KB · Views: 59 -
![IMG_20161002_105917615[1].jpg](/forum/data/attachments/492/492868-06b0d86090e6e779c2ca3816b5d24b23.jpg) IMG_20161002_105917615[1].jpg142.7 KB · Views: 60
IMG_20161002_105917615[1].jpg142.7 KB · Views: 60 -
![IMG_20161002_104010021_HDR[1].jpg](/forum/data/attachments/492/492820-8d82f87f3e41c44962cb5086da613ff5.jpg) IMG_20161002_104010021_HDR[1].jpg141.3 KB · Views: 64
IMG_20161002_104010021_HDR[1].jpg141.3 KB · Views: 64 -
![IMG_20161002_092426217_HDR[1].jpg](/forum/data/attachments/492/492772-37667324e27aac25cf755958a0696468.jpg) IMG_20161002_092426217_HDR[1].jpg140 KB · Views: 66
IMG_20161002_092426217_HDR[1].jpg140 KB · Views: 66 -
![IMG_20161002_081306015_HDR[1].jpg](/forum/data/attachments/492/492729-864a3f7df4cb5abbb18e736759772bf3.jpg) IMG_20161002_081306015_HDR[1].jpg142.3 KB · Views: 59
IMG_20161002_081306015_HDR[1].jpg142.3 KB · Views: 59 -
![IMG_20161002_083017101_HDR[1].jpg](/forum/data/attachments/492/492939-52900aec1d5d042052e516331ba4b4c7.jpg) IMG_20161002_083017101_HDR[1].jpg155.5 KB · Views: 53
IMG_20161002_083017101_HDR[1].jpg155.5 KB · Views: 53 -
![IMG_20160920_192958723[1].jpg](/forum/data/attachments/492/492981-866946d763db2e4823308bf522250349.jpg) IMG_20160920_192958723[1].jpg149.3 KB · Views: 56
IMG_20160920_192958723[1].jpg149.3 KB · Views: 56
Last edited:
dr_clyde
When you say production, i hope you don't mean pharmaceutical. I did some college work experience at a pharma company and every weld had to be clean inside and out, we had to use a seperate tank to ensure the welds were clean. and those welds while done well need to be cleaner.
When you say production, i hope you don't mean pharmaceutical. I did some college work experience at a pharma company and every weld had to be clean inside and out, we had to use a seperate tank to ensure the welds were clean. and those welds while done well need to be cleaner.
dr_clyde
When you say production, i hope you don't mean pharmaceutical. I did some college work experience at a pharma company and every weld had to be clean inside and out, we had to use a seperate tank to ensure the welds were clean. and those welds while done well need to be cleaner.
Production has many different levels.
There is the production worker who welds the bicycles together for Walmart and the production welder that welds the main rotor spar of the Sikorsky CH-53E.
When I first got my welder back on line earlier this year after not having welded in about 4 years, the first job I had to do was to weld my sons bicycle handle bars to the goose neck. I noticed my welds were better than one of the production welds on the Walmart bicycle.
So I'm somewhere between the Chinese bicycle factory and the Sikorsky main rotor spar welder. Let me give you a clue, I'm closer to the Chinese bicycle factory.
sberry
Banned
Some of the China production welding is super good.
Looking way better, I still think you should practice laying beads on flat pieces and then move to your boxes.
Dont be scared to go back over a weld and "pretty" it up if one needs a bit more filler or melted in a bit.
I was actually doing that all day yesterday. But it kind of becomes useless after a while. It just doesn't have the same challenges as real welding, even those boxes are easy compared to the large shelves I made where I have to stand up and steady myself in air. I probably went through about 10 filler rods making straight lines in 3 in sections. Maybe I dipped twice the whole time.
But I will continue to do more flat plate welding for the purpose of developing filler control. As of yet I cannot feed the rod without stopping.
Welding Tips And Tricks has some great advice on the fillet welds, how to get into the corners etc. He kind of covered all my problems so I will be looking into that. It also where I got the Idea for pulsing on the corners.
Last edited:
dr_clyde
Well-known member
dr_clyde
When you say production, i hope you don't mean pharmaceutical. I did some college work experience at a pharma company and every weld had to be clean inside and out, we had to use a seperate tank to ensure the welds were clean. and those welds while done well need to be cleaner.
Ultralight airplane parts. I had mentioned they get powder coated. They get a chemical bath or sanded before they get coated.
I do sanitary work at my day job. All of that is stainless though.
maintenancemike
Active member
- Joined
- Apr 4, 2016
- Messages
- 39
The problem is your heat input, travel speed, technique, consistency, cleaning, balance, propping, and failure to stop and correct mistakes.Not really the job is done with no scrap.
Besides I did exactly that first. No problems with small pieces on the bench.
Sent from my SM-G900R4 using Tapatalk
The problem is your heat input, travel speed, technique, consistency, cleaning, balance, propping, and failure to stop and correct mistakes.
Sent from my SM-G900R4 using Tapatalk
Quite a reply from someone who just passed by.
Well I came here to ask advise So:
Whats wrong with my travel speed?
Whats wrong with my technique?
Do you recommend that I consistently do the same thing I started with or maybe I should try something different.
Which of the six or so cleaning methods I applied did you not like?
How do you adjust the balance in a non adjustable machine?
What was wrong with my propping.
Failure to stop and correct mistakes. In order to correct mistake you have to know how to correct them. The frames I welded in the first couple of posts had three welds (holes) I would like to clean up. I fixed one made a huge gaping dirty hole in the next one and decided to hold off on the last one. Or do you recommend I keep trying to fix it.
Keep going, those videos your watching do help. I think the adjustable phase machines make a prettier weld than your machine. You came a long ways from the beginning of this thread....
Aluminum welds the best when its getting ready melt onto the floor, LOL
Aluminum welds the best when its getting ready melt onto the floor, LOL
koditten
Well-known member
The problem is your heat input, travel speed, technique, consistency, cleaning, balance, propping, and failure to stop and correct mistakes.
Sent from my SM-G900R4 using Tapatalk
All that power in a phone and its pretty much being wasted. If you don't want to put some effort into your reply, maybe just skip replying?
This quote reminds me when the wife is pissed at me. "your problem is you were born a man" WTF does that mean?!
buildyourown
Well-known member
- Joined
- Jan 8, 2010
- Messages
- 185
Try swapping out the gas lens for a regular collet body and a #5 or #6 cup. I run the biggest tungsten I can get to hold an arc (1/8" for almost everything) and big filler that wont ball up before it gets to the puddle. Run the tungsten up tight in the cup with very little stick out. This keeps the tungsten tucked away and you are less likley to dip it or drag the filler across it.
If you are having a hard time starting the puddle: Start the arc at a nice low amp. Let the cleaning action do its thing for a few seconds. Maybe 5-10 sec. Then push the peddle to the floor and make a puddle. Works especially well on castings and repair work
If you are having a hard time starting the puddle: Start the arc at a nice low amp. Let the cleaning action do its thing for a few seconds. Maybe 5-10 sec. Then push the peddle to the floor and make a puddle. Works especially well on castings and repair work
Superbec
Well-known member
Try swapping out the gas lens for a regular collet body and a #5 or #6 cup. I run the biggest tungsten I can get to hold an arc (1/8" for almost everything) and big filler that wont ball up before it gets to the puddle. Run the tungsten up tight in the cup with very little stick out. This keeps the tungsten tucked away and you are less likley to dip it or drag the filler across it.
If you are having a hard time starting the puddle: Start the arc at a nice low amp. Let the cleaning action do its thing for a few seconds. Maybe 5-10 sec. Then push the peddle to the floor and make a puddle. Works especially well on castings and repair work
let me guess , you do more woodworking than welding
dr_clyde
Well-known member
Try swapping out the gas lens for a regular collet body and a #5 or #6 cup. I run the biggest tungsten I can get to hold an arc (1/8" for almost everything) and big filler that wont ball up before it gets to the puddle. Run the tungsten up tight in the cup with very little stick out. This keeps the tungsten tucked away and you are less likley to dip it or drag the filler across it.
If you are having a hard time starting the puddle: Start the arc at a nice low amp. Let the cleaning action do its thing for a few seconds. Maybe 5-10 sec. Then push the peddle to the floor and make a puddle. Works especially well on castings and repair work
The first paragraph of this is bad advice. You want a gas lens vs a collet body due to the more laminar flow of gas. This allows you to put the electrode out where you can see it, and makes for a better shielding envelope for a given gas flow.
As for recessing the electrode into the cup, this is also not a good idea. The arc is bell shaped. The closer you get your tungsten to the work, the more intense and focused the heat is. When you have an increased arc length, it increases the overall amperage needed, and due to the wider arc also makes it harder to control heat input. The only time I pull the electrode into the cup is when I will be walking the cup on pipe, and the roundness of the pipe allows me to see what I'm doing while the cup is resting on the metal.
Finally, if your filler is melting before you get it into the puddle, your torch angle is wrong. Probably due to the tungsten being so far into the cup you tilt the torch more to see it.
The second paragraph is right though, a few seconds of cleaning action before you give it the beans can help, as well as let you get the arc stabilized and get your bearings.
Try swapping out the gas lens for a regular collet body and a #5 or #6 cup. I run the biggest tungsten I can get to hold an arc (1/8" for almost everything) and big filler that wont ball up before it gets to the puddle. Run the tungsten up tight in the cup with very little stick out. This keeps the tungsten tucked away and you are less likley to dip it or drag the filler across it.
If you are having a hard time starting the puddle: Start the arc at a nice low amp. Let the cleaning action do its thing for a few seconds. Maybe 5-10 sec. Then push the peddle to the floor and make a puddle. Works especially well on castings and repair work
I tried both regular and gas lens #5. Gas lens did slightly better. I tried reducing Argon with the gas lens from 15 to 10 CFH to take advantage of the better flow pattern but that did not work. Maybe I can get away with 12 or 13 CFH but will leave it at 15 for the moment.
I have read about people sharpening the tungsten successfully for but mostly for inverter machines. But I have seen Jody from welding Tips and Tricks sharpen a Lanthonated tungsten and demonstrate it on my Lincoln SW 175. If I could sharpen I might consider a larger tungsten but if I have to have a ball I want a small ball. For the moment I am finding the Zirconiated tungsten to work fine with a ball with the exception of the inside corner fillet welds, that where I feel I really could use a point. The puddle is only difficult to start on the inside corners if I start at the edges. If I start in the center of the joint and work toward the edges it comes out pretty nice. This may be me being reluctant to turn up the current for these corner starts.