To avoid these ads, REGISTER NOW!

Accent wall - Slightly off, uneven

freebo86

Well-known member
Joined
Jun 19, 2015
Messages
362
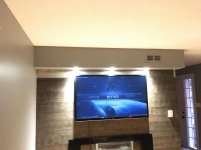
So I've been working on this accent wall at the house, basically build a small bulkhead with 3 pot lights, moved a receptacle so the wires are hidden behind the TV. Recessed electric place in wall and then did tongue & grove stained boards.

As I am approach completion I am putting up my last row of boards against the bulk head and I notice that it's slightly even so on my last row on this tongue and grove board At one end my boards are pretty much right against the bulkhead, on the other side I have about 1/4" gap. Throughout the process I used a level and I kept checking.

Now I am a little stuck as I am uncertain how to finish this off to hide the fact I have a little larger gap on one side. I was going to use a trim piece almost as a border, but since the boards are stained to get the right match on trim piece and boards is gonna be pretty hard.

Any advice?
 
Last edited:
To avoid these ads, REGISTER NOW!
OP
F

freebo86

Well-known member
Joined
Jun 19, 2015
Messages
362
Sure, last row isnt installed. But see in the top right corner where I have that plank I have about 1/4" gap to the top of the bulkhead.

However on the opposite end my board is almost right against the bulkhead and very snug fit.
 

Attachments

  • IMG_3745.jpg
    IMG_3745.jpg
    139.4 KB · Views: 295
OP
F

freebo86

Well-known member
Joined
Jun 19, 2015
Messages
362
Add another layer of drywall to the soffit and plane the top board so it fits.

The soffit is basically finished, sanded & painted. Not sure what you mean by adding another layer as in compound or actually add more drywall?
 

nh_yota

Well-known member
Joined
Mar 10, 2015
Messages
4,078
Location
Seacoast New Hampshire
Yes I meant doubling up the drywall. Another option is to remove a few of the boards from the top and plane then down a little bit so you can fit a small board in at the top, but then you won't have a full board at the top.

The easy way out is to fill the gap with gray paintable caulk and then paint it with a color that more closely matches the stain on the wood.
 

PCustoms

Well-known member
Joined
Jul 23, 2011
Messages
23,490
Location
VT
Put a small moulding along the top edge tk cover the gap. Paint it the same color as the ceiling of the bulkhead.

Will be barely noticible if you only have to hide 1/4"
 

Brian_WK

Well-known member
Joined
Jun 30, 2015
Messages
1,177
Location
NE South Dakota
Stained to match boards or painted same color as ceiling piece of 1/4 round at the top or strip of 1" stainless from end to end.

Brian
 

-Brent-

Well-known member
Joined
Dec 23, 2009
Messages
4,709
Location
Utah
It's actually not a bad idea to run another sheet of drywall and then trimming the top plank to fit. Ideally, when doing a plank wall, as such, you want to be able to trim/rip the last piece to fit. Like with t&g, ripping the last 1/8th off. Nothing is ever straight or square.

In looking around the pic, even if you tried to tie in molding it's going to stick out and look DIY. So would putting narrower planks at the top. You're eye is going to be drawn to the error.

However, with the drywall solution, nobody would be the wiser. Plus, I'd bet a dollar that gap is more than a 1/4".

How are those recessed lights installed?
 
OP
F

freebo86

Well-known member
Joined
Jun 19, 2015
Messages
362
Stained to match boards or painted same color as ceiling piece of 1/4 round at the top or strip of 1" stainless from end to end.

Brian

Hmm stainless, think it would be alright? I was thinking of this perhaps!

The boards are like a dark brown stain, the bulkhead and walls around are a gray.
 
OP
F

freebo86

Well-known member
Joined
Jun 19, 2015
Messages
362
It's actually not a bad idea to run another sheet of drywall and then trimming the top plank to fit. Ideally, when doing a plank wall, as such, you want to be able to trim/rip the last piece to fit. Like with t&g, ripping the last 1/8th off. Nothing is ever straight or square.

In looking around the pic, even if you tried to tie in molding it's going to stick out and look DIY. So would putting narrower planks at the top. You're eye is going to be drawn to the error.

However, with the drywall solution, nobody would be the wiser. Plus, I'd bet a dollar that gap is more than a 1/4".

How are those recessed lights installed?

Nah it's 1/4" at the worst spot far right corner. So maybe I am not understanding then what you guys mean by another sheet of drywall. As in add another sheet to the underside of that bulkhead? How am I ever going to even this out as it would add another 1/4" the whole length..

What do you mean how they are installed? Recessed in lol? Their LED, bulkhead is pretty much empty? Is that what you mean?
 

nh_yota

Well-known member
Joined
Mar 10, 2015
Messages
4,078
Location
Seacoast New Hampshire
No what we mean is to add another sheet of drywall to the underside of the soffit so it brings the false ceiling down farther by the thickness of the drywall.

Suppose the gap is currently 1/2" at its widest. If you add a sheet of 1/2" drywall to the underside it will mean the board is 1/2" too wide at its narrowest. Then you just trim the top board with a hand plane or belt sander. As you can see it's a lot easier to trim a little bit off a board than add a little bit to the board.
 
To avoid these ads, REGISTER NOW!

nh_yota

Well-known member
Joined
Mar 10, 2015
Messages
4,078
Location
Seacoast New Hampshire
Pro tip: Always assume drywall surfaces are not even/level/square. Heck, always assume every surface is not even/level/square. You'd be surprised at how large the industry-accepted tolerances are for framing and walls. It's buried somewhere in the building code book.

Drywall sheets are feathered on the long sides so they provide some room to add tape and mud on the seam without making them stick out like ridges on the drywall. When things like bulkheads or soffits are covered with drywall you can end up with variations in dimensions based on how the drywall sheets were cut and how they were taped.
 

nh_yota

Well-known member
Joined
Mar 10, 2015
Messages
4,078
Location
Seacoast New Hampshire
Honestly I would go the trim route because trim that small is cheap so you can make a few attempts at staining it to get the right shade of gray. If it doesn't come out the right shade, cut another piece and try again.
 
OP
F

freebo86

Well-known member
Joined
Jun 19, 2015
Messages
362
Honestly I would go the trim route because trim that small is cheap so you can make a few attempts at staining it to get the right shade of gray. If it doesn't come out the right shade, cut another piece and try again.

Well that's what I am leaning towards considering this project is 98% done, besides that last row of boards I have which are sitting on the side and just need to be glued and fastened to wall...

I was wondering if I somehow can cut this last row and then add another set of boards so the boards are approx 5.5" high, if I trim down lets say 2.5" from that row and give it a even distance across then I would have a smaller 2-2-1/4" strip at the very top against the bulkhead. Thoughts on how this would look? Or would it be just better to do the trim piece...
 

bimmer1980

Well-known member
Joined
Feb 5, 2009
Messages
2,105
Location
York, PA
Well that's what I am leaning towards considering this project is 98% done, besides that last row of boards I have which are sitting on the side and just need to be glued and fastened to wall...

I was wondering if I somehow can cut this last row and then add another set of boards so the boards are approx 5.5" high, if I trim down lets say 2.5" from that row and give it a even distance across then I would have a smaller 2-2-1/4" strip at the very top against the bulkhead. Thoughts on how this would look? Or would it be just better to do the trim piece...

Yes. This would be the better approach. Just run your last board across the wall.

Then the new trim board sits on "on top" or in front of the last board. It would cover part of your accent boards, the gap and sit flush to the top of the wall where it meets the ceiling of the soffit.

I would equate this to masonry work. Typically there is a trim board at the top of the wall that covers part of the top course of masonry and fills the gap. This is because it is difficult to lay the last course of brick tight to the top of a wall.

It's essentially a "Frieze" board.

For the record and for those doing this type of project, it would have been better to plan from the top down. In this case, plan for 1/2 to 7/8 of the board width for the top. This would give room for cutting it to match the top if you wanted no trim. It is similar to planning tile out so that you don't have a sliver on one end and a full tile on the other end. Ideally, you would want roughly the same amount cut on either end of the run. More work, but it does look nicer when complete.

Regardless, add the trim board and call it a day. Pop your favorite beverage and enjoy the look of your project.
 

-Brent-

Well-known member
Joined
Dec 23, 2009
Messages
4,709
Location
Utah
What do you mean how they are installed? Recessed in lol? Their LED, bulkhead is pretty much empty? Is that what you mean?

Recessed light are fastened a few different ways. New work cans are different than remodel cans. I assume yours are the kind that have spring steel tabs that snap down onto the drywall as it's sandwiched between a lip on the light housing and the clip?

The reason I had asked was because if you did add another sheet onto the drywall it would have made it a thicker surface and messed with your lights.
 

-Brent-

Well-known member
Joined
Dec 23, 2009
Messages
4,709
Location
Utah
What's the board width of the material you are using? Is there a wider option? If so, you could rip the angle into it and pop it up.
 

rharman

Well-known member
Joined
Apr 22, 2012
Messages
8,905
Location
SoCal
What about a 1/2 or 1/3 width board overlaid across the top row? Might make an interesting shadow line.
 

Guster

Well-known member
Joined
Mar 11, 2012
Messages
1,543
Location
Auckland, New Zealand
What about some aluminium edging like you use on the edge or corner of tiling and other internal cladding. They come on lots of different colours and profiles. This would not be traditionally where it would be used(rather than on the outside edge or corner of your wall) but it will make a nice tidy filler provided you trim the top board down a little to match.
 

K13

Well-known member
Joined
Oct 24, 2007
Messages
2,233
Location
St. Albert, AB Canada
Do you know/have the paint colour on the bulkhead? If so I would put a piece of trim on paint it the same colour as the bulk head and be done with it. The trim is either not going to match the ceiling or the wall where it makes contact and if you have the ceiling paint it will be a lot easier than trying to match the stain colour. A good coatings company could do it (I had to make some custom pieces for a hardwood floor I put in my house and I was able to get an almost exact match) but it wasn't cheap.
 

larry_g

Well-known member
Joined
Apr 28, 2007
Messages
16,893
Location
oregon
Easiest; paint trim the color of the ceiling and put it up.

Be bold; paint trim bright red or green or blue and let people see something that is not there.

Put a valance in front of the pot lights so they do not blind the room occupants and it hides the intersection of wall and ceiling.

lg
no neat sig line
 

gasgas17

Well-known member
Joined
Nov 7, 2009
Messages
443
Location
Nova Scotia, Canada
What's the board width of the material you are using? Is there a wider option? If so, you could rip the angle into it and pop it up.

I would second this idea. Even if you can laminate 2 boards together to make a wider one and then cut it to fit the ceiling. We pretty much never count on a drywall surface to be level, plumb or square with anything. Always allow for some scribing to fit. Even adding the trim is not a bad idea and you could just use the same board material ripped down to a smaller width around 1 1/2" and say 1/2" thick. It would look just fine.
 

bb_max

Well-known member
Joined
Apr 16, 2015
Messages
83
Location
central IA
Rip two full length boards and glue back together to make a single board that is the 1/4" wider
 
To avoid these ads, REGISTER NOW!
Top Bottom