To avoid these ads, REGISTER NOW!

My 1975 Chevy Dually Build

OP
7

75Dually

Well-known member
Joined
Dec 5, 2013
Messages
444
Location
Lubbock, TX
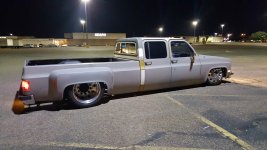
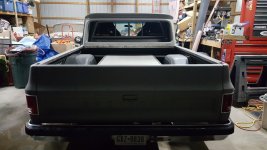
Ok I posted on Facebook yesterday that I had gone to Home Depot and I took my truck. What I actually said was that I had taken "The Brick" with me (photo below). It was just an off the cuff remark, but as it turns out some guys liked the name and said I should use it. What do you guys think? It's one heck of a name, and it kind of rings to me.

Your thoughts?
 

Attachments

  • Dually 19.jpg
    Dually 19.jpg
    68.9 KB · Views: 158
To avoid these ads, REGISTER NOW!
OP
7

75Dually

Well-known member
Joined
Dec 5, 2013
Messages
444
Location
Lubbock, TX
OK tonight because this chest cold has returned with a vengeance I went out to the shop to grab the stereo manual. Why you ask... Well because this head unit is fairly complicated, no that's a lie, I simply have never taken the time to go through the owners manual and learn about it, and seeing that I have some easy chair time I thought I would learn how to operate my stereo.

So I down load the manual in a PDF file and start scrolling through the pages. I get to only page 3 and they show a picture of the faceplate being removable. WHAT! SINCE WHEN! So I start trying not to laugh hard because it will get me coughing a ton. I mean come on how do you miss something like that!

So why put this mega obvious mistake out here in the interweb? Well I think we need to laugh at ourselves often. Admit it we do some really funny stuff (read dumb stuff). Most of it we just sweep under the closest carpet (or out the shop door), and hope that no one ever sees what we just did. I mean we supposed to be cool, right? We work so hard on our trucks, and most of us take a deep enjoyment in our hobby. But come on! The faceplate comes off!!!;):lol:
 

xtremek

Well-known member
Joined
Apr 13, 2012
Messages
11,603
Location
St. Johns, Mi
Time to finish the paint and call the pinstriper and give the beast a tramp stamp. And add a pic of a kid about to chuck a brick.
 
OP
7

75Dually

Well-known member
Joined
Dec 5, 2013
Messages
444
Location
Lubbock, TX
Did a lot of work on the special surprise today. Must have done 5 hours on it. Feel a ton better and ready to get it completed. Should be soon!

Stay tuned! :D
 

Attachments

  • Dually 27.jpg
    Dually 27.jpg
    48.8 KB · Views: 108
OP
7

75Dually

Well-known member
Joined
Dec 5, 2013
Messages
444
Location
Lubbock, TX
A little bit more work got done on the surprise this evening. I hope to have it mostly done by tomorrow. Should not be to much longer...;)

Stay tuned!:D
 

Attachments

  • Dually 30.jpg
    Dually 30.jpg
    112.5 KB · Views: 94
OP
7

75Dually

Well-known member
Joined
Dec 5, 2013
Messages
444
Location
Lubbock, TX
A short update. I worked on the surprise all day, and got a ton done. I would have still been working on it but got rained out (and the wife was hungry and wanted to get something to eat...). I still have one more day worth of hard work, and then it is ready for paint.

Yeah I know I've got a lot of you saying "Come ON! Hurry up!!" But that chest cold put me behind schedule and this project cannot be rushed. Plus I think that it is going to be pretty controversial once you see it. I bet that half of you will not like it, and the other half will think it is cool (or at least I hope you will think it is cool... Who knows...)

Anyways. Stay tuned! ;)
 
OP
7

75Dually

Well-known member
Joined
Dec 5, 2013
Messages
444
Location
Lubbock, TX
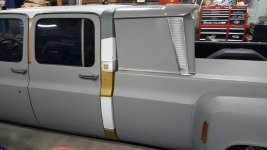
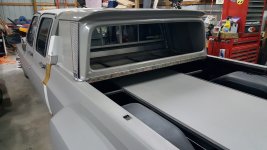
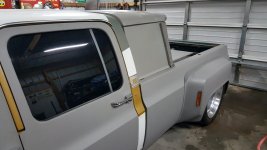
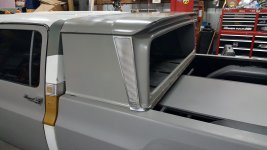
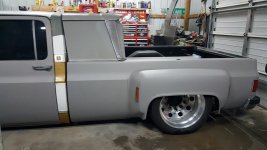
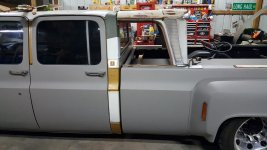
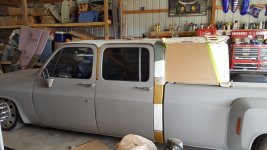
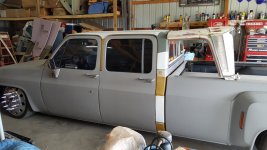
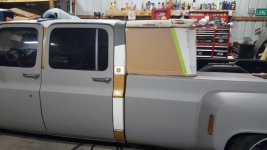
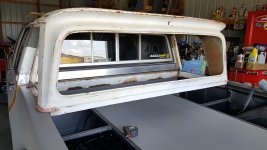
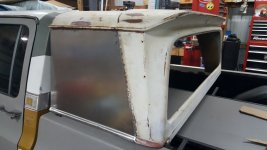
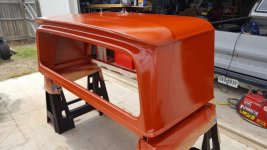
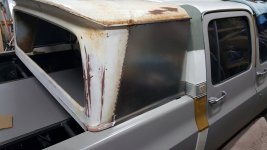
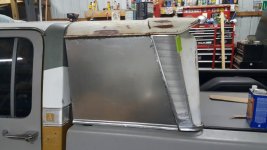
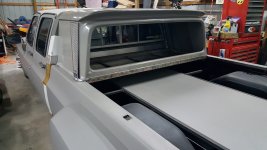
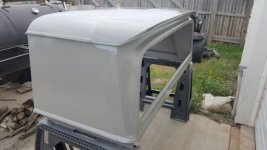
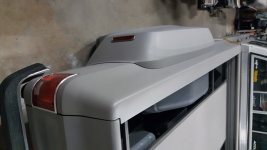
OK you guys have been very patiently waiting on the reveal of my special project. A big thanks to everyone! A special thanks to the guys who guessed correctly. Man it was tough not to reveal what is was... Well it turns out I have to go out of town again this coming week so I won't get much chance to work on it for quite a while, so I thought just show them! As you can see it is no where near finished, but I am getting there.

So this started out because a friend of mine in California found a sleeper cab with a turbo wing for $200 for his square body on Craigslist. I always liked that look. So the next day I went out to the shop and took a sawzall to my 61 cab. The cab was junk (it was the cab I took the dash out of) and the bottom is completely rusted out. So my neighbor helped me mock it up on the dually, and I was off to the races. I will post the build pics to date in another set of posts, but I wanted you to see it as it sits today.

What is left to do: I need to order the new back window and seal. The lower portion needs to be body worked and primed. Obviously it is not painted yet, but will be as soon as I get some free days. The interior portion needs a cushion made (reminder to self, be nice to the wife!). The seal between the cab and the sleeper will be a door seal, so it should be fairly weather proof.

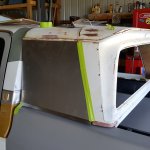
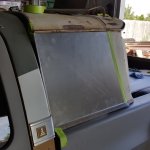
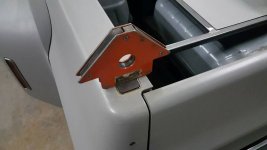
In the pictures you see the stainless door pillar trim. In these shots it is just held on by some tape for these pics so it is not even mounted. It actually needs to be trimmed up so it sits flush with the panel. One more thing on my long list of things to do...

Like I said from the beginning I think this is going to be controversial. Look if you don't like it then that's cool, but please don't be ugly. I really like the 80's sleepers (especially with a turbo wing on them!), they were awesome in my mind. I just wanted something that no one had ever done, and something that set my truck apart from all the other square body dually's out there today. I think the rear portion of the 61 cab looks like a wing, and the shape of the rear window surround is just amazing. Again this is not going to be for everyone, it was never meant to be, but the more I worked with it the cooler I thought it looked. I will pull the truck out tomorrow and get some better overall shots with the new sleeper.

Ok there you go. What do you think?
 

Attachments

  • Sleeper 7.jpg
    Sleeper 7.jpg
    106.5 KB · Views: 92
  • Sleeper 6.jpg
    Sleeper 6.jpg
    124.9 KB · Views: 102
  • Sleeper 5.jpg
    Sleeper 5.jpg
    105.8 KB · Views: 116
  • Sleeper 4.jpg
    Sleeper 4.jpg
    113.6 KB · Views: 106
  • Sleeper 3.jpg
    Sleeper 3.jpg
    128.5 KB · Views: 108
  • Sleeper 2.jpg
    Sleeper 2.jpg
    113.1 KB · Views: 122
  • Sleeper 1.jpg
    Sleeper 1.jpg
    121 KB · Views: 119
OP
7

75Dually

Well-known member
Joined
Dec 5, 2013
Messages
444
Location
Lubbock, TX
So this is how the project started out. I cut the back half of the cab off and my neighbor helped me set it up. Then we were off to the races.
 

Attachments

  • Sleeper 10.jpg
    Sleeper 10.jpg
    127 KB · Views: 61
  • Sleeper 9.jpg
    Sleeper 9.jpg
    130.4 KB · Views: 71
  • Sleeper 8.jpg
    Sleeper 8.jpg
    136.9 KB · Views: 75
OP
7

75Dually

Well-known member
Joined
Dec 5, 2013
Messages
444
Location
Lubbock, TX
I really like it! But, I think it should be shaped to match the curve/contour of the c pillars.

I actually mocked it up with that profile and it did not look good at all. The whole contour and overall scale just looked funky.That is why I kept the stock profile. I guess you have to see it in person to really see what I see.:D
 
OP
7

75Dually

Well-known member
Joined
Dec 5, 2013
Messages
444
Location
Lubbock, TX
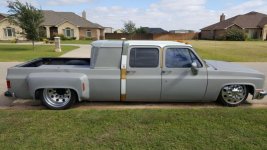
Ok this is the first time I've had it out of the shop with the sleeper on it. I'm more stoked on it today than the first time I started this project.
 

Attachments

  • Dually 35.jpg
    Dually 35.jpg
    134.2 KB · Views: 101
  • Dually 36.jpg
    Dually 36.jpg
    58.5 KB · Views: 101

xtremek

Well-known member
Joined
Apr 13, 2012
Messages
11,603
Location
St. Johns, Mi
What I'm about to say may not make sense. It's wicked cool, but the styling doesn't fit your truck. The best part though is that's it's your truck, build it the way you want, and we'll all sit back and admire your incredible work. Kind of like Jimmy Hendrick's music. I don't like it, but every time I hear it, I stop and listen, and admire his amazing skills.
 
OP
7

75Dually

Well-known member
Joined
Dec 5, 2013
Messages
444
Location
Lubbock, TX
What I'm about to say may not make sense. It's wicked cool, but the styling doesn't fit your truck. The best part though is that's it's your truck, build it the way you want, and we'll all sit back and admire your incredible work. Kind of like Jimmy Hendrick's music. I don't like it, but every time I hear it, I stop and listen, and admire his amazing skills.

You know that is a really fair assessment, and I greatly appreciate your comments. I have had a lot of different conversations over this since I released it. I think it comes down to a couple of points. First of all no one has ever done this before, and we are on new ground. So how it's supposed to look is really up for grabs. Yes not everything lines up perfectly as far as the gutters, ok, but should they or shouldn't they. Some would say yes and others don't care. What I really like about it myself is that it is funky, and it turns this truck into something completely different. It is now not your average square dually.

What I have found interesting (and I actually like quite a lot) are the guys who are picking apart the details. Part of their mind likes it, but the other part, the OCD part, says "my dominos are not perfectly aligned!" Mixing two totally different styles is very risky. Most of the times it fails, but in this case I don't think it does only because like you said it is my truck and I stood far out on the limb to see what might be possible. That to me was worth every moment in the shop, and it's what keeps me going in the future. I don't want my stuff to be like everyone else's. And I bet you dollars for donuts someone grabbed a pen after seeing this and did some sketches, or went out and looked at a funky top and thought "that might just work..." To me that rocks!

Thanks again for the kind words it means a lot to me!:thumbup:
 
To avoid these ads, REGISTER NOW!
OP
7

75Dually

Well-known member
Joined
Dec 5, 2013
Messages
444
Location
Lubbock, TX
OK so where did I leave off... So I made an inner structure. I had some old parts from a headache rack that I cut up for this use. Then I started to mock up the side panels. In the next set I will show you how I made the one piece side panel.

Stay tuned!;)
 

Attachments

  • Sleeper 20.jpg
    Sleeper 20.jpg
    106 KB · Views: 101
  • Sleeper 18.jpg
    Sleeper 18.jpg
    131.4 KB · Views: 106
  • Sleeper 16.jpg
    Sleeper 16.jpg
    134.2 KB · Views: 96
  • Sleeper 15.jpg
    Sleeper 15.jpg
    141 KB · Views: 106
OP
7

75Dually

Well-known member
Joined
Dec 5, 2013
Messages
444
Location
Lubbock, TX
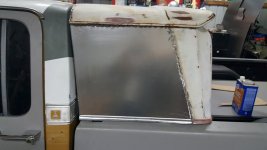
So now we move on to making and shaping the side panel. OK so you know up front I'm not a professional body guy. I try to make it look as good as possible, but there you have it... These panels were actually fun to make. They took a lot of time and planning to come out right. So I spent a lot of time cutting out the cardboard templates. BTW these panels are all one piece.

As you can see in the pics below the lower edge has not been shaped round to match the original profile. I went back to the press brake and bend it a second time, and then used a hammer and dolly to refine the shape. Eventually they still needed some massaging and a little bit of body filler to perfect the round shape. I spent a lot of time on this element alone. It's items such as this that makes or breaks the outcome of a project in my mind. If someone can walk by it and not notice any flaws in it then I did my job correctly.

More to come...:D
 

Attachments

  • Sleeper 21.jpg
    Sleeper 21.jpg
    108.8 KB · Views: 57
  • Sleeper 22.jpg
    Sleeper 22.jpg
    95.5 KB · Views: 60
  • Sleeper 23.jpg
    Sleeper 23.jpg
    100.1 KB · Views: 63
  • Sleeper 24.jpg
    Sleeper 24.jpg
    112.3 KB · Views: 56
OP
7

75Dually

Well-known member
Joined
Dec 5, 2013
Messages
444
Location
Lubbock, TX
I got to looking at my pics again today, and one of the parts of the puzzle that was hard to solve on this project was the overall height and the profile of the sleeper that seems in some angles to stick out beyond the profile of the trucks roof line.

If I counted the hours I spent working on this problem I could have cured some horrible disease or something like that... You see the issue is that the rear part of the roof line on these crew cabs slopes a lot in the last 4 inches or so. What looks like a flat roof line is anything but that. So If you lined up the top of the sleeper with the corner of the roof then the sleeper would have been much lower and even more shrunk in on the sides.

So what to do? I took a long straight edge and lined up both roof lines to have the same overall height. That way when you look at this truck from the side profile the roof line matches. If I would have dropped the sleeper down to meet the corner on the trucks roof line it would have made the sleeper look like it was shrunk down to 9/10ths scale, and would have never worked in my mind.
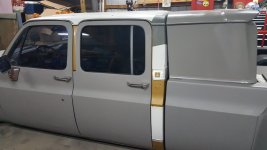
This project had some many fun challenges. In the end some have liked it and some have not. And that's OK by me.

Stay tuned...:D
 

Attachments

  • Smoker X.jpg
    Smoker X.jpg
    105.8 KB · Views: 123
Last edited:
OP
7

75Dually

Well-known member
Joined
Dec 5, 2013
Messages
444
Location
Lubbock, TX
Since the beginning of this sleeper I wanted to incorporate the stainless side trim from the 61. So I have yet to trim it up so it will fit the new panel, but will soon do so once I get this thing in paint. I will use the super duty 3M body molding double sided tape to adhere it to the side panel and the rear of the trim uses a single screw to attach it.

In the pictures below I copied what I had done on the drivers side on the passenger side. Naturally it was a lot easier the second time... From there I pulled it outside and shot a coat of oxide primer on it to give it some protection after I sanded the outside surface and got rid of all that surface rust. I then started to do the body work on it. That was a lot of work ;) :waah: :willy_nil

More later!
 

Attachments

  • Sleeper 34.jpg
    Sleeper 34.jpg
    128.9 KB · Views: 74
  • Sleeper 31.jpg
    Sleeper 31.jpg
    52.3 KB · Views: 83
  • Sleeper 27.jpg
    Sleeper 27.jpg
    113.9 KB · Views: 68
  • Sleeper 26.jpg
    Sleeper 26.jpg
    118.7 KB · Views: 66
OP
7

75Dually

Well-known member
Joined
Dec 5, 2013
Messages
444
Location
Lubbock, TX
So to round out where I am at to date with the sleeper cab. I did a lot of finish work and then shot some grey primer. I then got around to making the lower floor pan and the inner structure for that.

I still have a lot left to do on it. I need to finish all the prep work before I paint it, order a new rear window and seal, and much more...

Stay tuned! ;)
 

Attachments

  • Sleeper 6.jpg
    Sleeper 6.jpg
    124.9 KB · Views: 80
  • Sleeper 5.jpg
    Sleeper 5.jpg
    105.8 KB · Views: 77
  • Sleeper 40.jpg
    Sleeper 40.jpg
    112 KB · Views: 72
  • Sleeper 37.jpg
    Sleeper 37.jpg
    98.4 KB · Views: 80
OP
7

75Dually

Well-known member
Joined
Dec 5, 2013
Messages
444
Location
Lubbock, TX
I was out in the shop tonight with my son in law and we started talking about how to solve the gutter line. I then took some 18 gauge and bent up two pieces so that we could mock up the additional gutters on the cab. This was the best shot I could get because the shop is rather full at the moment. Seeing that is one of the bigger points most guys have an issue with I wanted to hear from you what you think about this possible solution.

This idea was originally proposed by a friend of mine who is a professional hot rod builder here in town. Just in case you don't see it the first one is obvious on the back of the cab near the sleeper, but the other piece is in between the front and rear drip rails in the middle of the cab. For this line to make any sense it needs both parts. I think it has some merit, but would be interested on your thoughts.:thumbup:
 

Attachments

  • Sleeper 42.jpg
    Sleeper 42.jpg
    99.8 KB · Views: 122
OP
7

75Dually

Well-known member
Joined
Dec 5, 2013
Messages
444
Location
Lubbock, TX
So tonight I finished up shaving the stake pockets. I put a coat of primer over them before I left the shop, and I should be able to put a skim coat of filler on them tomorrow or Thursday.

I want this thing in paint before LST!:thumbup:
 

Attachments

  • Stake pockets.jpg
    Stake pockets.jpg
    30.2 KB · Views: 84
OP
7

75Dually

Well-known member
Joined
Dec 5, 2013
Messages
444
Location
Lubbock, TX
So I got the bed rails almost perfect. I still have a couple of minor imperfections to clean up, but they are 99% completed. I know OCD... :lol:

Sorry for the sideways shot it was the only way the system would allow that picture to be downloaded.

So I started on the body work for the drivers door and the drivers side front fender last night. I should have that smoothed out in the next couple of days. I've got a little bit of smoothing on the passenger side too, but then I get to start on the dreaded roof. All those hail dents... Not looking forward to that, but them's the breaks!

After that I need to finalize the body gaps. Remember I pulled the front clip off my donor 89' burb, and naturally it is going to take some serious patience to get this as close as possible. I think I'm actually going to enjoy that part. I am very patient when it comes to matter like this. Let's hope so at least!

Stay tuned!
 

Attachments

  • Bed 48.jpg
    Bed 48.jpg
    87.8 KB · Views: 78
OP
7

75Dually

Well-known member
Joined
Dec 5, 2013
Messages
444
Location
Lubbock, TX
Worked a lot more on the drivers door and the drivers front fender tonight. Basically I smoothed out the skim coat of body filler I put on the lower portion of the drivers door. There was some past slight damage and it needed some help. I also ground out yesterday some really crappy body work done on the drivers side front fender. It was only a small bit on the edge by the driver door, but with a little bit of work it is much better. I may not be the best body guy but I do have standards... :thumbup:

Stay tuned!
 
OP
7

75Dually

Well-known member
Joined
Dec 5, 2013
Messages
444
Location
Lubbock, TX
OP
7

75Dually

Well-known member
Joined
Dec 5, 2013
Messages
444
Location
Lubbock, TX
OK today was a semi serious work day on the truck. Got up late, the wife and I went and got donuts, then I got on the truck... ;)

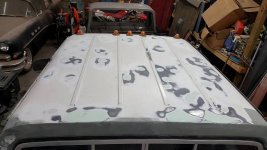
So my main area of work today was a small spot on the hood, and then it was off to the races with the roof and all those darn hail dings. I think I got all of them. Tomorrow I will take the drip rails off, take off the marker lights, and finish sand the balance of the roof. I have a couple of trim holes to weld up and body work. After that I will spray the primer and make this truck finally one color, if grey is really a color...:D

The nice thing is the FM station I was listening to all day was playing some great music! I just had to keep pace with the jams!!
 

Attachments

  • Roof 1.jpg
    Roof 1.jpg
    51 KB · Views: 41

xtremek

Well-known member
Joined
Apr 13, 2012
Messages
11,603
Location
St. Johns, Mi
.....The nice thing is the FM station I was listening to all day was playing some great music! I just had to keep pace with the jams!!

So, curious minds want to know, what was the station playing? Or what kind of music? What station?:dunno:
 
OP
7

75Dually

Well-known member
Joined
Dec 5, 2013
Messages
444
Location
Lubbock, TX
So, curious minds want to know, what was the station playing? Or what kind of music? What station?:dunno:

So the station that I was listening to is called... Get this... Awesome 98.1! They play 70's and 80's music. But the girl DJ was just kicking out hit after hit. Everything from Van Halen (I'm a big fan!), Men at work (don't judge me...), to every top hit from both eras. It was like she was playing most of my favorite songs from high school and college. Just a great day to be working in the shop and jamming to Awesome tunes (pun intended!)!:thumbup:
 
To avoid these ads, REGISTER NOW!
Top Bottom