To avoid these ads, REGISTER NOW!

Dialarc, HF Box, and a cracked oil pan

pvfjr

Well-known member
Joined
Aug 6, 2015
Messages
101
Location
Oregon
Hello all, I've got a car with a busted aluminum oil pan. It's a $300 car, so I thought I'd take a swing at repairing it before I dropped $150 on a new/used pan.

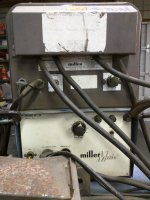
I have a Dialarc 250, a high frequency box (HF-15-1) to go with it, 1/16" and 3/32 2% thoriated tungsten, and some 3/32 4043 rod. Can I make a go of this?

I'm not sure what to do to set this thing up for the aluminum pan. :headscrat
DCEN plus HF?
Where should I set the HF intensity knob (0-100)?
Should the 3/32 electrode and filler rod work fine? (The pan is 0.112" thick)
Pointed electrode or balled?
What's the ballpark for amperage?

Is there a comprehensive cheat sheet anywhere that would have all the basic configurations for steel, aluminum, stainless, etc? Of course, a chart that assumes I have a square wave welder with adjustments for cleaning wouldn't do much good.
 
To avoid these ads, REGISTER NOW!

Hiball

Well-known member
Joined
Apr 30, 2009
Messages
14,032
Location
Missery
$300 car? The last Hotel car I had wore Duct tape in a criss cross pattern over a stress crack on the oil pan, I never has any issues over a 2 year period, with that said it was a very thin gap. I'm sure you will get some better info, just my personal experience.
 
OP
P

pvfjr

Well-known member
Joined
Aug 6, 2015
Messages
101
Location
Oregon
$300 car? The last Hotel car I had wore Duct tape in a criss cross pattern over a stress crack on the oil pan, I never has any issues over a 2 year period, with that said it was a very thin gap. I'm sure you will get some better info, just my personal experience.
Yeah, it's my second $300 car this year. Last one was a Bonneville SSEi with the supercharged series II 3800. Was like a fast living room on wheels. :3gears:

This one is a 2001 Volvo S40 turbo. Should make for a decent commuter if I get it running. The busted oil pan is supposed to be the only thing wrong with it. I just can't see paying 50% of the purchase price for a part. You know, cause I'm a cheapskate.

This whole welding setup was also $300, come to think of it. I like to get good deals, I guess. :bounce:
 

CJM8515

Well-known member
Joined
Mar 8, 2014
Messages
9,314
Location
NJ
Clean the pan off as much as possible and fiberglass it then undercoat it.
 
OP
P

pvfjr

Well-known member
Joined
Aug 6, 2015
Messages
101
Location
Oregon
Check car-part.com for a pan in your area? Did a search for this area and they are well under $150 bucks

My best option is $125 over 50 miles away (actually, eBay could come in at around $110 total last I checked). They don't tend to let you take engines apart around here, they'd rather sell the whole assembly. That's kinda beside the point anyway. I appreciate the suggestion, but I'm really looking more for TIG advice. Fixing cars as cheaply as possible is something I'm well versed in, but I think this time it gives me a good excuse to develop a new skill.
 
OP
P

pvfjr

Well-known member
Joined
Aug 6, 2015
Messages
101
Location
Oregon
Clean the pan off as much as possible and fiberglass it then undercoat it.
That's another option, and one I might consider if I didn't have a TIG welder at my disposal. I've done fiberglass to death in a previous job, but am fresh out of supplies. I'd rather patch it with aluminum if I can. I may have to coat the inside with some sort of sealant when I'm done, however. We'll see.
 
OP
P

pvfjr

Well-known member
Joined
Aug 6, 2015
Messages
101
Location
Oregon
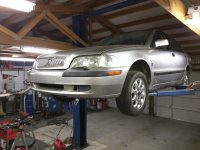
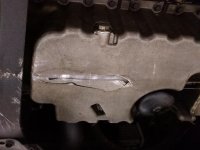
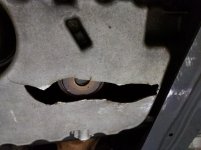
Since everyone loves pics, here we go:
 

Attachments

  • IMG_20161022_193833.jpg
    IMG_20161022_193833.jpg
    137.6 KB · Views: 272
  • IMG_20161022_182823.jpg
    IMG_20161022_182823.jpg
    140.5 KB · Views: 354
  • IMG_20161022_193601.jpg
    IMG_20161022_193601.jpg
    136 KB · Views: 366
  • IMG_20161022_184123.jpg
    IMG_20161022_184123.jpg
    141.5 KB · Views: 237
  • IMG_20161022_184140.jpg
    IMG_20161022_184140.jpg
    139.5 KB · Views: 214
  • IMG_20161022_184147.jpg
    IMG_20161022_184147.jpg
    138.7 KB · Views: 213
OP
P

pvfjr

Well-known member
Joined
Aug 6, 2015
Messages
101
Location
Oregon
So, obviously, to get it clean enough, the pan will have to come off. I don't want my first TIG job to be over my head anyway (well, figuratively, that'll happen regardless). I've got a crack to chase down and drill-stop, then I can groove it out a bit. I have the busted out pieces, but I think I may try to find a fresh patch piece to go over the whole hole. I guess I'll be headed to the metal yard on Monday. I've got nothing but steel around here.

As you can see, the car isn't complete junk. I want to fix it cheap if I can, but would like to the be a nice, permanent fix rather than a total hack job.

I found a weld setting calculator from Miller, but as suspected, it's assuming I have a square wave. :( https://www.millerwelds.com/resources/weld-setting-calculators/tig-welding-calculator
For my 1/8" Al lap joint, they suggest 17 CFH of Argon, a 3/32 tungsten, 105-130A, a 3/8-7/16 torch cup. Luckily, I can do all those things suggested here. I'm still not sure about the polarity though.
 
OP
P

pvfjr

Well-known member
Joined
Aug 6, 2015
Messages
101
Location
Oregon
Ha... yeah I don't think the duct tape is gonna work either... lol @Op I vote for a replacement.
But if I replace it, and tune up a couple things, then this is getting close to a $500 car. I'm going for the nicest, cheapest car possible here. Anyone can have a nice $500 car, but a nice $300-$350 car? That's a whole new level there. ;)
 

brooksdr

Well-known member
Joined
May 12, 2016
Messages
149
How long did they run it after they put the hole in the pan? Not very long judging by the size of that hole. Kinda make you wonder if the engine was oil starved. I be surprised if all it needs is the pan fixed.
 

CJM8515

Well-known member
Joined
Mar 8, 2014
Messages
9,314
Location
NJ
How long did they run it after they put the hole in the pan? Not very long judging by the size of that hole. Kinda make you wonder if the engine was oil starved. I be surprised if all it needs is the pan fixed.
Kinda wondering that myself here, the hole is huge!

Uh yea I didnt think it was that bad. Id say tig is the only option.
 
OP
P

pvfjr

Well-known member
Joined
Aug 6, 2015
Messages
101
Location
Oregon
Well they crashed it, I'd guess the engine is fine. No one has tried starting it or anything. That risk is just anther good reason not to invest money in this engine, just in case it's toast.
 

Monkey Milk

Well-known member
Joined
Nov 18, 2012
Messages
450
Location
Hawaii
I have a Dialarc 250, a high frequency box (HF-15-1) to go with it, 1/16" and 3/32 2% thoriated tungsten, and some 3/32 4043 rod. Can I make a go of this?

I'm not sure what to do to set this thing up for the aluminum pan. :headscrat
DCEN plus HF?
Where should I set the HF intensity knob (0-100)?
Should the 3/32 electrode and filler rod work fine? (The pan is 0.112" thick)
Pointed electrode or balled?
What's the ballpark for amperage?

If this is your first tig job and on aluminum good luck. Not something I would want for my first job.
Anyway, enlarge the crack with a grinder then preheat the pan with a propane torch.

your settings will be AC about 120 and up, 3/32 tungsten and the same for filler rod. HF around 60 more or less.

Or just get some alumirod (I think they call it that) that uses a propane torch that fills like solder but made for aluminum. Get it at your LWS.
 

Shiftless

Well-known member
Joined
Mar 9, 2014
Messages
14,605
Location
East Bay SFO
Would it be possible to buy a used pan with return privileges?
Like others above already said, that engine had zero oil pressure in about 1 second after the impact that shattered the pan. If the engine internals suffered from that event, you should part out the rest of the car. I see more than $350 worth in your pic.
 

Warrenator

Well-known member
Joined
May 31, 2008
Messages
781
Location
Newberg, OR
Clean clean clean the pan, you may want to run the tig torch along the weld area a few times with 50% AC balance to burn some of the crud out. If you're used to welding steel you have to feed a LOT more rod into the puddle. You want a raised bead for strength of the weld, has to do with the alloying characteristics of the rod. Or so I was told.
 
To avoid these ads, REGISTER NOW!

risc

Well-known member
Joined
Dec 21, 2012
Messages
220
Why not just epoxy a patch over the hole? Hell, screw the patch panel to the pan and goop over the whole thing with JB weld.
 

unslow1

Well-known member
Joined
Mar 3, 2012
Messages
7,880
Location
Illinois
Why not just epoxy a patch over the hole? Hell, screw the patch panel to the pan and goop over the whole thing with JB weld.

That was my thought. If you must patch instead of replace do it from the inside of the pan with epoxy. Some kind of plate glued down would probably hold. Then maybe use a body filler spreader and JB Weld on the outside.
 
OP
P

pvfjr

Well-known member
Joined
Aug 6, 2015
Messages
101
Location
Oregon
If this is your first tig job and on aluminum good luck. Not something I would want for my first job.
Anyway, enlarge the crack with a grinder then preheat the pan with a propane torch.

your settings will be AC about 120 and up, 3/32 tungsten and the same for filler rod. HF around 60 more or less.

Or just get some alumirod (I think they call it that) that uses a propane torch that fills like solder but made for aluminum. Get it at your LWS.
Thanks for the actual welding advice, I was beginning to think this thread has gone completely sideways. I think I'll practice on some scrap, maybe the pan will be my second TIG job instead.
 
OP
P

pvfjr

Well-known member
Joined
Aug 6, 2015
Messages
101
Location
Oregon
Clean clean clean the pan, you may want to run the tig torch along the weld area a few times with 50% AC balance to burn some of the crud out. If you're used to welding steel you have to feed a LOT more rod into the puddle. You want a raised bead for strength of the weld, has to do with the alloying characteristics of the rod. Or so I was told.

Ah, running the torch up and down to clean it out sounds vaguely familiar, I may have heard that before. I think I'll give that a go, especially since this is cast. The porosity of it probably compounds the contamination.
 

Monkey Milk

Well-known member
Joined
Nov 18, 2012
Messages
450
Location
Hawaii
Thanks for the actual welding advice, I was beginning to think this thread has gone completely sideways. I think I'll practice on some scrap, maybe the pan will be my second TIG job instead.

Post in the fab section if you want more welding advice.;)
 

BlackLS2

Well-known member
Joined
Mar 12, 2016
Messages
143
If I had that welder, I would want to try that as well....just to dust off and validate my manly man skills.

I might also be intrigued by the fiberglass option given the situation.

It while be fun to see what you do!
 
Last edited:

WhiffySpark

Well-known member
Joined
Oct 22, 2009
Messages
6,252
I brought a $400 car and even I'm not that cheap lol. If the motor will turn over with a breaker bar buy a pan
 

helterskelter

Well-known member
Joined
Mar 26, 2010
Messages
296
As long as they shut it off after the crash and didn't let it idle for long the bearings should be fine. They didn't go immediately dry just because oil pressure dropped. On a $300 car I'd just run it and not worry about the condition of the bearings.

You can get an oil pan at pick n pull for $23 and it will have a higher success rate than that weld (and probably faster too). You're going to be fighting porosity and the filler isn't going to want to flow. If you plan on welding on the pan I recommend spending a couple hours practicing on some test places. It can't hurt to attempt, but I do not think you will be happy with the results. Let us know.
 

Bobcat753

Well-known member
Joined
Feb 24, 2014
Messages
1,487
Location
New Hampshire
Wow that is quite the hole. I doubt you will have much luck welding it. Cast Aluminum tends to be very porous so it has a good amount of **** in it which will inhibit welding.

If you still really want to try welding it I would take it off the engine and let it sit in some heavy duty degreaser for a couple days. Then after it has sit take it out and put it into an oven to dry it out and evaporate what's left. Then clean the weld area very well with a STAINLESS STEEL wire brush on a grinder. After you do that you can put it back in the oven to preheat it for welding. You will need to run about 120 amps with 40% HF
 

redwrench60

Well-known member
Joined
Sep 10, 2011
Messages
6,078
Location
East Tennessee
When I was 18 or 19 I dated a girl who shattered the cast aluminum oil pan on her BMW inline 6 cyl when she hopped a concrete parking space slab. I mean shattered into pieces! I collected all the pieces, had the car towed home, pulled the oil pan and took it down to a local welding and fabrication shop where they cleaned and welded up all the spider web cracks in the structural pan and welded a piece of aluminum plate for a new pan bottom. I can't remember what they charged me but it was much, MUCH less than a new pan from BMW. I DO remember how I was rewarded..........;)
 

pi_guy

Well-known member
Joined
Jul 27, 2014
Messages
2,831
Location
N/A
Do not waste your time.
Buy new pan.
One you need to jig pan so it will not warp.
Two betting that it is not all aluminum.
Three not a job to learn on.
 

rsanter

Well-known member
Joined
Dec 22, 2007
Messages
18,530
Location
visalia ca
If it was me I would use epoxy.
Clean the whole bottom of the pan and epoxy an aluminum plate over the whole,bottom of the pan

Bob
 

txvwnut

Well-known member
Joined
Jan 1, 2015
Messages
7,667
Location
Bedford, Texas
That's a cast oil pan good luck welding it. If want to be successful you'll want to preheat the pan before welding it and then keep it heated while welding and then let it cool slowly over time. If you let it fast cool your gonna end up chasing cracks all around.

If you've got the room to put a piece inside it and epoxy it in that is what I would try instead of welding.
 

bobcatdan

Well-known member
Joined
Jan 4, 2011
Messages
9,948
Location
Kaukauna,WI
You will have a hell of a time getting the crack perfectly clean and free of oil. The weld will never be perfect. JB welded it and be done.
 

2000-cvpi

Well-known member
Joined
Oct 21, 2015
Messages
350
That looks like a clean well cared for Volvo, that once fixed would bring 2 grand or more. Stop being cheap and just put a used oil pan on it. Cheap has its moments, this isn't one of them.
 
OP
P

pvfjr

Well-known member
Joined
Aug 6, 2015
Messages
101
Location
Oregon
That looks like a clean well cared for Volvo, that once fixed would bring 2 grand or more. Stop being cheap and just put a used oil pan on it. Cheap has its moments, this isn't one of them.

This most definitely is a cheap moment. The interior is beat up, and it needs CVs too, and will likely have the same neglected PCV system that all Volvos have. It had dents and dings going all around it. Who knows what else once I get it fired up. The headlights look fantastic, and I think it makes people think the car is nicer than it really is. I have nothing to lose by trying to repair the old pan. If it doesn't work, of course I'll find a used one.

Can we focus on the welding now? To be fair, I never once asked if I should weld the pan. That decision has already been made. I was hoping to hear from an old-timer who knows sine-wave machines and would have some tips for me.
 

MJD1

Well-known member
Joined
Dec 28, 2014
Messages
608
Hello all, I've got a car with a busted aluminum oil pan. It's a $300 car, so I thought I'd take a swing at repairing it before I dropped $150 on a new/used pan.

I have a Dialarc 250, a high frequency box (HF-15-1) to go with it, 1/16" and 3/32 2% thoriated tungsten, and some 3/32 4043 rod. Can I make a go of this?

I'm not sure what to do to set this thing up for the aluminum pan. :headscrat
DCEN plus HF?
Where should I set the HF intensity knob (0-100)?
Should the 3/32 electrode and filler rod work fine? (The pan is 0.112" thick)
Pointed electrode or balled?
What's the ballpark for amperage?

Is there a comprehensive cheat sheet anywhere that would have all the basic configurations for steel, aluminum, stainless, etc? Of course, a chart that assumes I have a square wave welder with adjustments for cleaning wouldn't do much good.

Honestly, you haven't a clue, but I'll play. Ac current, pure tungsten 3-32 or1/8". Leave the HF at max. Short taper on tungsten, it will ball on its own. With a pedal, set it hot and use the pedal, that's what is for. If no pedal good luck, you will need it. Filler should be OK, 1/16" may work better. Clean it tillnyou believe its clean, then clean it some more. Start your arc and work around to burn out the ****. Only after that consider adding filler. After that, throw away and buy a used pan.
 

MDK22

Well-known member
Joined
Apr 1, 2015
Messages
222
Location
Philadelphia, PA
Bar the engine over by hand before you do anything. See if it is even worth your time. That takes 15 mins tops on a crank pully bolt.

The pan is cast. Forget welding it. It will be a pain and it would take most good welders a while to do that. If you are going to weld it. You have to remove it or you will mess up the gasket. You then need to clean it thoroughly so brakleen it till it rinses clear. Then steam clean or dishwasher. then you might be able to braze it but, once again its cast so you need to heat the whole thing. BTW that crack is already starting to run up the side of the pan. Heating the pan to weld it or just from the heat of the welder is likely to crack it further. But.....

Why not just epoxy a patch over the hole? Hell, screw the patch panel to the pan and goop over the whole thing with JB weld.

To be honest if you are looking at the cheapest way to do it. This will work. I suggest drilling pilots, using self-taping screws, and jb weld the corners of the plate to the bottom of the pan. Let it dry. Then spray paint the entire bottom to prevent rusting. I would suggest thick stuff like 1/8" and space out the holes so they do not come within and inch and a half of the crack. Make sure you clean everything with a wire brush and brakleen and take some time doing it you want it as clean as possible. I would also rough it up with a file. The other thing is the crack is rounding the bend so to speak so you are screwed if you so not find every fine line and run the JB weld an inch wide 4 inches up from the end point.

Will it look good? no. Will it work for probably the next 6months to a year or more? ya. If it is a $300 dollar car it gets a $15-25 fix. No need to remove the pan. No need to buy new gaskets. Not to mention where that oil filter is mounted looks like it is part of the pan which means removing oil lines possibility of screwing hoses up etc.
 
OP
P

pvfjr

Well-known member
Joined
Aug 6, 2015
Messages
101
Location
Oregon
Bar the engine over by hand before you do anything. See if it is even worth your time. That takes 15 mins tops on a crank pully bolt.

The pan is cast. Forget welding it. It will be a pain and it would take most good welders a while to do that. If you are going to weld it. You have to remove it or you will mess up the gasket. You then need to clean it thoroughly so brakleen it till it rinses clear. Then steam clean or dishwasher. then you might be able to braze it but, once again its cast so you need to heat the whole thing. BTW that crack is already starting to run up the side of the pan. Heating the pan to weld it or just from the heat of the welder is likely to crack it further. But.....


To be honest if you are looking at the cheapest way to do it. This will work. I suggest drilling pilots, using self-taping screws, and jb weld the corners of the plate to the bottom of the pan. Let it dry. Then spray paint the entire bottom to prevent rusting. I would suggest thick stuff like 1/8" and space out the holes so they do not come within and inch and a half of the crack. Make sure you clean everything with a wire brush and brakleen and take some time doing it you want it as clean as possible. I would also rough it up with a file. The other thing is the crack is rounding the bend so to speak so you are screwed if you so not find every fine line and run the JB weld an inch wide 4 inches up from the end point.

Will it look good? no. Will it work for probably the next 6months to a year or more? ya. If it is a $300 dollar car it gets a $15-25 fix. No need to remove the pan. No need to buy new gaskets. Not to mention where that oil filter is mounted looks like it is part of the pan which means removing oil lines possibility of screwing hoses up etc.

I appreciate the input. I really do think the engine is fine. I rotated it by hand by simply yanking on the belt before I even bought it. There was also no bearing material to be found in the pan. This pan doesn't have a gasket either, it uses anaerobic sealant instead. I already have a lot of the sealant left over from my last Volvo project. The oil filter doesn't complicate things either, there are just o-rings at the mating surface when the pan unbolts. In actuality, these o-rings usually need replace at this mileage/age of the car to help maintain proper oil pressure. Removing the pan for this job can only be beneficial. It also has a nice flat mating surface which should clamp down nicely to my welding table to keep things from moving around.

I think I'll skip the brake cleaner (phosgene gas sounds unpleasant). I'll remove as much contamination as possible with mechanical means, then use soapy water, then alcohol.
 
Last edited:
To avoid these ads, REGISTER NOW!
Top Bottom