
XcYZ
Well-known member
I've been lurking here for a while, checking out everyone else's projects, so I thought I'd show what I've done with mine. It's taken me about 3 months to do, but it's been a fun project. I'm definitely not the best with tape and mud, but you learn as you go. lol
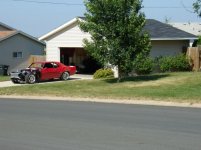
I built this garage, a separate 2 car garage, 8 years ago. I was on vacation the week of 9/11 doing the roof and siding... Anyways, after recently finishing the total rebuild of my Camaro, I could turn my focus and energy on the garage. In this random pic, you can see what it looked like before I started. TOTALLY unfinished, un-organized, just a mess...

I started by totally gutting the garage. I hauled everything out of my detached garage to the attached garage. That took way longer than I thought it would. lol All the old shelving/soffit storage/cabinets were torn out. It was pretty much back down to a bare shell. When I first built the garage I had insulated and installed vapor barrier, but after a number of years of abuse, the plastic was trashed. I installed new vapor barrier, sheetrocked, taped, mudded, and sanded the walls and ceiling.
I built all new shelves that I soffited in. There are 5 recessed lights built into the soffit on each wall. They were only $8 each (including the bulb) at the local big box home improvement store and will make good task lighting above the countertop. The main lights are six 4 T8 fixtures surface mounted to the ceiling. 24 T8 bulbs put out good lighting.
Here are some pics of it coming together and the walls primed. The soffit shelves are all new as I wanted them to be built out of 2x6's.


Above the soffit opening, I installed tracks to mount the doors to enclose the shelving. They can be rolled out of the way to get to the storage, then rolled back to hide what's up there. I used some plain trim painted black to hide the tracks and to hold the bottom of the doors in place. It works fantastic.
In the soffit doors in the front of the garage, I cut openings in 2 of the doors for the speakers. The speakers are on the shelf behind them and the speaker grilles are mounted to the doors. It keeps them hidden yet still sound great.
The red is oversaturated in these pics, it's pretty much an exact match of the red that's on a Craftsman toolbox.


On to the floor. After degreasing and etching, I filled a few knicks and the expansion gaps. I used Wolverine Coatings from Alpha Garage. I used a light grey epoxy with black, white, and grey flakes. It has a granite look to it. In these pics, the epoxy has almost cured over - I could touch it and another few hours and I could walk on it.


With all the construction and floor done, I could put the car back in.


Almost there.... I ordered plain black cabinets from Dakota Kitchen. The are made out of 3/4" and are much heavier duty than I had expected. The quality is great. While they are black on the outside, they are totally white on the inside.
In these shots, I still had to secure the base cabinets together, install the toe kicks, install the door handle hardware, secure the countertops, and finish the baseboard trim and a few other small pieces of trim and the project is about done.
The countertops are basic off the shelf units from the home improvement store. Far from fancy and were pretty cheap, but in thes pics, I still had to cut them to length. They have a black marble look, solid black would have been better, but would have cost at least 3 times as much. lol So this will do just fine.


And finally, it's almost finished. I'm waiting for the grey outlets, covers, switches, etc, to show up from the electrical supply store. The almond colored electrical stuff is what I used when I built the garage 8 years ago. The last piece to finish is the trim around the service door.
Everything that large and that is sitting on the floor is mounted on wheels so I can easily move it. My welding table, band saw, drill press, etc.


I built this garage, a separate 2 car garage, 8 years ago. I was on vacation the week of 9/11 doing the roof and siding... Anyways, after recently finishing the total rebuild of my Camaro, I could turn my focus and energy on the garage. In this random pic, you can see what it looked like before I started. TOTALLY unfinished, un-organized, just a mess...
I started by totally gutting the garage. I hauled everything out of my detached garage to the attached garage. That took way longer than I thought it would. lol All the old shelving/soffit storage/cabinets were torn out. It was pretty much back down to a bare shell. When I first built the garage I had insulated and installed vapor barrier, but after a number of years of abuse, the plastic was trashed. I installed new vapor barrier, sheetrocked, taped, mudded, and sanded the walls and ceiling.
I built all new shelves that I soffited in. There are 5 recessed lights built into the soffit on each wall. They were only $8 each (including the bulb) at the local big box home improvement store and will make good task lighting above the countertop. The main lights are six 4 T8 fixtures surface mounted to the ceiling. 24 T8 bulbs put out good lighting.
Here are some pics of it coming together and the walls primed. The soffit shelves are all new as I wanted them to be built out of 2x6's.
Above the soffit opening, I installed tracks to mount the doors to enclose the shelving. They can be rolled out of the way to get to the storage, then rolled back to hide what's up there. I used some plain trim painted black to hide the tracks and to hold the bottom of the doors in place. It works fantastic.
In the soffit doors in the front of the garage, I cut openings in 2 of the doors for the speakers. The speakers are on the shelf behind them and the speaker grilles are mounted to the doors. It keeps them hidden yet still sound great.
The red is oversaturated in these pics, it's pretty much an exact match of the red that's on a Craftsman toolbox.
On to the floor. After degreasing and etching, I filled a few knicks and the expansion gaps. I used Wolverine Coatings from Alpha Garage. I used a light grey epoxy with black, white, and grey flakes. It has a granite look to it. In these pics, the epoxy has almost cured over - I could touch it and another few hours and I could walk on it.
With all the construction and floor done, I could put the car back in.
Almost there.... I ordered plain black cabinets from Dakota Kitchen. The are made out of 3/4" and are much heavier duty than I had expected. The quality is great. While they are black on the outside, they are totally white on the inside.
In these shots, I still had to secure the base cabinets together, install the toe kicks, install the door handle hardware, secure the countertops, and finish the baseboard trim and a few other small pieces of trim and the project is about done.
The countertops are basic off the shelf units from the home improvement store. Far from fancy and were pretty cheap, but in thes pics, I still had to cut them to length. They have a black marble look, solid black would have been better, but would have cost at least 3 times as much. lol So this will do just fine.
And finally, it's almost finished. I'm waiting for the grey outlets, covers, switches, etc, to show up from the electrical supply store. The almond colored electrical stuff is what I used when I built the garage 8 years ago. The last piece to finish is the trim around the service door.
Everything that large and that is sitting on the floor is mounted on wheels so I can easily move it. My welding table, band saw, drill press, etc.


 . I'm with everbody else, i hate you.
")
 ?
?