To avoid these ads, REGISTER NOW!

Crusty old Delta DP-220 drill press

Redboy

Well-known member
Joined
Feb 6, 2014
Messages
166
Location
twin cities mn
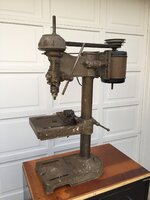
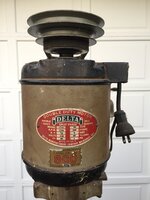
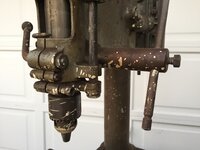
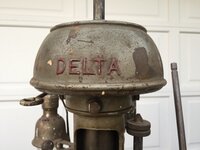
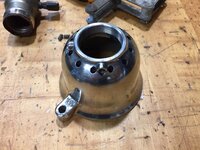
I didn't really need another drill press but for $60 I couldn't just leave it there... right?

It oughta clean up nicely.

Any guesses as to how old it is?


bd7826b4a513edfa38392c84eea55f20.jpg

bc1a936e97d213c0769ce489af838532.jpg

20ea0b2fd82edf6f492c6ae641dd27fa.jpg
 

Attachments

  • bd7826b4a513edfa38392c84eea55f20.jpg
    bd7826b4a513edfa38392c84eea55f20.jpg
    403.9 KB · Views: 2
  • bc1a936e97d213c0769ce489af838532.jpg
    bc1a936e97d213c0769ce489af838532.jpg
    371.1 KB · Views: 1
  • 20ea0b2fd82edf6f492c6ae641dd27fa.jpg
    20ea0b2fd82edf6f492c6ae641dd27fa.jpg
    428.3 KB · Views: 1
To avoid these ads, REGISTER NOW!

454ragtop

Well-known member
Joined
Mar 24, 2008
Messages
5,011
Location
Carver, MA
That's an early one with the raised "Delta" on the belt guard, late 30's I think. Do you have a serial number? That would tell for sure. You did very well, the "retirement" light and pull switch alone are worth more than $60.
 
OP
R

Redboy

Well-known member
Joined
Feb 6, 2014
Messages
166
Location
twin cities mn
That's an early one with the raised "Delta" on the belt guard, late 30's I think. Do you have a serial number? That would tell for sure. You did very well, the "retirement" light and pull switch alone are worth more than $60.


Thanks! I've shopped retirement lights before (need one for my bandsaw!) and I figure I got one... with a free drill press attached!

I don't see a serial number anywhere, or the usual tag that would carry one. Did Delta put the serial somewhere else in the early days?
 

Lssix

Well-known member
Joined
Oct 10, 2016
Messages
101
I like it, especially the lamp.

Sent from my SM-G930P using Tapatalk
 
OP
R

Redboy

Well-known member
Joined
Feb 6, 2014
Messages
166
Location
twin cities mn
A few more pictures...

b157105a43ef61806bd089b0b8330d9d.jpg


872bcb0bbf9c9ad373ea9e064e4c69af.jpg


a3c621714acdba8e9b38e597f9ea373d.jpg
 

Attachments

  • a3c621714acdba8e9b38e597f9ea373d.jpg
    a3c621714acdba8e9b38e597f9ea373d.jpg
    485.4 KB · Views: 2
  • 872bcb0bbf9c9ad373ea9e064e4c69af.jpg
    872bcb0bbf9c9ad373ea9e064e4c69af.jpg
    393.7 KB · Views: 0
  • b157105a43ef61806bd089b0b8330d9d.jpg
    b157105a43ef61806bd089b0b8330d9d.jpg
    374.9 KB · Views: 0

Packard V8

Well-known member
Joined
Mar 16, 2009
Messages
7,380
Location
Spokane, WA
Not crusty, not rusty; just a remove the paint spatters and tell everyone it is a period-correct restoration preserving the patina.

jack vines
 
OP
R

Redboy

Well-known member
Joined
Feb 6, 2014
Messages
166
Location
twin cities mn
Not crusty, not rusty; just a remove the paint spatters and tell everyone it is a period-correct restoration preserving the patina.

jack vines
Actually, Jack, I started at it with a soft brush and some solvent last night and the original paint's in better condition than I thought! It's mostly dusty and grimy, though there are some spots where it's worn off. We'll see...
 

Lssix

Well-known member
Joined
Oct 10, 2016
Messages
101
Actually, Jack, I started at it with a soft brush and some solvent last night and the original paint's in better condition than I thought! It's mostly dusty and grimy, though there are some spots where it's worn off. We'll see...
Thats where Im at with my walker, as tempting as a fresh paint job is I appreciate the history of my machine.

Im definitely cleaning up any corrosion and restoring anything mechanical.

Sent from my SM-G930P using Tapatalk
 
OP
R

Redboy

Well-known member
Joined
Feb 6, 2014
Messages
166
Location
twin cities mn
Okay, I've officially begun. I still don't know if I'll fully strip and paint the thing, but it's begun...

I started with the "retirement light" and after a few minutes with the buffer, the aluminum shade is looking good!

c7f19d38b161b64d5d87a0bcc1f215f9.jpg
 

Attachments

  • c7f19d38b161b64d5d87a0bcc1f215f9.jpg
    c7f19d38b161b64d5d87a0bcc1f215f9.jpg
    265.6 KB · Views: 1
OP
R

Redboy

Well-known member
Joined
Feb 6, 2014
Messages
166
Location
twin cities mn
I also started taking the whole thing apart. Here's how I'm cataloging the parts - I'm hoping this will help me remember where they all go when it's time to reassemble!

Oh, and please excuse any mislabeled stuff - this is just shorthand for what works for me.

attachment.php
 

Attachments

  • FullSizeRender 10.jpg
    FullSizeRender 10.jpg
    133.3 KB · Views: 532
OP
R

Redboy

Well-known member
Joined
Feb 6, 2014
Messages
166
Location
twin cities mn
A little time with some naval jelly, steel wool and a wire brush, and the first batch of small parts is cleaning up nicely!

I have some grinder wheels on order - one of those 3M EXL wheels and a couple of wire wheels - so these parts will get another hit later.

Pretty good so far, though!

attachment.php
 

Attachments

  • IMG_7502.jpg
    IMG_7502.jpg
    145.7 KB · Views: 532
OP
R

Redboy

Well-known member
Joined
Feb 6, 2014
Messages
166
Location
twin cities mn
Okay, a question for the smarterer ones of the bunch...

How do I determine if the spindle bearings should be replaced?
 

Davefr

Well-known member
Joined
Jan 7, 2010
Messages
11,823
Location
OR
After nearly 75 years they need to be cleaned/repacked or better yet replaced. You can trying flushing them out, lubricated them and see if they run smooth but it's just as easy to replace them and be done with it.

The same should be done with the motor's bearings.
 
To avoid these ads, REGISTER NOW!
OP
R

Redboy

Well-known member
Joined
Feb 6, 2014
Messages
166
Location
twin cities mn
After nearly 75 years they need to be cleaned/repacked or better yet replaced. You can trying flushing them out, lubricated them and see if they run smooth but it's just as easy to replace them and be done with it.

The same should be done with the motor's bearings.

Thanks Dave. That's generally the way I approach these things but sometimes I need to know where to draw the line. I'll replace some bearings, some bolts, some parts and next thing I know I've built a brand new machine!

Not really, but you probably know what I mean. It's like the hammer that my great grandfather brought from the old country... "I replaced the handle twice and the head once."
 

Cruzan80

Well-known member
Joined
Jul 22, 2015
Messages
4,201
Location
Denver, CO
Be aware, if you want to match the specific bearings, they have an extended inner race that needs to be pressed in to match. Only a few people are doing them this way. From what I have read, you can use other substitutes without much loss, as the originals are designed to handle extra forces from mortising/drum sanding/etc.
 

Straightgrain

Well-known member
Joined
Jun 19, 2011
Messages
608
Location
North Texas
Your drill press looks like a bruiser! I have a 220 from 1951 & it's a strain lifting it from below waist high. You did a good job on the light.
 

2oolhound

Well-known member
Joined
Dec 18, 2010
Messages
5,918
Location
BC Canada
I live in a non industrial town so bearings are hard to get and they cost a fortune when you do get them. You gotta figure they are precision balls or rollers fitted into an inner and an outer race that is also precision. Here's what I do to check bearings.

If you grasp the inner race putting your finger through the hole and hold the outer race and push them together while turning them they should feel perfectly smooth, no little bumps or resistance or uneven force needed to turn them. I've soaked them in solvent, gas etc. then blew them out to remove impurities. If you get them spinning with compressed air they should sound quiet. Worn bearings are noisy. If you can remove any part of the bearings they should not be mixed with components from other bearings because once they are used they are a matching set and have different wear patterns. If they aren't sealed you may be able to see the contact areas that will have a dull finish rather than a mirror finish but there should be no pitting.
 

Davefr

Well-known member
Joined
Jan 7, 2010
Messages
11,823
Location
OR
Thanks Dave. That's generally the way I approach these things but sometimes I need to know where to draw the line. I'll replace some bearings, some bolts, some parts and next thing I know I've built a brand new machine!

You could simply "run to fail" or until there's a symptom like runout.

There's no major reason why they'd need to be replaced now. The quill and motor can be just as easily removed/serviced later on.

The thought of old dried up bearing grease would drive me nuts on an otherwise restored machine.
 
OP
R

Redboy

Well-known member
Joined
Feb 6, 2014
Messages
166
Location
twin cities mn
Be aware, if you want to match the specific bearings, they have an extended inner race that needs to be pressed in to match. Only a few people are doing them this way. From what I have read, you can use other substitutes without much loss, as the originals are designed to handle extra forces from mortising/drum sanding/etc.


Your drill press looks like a bruiser! I have a 220 from 1951 & it's a strain lifting it from below waist high. You did a good job on the light.
It's heavy! I plan to not lift it a lot. :)

The light is coming along. I think the bulb base will be trickier to clean up than the shade, and I need to crack it open just a bit to replace the wiring, which crumbled into dust. :-/

Here's what I do to check bearings.

If you grasp the inner race putting your finger through the hole and hold the outer race and push them together while turning them they should feel perfectly smooth, no little bumps or resistance or uneven force needed to turn them. I've soaked them in solvent, gas etc. then blew them out to remove impurities. If you get them spinning with compressed air they should sound quiet. Worn bearings are noisy. If you can remove any part of the bearings they should not be mixed with components from other bearings because once they are used they are a matching set and have different wear patterns. If they aren't sealed you may be able to see the contact areas that will have a dull finish rather than a mirror finish but there should be no pitting.
This is helpful, thanks. I may just clean them up first, but I see there are some specialty replacement bearings out there. They're pricey suckers, though!


You could simply "run to fail" or until there's a symptom like runout.

There's no major reason why they'd need to be replaced now. The quill and motor can be just as easily removed/serviced later on.

The thought of old dried up bearing grease would drive me nuts on an otherwise restored machine.
Oh, that old grease is definitely going to go!
 
OP
R

Redboy

Well-known member
Joined
Feb 6, 2014
Messages
166
Location
twin cities mn
Spinning bearings with compressed air is a Very Bad idea for several good reasons.
...and you're going to leave it at that? Why is that?

Good or bad, I have no compressed air. I'll probably just douse 'em in gasoline and set them on fire.
 
Last edited:
OP
R

Redboy

Well-known member
Joined
Feb 6, 2014
Messages
166
Location
twin cities mn
Well, I'm impulsive and impatient. :)

For better or for worse, I just ordered a full set of replacement bearings for this machine from www.hammerscale.com. They're spendy, but I figure this old gem deserves some love!
 

2oolhound

Well-known member
Joined
Dec 18, 2010
Messages
5,918
Location
BC Canada
Spinning bearings with compressed air is a Very Bad idea for several good reasons.

Please expound. I've always blown dry bearings I've cleaned for re-use. I know I've got them spinning pretty good too. Other than the possibility of blowing some foreign abrasive into the rapidly spinning bearings is there other reasons to avoid this?
 

Packard V8

Well-known member
Joined
Mar 16, 2009
Messages
7,380
Location
Spokane, WA
Please expound. I've always blown dry bearings I've cleaned for re-use. I know I've got them spinning pretty good too. Other than the possibility of blowing some foreign abrasive into the rapidly spinning bearings is there other reasons to avoid this?
It's theoretically possible to blow on it long and hard enough to overspeed a dry bearing and gall or even explode it. In fifty years of practice I've never had a problem or seen it happen. So, yes, I always carefully blow mine dry.

Jack Vines
 

454ragtop

Well-known member
Joined
Mar 24, 2008
Messages
5,011
Location
Carver, MA
I blew a bearing up spinning it with compressed air more than 30 years ago, scared the **** out of me at the time. Front wheel bearing I was in the process of cleaning and packing as part of a brake job. Don't spin them with air any more, although I sometimes blow air thru, being careful not to get the bearing spinning.
 
OP
R

Redboy

Well-known member
Joined
Feb 6, 2014
Messages
166
Location
twin cities mn
I got a shipping notification for the bearings yesterday. Hopefully they'll show up before Thanksgiving so I don't have to wait until the following week! And Amazon goofed my order and sent me the wrong size EXL wheel, so that's headed back...

Fortunately, the brass wire wheel I got is awesome! On a Baldor buffer, it makes short work of that weird paint splatter, and shines up the steel bits really nicely!

I wish there were some way to keep the original finish, but I can't figure out how to get the paint splatter off without messing it up. And while the paint on the head casting is in good condition overall, the base is actually pretty rough - it needs more than a good scrubbing. So a total strip-down and repaint seems in order.

I'll try to get a few more pics posted up later today.
 

AZ Pakrat

Member
Joined
Jun 10, 2012
Messages
13
Location
Peoria, Arizona
Went to an Estate Sale Thurs. they had a DP-220 for $50, came back Sat. 50% off day, figured it would be Long Gone. But still there, so got it for $25, will restore it, missing the front pulley cover, but rest of the Drill Press looks taken care of, GE motor runs good.
delta_dp_220_drill_press
Not sure how to post a picture, but I'll just give it a try anyway.
 

Bobioz1

Well-known member
Joined
Jun 26, 2013
Messages
821
Location
Northern il. (For now)
It's heavy! I plan to not lift it a lot. :)

The light is coming along. I think the bulb base will be trickier to clean up than the shade, and I need to crack it open just a bit to replace the wiring, which crumbled into dust. :-/

This is helpful, thanks. I may just clean them up first, but I see there are some specialty replacement bearings out there. They're pricey suckers, though!


Oh, that old grease is definitely going to go!

If you look on the side of the bulb base it should say “press” somewhere. Press there and it should come apart easy.
 
To avoid these ads, REGISTER NOW!
Top Bottom