To avoid these ads, REGISTER NOW!

Woodworking 101--Tools and Tips

OP
J

jimreed2160

Well-known member
Joined
Aug 7, 2016
Messages
3,589
Location
Tallahassee FL
CRS--I have the same rolling pin and it is superior for pie dough. Its shape makes it easy to change directions by pushing down on one end.

Teen--The flared end chisels are common in Japanese tools and are generally used for close work paring. They often call them "fishtail".
 
To avoid these ads, REGISTER NOW!

Craptain

Well-known member
Joined
Apr 18, 2013
Messages
4,028
Location
Tampa Bay FL
Wow, I am inspired to practice with my Japanese plane and saw. But sadly I already know I will never achieve that standard of excellence.

Sent from my SM-G900T using Tapatalk
 

turbowoodworker

Well-known member
Joined
Mar 18, 2012
Messages
3,531
Location
Apex NC
Teenager,

I would guess that what you are showing are not typical chisels but specialty tools for carving. The handles appear made fro palming the tool and certainly not for use with a mallet. A picture of the other side may confirm this.

I posted a link to a carving set at Rockler that looks similar. The cutting edges are curved and flared to allow the tool to be rolled in the palm.
If I get a chance I'll post pics of my carving set. I bet Jim already has pics of all the different types. An earlier post by Jim discussed some of this if I recall.


http://www.rockler.com/flexcut-6-piece-carving-tools-starter-set

The next link is a primer on the different types of chisels, of which there are many. The typical chisels used in everyday woodworking are bench chisels, firmers and mortising chisels. From there they just get more specialized for dovetail cleanout, paring, skew work, etc. etc.

https://toolsforworkingwood.com/store/know/chiselguide.html
 

drivesitfar

Well-known member
Joined
Oct 23, 2013
Messages
36,007
Location
Pacific Northwest
ALL: all this talk about rolling pins is making me hungry. i just learned how to bake cookies this year so i guess pies are next. my wife has both a wood roller and a marble one.

CRS: I like your design and can't say i've seen a roller like that ever. if you say it works i'm excited to get my Shopsmith lathe set up so i can make one. after you finish making the final cuts and sanding on the lathe do you put any oil on the wood and maybe you said, but i missed it?

ALL: just a note that some of you looking for online wood sources there is a new thread started over in Fabrication about them and here's the link.

http://www.garagejournal.com/forum/showthread.php?p=6134206&posted=1#post6134206

i'd love to see the discussion to be on this thread so we can sort of have a one stop shopping if you know what i mean when looking for information on WOODWORKING.
 

CRSINMICH

Well-known member
Joined
Aug 15, 2015
Messages
2,397
Location
Southeastern Michigan
Drives: I bought that tapered rolling pin. I wish I could take credit for the design. I believe it's a traditional French design. Jacques Pepin prefers tapered rolling pins but I've seen him use a wine bottle and get the same results. I'd like to try turning one out of tiger maple. I recommended to Teenager that he only use salad bowl finish or mineral oil. You don't want to use an organic finish that will turn rancid and you definitely don't want to use a finish that will harden. Pastry is supposed to be flakey but not with flakes of varnish.
 
OP
J

jimreed2160

Well-known member
Joined
Aug 7, 2016
Messages
3,589
Location
Tallahassee FL
Dados
Sometimes words are related in ways that are not apparent at first glance. Dada was an art movement and the dado joint is about wood movement. So there.

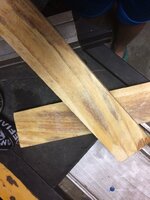
A dado is a wood joint composed of a tall piece, an inserted piece, and a cross grained groove. The tall piece, like the side of a shelf, has grooves cut across the grain at a depth of 1/3 to 1/2 of its total thickness. This groove is exactly the width of the thickness of the inserted piece.

Dado joints are often used where shear strength is important, as in bookshelves. A glue joint with end grain and side grain would be very weak. Using attachment devices like nails or dowels could cause either piece to crack due to uneven movement. In addition, the shear strength would be limited to the attachment devices.

With a dado joint, the shear strength is derived from end grain wood, which is one of its strongest points.

Stanley understood the importance of dados and made several planes for that very purpose. The first was the #46, Trauts combination dado plane. That was followed up with the #39 set. This set of eight dedicated planes is graduated from 1/4 to a full inch.

DSCN0991.jpg


Of course, these tools need a helper. That is where the stair saw comes in. Here are two examples.

DSCN0992.jpg


The top one is a recent Ulmia from the 1990s. The lower one is a very early Disston. It was damaged in a fire and I remade the front horn. In fact, I customized it to fit my hand. My saw, my rules. But here is where the Sesame Street song comes in. "One of these things is not like the other." Can you tell the difference? Here is another clue.

DSCN0993.jpg


The early one is made for cutting dados and the Ulmia is made for cutting sliding dovetails. What is a sliding dovetail, you ask? Tune in for tomorrow's lesson. Today we are talking about dados.

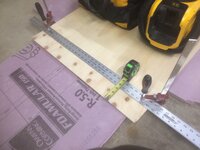
The first step is to place the inserted piece on the tall piece and scribe a line on each side. Then you push your stair saw along that line to make a kerf. Stair saws cut on the push stroke. Here it is in action.

DSCN0994.jpg


The stair saw blade adjusts to the depth of your dado and ceases cutting when that depth is reached. It is easier to control than a larger saw. Look at this large 12 pointer. It would cut the dado but would be very hard to control the depth.

DSCN0995.jpg


After a little sawing, the dado kerfs are made.

DSCN0996.jpg


The proper #39 plane would be the 7/8. BUT that is still in as found condition. Yet another project. Lucky for me that the next one down, the 3/4, is ready to go and has one of my custom blades. Cutting the dado waste can also be done with a chisel, but the #39 plane is quicker and easier. It leaves shavings that look like the stuff you find in pencil sharpeners. That is because cutting cross grain is difficult unless the blade is skewed. And the skewed blade leaves a funny looking shaving. But it looks nice when cleaned up.

DSCN0997.jpg


The true test is fit. And in this case--perfection. The insertion piece fits snug into the slot.

DSCN0998.jpg


So there is the dado joint. Sometimes these joints are glued and sometimes they are spiked with nails. If the fit is snug and the case is tight, I limit the spike to a single nail in the center. That strategy allows wood movement on both sides with a very low chance of splitting.

Dados can be made using routers, tablesaws or just chisels. I encourage you to use a dado in your next project. This strong joint will reward your attention with years of strong service. Time to go make some shavings.
 

Toolfool

Well-known member
Joined
Aug 22, 2011
Messages
4,982
Location
Tallahassee, FL
Doing a great job, Jim. I think you're inspiring a ton of people. One of my biggest worries is that I see VERY FEW young people coming into carpentry trades. They'll frame, hang drywall, but they don't have the patience to learn carpentry skills. Woodshop classes are being dropped in most school districts. A lifetime of learning will die with us old guys.
 

Teenager with old tools

Well-known member
Joined
Jun 3, 2015
Messages
595
Location
riverside california
Doing a great job, Jim. I think you're inspiring a ton of people. One of my biggest worries is that I see VERY FEW young people coming into carpentry trades. They'll frame, hang drywall, but they don't have the patience to learn carpentry skills. Woodshop classes are being dropped in most school districts. A lifetime of learning will die with us old guys.


I'm actually pissed. I graduate in June. In two years my schools gonna have woodshop again. So instead i've been learning wood turning at home and learning a metal lathe


Sent from my iPhone using Tapatalk
 

Autonomous

Well-known member
Joined
Dec 26, 2015
Messages
66
I'm actually pissed. I graduate in June. In two years my schools gonna have woodshop again. So instead i've been learning wood turning at home and learning a metal lathe


Sent from my iPhone using Tapatalk
A lathe is something I'd love to have but don't have the time or space to learn currently. I went into auto mechanics instead of wood shop back when I was in school, now i wish I could have had both but the schedule conflicted. Good on you for being self-taught at a young age!

Sent from my XT1254 using Tapatalk

*Edited to correct Autocorrect*
 

Teenager with old tools

Well-known member
Joined
Jun 3, 2015
Messages
595
Location
riverside california
A lathe is something I'd love to have but don't have the time or space to learn currently. I went into auto mechanics instead of wood shop back when I was in school, now i wish I could have had both but the schedule conflicted. Good on you for being self-taught at a young age!

Sent from my XT1254 using Tapatalk

*Edited to correct Autocorrect*


I'm In auto right now. I'm always the one fixing the **** that the period before me screwed up on actual people's cars.

The wood lathe is a ton of fun. 8x12 ain't big but it's fun. I'm gonna have a lot of woodchips soon.
What's the best way to sharpen a turning gouge without a special jig? My bench grinder? My knife stone? A file?


Sent from my iPhone using Tapatalk
 
OP
J

jimreed2160

Well-known member
Joined
Aug 7, 2016
Messages
3,589
Location
Tallahassee FL
Teen--Most turning tools are made from HSS (high speed steel) which is tempered at 800-900 degrees F. That means that it is much harder to ruin the temper on these tools than on your chisels. The chisels are probably O-1 or A-2 and they begin to temper at about 400-500 degrees F. So the good news is that your grinder is appropriate. Just keep your sessions quick and quench often.

I touch mine up freehand on the fine gray wheel. But the edge does not touch the wheel longer than 4-5 seconds.

Be careful with your grinder--it can hurt you. Wheels can explode. Use all of the guards. Use safety glasses. Learn how to dress the stone for best performance. Practice sharpening lawn mower blades.

Good luck. When you gain experience, you will want to upgrade your grinder wheels to white or pink and use them on chisels.
 

Teenager with old tools

Well-known member
Joined
Jun 3, 2015
Messages
595
Location
riverside california
Teen--Most turning tools are made from HSS (high speed steel) which is tempered at 800-900 degrees F. That means that it is much harder to ruin the temper on these tools than on your chisels. The chisels are probably O-1 or A-2 and they begin to temper at about 400-500 degrees F. So the good news is that your grinder is appropriate. Just keep your sessions quick and quench often.


I touch mine up freehand on the fine gray wheel. But the edge does not touch the wheel longer than 4-5 seconds.


Be careful with your grinder--it can hurt you. Wheels can explode. Use all of the guards. Use safety glasses. Learn how to dress the stone for best performance. Practice sharpening lawn mower blades.


Good luck. When you gain experience, you will want to upgrade your grinder wheels to white or pink and use them on chisels.


I always have a face shield on when using the lathes. At the very least when grinding I have my oakleys on. I've ground a bit for the metal lathe. They are just harbor freight ones for now so I don't screw up grinding nicer ones. Any recommended angle that way I can keep it close instead of a little off each time leading to problems?


Sent from my iPhone using Tapatalk
 

Teenager with old tools

Well-known member
Joined
Jun 3, 2015
Messages
595
Location
riverside california
Learn how to sharpen it using a sharpening stone, by hand.


Okay. I have one I use for my knives and normal chisels. That reminds me the guy never got back to me about making the fishtail chisels I drew dimensions of for few days ago. Well if the blacksmith guy responds again he estimated $7-12 per chisel blade, what's a nice wood for them. Man I got a list of things now. Make file handles for dad make rolling pin for stepmom and girlfriend make myself a few chisel handles and some file handles that should keep me busy today and tomorrow


Sent from my iPhone using Tapatalk
 

topop101

Well-known member
Joined
Jan 1, 2015
Messages
1,688
Location
NW Missouri
This is my first post on this thread. Inspired by Drives to do so. Any way this is my new tinker bench I put together from a slab of bowling alley I picked of this summer from a closing bowling alley . It was 42" wide and too wide for a one sided bench so I ripped it down and used the rip to make a shelf over it . Cut the heads off of bowling pins , drilled in threaded inserts and used them as shelf supports. Wrapped the edges in cherry stained oak and it all sits on cherry stain oak cabinets. cutting the bowling pins was probably the hardest part. Getting them square and even was tricky. I had to build a jig(sled) to rest the pin in to keep it true.
Well that may not have been the hardest part... Picking a vise or two to sit on it may be:wtf:
 

Attachments

  • IMG_3305.jpg
    IMG_3305.jpg
    142.6 KB · Views: 159
  • IMG_3307.jpg
    IMG_3307.jpg
    139.2 KB · Views: 141
  • IMG_3309.jpg
    IMG_3309.jpg
    147.7 KB · Views: 194

bj383ss

Well-known member
Joined
Sep 29, 2011
Messages
3,166
Location
TX
Topop,

Very nice bench. Thanks for joining the thread. That is a great idea with the bowling pins. I can't possible see why you had any trouble with finding a vise. :) Are those all yours?

Bret
 

drivesitfar

Well-known member
Joined
Oct 23, 2013
Messages
36,007
Location
Pacific Northwest
JIM: so how about showing us how you store all those planes? I was always wondering why some planes were so skinny and you just showed me at least one reason with the DADO LESSON. THANK YOU!!

TOP: great job on the bench and do you have any pictures of start to finish where you went to the bowling alley to pull out the lanes and then make that awesome bench. i see you have supports under the shelve so the blue stars on the pins will show otherwise resting the shelves on the pins the blue stars wouldn't have been seen. WELL DONE!!

i'll need a few more pictures to help you decide on the RIGHT VISE!! :D

BJ: some of us haven't done a frame up truck restoration or built a lot of cool stuff in our shops, but we are hoping to cause some of us own more than our share of tools and that is only some of Top's vises.
 

topop101

Well-known member
Joined
Jan 1, 2015
Messages
1,688
Location
NW Missouri
JIM: so how about showing us how you store all those planes? I was always wondering why some planes were so skinny and you just showed me at least one reason with the DADO LESSON. THANK YOU!!

TOP: great job on the bench and do you have any pictures of start to finish where you went to the bowling alley to pull out the lanes and then make that awesome bench. i see you have supports under the shelve so the blue stars on the pins will show otherwise resting the shelves on the pins the blue stars wouldn't have been seen. WELL DONE!!

i'll need a few more pictures to help you decide on the RIGHT VISE!! :D

BJ: some of us haven't done a frame up truck restoration or built a lot of cool stuff in our shops, but we are hoping to cause some of us own more than our share of tools and that is only some of Top's vises.

Drives There's no support under the shelf other than the pins. The angle underneath is what holds the lane together. They are under the bench as well. The shelf rest on the pins where I cut them flat then screwed the head back on the top side of the shelf. I put a threaded insert into each of the pin then used a piece of all thread to tie it together. The pins mount to the bench using a preexisting 7/16 hole in the pin. I inserted a 4" x 7/16" dowel in the bottom of the pin and laid out holes on the bench to match for the rest of the dowel to slip in to. I didn't glue it incase I ever want to move it.
As for pics , sorry I'm not a big picture taker . My mind gets focused on the job and I always forget to take WIP pics.
 

topop101

Well-known member
Joined
Jan 1, 2015
Messages
1,688
Location
NW Missouri
Topop,

Very nice bench. Thanks for joining the thread. That is a great idea with the bowling pins. I can't possible see why you had any trouble with finding a vise:spit:. :) Are those all yours?

Bret

lol... Yeah that's my vise collection . The other side of the room is handsaws, wrench's, planes and many other items.... I mean MANY!
 
To avoid these ads, REGISTER NOW!

Knyte Tyne

Well-known member
Joined
Apr 23, 2014
Messages
197
Location
Johannesburg South Africa
Top: Seriously I would have a vice mounted to absolutely everything... I can see why your going to have a tough Choice... And here I am thinking I'm starting a good little collection (3-4 Vice collected so far)

You could start and entire thread on that collection alone (if there already isn't one buried somewhere in the forum).

You guys are lucky that they still teach any form of trade in your school system... We are lucky if at any point in our system you even get to see an image of a screwdriver...
 
Last edited:

biowrench

Well-known member
Joined
Dec 25, 2013
Messages
100
Okay. I have one I use for my knives and normal chisels. That reminds me the guy never got back to me about making the fishtail chisels I drew dimensions of for few days ago. Well if the blacksmith guy responds again he estimated $7-12 per chisel blade, what's a nice wood for them. Man I got a list of things now. Make file handles for dad make rolling pin for stepmom and girlfriend make myself a few chisel handles and some file handles that should keep me busy today and tomorrow


Sent from my iPhone using Tapatalk

Don't use softwoods. If you're looking for handle-sized pieces of turnable wood in SoCal, keep an eye out for piles left on curbs. Carob, eucalyptus, oak, walnut, pecan, walnut, london plane, acacia free for the taking. Older neighborhoods with mature trees are prime.

Or find a good firewood place. Most have every kind of local oak, a foot to three in diameter, cut into 1-2' pieces, some in quarter rounds. Engelmann oak has tiger-striped rays that look amazing even in small projects.

Oh and $12 for blacksmith-made fishtail chisels? Where do I sign up?
 
Last edited:

bj383ss

Well-known member
Joined
Sep 29, 2011
Messages
3,166
Location
TX
Top you can't tease us with that. We need to see pics of all these amazing tool collections you have. Handsaws count as woodworking.

Bret
 

Teenager with old tools

Well-known member
Joined
Jun 3, 2015
Messages
595
Location
riverside california
Don't use softwoods. If you're looking for handle-sized pieces of turnable wood in SoCal, keep an eye out for piles left on curbs. Carob, eucalyptus, oak, walnut, pecan, walnut, london plane, acacia free for the taking. Older neighborhoods with mature trees are prime.

Or find a good firewood place. Most have every kind of local oak, a foot to three in diameter, cut into 1-2' pieces, some in quarter rounds. Engelmann oak has tiger-striped rays that look amazing even in small projects.

Oh and $12 for blacksmith-made fishtail chisels? Where do I sign up?


You sign up over here in socal. This doesn't look like pine but I don't know. 768276e7f79ea7615a3bc2ea2ad74d34.jpg or maybe it's the piece under it that doesn't. I have that wood right now. That's my brothers project to hold his hole saws. He's 10. My dad will probably use 1 file a year would pine atleast work for that?
96baea56cc9611e7d9151585758524b0.jpg what kind of wood is this

Sent from my iPhone using Tapatalk
 

Attachments

  • 96baea56cc9611e7d9151585758524b0.jpg
    96baea56cc9611e7d9151585758524b0.jpg
    236.3 KB · Views: 5
  • 768276e7f79ea7615a3bc2ea2ad74d34.jpg
    768276e7f79ea7615a3bc2ea2ad74d34.jpg
    265.9 KB · Views: 1
Last edited:

Craptain

Well-known member
Joined
Apr 18, 2013
Messages
4,028
Location
Tampa Bay FL
You sign up over here in socal. This doesn't look like pine but I don't know. 768276e7f79ea7615a3bc2ea2ad74d34.jpg or maybe it's the piece under it that doesn't. I have that wood right now. That's my brothers project to hold his hole saws. He's 10. My dad will probably use 1 file a year would pine atleast work for that?


Sent from my iPhone using Tapatalk

Well, yes it would work. But it will be harder to turn well. Hardwoods are much easier to turn and will generally give a better finish. In any case, why would you plan obsolescence in to a job you are doing. That is not why we, and I AM including you, are even on this site. To preserve and use our good old tools. I know you can do good work. You have showed your enthusiasm so give it your BEST shot.

If you are really struggling for material I can ship you a grab bag of good turning wood at no cost.
 

Attachments

  • 768276e7f79ea7615a3bc2ea2ad74d34.jpg
    768276e7f79ea7615a3bc2ea2ad74d34.jpg
    132.7 KB · Views: 2
OP
J

jimreed2160

Well-known member
Joined
Aug 7, 2016
Messages
3,589
Location
Tallahassee FL
Teen--You can get clever with file handles. I have seen almost everything used. My favorite is the farmer's old trick--corncobs. If you want to get fancy, make some prototypes using newspaper and ducktape. Ask dad what feels comfortable to grip but don't tell him what you are up to. Pine or any scrap wood works here. You can even glue a stack with contrasting wood in the center.
 

WhoWhatNow

Well-known member
Joined
Feb 22, 2011
Messages
1,885
Location
Collegeville, PA
Quick question for you guys who use hand planes. I just purchased a new Stanley #92. It came wrapped in butcher paper and well oiled. I know I need to remove the oil so I don’t mess up the finish on my project. I was thinking of a good wipe with acetone but how to best protect the bare steel after? Just a coat of Johnson’s Paste Wax?
 

ez-duzit

Well-known member
Joined
Jun 24, 2013
Messages
5,096
Location
Marina del Rey
Acetone might take the paint off. You can degrease with kerosene and clean with denatured/industrial alcohol.

Just keep it dry and clean. Paste wax will contaminate your wood and can ruin finishes and glue joints.
 

trainer

Well-known member
Joined
Nov 28, 2005
Messages
2,019
Location
Northern Ontario, Canada
I use paste wax on my planes as well as the cast iron top of my table saw and jointer. Never had an issue in years.
Definitely avoid any kind of automotive wax though as they could contain silicone
 

trainer

Well-known member
Joined
Nov 28, 2005
Messages
2,019
Location
Northern Ontario, Canada
Craftsman table saw moulding set. These are great for making trim and moulding. I recently ran some 14' pieces to use for chair rail out white pine.
attachment.php
 

Attachments

  • 14806151817381448772733.jpg
    14806151817381448772733.jpg
    138.3 KB · Views: 639
Last edited:
OP
J

jimreed2160

Well-known member
Joined
Aug 7, 2016
Messages
3,589
Location
Tallahassee FL
Whowhat--Congratulations on your new #92. I would wipe it clean with a dry cotton rag and then use Johnsons Paste wax. I keep my #92 in the house in a plastic toolbox and take it into the shop whenever I need it.
 
OP
J

jimreed2160

Well-known member
Joined
Aug 7, 2016
Messages
3,589
Location
Tallahassee FL
Sliding Dovetail Joint
Yesterday we covered the dado joint and how it is used to join wood pieces at a 90 degree angle. Its sophisticated cousin is the sliding dovetail joint. Imagine the dado slot is sloped like a dovetail and the insertion piece is the male counterpart of the dovetail. That would give you a locking dado, or a sliding dovetail. These joints are often used on case goods at the drawer runner. The dovetail locks both sides together. Here is a close up of the secretary desk I am working on. As you can see, the sides want to bow out but the dovetails are holding them in place (for now).

DSCN1014.jpg


Use the sliding dovetail when you need extra strength and where wood movement might be a problem. I used a sliding dovetail to attach wooden rockers to a cradle I made. It is still holding up strong.

First off, we need some tools. How about a chisel set, a stair saw, and a dovetail plane to start?

DSCN0999.jpg


Notice the angles of the saw bottom and the plane sole. I extended the saw to the intended depth. When it reached bottom, it will stop cutting.

DSCN1000.jpg


Here is the first cut.

DSCN1002.jpg


Now that both cuts are made, it is time to clear out the waste. I like to use a chisel.

DSCN1003.jpg


DSCN1004.jpg


And here are the candidates for finishing off the bottom of the cut. There is a small Preston or Record router plane, a larger Stanley #71 router plane, and a LN **** mortise plane. I settled on the Stanley because it seemed better suited for the job.

DSCN1005.jpg


Here is the #71 cleaning out the floor of the dovetail slot.

DSCN1008.jpg


This cleanout resulted in more chips than shavings. Then it was time to start on the male piece. The dovetail plane made fast work of that.

DSCN1012.jpg


This sample joint is a little loose at one end and tight at the other. Normally, this joint should be snug all around. But it needs room to move along with the wood.

DSCN1013.jpg


And here it is in place alongside the dado. Small sliding dovetails are easy enough to cut with the stair saw but larger slots are easier to make with an electric router. Just use a straight bit to cut a regular dado and then use a dovetail bit to cut the tail pieces. More passes with the router means less heat and stress. It is easy to bog down the router when cutting dados and dovetail slots. Breaking it into several steps makes it much easier.

And there is no perfect hand tool substitute for the dovetail plane. A shoulder plane comes close but the joint will not be as sharp on the shoulder. Using a back saw to cut the squared shoulder can help.

So look for reasons to use a sliding dovetail in your projects. The need does not come up every day, but when it does, a sliding dovetail can save the day. Good luck making your shavings.
 
OP
J

jimreed2160

Well-known member
Joined
Aug 7, 2016
Messages
3,589
Location
Tallahassee FL
Teen--You were asking about angles for your chisel blades. A good rule of thumb for wood cutting tools is 30 degrees. You can increase to 35 for hard and dense woods and decrease to 25 for soft wood like soft pine and fir. Use your protractor to make a gauge that you can keep by your grinder. Here is a brass gauge I purchased along with two wooden 30 degree gauges I made.
 

Teenager with old tools

Well-known member
Joined
Jun 3, 2015
Messages
595
Location
riverside california
Teen--You were asking about angles for your chisel blades. A good rule of thumb for wood cutting tools is 30 degrees. You can increase to 35 for hard and dense woods and decrease to 25 for soft wood like soft pine and fir. Use your protractor to make a gauge that you can keep by your grinder. Here is a brass gauge I purchased along with two wooden 30 degree gauges I made.


So turning chisels same angle as normal? Okay i've got that down good on a stone


Sent from my iPhone using Tapatalk
 

ztorres

Well-known member
Joined
Sep 22, 2016
Messages
195
Location
Iowa
I forgot to post this when drives asked about making joint cuts. When I was making the back piece for my dresser I thought this would be as good of piece as any. Jim talked about making dovetails with a hand plane and this is a rabbit with a router. I do not use a router table simply because these pieces are too long and not all cuts are continuous. The backing for a dresser works as a good example because I like to have joints for all the inner members of the pieces. It provides added stability to the finished product. The following technique can be used for making any joint cut with a router
First:
You need your layout for the cuts with dimensions. All that is needed for dimensions is the length of the cuts and the distance from an edge to the center of the cut. You can calculate the distance to center which is how I set up my drawing to show how.
70e581dfb56d1910e4595303ba296720.jpg
To calculate the distance to center for dimensions like seen above the size of the joint cut must be known, in this case it's 1/2". So knowing the width of the offset piece, I will use the 10" dimension, we can calculate the distance to center from the bottom edge to make a 10" offset piece. First add the width of the joint cut along the outside edge, if there is a rabbit there, then add 1/2 of the width of the joint to be cut. So to make this cut the distance from the bottom edge to the center of the rabbit cut is 10-3/4".

Second:
Measure the diameter of the router base. For my router the diameter is 6"
7710987b033c1af127341202d29a3557.jpg
You will use the radius, 1/2 of the diameter, to measure the distance for the guide edge for all cuts.

Third:
Select your bit and set the depth. I use a 1/2" straight router bit set to a depth of 1/8". I have set up a depth gauge to easily set the depth.
89a7ad3c42d03e84d8706a18026700c7.jpg
55f376a1751dd75c0d6b51a89844aeab.jpg

Fourth:
The first cuts we're going to make are along the outside edge. To do this we use the radius of router base and add 1/2 of the width of the rabbit cut. I like to add 1/16" for a little wiggle room. You have to add 1/2 the width of the cut to the radius so you are cutting the whole width. So for my router my guide edge will be offset 3-5/16" from all edges; this will yield a 9/16" rabbit cut. I do all of my cuts on the ground, I use 1" polystyrene placed underneath my piece that's being cut. I have a 48" and a 72" straight ruler that I use for router cuts. I determine which face I want to have my cuts on and place that side up. Next is to set up the straight edge for the guide. I measure on each edge and in the center and clamp the straight edge to the piece to be cut.
ed9f29cad5fff51a60fecae737748f54.jpg
d771e9f12e48dfe8645ee4fddfc4b1f6.jpg

Fifth:
Now to the important part, making the actual cut. It is important to make sure you are making a cut that cuts with the rotation of the bit. For my router it spins clockwise, so I will move from left to right. Make sure the base plate of the router is always tight across the face of the cutting piece, do this to get a consistent cut depth. Also make sure the router is always pressed up tightly against the guide edge.
8e4f967f5c830a1f7c71938a83ade71a.jpg
After about 8" of cutting
0773cb0c046080dbbd7c504a8cad29da.jpg
Notice how the edge is pressed up tightly to the straight guide
fbb97dba7b56e0d714419d81d7893b42.jpg
After the cut is completed
1fc8c94a051fb371962a4eb6e6317a7d.jpg
I take a sander and remove the rough edges
0e94f4158aa0d3a928237c91c8310595.jpg
Notice the width of the rabbit is ~1/2"
Sixth:
Repeat this process for all edges
Seventh:
It's time to make the internal cuts, to do this we take the dimension of the edge to center of joint cut and add the radius, I'll add 1/32", and place a straight edge along this edge same as before. Then take dimension of edge to center of joint cut and subtract the radius, I'll subtract another 1/32". This gives me 1/16" of overall wiggle room. Clamp a second straight edge here. Cut using the same techniques as before, you will have to make two passes to cut the extra 1/16".
5412dee1366cf72e798b915203ee7c61.jpg
7c04d96cf534d1a85fe82a6eaf3edc2e.jpg
Final cut
Eighth:
Repeat process for all internal cuts
7907d3380f8a9f87385ab3ab02db3b56.jpg
The final piece


Zach
 

Attachments

  • 8e4f967f5c830a1f7c71938a83ade71a.jpg
    8e4f967f5c830a1f7c71938a83ade71a.jpg
    465 KB · Views: 0
  • 0773cb0c046080dbbd7c504a8cad29da.jpg
    0773cb0c046080dbbd7c504a8cad29da.jpg
    371.7 KB · Views: 0
  • fbb97dba7b56e0d714419d81d7893b42.jpg
    fbb97dba7b56e0d714419d81d7893b42.jpg
    362 KB · Views: 0
  • 1fc8c94a051fb371962a4eb6e6317a7d.jpg
    1fc8c94a051fb371962a4eb6e6317a7d.jpg
    412.6 KB · Views: 0
  • 0e94f4158aa0d3a928237c91c8310595.jpg
    0e94f4158aa0d3a928237c91c8310595.jpg
    425.4 KB · Views: 0
  • 5412dee1366cf72e798b915203ee7c61.jpg
    5412dee1366cf72e798b915203ee7c61.jpg
    336.2 KB · Views: 0
  • 7c04d96cf534d1a85fe82a6eaf3edc2e.jpg
    7c04d96cf534d1a85fe82a6eaf3edc2e.jpg
    350.4 KB · Views: 0
  • d771e9f12e48dfe8645ee4fddfc4b1f6.jpg
    d771e9f12e48dfe8645ee4fddfc4b1f6.jpg
    372.9 KB · Views: 0
  • ed9f29cad5fff51a60fecae737748f54.jpg
    ed9f29cad5fff51a60fecae737748f54.jpg
    333.4 KB · Views: 0
  • 55f376a1751dd75c0d6b51a89844aeab.jpg
    55f376a1751dd75c0d6b51a89844aeab.jpg
    396.9 KB · Views: 0
  • 89a7ad3c42d03e84d8706a18026700c7.jpg
    89a7ad3c42d03e84d8706a18026700c7.jpg
    283.9 KB · Views: 0
  • 7710987b033c1af127341202d29a3557.jpg
    7710987b033c1af127341202d29a3557.jpg
    425.5 KB · Views: 0
  • 70e581dfb56d1910e4595303ba296720.jpg
    70e581dfb56d1910e4595303ba296720.jpg
    16.2 KB · Views: 0
  • 7907d3380f8a9f87385ab3ab02db3b56.jpg
    7907d3380f8a9f87385ab3ab02db3b56.jpg
    301.8 KB · Views: 1

drivesitfar

Well-known member
Joined
Oct 23, 2013
Messages
36,007
Location
Pacific Northwest
TEEN: did you teach your 10 year old brother to cut that wood so he could set his hole saw blades in it? great idea whoever thought of it and i've always just threw mine in a drawer or toolbox.

Jim: thanks again for the lessons and showing us some more cool tools and how to use them. :bowdown:

Zach: thanks for the drawings, pictures and words telling me (us) how you make all those shelves. i agree it's a great joint.
 

cheechi

Well-known member
Joined
Feb 29, 2012
Messages
4,384
Location
Triad, NC
Teenager

Pine is no good for handle stock. Here is something you could do.
Take some cutting boards. yes. like these. Rip them down and glue them together until you have something like 2x2x4" pieces. Basically you have real cheap rainbow coloured turning stock. Poly cutting boards aren't as hard as hardwood boards are, but they are harder than a pine board would be.

This is not as good as hardwood. If you don't have access to hardwood and don't care about looks then go to the dollar store and stock up on plain white cutting boards. Or use the milticoloured sets and either make an all red or rainbow or whatever.

I don't know the best glue to recommend to you, I just use PL premium or subfloor adhesive or something like that and a ton of clamps. Takes a while to make the stock you want but if you do it in big batches and plan ahead you can come out with some decent inventory.
 
Last edited:

ztorres

Well-known member
Joined
Sep 22, 2016
Messages
195
Location
Iowa
Drives:
Thanks
All:
As far as getting the younger generation into woodworking isn't the fault that schools don't have shop entirely. I didn't have shop and drove a half hour for ffa away from school which was a 20 min drive itself. I got into woodworking after watching my grandpa and having motivation. I think that's what we see in Teen, he has motivation to do it on his own. I taught myself mechanic work and am pretty good at it. It's all about self motivation. I'm only 25 and feel like I've motivated myself to do a lot of trade works most my age wouldn't do. We, as woodworkers, need to teach people early. And this thread does it really well.


Zach
 
OP
J

jimreed2160

Well-known member
Joined
Aug 7, 2016
Messages
3,589
Location
Tallahassee FL
Zach--Thanks for posting details about the electric side of ww. Doing all of that dado work with a handplane would give a guy blisters fer sure.

Drives--Sorry but my plane storage is really not that impressive. The bench planes sit on dusty shelves in the shop and the specialty planes are stored in a closet inside so they will not rust. And no, they do not sit inside specially made cases--I have them organized in plastic tool boxes. It is very convenient and they don't seem to mind. :thumbup:
 
To avoid these ads, REGISTER NOW!
Top Bottom