To avoid these ads, REGISTER NOW!

Woodworking 101--Tools and Tips

jimreed2160

Well-known member
Joined
Aug 7, 2016
Messages
3,589
Location
Tallahassee FL
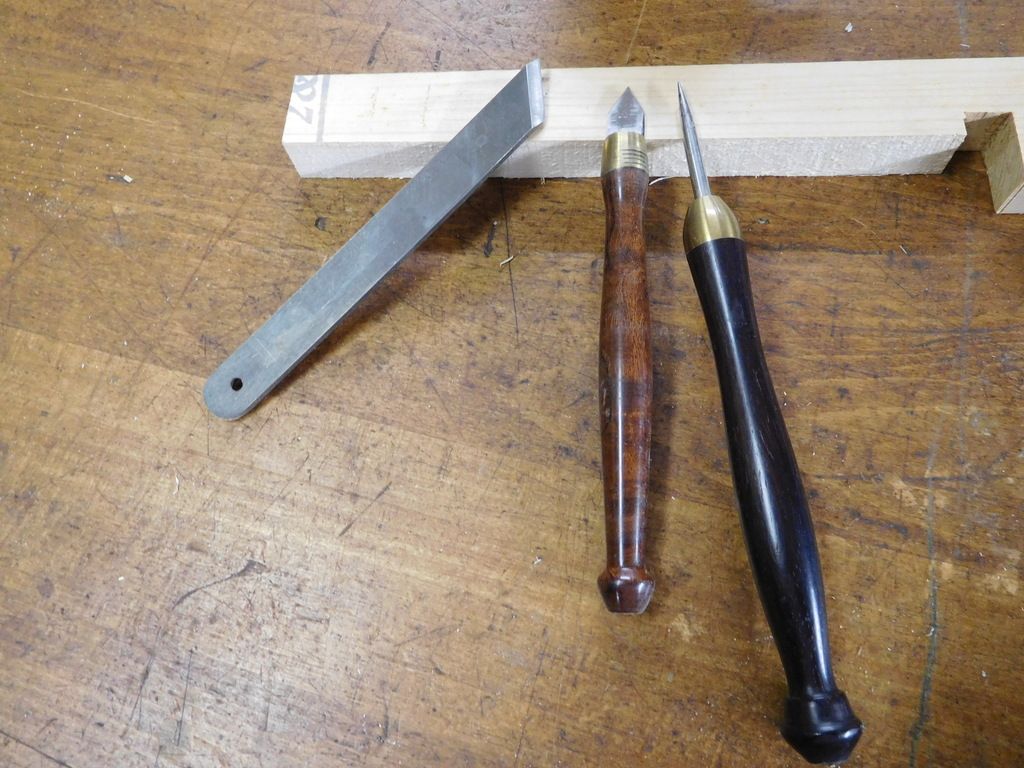
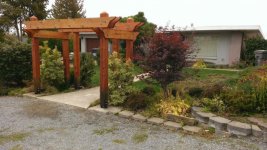
It's time for some woodworking fun in the garage. Back in the day, schools taught woodshop and every dad in the neighborhood knew some woodworking skills. Well, the schools are giving up on trades and dad is no longer a reliable go to source for woodworking knowledge. There are sites which specialize in woodworking lore but I hope we can deal with basic subjects here which will help all GJ members understand the useful skills of working with wood.

For me it all began at age two or three. My dad and his buddy were building a walnut desk in the garage but he also had toddler duty. Being a responsible parent of the 1950's, he sat me down just under the jointer outfeed in a pile of walnut shavings. I had a cut off stick and played in the aromatic shavings all afternoon. The smell of freshly cut American walnut is intoxicating and I was hooked. Fast forward many years and I am still making shavings and enjoying wood.

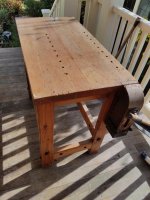
It all begins with a bench and I am lucky to have a European cabinetmaker's bench. My dad was pursuing his garage dream by closing in the carport AND the parking pad. It was there that I spied the bench one day in the mid 1990s. It was piled high with garage type stuff, having never been used for its intended purpose. I caught him in a weak moment--perhaps the guilt of never using the bench helped. Anyway, he helped me load it in my truck. That was quite a feat because the beech top weighs 200+ pounds.

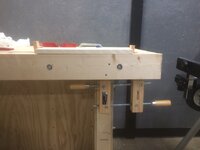
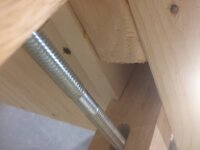
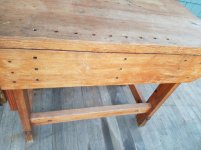
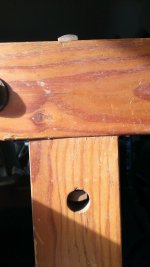
It is an Ulmia woodworkers bench that was made sometime in the 1980s. There is a shoulder vise on the left and an end vise on the right. Square dog holes are evenly spaced for use by the six metal dogs. The top is dead flat.
DSCN0795.jpg

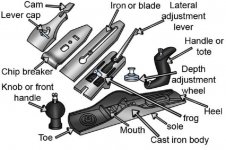
Flat is important to a woodworker because it provides a reference surface for projects. I use this bench to hold wood for my handplanes.

DSCN0797.jpg

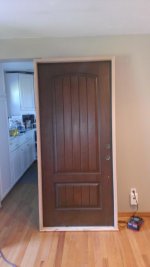
If you desire to do some serious woodworking, get or make yourself a bench. It does not have to be the fancy euro model. I started with much less and got by. But looking at the attributes of the cabinetmakers bench will help you on your journey. Above all, a woodworkers bench must be sturdy and flat. Attaching a lightweight bench to the wall can help make it sturdy. Using a solid core door can provide you a surprisingly flat surface.

So post pictures of your woodworking benches and bench tips. Help beginners understand bench lore.
 
To avoid these ads, REGISTER NOW!
OP
J

jimreed2160

Well-known member
Joined
Aug 7, 2016
Messages
3,589
Location
Tallahassee FL
Here is a random piece of construction lumber. It has a slight bow and a twist. We know the top of the bench is flat. Notice how much the end of the board turns up.

DSCN0798.jpg

Nothing else to do but chuck the board upside down between some bench dogs and work on that high middle.

We can discuss hand planes in detail later, but here is a nice shot of a beautifully thin tortured shaving. When your handplane pulls a thin and wispy shaving, its blade is sharp and perfectly set up. A little tortured wavy shaving is the best and indicates a nice finish on the workpiece.

DSCN0800.jpg

The plane is working and the woodworker is rewarded with a nice pile of fluffy shavings.
 
OP
J

jimreed2160

Well-known member
Joined
Aug 7, 2016
Messages
3,589
Location
Tallahassee FL
Here is the pile of shavings.

DSCN0802.jpg

But there are other workbenches that are suitable for woodworking. How about a solid core door? Price was FREE.

DSCN0803.jpg

Take one commercial grade 8 ft solid core door. Chop it to six feet, build a 2x4 frame base, and mount a quick release woodworking vise on the corner. This table makes a great assembly table because it is flat. Of course, it has been repurposed into a vise park, but you get the idea.

Another handy woodworking bench is the sawyers bench.

DSCN0796.jpg

Use this low bench when you need to use a hand saw for crosscutting or ripping. Use your foot or knee to hold the workpiece steady. When you make this bench, adjust bricks or other objects to find a suitable working height. Then make your bench to fit your leg length.

By the way, ripping is cutting wood with the grain. This process makes wide boards narrower. The saw pictured is a rip saw and has a finger hole for two handed use. Ripping long boards by hand is a tedious process and two hands are better than one. Rip saws are aggressive and have widely spaced teeth. This saw has 4 1/2 teeth per inch. Rip teeth are like little chisels and are square to the bottom.

Crosscut saws are used to cut across the grain of the wood. Their teeth are finer (like 8 tpi), are pointed, and stick out more. This tooth geometry is necessary for quickly severing wood fibers.
 

Irongrave

Well-known member
Joined
Jan 28, 2014
Messages
115
Location
Florence SC
Awesome woodworking bench. I am working up plans for a pair of benches one as a building bench and the other with a sacrifice top for my track saws but both will be stained and serve as show pieces as well.
 

drivesitfar

Well-known member
Joined
Oct 23, 2013
Messages
35,988
Location
Pacific Northwest
JIM: First of all thank you very much for starting this thread because it's way overdue. i'm positive there are many members here that have an enormous amount of skills and wisdom to share like yourself and even more members like me that would like to become more of a skilled woodworker instead of more of a wood butcherer.

Well said about teaching our younger generations that didn't have the privilege of getting Wood shop in school to learn a few of the basic skills and learn about the tools of the trade and the cool machines. that is one awesome bench and i bet it has served you well. i'd love to learn how to make and use BENCH DOGS.

thanks again for sharing your wisdom and i bet you might just learn a thing or two from a few of the members too.

ALL: I just finished taking apart a 4 year old pergola that i built from my head out of cedar that needed a few adjustments to prevent rot and also keep the ants and other critters from getting easy access to it. When i made the cement footings (yes i made them about 8 inches deep which might have been a bit overkill) i didn't realize i needed to put the Simpson (sp?) galvanized supports maybe an inch or two off the ground to prevent dirt and rainwater from damaging the bottom of my cedar pergola. it's built with 6.25 x 6.25 8 foot long posts that i had hand planed with an electric 3.25 inch Craftsman and Makita planer so not a perfect tool for the job, but it worked. i also had to narrow the bases so they would fit in the 5.5 inch supports and since i was (and still am) planning a brick or maybe wood base for them i wasn't so worried about it looking square. well after 3 years it needed to be re stained which is part of maintainence, but i thought it would be a good time to cut the bottoms off the posts to get them some air. there were also more than a few moisture ants making a home in the cracks so about a month ago (yes about a year to make time to do it after i first thought about it) i took it apart.

i cut about 2 inches off the bottom of each post and continued to sand all the parts with an old Craftsman rotary sander i'd picked up at a garage sale that worked better than my old Craftsman belt sander in this instance. I then painted on copper green (use mask and gloves please using this stuff) on the bottom couple feet and used Seikens (sp?) cedar stain to put on all the pieces after I'd sanded them on all sides. it took a good 2 maybe closer to 3 weeks, but my 4 year old pergola looks maybe better than new again and i don't have to worry about dry rot, ants or other critters eating at it until i need to stain it again. the cross beams are 2x12's and i've got 4x4's on top. here's the pictures of it when new and i'll make a few posts. it really was a fun project in the beginning and my wife was saying all along that it was going to be TOO BIG.

i'll have a couple questions on my last post for some of the experts or feel free to give your thoughts or opinions as you have some time to. i used pretty simple tools to make this and here's the list as i can recall.

1) cement tools
2) small Ryobi 18v chain saw for cutting 6x6's
3) Makita 10 inch miter saw
4) Craftsman and makita 3.25 inch electric planers
5) Craftsman 3/4 HP router to put an edge on the 2x12's
6) Craftsman rotary sander
7) paint brush and masks

there might be a few other tools and yes I had to go to the local commercial screw company to get some 13 inch galvanized bolts that cost about $200 and i put a couple coats of rustoleum on them just before re installing them the second time. Cedar was bought at a local cedar mill so i get the wood wet and needed to put them on a rack under a tarp for a few months. i hear there is a chemical you should paint on the ends of your wood to keep it from cracking so would like to know and hear more about storing and keeping wood at the ready for projects.

if any of you have more questions just ask and i'll try to do my best to let you know what i know or learned doing this Pergola. first off before pictures when i built it 4 years ago. also 3 pictures i took this spring when knowing that i wanted to take it apart and improve it.
 

Attachments

  • from street southwest.jpg
    from street southwest.jpg
    156.2 KB · Views: 1,120
  • WP_20160414_024.jpg
    WP_20160414_024.jpg
    152.5 KB · Views: 1,000
  • from driveway north.jpg
    from driveway north.jpg
    153.7 KB · Views: 1,049
  • from driveway toward street.jpg
    from driveway toward street.jpg
    154.1 KB · Views: 1,048
  • WP_20160414_022.jpg
    WP_20160414_022.jpg
    152.9 KB · Views: 901
  • pergola from street.jpg
    pergola from street.jpg
    152.1 KB · Views: 1,347
  • WP_20160414_021.jpg
    WP_20160414_021.jpg
    156.4 KB · Views: 970
Last edited:

drivesitfar

Well-known member
Joined
Oct 23, 2013
Messages
35,988
Location
Pacific Northwest
ALL: so here's more pictures of the process. yes i have more than a few sawhorses and benches and thanks to the great September and October weather i only had one rainy day to deal with covering up my cedar.
 

Attachments

  • WP_20160926_018.jpg
    WP_20160926_018.jpg
    149.2 KB · Views: 807
  • WP_20160924_008.jpg
    WP_20160924_008.jpg
    151.3 KB · Views: 756
  • WP_20160924_007.jpg
    WP_20160924_007.jpg
    155.7 KB · Views: 779
  • WP_20160926_023.jpg
    WP_20160926_023.jpg
    159.3 KB · Views: 783
  • WP_20160926_016.jpg
    WP_20160926_016.jpg
    147.6 KB · Views: 801
  • WP_20160928_005.jpg
    WP_20160928_005.jpg
    150.1 KB · Views: 736
  • WP_20160924_006.jpg
    WP_20160924_006.jpg
    154.3 KB · Views: 807
Last edited:

drivesitfar

Well-known member
Joined
Oct 23, 2013
Messages
35,988
Location
Pacific Northwest
ALL: more pergola pictures
 

Attachments

  • WP_20161006_014.jpg
    WP_20161006_014.jpg
    153.2 KB · Views: 694
  • WP_20161006_009.jpg
    WP_20161006_009.jpg
    148.4 KB · Views: 682
  • WP_20161004_002.jpg
    WP_20161004_002.jpg
    155.9 KB · Views: 652
  • WP_20161004_001.jpg
    WP_20161004_001.jpg
    157.5 KB · Views: 639
  • WP_20161003_003.jpg
    WP_20161003_003.jpg
    149.8 KB · Views: 652
  • WP_20161003_004.jpg
    WP_20161003_004.jpg
    153.1 KB · Views: 675
  • WP_20161005_006.jpg
    WP_20161005_006.jpg
    152.5 KB · Views: 634
Last edited:

drivesitfar

Well-known member
Joined
Oct 23, 2013
Messages
35,988
Location
Pacific Northwest
ALL: i had to move the 4x4 staining inside my wife's side of our garage that Mrs. DIF was happily (for first time maybe in a while) to give up for one of my projects.

my plan is to build either a brick or basalt base around the base of the 6x6 cedar posts to give it maybe a better look and also hide the copper green that i put on them for protection from bugs and rot. any ideas on how i would finish it in wood if i decided to go that route or if a mason or brick guy wants to lend some of their finishing tips i'm sure the thread wouldn't mind.

also i think i might want to add one more 4x4 on top of it. this was the biggest hurdle in my design getting my wife's approval. she fought me the entire time i was getting the 4 x 4's ready to put up there saying it would be TOO BIG and when i finally put them up there she actually liked them. so if i add another one i might get the spacing a bit better and another thing i have never screwed them in place (don't want to nail in case i need to take it apart again to restain it if we are still living here in 3 or 4 years). anybody want to say if i should toe nail screws in or i have some 6 inch phillips head galvanized screws that i could put in straight in from the top that i'd probably want to first pre drill a hole through the cedar to do that.

any thoughts??

like i said it was a fun project and when i originally put it in i actually would see people just sitting in front of my house staring at it (I hope they were anyway instead of checking out my bride or my stuff). i remember one guy slamming on his breaks and then when he saw me in the driveway giving me a huge thumbs up. many of my builders (I was a REALTOR for 30 years) would stop by and wonder why i didn't have them build it and when they found out i did it myself they said WELL DONE.

hope some of you enjoy it and if you might want to copy my design or ask any questions feel free to cause i'm happy to share.
 

Attachments

  • WP_20161018_009[2322].jpg
    WP_20161018_009[2322].jpg
    147.7 KB · Views: 553
  • WP_20161022_018.jpg
    WP_20161022_018.jpg
    156.6 KB · Views: 565
  • WP_20161018_008.jpg
    WP_20161018_008.jpg
    152.6 KB · Views: 574
  • WP_20161018_007.jpg
    WP_20161018_007.jpg
    148.5 KB · Views: 587
  • WP_20161018_006.jpg
    WP_20161018_006.jpg
    154.4 KB · Views: 596
  • WP_20161017_005.jpg
    WP_20161017_005.jpg
    154.6 KB · Views: 621
  • WP_20161006_008.jpg
    WP_20161006_008.jpg
    151.6 KB · Views: 631
Last edited:

drivesitfar

Well-known member
Joined
Oct 23, 2013
Messages
35,988
Location
Pacific Northwest
Jim: i love the pictures you've been posting show the planer in action and believe it or not I probably own maybe 30 of them cause i pick one up every chance i get when i'm buying a vise or other tools. i'd love to learn how to not only repair or tune them up like a few members have shown me, but also the correct method of using them. please post up more of your projects and skills to make them as you have the time to. thanks

ALL: i just saw a cabinet or wood scraper on YouTube mentioned the other day on a thread i started about an old wood bench i bought. speaking of which here's my little wood bench i had to move half my garage to gain 3 inches to make it fit. i'd love to learn to use it like it is suppose to and maybe spiff it up to and maybe this will be the first bench i own that i won't put anything on top of and leave it there because i have FSD (flat surface disease). as you can see in the picture i already put a chop saw and worm drive saw on it. here's a link to the thread about this little old wood bench with a cool old wood vise on it in case any of you like it or have more information about it to share.

http://www.garagejournal.com/forum/showthread.php?p=6092092#post6092092
 

Attachments

  • C__Data_Users_DefApps_AppData_INTERNETEXPLORER_Temp_Saved Images_00q0q_kptUzldHOVJ_1200x900.jpg
    C__Data_Users_DefApps_AppData_INTERNETEXPLORER_Temp_Saved Images_00q0q_kptUzldHOVJ_1200x900.jpg
    130.4 KB · Views: 676
  • V__10EC.jpg
    V__10EC.jpg
    139.8 KB · Views: 646
  • C__Data_Users_DefApps_AppData_INTERNETEXPLORER_Temp_Saved Images_00A0A_2ERbbzOS5xs_1200x900.jpg
    C__Data_Users_DefApps_AppData_INTERNETEXPLORER_Temp_Saved Images_00A0A_2ERbbzOS5xs_1200x900.jpg
    122.3 KB · Views: 723
  • V__279C.jpg
    V__279C.jpg
    133.1 KB · Views: 659
  • V__B36F.jpg
    V__B36F.jpg
    141.9 KB · Views: 664
  • WP_20161106_002.jpg
    WP_20161106_002.jpg
    137.8 KB · Views: 675
  • WP_20161106_008.jpg
    WP_20161106_008.jpg
    145.4 KB · Views: 606

drivesitfar

Well-known member
Joined
Oct 23, 2013
Messages
35,988
Location
Pacific Northwest
IG: thanks for the Kudos and i like this little bench more and more as i see it. i'm hoping it will also start the cure of my FSD as you can see on my other bench that i still need to mount another vise too since i moved it there a couple months ago.

ALL: my BIL (brother in law) stopped by yesterday to help me put in my new front door. my wife and i bought the door as a floor model without the frame at the place we bought our new garage doors a couple years ago. i was hoping to make a frame because i have most if not all the tools, but lacked the skills. it was sitting in my wife's craft room sort of out of sight from me and she wasn't bugging me much about it so there it sat.

i decided to find a place to make a frame and a local GJ member had a woodworker friend that fit me in his busy schedule and made on for me with weather stripping, sweep and cut the wheelchair base (forgot the name for it) to size.

my BIL is a contractor, but has very little extra time so i just asked him to put me on the list and my wife was very patient. he showed up yesterday around 10am and we had the old door cut out in about 30 minutes. i mentioned that a piece of steel behind the door frame might help with security and he agreed and asked if i had one. is the POPE CATHOLIC?? i found a 5/16 piece about the right length and width and handed it to him. he didn't laugh or cry and said he'd be right back and went to ACE about a mile away and grabbed 3 new jig saw blades. i also had a good size piece of aluminum 5/16 that he cut to size and put on the back of the framing. enough about security, but if anybody wants to know what else you can do just ask or PM me.

so he wasn't happy that the door was moving in or out on it's own and kept making simple adjustments with shims and screws until he had it right. we put the hardware on the door, he caulked everything with a few tubes i'd bought for hardy board siding a few months ago (yes caulking does go bad and i had some tubes in a box i thought might work dated 1997 that are now disposed of).

old door out and new door in the same day. i'm happy and my wife is ecstatic.

so now that I've almost finished up this project maybe one or more of you can teach us how to make and install a nice door from SCRATCH? if we move and i need a new door i'd LOVE to make it myself and install it too.

thanks in advance
 

Attachments

  • WP_20161108_032.jpg
    WP_20161108_032.jpg
    144.3 KB · Views: 550
  • WP_20161108_033.jpg
    WP_20161108_033.jpg
    145.2 KB · Views: 554
  • WP_20161108_031.jpg
    WP_20161108_031.jpg
    141.8 KB · Views: 563
  • WP_20161108_028.jpg
    WP_20161108_028.jpg
    100.5 KB · Views: 556
  • WP_20161108_021.jpg
    WP_20161108_021.jpg
    147.6 KB · Views: 528
  • WP_20161108_015.jpg
    WP_20161108_015.jpg
    99.2 KB · Views: 544
  • WP_20160427_010.jpg
    WP_20160427_010.jpg
    145.1 KB · Views: 544
OP
J

jimreed2160

Well-known member
Joined
Aug 7, 2016
Messages
3,589
Location
Tallahassee FL
"...protect the blade"

Well the bench is beech wood and the blade is O-1 steel. Not much danger of blade damage. BUT if my shop teacher told me to lay the planes on their sides, then on their sides they would be! His shop--his rules. :bowdown:

Thanks for looking.
 

ztorres

Well-known member
Joined
Sep 22, 2016
Messages
195
Location
Iowa
6d216444ac23363a4771c49556bd966e.jpg
I just made myself an English work bench last month. Probably one of my favorite work benches of all time. Having a level surface is incredibly important with woodworking. One thing that I did was I put an enclosed center brace on my table and ran 2-6' threaded rod through it; this helps eliminate any irregularities in cuts. I grew up spending almost every night in my grandfather's wood shop just watching him. He did all sorts of woodworking and I have learned a lot from him. His woodshop is roughly 60'x100' with every tool that has ever existed. I used a simple 2x4 table for the longest time though 1e7f6baa90d8cf1dc3063405950174f6.jpg


Sent from my iPhone using Tapatalk
 

Attachments

  • 1e7f6baa90d8cf1dc3063405950174f6.jpg
    1e7f6baa90d8cf1dc3063405950174f6.jpg
    212.8 KB · Views: 34
  • 6d216444ac23363a4771c49556bd966e.jpg
    6d216444ac23363a4771c49556bd966e.jpg
    103.4 KB · Views: 28

bj383ss

Well-known member
Joined
Sep 29, 2011
Messages
3,166
Location
TX
I'm sub'd.

Jim that is a fantastic bench and kudos to your dad for having you there in those walnut shavings. I have a few hand planes and scrapers, but I mostly use power tools.

Drive. I saw your pergola before it looks great.

Ztorres that is a very nice bench and you can appreciate it more because you built it. You understand a good workbench.

I will share my bench and some of my projects.

This is my main bench and I have rebuilt it 3 times to the current state. The top is two 3/4" layers of MDF. The bottom is mortise in Tenon joints using plywood layers to make the tenons and mortises. The bottom is filled with a 100lbs. of sand. My dad and I could hardly lift it off the ground.

30851521056_43ed9dcd83_b.jpg20161109_191352 by bjohnson388, on Flickr

My lathe workbench. It has 100lbs of sand in the bottom and its bolted to the wall.

30252076403_7925c628c5_b.jpg20161109_191421 by bjohnson388, on Flickr

Automotive side of the garage just a set of cabinets with standard benchtop.

30851521526_d3b2405b8f_b.jpg20161109_191448 by bjohnson388, on Flickr

Mitersaw workbench. It has been added on so many times I can't remember. It is functional but it is a mess. I plan to completely redo this entire workbench when I get time. The biggest problem is the saw is only has 6 feet of cutoff space on the right. Need to put it more in the center. And the drawer has all my router bits in it and the router is on the other side of the garage. In my old garage this was right across from my router table.

30252079433_0aab5cf3c3_b.jpg20161109_191514 by bjohnson388, on Flickr


Last but not least some of my wooden toys and scale models I have built. I also obviously enjoy building cabinets.

30252081563_55c8b1ba2e_b.jpg20161109_191533 by bjohnson388, on Flickr


Almost forgot have a bench in the shed. Nothing special exact same my automotive one in the garage. They are modular cabinets made from plans in Shopnotes.

30109600402_49c51c8338_b.jpg20161009_185431 by bjohnson388, on Flickr

I am really excited about this thread and hope it gains some momentum. As Drive has said there are a lot of woodies on here.
 

ztorres

Well-known member
Joined
Sep 22, 2016
Messages
195
Location
Iowa
ZTorres, show us that row of dogs in action please. I think I see how with the Jorgy clamp.


I will get some pics of it tomorrow. But essentially you place your dog and use the hand screw to clamp it in place. The hand screw is mounted into the bench. It took some routing of the face to bring the thickness down. But I will definitely get pics of it in action tomorrow.


Sent from my iPhone using Tapatalk
 
To avoid these ads, REGISTER NOW!

turbowoodworker

Well-known member
Joined
Mar 18, 2012
Messages
3,519
Location
Apex NC
Here are a few pictures of my bench I built almost entirely from repurposed materials. Base is from pine from an old office building I was remodeling, top is from a neighbor's kitchen island they were discarding (maple butcherblock). Side aprons are walnut. Veritas twin screw end vise, Veritas dogs, Rockler face vise. Cabinet in base is alder ply and alder scraps from a cabinet project at a prior house.

I am really happy Jim started this thread. It is a long time coming but I expect it will bring a lot of people out of the woodwork!

Rick
 

Attachments

  • IMG_4357.jpg
    IMG_4357.jpg
    140.1 KB · Views: 752
  • IMG_4368.jpg
    IMG_4368.jpg
    131.1 KB · Views: 621
  • IMG_4364.jpg
    IMG_4364.jpg
    132.8 KB · Views: 645

Coolabah

Well-known member
Joined
Jun 6, 2010
Messages
1,360
Location
2nd Floor, 3rd on the Right,Narooma, Australia
"...protect the blade"

Well the bench is beech wood and the blade is O-1 steel. Not much danger of blade damage. BUT if my shop teacher told me to lay the planes on their sides, then on their sides they would be! His shop--his rules. :bowdown:

Thanks for looking.

Hey my shop teacher told me that too many decades ago. Not sure if it really is an issue if you "place not throw" the plane down. Counter argument is placing the plane on it's side might let the blade shift esp if not fully cranked tight ?? dunno but I always (now I am in my own shop ) place blade down and do not notice any bad effects
 

bj383ss

Well-known member
Joined
Sep 29, 2011
Messages
3,166
Location
TX
Here are a few pictures of my bench I built almost entirely from repurposed materials. Base is from pine from an old office building I was remodeling, top is from a neighbor's kitchen island they were discarding (maple butcherblock). Side aprons are walnut. Veritas twin screw end vise, Veritas dogs, Rockler face vise. Cabinet in base is alder ply and alder scraps from a cabinet project at a prior house.

I am really happy Jim started this thread. It is a long time coming but I expect it will bring a lot of people out of the woodwork!

Rick

Very nice bench. Love building stuff from reclaimed wood and its free.

Bret
 

dlcwent

Member Emeritus
Joined
Feb 24, 2014
Messages
8,427
Location
coastal maine
Great idea for a thread. I'm all in. The models you've built are fantastic. Very impressive. I'll be looking forward to watching and learning. I doubt that I'll have much to add as I am only a sawdust maker.
 

drivesitfar

Well-known member
Joined
Oct 23, 2013
Messages
35,988
Location
Pacific Northwest
BJ: i think i counted 5 benches including your huge bench that looks like it gives you plenty of room to work on almost anything. nice looking shop and just curious how big is it or is it a 3 car garage that you might still park a car in? did you make all those cool wood toys on the shelf above your bench?

Turbo: i agree with BJ your bench is awesome and well done making it yourself. just curious if you always leave it on wheels or where you just moving it that one day? if you do leave it on wheels how sturdy and steady is it when you are working on it?

DLC: questions and good comments might make us both more handy and less of a sawdust or wood butcher.

ALL: since you all seem to have a nice looking bench anybody want to show us how you make and use bench dogs and how you use your bench? looks like Turbo has brass ones and some are bigger than others so i'm guessing it makes a difference or do you just need something to put in the holes?
 

turbowoodworker

Well-known member
Joined
Mar 18, 2012
Messages
3,519
Location
Apex NC
Turbo: i agree with BJ your bench is awesome and well done making it yourself. just curious if you always leave it on wheels or where you just moving it that one day? if you do leave it on wheels how sturdy and steady is it when you are working on it?

ALL: since you all seem to have a nice looking bench anybody want to show us how you make and use bench dogs and how you use your bench? looks like Turbo has brass ones and some are bigger than others so i'm guessing it makes a difference or do you just need something to put in the holes?[/QUOTE]

Drives, It was on wheels that week when I was moving and trying to determine best location. I'm betting it weighs 800 lbs without the tools in it so it won't move. Even on wheels I could plane and hand saw without it rolling on the HF wheel dolleys. I finally decided on placing it right in front of the window. It is a pleasant place to work.

I will try to get pics of the bench dogs in action but there is not much magic to it. Two different kinds of dogs on my bench are due to me building it and experimenting, which was way fun. The brass dogs are round and go in a drilled 3/4" hole and those holes are in the middle of the table.

The square dogs fit in sq or rectangular and slanted slots created with the miter saw. I cut 5-6" blocks at a 5* angle then fixed them to the walnut sandwich that makes up the edge strip. There is a small notch at the top of the hole that allows the dog's pad to sit flush with the bench and not slide too deep. The strip, made of three board thicknesses essentially, makes up the apron on each side.

I probably read ten books on workbench design and got that idea from one of them.

It is always fun to do something different in the shop. When I build furniture, I always try to incorporate a technique I've never used before, like when I make mortises. I've used the router, mortising machine, hand cut, sandwiching with multiple boards, etc. All fun in their own way.
 

drivesitfar

Well-known member
Joined
Oct 23, 2013
Messages
35,988
Location
Pacific Northwest
Turbo: thanks for the information. also i (we) would all love to watch you and the other guys make furniture or projects no matter how simple some of you think they might be to make. i remember maybe the first time i used a router and I was just 45 ing an edge on a piece of formica on a bench i was making for my wife's store 30 years ago and after using it i was amazed at how easy it was to use and what a great job it did. i still need to learn a lot about using routers and hope to learn a lot on this thread and youtube. i'd have to move or maybe make an addition to our garage if even possible to have a bench that big, but i'd love one and again WELL DONE.

ALL: speaking of youtube i already saw a couple bench dog videos, but if somebody wants to explain how to use them and maybe tell us what styles work best for what it would be great for those of us that haven't used them.

also i was watching this guy install a vise on his bench and he uses a tool to mark and score the wood about the 5 minute mark that i've never seen before. anybody know what it is called and do you use it or would it be a good tool to own in your wood shop?

 
OP
J

jimreed2160

Well-known member
Joined
Aug 7, 2016
Messages
3,589
Location
Tallahassee FL
Wow! Great stuff.

Ztorres--Love your bench.
BJ--Love your shop
Turbo--You are my recycling hero
Drives--The tool is a circular marking gauge. The end has a wheel cutter. And yes, marking scribes and gauges are very helpful in woodworking. Over the years many different types have been invented. I will dig out some of my vintage markers for a class photo.

Thanks to everyone for looking, lurking, and posting. Woodworking is very close to my heart. My grandfather was a math teacher, principal, and later superintendent of schools, but ww was a passion of his. He had a small shed shop in his back yard and loved to talk of geometry and ww. "The triangle is the strongest building form. Remember that."
 
OP
J

jimreed2160

Well-known member
Joined
Aug 7, 2016
Messages
3,589
Location
Tallahassee FL
Today seems like a good day to talk about hand planes. I fiddled with my dad's Craftsman plane throughout my youth. It was a mystery to me. Sometimes I could get it to work but mostly I just moved the adjuster and wondered. One day I dropped it and learned how to repair handles (the rear handle is called a tote). Many years later I went to a Highland Hardware (Atlanta) outdoor event and saw a lone ww under the tent by himself. He was happy as a clam as he hummed and turned a 2x6 into a pile of wispy shavings up to his ankles. At long last, I knew what it was all about. Swish, swish is the zen of using a hand plane. It is the rhythm of swish, swish and the beauty of delightful floating shavings. So let's go over some of the basics. I have recruited my shop assistant today.

DSCN0805.jpg


These are very common handplanes. One is a Stanley Bailey #5 and the other is a Stanley Bedrock #605. Out shop assistant clearly has a favorite and that is the Bedrock--Stanley's premium plane. Bedrocks are favored because they were made to higher quality standards and are easier to adjust. I like them because they tend to have less backlash in the blade adjuster. But that is not always the case because this particular Bedrock has lots of slop when adjusting. It is, however, a great user plane. Let's look at some of the finer points.

Here you can see the assistant pointing out the lateral adjuster lever. The circular cam protrudes into the rear of the blade/clipbreaker assembly and allows the user to move the blade from side to side. Sometimes one side of the blade is set lower and this lever is used as a microadjuster to level out the blade in the mouth of the plane. Lateral adjusters are useful. On old woodie planes, you had to whack the side of the blade with a stick.

DSCN0806.jpg


Here is the back side of the blade. Mine is a little grungy but turns to a high polish at the business end. This side should be flat because it determines the cutting angle. The frog of the plane is set at 45 degrees because that is a good angle of attack. Keeping the back flat preserves that angle. If you are lazy like me, just attend to the cutting edge and leave a little protective rust in place.

DSCN0807.jpg


Here is a shot of the bevel side after touch up. I purchased a marble floor tile at the box store and glued aluminum oxide paper to its flat surface. The spray glue was so noxious that I never tried that again. I just lay fresh paper over the original sheet. I start with 220 and finish with 400. This blade just needed a touch up. It was originally ground at 30 degrees.

DSCN0809.jpg


The blade is matched to the chipbreaker and they are held together by a screw. The chipbreaker forces the thin shaving to curl out of the way and also stiffens the blade. As you can see, I leave only about 1/16" of the blade free. Having the chipbreaker closer to the edge makes it stiffer.

DSCN0810.jpg


The blade/chipbreaker is replaced in the plane and seated on the frog. Bevel is down.

DSCN0811.jpg


Here is an important tip. There is a screw on the frog that is used like a stud post for the lever cap. On vintage planes, this screw is usually frozen. I like to free it up so that it can be turned with my thumbnail. The lever cap should be just finger tight so you can adjust the blade. Adjust this screw until you get the exact pressure you need. I adjust mine almost every time I replace the lever cap. If the lever cap is too tight, the blade will be hard to adjust. If it is too loose, the blade will not stay in place.

DSCN0814.jpg


Here is the blade protruding from the mouth. Notice how small the opening is.

DSCN0815.jpg


The assistant is pointing out the adjuster wheel. Use this to raise or lower the blade. Make sure it is loose so you can just flick it with your thumb. I like to set my blade just above the mouth so it does not touch the wood. Then I adjust until it just barely takes an even and wispy shaving.

DSCN0816.jpg


Curly and wispy is what you are going for.

DSCN0817.jpg


If you are lucky, you can leave the cleanup to your shop assistant.

DSCN0818.jpg


So that is a quick run through on how to use a handplane. Time to make some shavings.
 

ztorres

Well-known member
Joined
Sep 22, 2016
Messages
195
Location
Iowa
bb7f9c81a52b0eb3bedddfe06d420541.jpg
Just to demonstrate how my setup works. Use two bench dogs one in the precut holes and another on the hand screw. The key to doing it though is the hand screw has to parallel to each side and perpendicular to the top to keep it flush. I don't have any dogs made yet so I used some scrap wood here, but it follows the same principle.

6736d93e40d38e35052043ac1859d4d1.jpg
Sent from my iPhone using Tapatalk
 

Attachments

  • bb7f9c81a52b0eb3bedddfe06d420541.jpg
    bb7f9c81a52b0eb3bedddfe06d420541.jpg
    163.3 KB · Views: 41
  • 6736d93e40d38e35052043ac1859d4d1.jpg
    6736d93e40d38e35052043ac1859d4d1.jpg
    158.9 KB · Views: 37
OP
J

jimreed2160

Well-known member
Joined
Aug 7, 2016
Messages
3,589
Location
Tallahassee FL
Ztorres--that is both a clever and an inexpensive solution. Woodworking benches don't have to be expensive to be effective. I am sure others can adapt your idea for their own use. Thanks for posting details.
 

bj383ss

Well-known member
Joined
Sep 29, 2011
Messages
3,166
Location
TX
Jim great school on the planes. I have a few myself but have never really gotten into them yet. Thanks for the info. I am sure I have read about most of it in one of my 100's of woodworking mags but have never been caught by the hand tools bug yet. Notice I said "yet".

Jim I love your shop assistant. One of my favorite all time characters. I have a few helpers in my shop as well.

DSCN8910 by bjohnson388, on Flickr

15852422119_98d35d8aab_o by bjohnson388, on Flickr

20141216_173633 by bjohnson388, on Flickr

Z that is a great setup you have for your benchdogs. Mine are round holes.

I mainly use mine as a stop and use a bench dog on one side and a board clamped down on the other. I put them in the bench but like my hand tools have rarely used them.

One good feature I like is you can drill holes in a work piece if you line it up with a bench dog hole and not drill into your bench. I also put my bottle of glue in one of the holes to hold it upside down and the nozzle goes down in the hole if that makes sense.

Drives to answer your question yes I made all those toys and scale models. Haven't made anything in the last 3-4 years as I have been busy restoring my 64' Chevy truck. My garage is 3 car 20x32. The 3rd car is primarily the woodshop side. I will cleanup this weekend and get you some better pictures for you.

I can post more of my projects I have done or do you guys want to stick mostly to techniques and tips?

Bret
 

yhprum

Well-known member
Joined
Jul 27, 2006
Messages
1,379
Location
Brisbane Australia
Nice write up Jimreed.
I have been thinking of getting some planes. How do you hold the blade when you sharpen it? Is the angle the same as the angle between the plane bottom and the blade?

I have thought about getting the woodwright books for woodworking using handtools, it looks interesting.
 

CRSINMICH

Well-known member
Joined
Aug 15, 2015
Messages
2,393
Location
Southeastern Michigan
Hand Plane Parts​
If you're new to hand planes this simple diagram may help you understand what some of these helpful posts are talking about. WARNING: Planes have a HIGH addiction quotient!
 

Attachments

  • Hand plane exploded view.jpg
    Hand plane exploded view.jpg
    123.7 KB · Views: 393
Last edited:
OP
J

jimreed2160

Well-known member
Joined
Aug 7, 2016
Messages
3,589
Location
Tallahassee FL
Thanks for visiting.

BJ--Love your crew of shop assistants! Reminds me of my last work team. Feel free to post your projects. You know we all love pictures.

YHPRUM--I hold the blade by hand when I sharpen on the sandpaper. The flat part is easy of course. I have two inches or so of it on the edge of the paper and use a quick sideways zip-zop. For the bevel, I hold it at 30 degrees and drag it quickly. There are jigs available but they are like training wheels.

EJ--Nice fleet. I especially like the shoulder plane set.

CRS--Thanks for the diagram. It helps to have a common set of terminology.

It is a little cool in my shop today but I will try to come up with something interesting. I am sure a warm cup of coffee will be involved.
 

CRSINMICH

Well-known member
Joined
Aug 15, 2015
Messages
2,393
Location
Southeastern Michigan
Thanks for visiting.


CRS--Thanks for the diagram. It helps to have a common set of terminology.

It is a little cool in my shop today but I will try to come up with something interesting. I am sure a warm cup of coffee will be involved.

Jim: Now that I looked at it a little closer, there are probably a few more parts that could be identified: Frog receiver, knob boss, tote boss, and most importantly frog adjustment screw. Most of those would only be of interest to compulsive people (like me) who like to figure out what Type Number their plane is and when it was made. I'll try to alter the original to identify those parts and see what I come up with.

Enjoy your coffee

Nevermind. I found a more detailed diagram from Stanley himself.
 

Attachments

  • Stanley plane parts.jpg
    Stanley plane parts.jpg
    98.9 KB · Views: 306
Last edited:
OP
J

jimreed2160

Well-known member
Joined
Aug 7, 2016
Messages
3,589
Location
Tallahassee FL
CRS--Keep those diagrams coming. The correct term always beats
"thing-a-mbob".

Drives--You had a question about a marking gauge you saw in a video. Thanks for being so perceptive. Woodworking is all about geometry and marking is so very important that woodworkers have developed many marking tools over time. One of the most common gauges used by western ww is the marking gauge. Here is a class photo of some that hang around my shop.

DSCN0821.jpg


The gauge you saw is descended from the Stanley #97. It is a rod with ruler marks and an adjustable stop. One end has a sharp spike and the other end has a sharp cutter wheel that spins.

DSCN0822.jpg


Wood surfaces vary considerably and react differently to marking. The wheel will hardly dent hard woods like maple and tropical woods. For those woods, the spike scratch works best. On soft pine, the wheel makes a nice mark but the spike makes an ugly scratch as you can see.

DSCN0825.jpg


The adjustable dual marking gauges are commonly used to mark out mortices and tenons. Just think--a simple table with a skirt has four legs and each leg needs two mortice and tenon joints. Each mortice needs four marks. So that is four marks x2 or 8 per leg. Four legs need 4x8 or 32 separate marks! This stuff adds up quickly. The clever cabinetmaker will set one gauge for the vertical marks and one gauge for the horizontal marks. Now things are easy.

In addition to marking for mortices and dados, the gauges have a single pin on the other side for single marks.

DSCN0827.jpg


Early woodworkers used striking knives. These were pieces of iron or steel that were sharpened with a bevel on one side. Striking knives are a little more precise than awls, which are also popular markers. Here is a striking knife that I made along with a dual striker and an awl. Both of these tools were made by some of my ww buddies.

Their tools were made as gifts and are very nicely done. My striking knife was made from tool steel and was professionally hardened. BUT--you do not have to expend such effort to make a handy tool. Find yourself a suitable piece of steel, grind it to shape, and put an edge on the end. OR start with a spade bit and grind a sharpened bevel on one end. Then you can sharpen the other end and have a striking knife/awl tool.

All ww need to make marks in wood. Do you have the correct tools for the job? Find or fabricate what you need and your ww projects will immediately improve.
 
To avoid these ads, REGISTER NOW!
Top Bottom