To avoid these ads, REGISTER NOW!

Concealed wiring with surface mounted boxes. Who's done it? Pictures?

C10Dan

Member
Joined
Nov 25, 2016
Messages
21
Location
Buffalo, NY
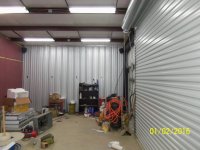
Hey guys, this is my first post, so thanks in advance for your help. I'm in the process of working on an addition to my existing 40x40 pole barn. The new addition is 46x48 with 14' ceiling. Ceilings and walls will be white metal liner. I know it's personal preference, but I don't care for the look of EMT on the walls. I know many of you like it because it gives an "industrial" like look, and say it's easy to make changes down the road.

I personally prefer the look of concealed wiring because IMO it gives a cleaner look. And I honestly have to say that in the past 8-years since my original shop has been in existence, I have never needed/wanted to change my wiring. Nonetheless, I'm considering running MC cable in the walls and using surface mounted boxes placed at 4' high on the girt. I'll also do the same for any 220V receptacles. I know it may be more work then just running EMT on the outside of the liner, but I don't care.

Who out there has done this? And do you have pictures of your install? Open to discussion and welcome your feedback. Thanks.
 
To avoid these ads, REGISTER NOW!

Daedalus

Well-known member
Joined
Sep 28, 2009
Messages
6,020
Why run MC if it's in the walls? Why not regular NM? MC sounds like a real pain to fish through.
 
OP
C

C10Dan

Member
Joined
Nov 25, 2016
Messages
21
Location
Buffalo, NY
Why run MC if it's in the walls? Why not regular NM? MC sounds like a real pain to fish through.

You know I thought about it, and actually that's what I did in my original pole barn. I also had a few rodents in the walls and they love to chew on wiring. So far no problem with my existing shop, but those buggers can be a bear to keep out. They find their way into everything. Also, I don't think fishing the MC will be that big of a problem. The work would be done before installation of the wall liner. Why do you think it would be so much more work then NM? Just curious.
 

Daedalus

Well-known member
Joined
Sep 28, 2009
Messages
6,020
Sorry, I missed the "will be" part. Assumed the walls were already finished.

So you don't want exposed conduit, but you do want surface mounted boxes? I get the exposed conduit part. I have it in my shop and feel like it gets in the way of other things that want to be flush to the wall. But if I had my say I would recess the boxes too.
 

ard

Well-known member
Joined
Feb 16, 2015
Messages
4,391
Location
Sierra Foothills... California
I did my shop with all EMT, buried in the walls. Basically a commerical job. Insultation, sheetrock. Boxes flush to face of the sheetrock with plaster rings. Basically there is a 4x4 box every 6 feet, plus a few 240V outlets. If I ever need to add something, I can put on an extensiion box, run some surface EMT or a whip, and with multiple EMT homeruns to the main panel, adding a circuit is easy.

For OP, not sure what the surface actually IS, and how a flush mount box would work....(ie closure btween edge if box opening, surface and wall plate.
 
OP
C

C10Dan

Member
Joined
Nov 25, 2016
Messages
21
Location
Buffalo, NY
I did my shop with all EMT, buried in the walls. Basically a commerical job. Insultation, sheetrock. Boxes flush to face of the sheetrock with plaster rings. Basically there is a 4x4 box every 6 feet, plus a few 240V outlets. If I ever need to add something, I can put on an extensiion box, run some surface EMT or a whip, and with multiple EMT homeruns to the main panel, adding a circuit is easy.

For OP, not sure what the surface actually IS, and how a flush mount box would work....(ie closure btween edge if box opening, surface and wall plate.

Not sure if I want to try to flush mount boxes in the sheet metal walls. I think it would be a long process to cut in each box, making sure I'm not on a high rib. Also, even though my walls are insulated, I think the idea of cutting into the steel would cause some heat loss around the plugs. Not sure if you can see this picture, but someone on this site surface mounted boxes on steel walls. I actually like the way this looks (especially without the EMT.
 

Attachments

  • 1.jpg
    1.jpg
    25.7 KB · Views: 241
OP
C

C10Dan

Member
Joined
Nov 25, 2016
Messages
21
Location
Buffalo, NY
My outlets are at 4' and its right in the way when I want to lay a sheet of something against the walls, Yes I started doing that after about 15 Years.

I'm actually planning to install my outlets at 4' height along the girt. I don't want to bend over anymore to plug things in. :)
 

TGSjr

Member
Joined
Jan 9, 2015
Messages
6
i put my boxes on top of wall girts
 

Attachments

  • 16-0102 Workshop Interior (7).jpg
    16-0102 Workshop Interior (7).jpg
    137.6 KB · Views: 275

bczygan

Well-known member
Joined
Nov 4, 2009
Messages
22,002
Location
DETROIT! Arsenal of Scrappers
Brick walls in my garage so the side walls got a line of grey Carlon outside boxes and grey PVC conduit surface mounted. Have plastic face plates, soon to be replaced with stainless.

Bill
 
To avoid these ads, REGISTER NOW!

TheEquineFencer

Well-known member
Joined
Jan 15, 2009
Messages
9,278
Location
Farmville, NC 27828
Not sure if I want to try to flush mount boxes in the sheet metal walls. I think it would be a long process to cut in each box, making sure I'm not on a high rib. Also, even though my walls are insulated, I think the idea of cutting into the steel would cause some heat loss around the plugs. Not sure if you can see this picture, but someone on this site surface mounted boxes on steel walls. I actually like the way this looks (especially without the EMT.

Thanks, I thought the picture looked familiar! I saw it and thought...WTF, that looks like my work!.

If it's a steel building, with the girts along the wall, I ran a 3/4 conduit on top of the girt behind the metal panel. My girts were about 8 inches short than the 8ft panels i lined the shop with. about every 10ft I mounted a DEEP 4x4 box. Out of that box I ran BX cable with the PITA to take out once you put them in push lock on connectors. (Don't use them if you even think you might want to take them out). Mount your wall boxes with a couple of GOOD self tapping screws to the girt so the top 1/2 of the box at the rear can have the wire come in from the rear. Mount the box, then mark the hole in the rear, remove the box and knock the hole through the panel. Your wire you are "flexing" out of the trough above will fit through the raised rib. Go get you some aluminum rod like a suspended ceiling is hung with to fish the wire to the box you're going to mount to the wall. Attach the wire with the "snap it" connectors, do your terminations, then screw the box back to the wall.

The "snap it" connectors work great...unless you want to remove them....you'll get frustrated possibly and rip them out...I did a time or two.

You can use that same conduit to run lighting and such as long as you stay within NEC code.
 
Last edited:
OP
C

C10Dan

Member
Joined
Nov 25, 2016
Messages
21
Location
Buffalo, NY
Thanks, I thought the picture looked familiar! I saw it and thought...WTF, that looks like my work!.

If it's a steel building, with the girts along the wall, I ran a 3/4 conduit on top of the girt behind the metal panel. My girts were about 8 inches short than the 8ft panels i lined the shop with. about every 10ft I mounted a DEEP 4x4 box. Out of that box I ran BX cable with the PITA to take out once you put them in push lock on connectors. (Don't use them if you even think you might want to take them out). Mount your wall boxes with a couple of GOOD self tapping screws to the girt so the top 1/2 of the box at the rear can have the wire come in from the rear. Mount the box, then mark the hole in the rear, remove the box and knock the hole through the panel. Your wire you are "flexing" out of the trough above will fit through the raised rib. Go get you some aluminum rod like a suspended ceiling is hung with to fish the wire to the box you're going to mount to the wall. Attach the wire with the "snap it" connectors, do your terminations, then screw the box back to the wall.

The "snap it" connectors work great...unless you want to remove them....you'll get frustrated possibly and rip them out...I did a time or two.

You can use that same conduit to run lighting and such as long as you stay within NEC code.

So if I'm reading this right... You ran 3/4" conduit on top of the wall girt, then you transitioned to a piece of BX cable where you ran into the back of the box. Then did you go back out through that same BX cable to run to the next box down the line? Just wondering how you ran from one box to the next. Thanks for the info.
 

TheEquineFencer

Well-known member
Joined
Jan 15, 2009
Messages
9,278
Location
Farmville, NC 27828
So if I'm reading this right... You ran 3/4" conduit on top of the wall girt, then you transitioned to a piece of BX cable where you ran into the back of the box. Then did you go back out through that same BX cable to run to the next box down the line? Just wondering how you ran from one box to the next. Thanks for the info.

I did normal termination of the BX inside my wall box. I did my connections inside a DEEP 4x4 box that I set inside the top of the girt. Basically I just tapped the wires for the circuit that ran along the top of the girt.

I also ran every other wall receptacle on different circuits. I used two separate breakers with each circuit having its own hot and neutral but I did share the grounds as well as grounding each box with a ground. Use red and black for running the two circuits, then you just need to keep up with which of the correct white wires go to each receptacle. You do not want to get the white wires mixed up with each other.

I also posted a picture on what to use to cut the BX, it makes life a LOT easier.
 

Attachments

  • BX cable coming out of trough mounted 4x4 boxes.jpg
    BX cable coming out of trough mounted 4x4 boxes.jpg
    79.3 KB · Views: 104
  • BX cable, connector and cutter.jpg
    BX cable, connector and cutter.jpg
    130.4 KB · Views: 105

TheEquineFencer

Well-known member
Joined
Jan 15, 2009
Messages
9,278
Location
Farmville, NC 27828
Quote:
Originally Posted by C10Dan View Post
So if I'm reading this right... You ran 3/4" conduit on top of the wall girt, then you transitioned to a piece of BX cable where you ran into the back of the box. Then did you go back out through that same BX cable to run to the next box down the line? Just wondering how you ran from one box to the next. Thanks for the info.
I did normal termination of the BX inside my wall box. I did my connections inside a DEEP 4x4 box that I set inside the top of the girt. Basically I just tapped the wires for the circuit that ran along the top of the girt.

I also ran every other wall receptacle on different circuits. I used two separate breakers with each circuit having its own hot and neutral but I did share the grounds as well as grounding each box with a ground. Use red and black for running the two circuits, then you just need to keep up with which of the correct white wires go to each receptacle. You do not want to get the white wires mixed up with each other.

I hope this edit works ok. I added a picture showing just the Blk Grd and Red wires. Keep in mind as i said before, you want to keep the same white wires going to the same receptacles on the the same circuit.

I also posted a picture on what to use to cut the BX, it makes life a LOT easier.
 

Attachments

  • 4x4 box wiring.jpg
    4x4 box wiring.jpg
    77.7 KB · Views: 58

Norcal

Well-known member
Joined
Mar 16, 2008
Messages
13,758
I did normal termination of the BX inside my wall box. I did my connections inside a DEEP 4x4 box that I set inside the top of the girt. Basically I just tapped the wires for the circuit that ran along the top of the girt.

I also ran every other wall receptacle on different circuits. I used two separate breakers with each circuit having its own hot and neutral but I did share the grounds as well as grounding each box with a ground. Use red and black for running the two circuits, then you just need to keep up with which of the correct white wires go to each receptacle. You do not want to get the white wires mixed up with each other.

I also posted a picture on what to use to cut the BX, it makes life a LOT easier.

What you call "BX" is not BX, the photo shows MC cable, there is a difference and AC "BX" and MC cable have separate articles in the NEC.
 

alfredeneuman

Well-known member
Joined
Mar 3, 2011
Messages
4,581
Location
Fullerton, CA
MC Cable does not require the use of anti-short bushings (The red things). MC Cable uses a mylar jacket that serves the same purpose.

AC Cable ("Bx", I hate to use the term because it refers to a product that doesn't exist any more) only has a paper filler and anti-short bushings are required.

I got this info straight from Southwire's Tech Dept. years ago. They said that they include the bag of anti-shorts with every roll of MC as an "Added optional form of insurance"

AC Cable has an aluminum strip in intimate contact with the armor that serves as a grounding conductor whereas MC Cable has an insulated conductor used for grounding.
 

ard

Well-known member
Joined
Feb 16, 2015
Messages
4,391
Location
Sierra Foothills... California
MC Cable does not require the use of anti-short bushings (The red things). MC Cable uses a mylar jacket that serves the same purpose.

AC Cable ("Bx", I hate to use the term because it refers to a product that doesn't exist any more) only has a paper filler and anti-short bushings are required.

I got this info straight from Southwire's Tech Dept. years ago. They said that they include the bag of anti-shorts with every roll of MC as an "Added optional form of insurance"

AC Cable has an aluminum strip in intimate contact with the armor that serves as a grounding conductor whereas MC Cable has an insulated conductor used for grounding.

Thanks

My bad then, I grew up knowing it as BX, I guess it doesn't exist anymore.

Yeah, me too. Ran a crazy amount wiring in NYC in the 70s and 80s. Prolly still have a soup can with connectors and the little red bushes somewhere...
 

prostreetamx

Well-known member
Joined
Dec 19, 2016
Messages
222
Location
Las Vegas
You will find that MC cable is much more than the cost of Romex, NM cable but if covered up will work the same. I used MC on my first garage due to the fact that my in wall wiring was exposed for several years and subject to potential damage and Romex is required to be covered when exposed in walls. I did end up sheetrocking over it a few years later. I had a lot left over from a commercial side job I did so cost wasn't an issue at that time. I don't have an issue with rodents so I used all Romex, NM on my current garage, all rocked over. One more thought on your MC, they do make double connectors and 90 degree fittings for it that might make the surface mounting of your boxes easier.
 

TheEquineFencer

Well-known member
Joined
Jan 15, 2009
Messages
9,278
Location
Farmville, NC 27828
You will find that MC cable is much more than the cost of Romex, NM cable but if covered up will work the same. I used MC on my first garage due to the fact that my in wall wiring was exposed for several years and subject to potential damage and Romex is required to be covered when exposed in walls. I did end up sheetrocking over it a few years later. I had a lot left over from a commercial side job I did so cost wasn't an issue at that time. I don't have an issue with rodents so I used all Romex, NM on my current garage, all rocked over. One more thought on your MC, they do make double connectors and 90 degree fittings for it that might make the surface mounting of your boxes easier.

LOL, you're right about the cost....to a point...it's VERY labor saving wise the way I did it. Plus the fact I got ALL my cable for free and all I had to buy was the fittings....

I love the stuff now...and still have a fair amount left over. I did my tandem T-8's with it too. I ran 3/4 EMT across the ceiling, attached the fixtures at 14ft off the floor;about a 2-3 ft drop from the roof, with 1/4 thread-all and used the MC to wire out of the 4x4 boxes on the EMT to the fixture. Using the MC like I did was a breeze. Just make sure you get the length right, I didn't own a MC wire and sheath stretcher, so if I screwed up, I had to start over.
 

dw1

Well-known member
Joined
Jan 26, 2015
Messages
1,335
Location
Ky
LOL, you're right about the cost....to a point...it's VERY labor saving wise the way I did it. Plus the fact I got ALL my cable for free and all I had to buy was the fittings....

I love the stuff now...and still have a fair amount left over. I did my tandem T-8's with it too. I ran 3/4 EMT across the ceiling, attached the fixtures at 14ft off the floor;about a 2-3 ft drop from the roof, with 1/4 thread-all and used the MC to wire out of the 4x4 boxes on the EMT to the fixture. Using the MC like I did was a breeze. Just make sure you get the length right, I didn't own a MC wire and sheath stretcher, so if I screwed up, I had to start over.
:thumbup: I have one I don't use anymore, I can send it your way.:D
 

prostreetamx

Well-known member
Joined
Dec 19, 2016
Messages
222
Location
Las Vegas
I'm trying something new for lighting in my new garage. I am installing 3 rows of light tracks on 6 separate switches. The tracks will be mounted with spacers and long screws and I already have wood backing above the ceiling sheetrock. I plan to use various track heads (all LED) and possibly some 4' T-8 or similar fixtures. I will be able to put them anywhere along the track with adaptors that allow you to use standard 3 prong extension cords on the hanging fixtures. Spacing the track away from the ceiling will allow me to add supports for the 4' fixtures. I do this all the time in my current job as a Trade Show electrician which also supplied many of the track heads I will be using.
 
To avoid these ads, REGISTER NOW!
Top Bottom