To avoid these ads, REGISTER NOW!

My 1975 Chevy Dually Build

OP
7

75Dually

Well-known member
Joined
Dec 5, 2013
Messages
444
Location
Lubbock, TX
Today I decided to take one of my junky and rather beat up tail gate panels and see if I could resurrect it. I took some body filler glaze because it is very dense and is much harder than the other body fillers to fill in all the dents and scratches. After I sanded it down smooth I shot several coats of primer on it. Right now it is drying over night and tomorrow I will block it and then give it a silver paint job with a black accent edge.

I also cleaned up the GMC badge and shot it in silver. I will add some red paint to the letters once it is fully dried.

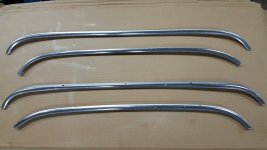
I saw a truck displayed at SEMA on Facebook that had all it's trim painted, and I thought it looked amazing. I will be doing the same treatment to the wrap around rear cab trim too. I thought it was going to be super hard to remove, but all you have to do is remove the 2 nuts that hold the corner trim pieces and then push the center piece out to one side. Lucky for me I did not break any of those ancient plastic mounting tabs. That would have been a disaster! Even a blind squirrel finds a nut on occasion...:lol:
 

Attachments

  • Tail gate 6.jpg
    Tail gate 6.jpg
    101 KB · Views: 111
To avoid these ads, REGISTER NOW!
OP
7

75Dually

Well-known member
Joined
Dec 5, 2013
Messages
444
Location
Lubbock, TX
Some days I feel like I don't get anything done, others I make some head way. Tonight I made some head way. I got the tail gate panel finished sanded and shot the silver paint on it. I also got the emblem cleaned up yesterday and let the silver paint dry over night. Tonight I got the lettering painted red. I think it turned out ok. Once the panel dries I will bolt down the emblem and take a shot of both of them.

Next is the rear cab trim. I will have to do a lot of work on those pieces, they are not in the best of shape right now, but hey sweat equity is so much cheaper than just buying new pieces. Plus I really like the silver on the tail gate panel, so it should be a nice accent to the rest of the truck once it gets it's new shinny coat. :D
 

Attachments

  • Tail gate 7.jpg
    Tail gate 7.jpg
    98.9 KB · Views: 71
  • Tail gate 8.jpg
    Tail gate 8.jpg
    93 KB · Views: 65
OP
7

75Dually

Well-known member
Joined
Dec 5, 2013
Messages
444
Location
Lubbock, TX
I should have posted these the other day but I forgot that I took them. Halloween was a blast! I stuffed some jeans with some old shirts, and used some work boots to make this display. When the wife saw it with the legs sticking out by the passenger door she said I better change it because it looked too real. Not only was I going to scare the kids to much, but the neighbors might just call the cops! So I took this to heart and moved my fake legs to the front... It was a big hit with all the folks out trick or treating.

However the kids would not come near it! They would get on the ground and peer as far as they could to see the rest of the body, blood, and guts! It was too funny!! Now I know a lot of you have done this before because I stole the idea from others... The best part is the fathers that would come up and grab the leg and shake while yelling loudly, it making all the kids scatter!! I went horse from all the laughing.

One of my favorite moments was when this large family had to get a group picture by the body. Man there are just some morbid folks out there! Just could not let that trucker lie in peace!! LOL!!!:lol::D
 

Attachments

  • Dually 39.jpg
    Dually 39.jpg
    53.4 KB · Views: 180
  • Dually 38.jpg
    Dually 38.jpg
    127.5 KB · Views: 226
OP
7

75Dually

Well-known member
Joined
Dec 5, 2013
Messages
444
Location
Lubbock, TX
I think this turned out pretty well. The badge is in ok shape but not perfect. There is only so much you can do with old pot metal badges.
 

Attachments

  • Tail gate 9.jpg
    Tail gate 9.jpg
    98.4 KB · Views: 97
OP
7

75Dually

Well-known member
Joined
Dec 5, 2013
Messages
444
Location
Lubbock, TX
Did some of the tedious stuff tonight. Got the body line on the drivers side lined up. Basically you have to take apart part of the interior to get to the door bolts. Worked my way from the rear to the front, and made 100 little adjustments. Next is the passenger side...
 
OP
7

75Dually

Well-known member
Joined
Dec 5, 2013
Messages
444
Location
Lubbock, TX
Getting back into the groove tonight. I started out with just a couple small items. Got all the drip rails off and then cleaned them up and painted them to make them more presentable. I then sanded down the roof where the drip rails were mounted.

I have also been working slowly around the entire truck on the gaps. I worked on the hood tonight. I've gotten it fairly close now and will get it as close as I can before I shoot the paint.

I know they threw these bodies together super fast. You can tell that little care was taken on certain areas... Of course if it was all perfect I would have nothing to talk about now would I!!! ;)

I still have to smooth out in between the doors where the roof is mounted, and the at the top of the A pillars. That will have to wait until after Thanksgiving. I hope over the break I can get a coat or two of primer on the roof. I hope everyone has a safe and happy holiday!! Hope I have lots to report on in my next post.
 

Attachments

  • Roof 3.jpg
    Roof 3.jpg
    100.6 KB · Views: 51
  • Roof 2.jpg
    Roof 2.jpg
    123.9 KB · Views: 62

bulletpruf

Well-known member
Joined
Nov 28, 2013
Messages
11,088
Location
San Antonio
Just noticed that you were from Lubbock. I bought a 69 Carousel Red GTO Judge from an aircraft hangar in/near Lubbock in 2005 or so. Can't think of the owners name right now, but he's a aircraft propellor repair guy.
 
OP
7

75Dually

Well-known member
Joined
Dec 5, 2013
Messages
444
Location
Lubbock, TX
Just noticed that you were from Lubbock. I bought a 69 Carousel Red GTO Judge from an aircraft hangar in/near Lubbock in 2005 or so. Can't think of the owners name right now, but he's a aircraft propellor repair guy.

There are a lot of awesome cars and trucks in Lubbock! Little to no rust and really good weather is the perfect situation for preservation (as long as you don't count the huge amount of dust build up!). When I want a new project this is the best place to look, ok maybe Arizona can be on that list too... LOL!:lol_hitti
 

bulletpruf

Well-known member
Joined
Nov 28, 2013
Messages
11,088
Location
San Antonio
There are a lot of awesome cars and trucks in Lubbock! Little to no rust and really good weather is the perfect situation for preservation (as long as you don't count the huge amount of dust build up!). When I want a new project this is the best place to look, ok maybe Arizona can be on that list too... LOL!:lol_hitti

I know exactly what you're talking about. I was stationed at Ft Hood for 2 years (although 15 months of that were spent in Iraq). I remember driving around on the country highways and seeing all of the RANDOM stuff sitting out in fields, well-preserved.

I was surprised by the variety of cars that were just sitting -- 40's, 50's, and 60's iron of all sorts. 4 doors, ugly cars, family cars, station wagons, random pickup trucks, etc.

I'm from Louisiana; lots of rain and humidity. The cars from the 40's - 60's have all rusted into the ground or crushed. The ones that were saved from the tin worn or the crusher are the desirable ones -- the 55-57 Chevy's, first generation Camaros, Mustangs, muscle cars, etc.

Scott
 
OP
7

75Dually

Well-known member
Joined
Dec 5, 2013
Messages
444
Location
Lubbock, TX
Just a quick note. I have been working on the truck, but nothing really to report right now. Just doing some body work on the drivers door and getting that cleaned up. With Thanksgiving and all the traveling we did took a lot of time away, but I'm really big about family and spending time with them. If the weather would stop being around the temp of the last ice age I would appreciate it! Supposed to warm up a bit over the weekend so I should be able to get some actual work done.
 

bigpokie

Well-known member
Joined
May 25, 2013
Messages
438
I was just reading through your duallyscene EDC build thread. When you talking about adding the EDC into the accuair ecu system you talk about a video. But I can't click the link. Do you still have that link ?
 
OP
7

75Dually

Well-known member
Joined
Dec 5, 2013
Messages
444
Location
Lubbock, TX
I was just reading through your duallyscene EDC build thread. When you talking about adding the EDC into the accuair ecu system you talk about a video. But I can't click the link. Do you still have that link ?

I just went through my old link and I could not find anything about a video. Can you tell me what page it was on? Maybe that will help me find what you were looking for.

Running an EDC with Accuair is super simple. The compressor clutch runs off the relay that is triggered off the pressure switch at the tank. The system will engage when the pressure drops below the minimum, and shuts off when the switch reads the requested PSI you have set with the Accuair ECU.
 

bigpokie

Well-known member
Joined
May 25, 2013
Messages
438
Sorry for not getting back sooner, I was on the vay kay. I got what you mean by what you wrote here. Thanks again.

Here is a thought though, I want to run a 210 and keep a 480 as a back up. Can I run both comps off of one relay BUUUUT be able to switch between the two in case of emergency ? Say if the York shits the bed, hit a switch or toggle to turn off the York but turn on the viair ? In worse case I can run a switch for both.
 
Last edited:
OP
7

75Dually

Well-known member
Joined
Dec 5, 2013
Messages
444
Location
Lubbock, TX
Sorry for not getting back sooner, I was on the vay kay. I got what you mean by what you wrote here. Thanks again.

Here is a thought though, I want to run a 210 and keep a 480 as a back up. Can I run both comps off of one relay BUUUUT be able to switch between the two in case of emergency ? Say if the York shits the bed, hit a switch or toggle to turn off the York but turn on the viair ? In worse case I can run a switch for both.

Actually I think that you could do that through one relay. As long as you are not energizing both units at the same time like you suggest above. Here is how I would possibly run it. I would use either 2 normal on/off switches, or a 3 way switch (3 way switches are hot on one end, the center is off, and the other end is hot as well). I would prefer a 3 way in this situation because you would never energize 2 items at the same time. Run the power from the relay that would say go to the clutch on the York, and split that line into 2 lines. Then take one of those lines and run it through one of the switches or to one side of the 3 way switch, and then continue on to the intended compressor (York or Viair). It actually is very simple once you lay it out. Take some pics once you do this so we can all learn.

Great idea BTW!:thumbup:
 
OP
7

75Dually

Well-known member
Joined
Dec 5, 2013
Messages
444
Location
Lubbock, TX
Since we have been dealing with these artic blasts I have been stuck inside for the most part. So I decided to make good use of my time. The Hot Wheel is no where near done, it needs a lot of finishing work, but it is something I have been wanting to do for quite some time. Tons of fun!
 

Attachments

  • Dually 45.jpg
    Dually 45.jpg
    32.3 KB · Views: 93
  • Dually 46.jpg
    Dually 46.jpg
    86 KB · Views: 95

xtremek

Well-known member
Joined
Apr 13, 2012
Messages
11,603
Location
St. Johns, Mi
That's so cool. I have all of the JADA toys of my F-150 Screw. Best part was, almost all of them came in the color that matches the truck, black. How did you get the cab cut to stay on?
 
To avoid these ads, REGISTER NOW!
OP
7

75Dually

Well-known member
Joined
Dec 5, 2013
Messages
444
Location
Lubbock, TX
That's so cool. I have all of the JADA toys of my F-150 Screw. Best part was, almost all of them came in the color that matches the truck, black. How did you get the cab cut to stay on?

The sleeper is right now just sitting on there lose, but I will probably glue it on once I get it painted. This is a project I have been wanting to do for quite a while.
 
OP
7

75Dually

Well-known member
Joined
Dec 5, 2013
Messages
444
Location
Lubbock, TX
OK, OK, I have been back on the truck for the past two evenings. Still doing bodywork on the drivers side. Probably a couple more days to get everything on that side finished up. I will take some progress pics tomorrow and show you what I have been doing. I have a couple of holes to fill where the old trim was on the rear of the cab on both sides. Once I get those cleaned up I can then shoot my first coat of primer on the roof. Yeah! Some progress!!

Stay tuned!
 
OP
7

75Dually

Well-known member
Joined
Dec 5, 2013
Messages
444
Location
Lubbock, TX
Sand, sand, sand, sand, repeat.... Have I mentioned before how much I like to sand... Let me tell ya! Found a couple of low spots, body filler is still drying in this shot. Should be able to have those quickly knocked out tomorrow after work. Lots more to do, but making progress!:lol:

Stay tuned!
 

Attachments

  • Dually 49.jpg
    Dually 49.jpg
    141.1 KB · Views: 96
OP
7

75Dually

Well-known member
Joined
Dec 5, 2013
Messages
444
Location
Lubbock, TX
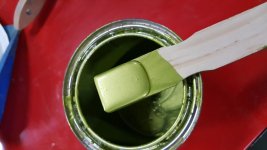
So here is one of the paint colors I am considering. It is a 2003 Saab lemon-lime. I've shot this color before on the roof on my 56 Buick. It changes a lot depending on the light, so it makes for an interesting color. Check it out and let me know what you think.
 

Attachments

  • Saab 2a.jpg
    Saab 2a.jpg
    61.3 KB · Views: 64
  • Saab 1a.jpg
    Saab 1a.jpg
    61.7 KB · Views: 71
  • DSC00013a.jpg
    DSC00013a.jpg
    58.2 KB · Views: 102
  • Paint color idea.jpg
    Paint color idea.jpg
    102.8 KB · Views: 73
OP
7

75Dually

Well-known member
Joined
Dec 5, 2013
Messages
444
Location
Lubbock, TX
Been working on the truck a little every night getting it ready for paint. Man it has been cold, but maybe that is the best time to sand. Hate doing it during the summer when all you do is sweat buckets, so not complaining. I think I have most of the major items addressed on the drivers side, the hood, and the roof. Tomorrow I will get it turned around and start on the passenger side. Just a little update...
 
OP
7

75Dually

Well-known member
Joined
Dec 5, 2013
Messages
444
Location
Lubbock, TX
So I saw a truck done in the green I picked, and... Ug, now I'm back at square one! Dang it! Thought it would look a lot better. Well at least I did not purchase any paint yet. I have my eye on another base color. Not sure yet...

Stay tuned!
 

donnie

Well-known member
Joined
Jan 24, 2007
Messages
953
Location
North Carliona
If you are only going to paint one color on that truck, i think you will need an lighter or mild color that is a big truck, i like that green but...
 
OP
7

75Dually

Well-known member
Joined
Dec 5, 2013
Messages
444
Location
Lubbock, TX
If you are only going to paint one color on that truck, i think you will need an lighter or mild color that is a big truck, i like that green but...

Donnie I think your right. I have another color that I went and looked at today. It is perfect with these big flat panels. So I will give it a couple of days to think about it and then I need to make a decision...:thumbup:
 
OP
7

75Dually

Well-known member
Joined
Dec 5, 2013
Messages
444
Location
Lubbock, TX
Flipped the truck around in the shop today so I can work on the passenger side bodywork now.

I spent the time in between church today getting the bed leveled. I've been noticing that the rear passenger corner of the bed was not right. In the end I cut all the existing mounts, leveled the truck, then spent for what seemed like forever measuring all the points a million times. I finally got it set what I think is right on, and then welded everything back up. I plan on the future to make some heavier mounts instead of the 1" box tubing. Don't like doing things twice, and I want it super strong for the long run.

So much to do, and if the weather will permit hopefully primer the whole truck this week.

Stay tuned!!!
 

Attachments

  • Dually 50.jpg
    Dually 50.jpg
    52 KB · Views: 66
  • Dually 51.jpg
    Dually 51.jpg
    67.2 KB · Views: 65
  • Dually 52.jpg
    Dually 52.jpg
    54.8 KB · Views: 61
OP
7

75Dually

Well-known member
Joined
Dec 5, 2013
Messages
444
Location
Lubbock, TX
Believe it or not I have been working a ton on the truck lately, getting it ready for primer. Just nothing really to take any pics of to show you the progress because it is all just a ton of little work here and there.

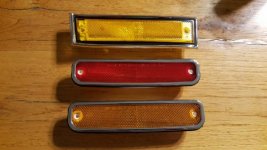
However the UPS guy dropped off some new items this evening. My new marker lamps! They are from LMC. They look amazing and will look even better on the truck. The old OEM lamps are just junk and needed to be replaced. So I had to take a quick pic of them and give you guys a short update. I also got a new Devilbiss paint gun. I have another Devilbiss and a Sata, both are really good guns, but this model came highly recommended. Plus it came with 3 tips, 1.3, 1.5, and a 1.8. So I can't wait to try it out.

My plans are to have the truck ready to shoot by mid week next week. We had some really good rain over the weekend and that slowed my progress, but in West Texas we never complain about rain. We take it when we can get it!

LST is in 4 and 1/2 weeks...

Stay tuned!
 

Attachments

  • New marker lamps.jpg
    New marker lamps.jpg
    52 KB · Views: 33
  • Devilbiss.jpg
    Devilbiss.jpg
    140.4 KB · Views: 37
OP
7

75Dually

Well-known member
Joined
Dec 5, 2013
Messages
444
Location
Lubbock, TX
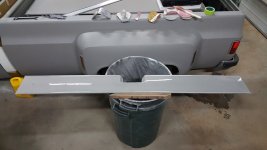
Got the tailgate trim panel finished. I like this grey better than the first go around. It will be a good accent color.

At least this is something I can check off my list of to do's!

Now on to harder items...

Stay tuned!;)
 

Attachments

  • Tail gate 10.jpg
    Tail gate 10.jpg
    99.4 KB · Views: 71
OP
7

75Dually

Well-known member
Joined
Dec 5, 2013
Messages
444
Location
Lubbock, TX
OK here is a big announcement!

I have been working on getting this truck ready for paint for quite some time, most of you who have been following my build already know this. The big thing is that I'm not going to paint it. I'm going to wrap it. The list of reasons is actually fairly long, and I'm going to give this a try. In the last picture I posted the tailgate trim was wrapped. I bet most of you thought it was paint. The results are really good in my opinion.

So as soon as I am done with all the body work it will get wrapped. The picture below shows several samples I laid out on the hood. I chose the blue that is in the circle. You can also see a piece of the rear cab trim that I have done in the same grey as the tailgate panel. The blue is going to be my primary color and the grey the accent color. The blue is a Porsche GT3 blue, and the grey they call Elephant Grey.

The brand I chose was Vvivid vinyl. They are rated very high and so far I have liked the way it applies and it is very easy to work with. Unlike paint if you mess it up, you simply pull it back up, heat it up, and it will take all the wrinkles out and you go at it once again. This is an amazing substance to work with, much higher tech than you would think.

I know you are going to have a ton of questions. I will try my best to answer them as always, but understand I'm in a time crunch for LST so I will do the best I can.

I hope to log this portion of the build fairly closely. For those guys out there on a budget this is a super way to finish out your ride and not break the bank like paint can.

Stay tuned!
 

Attachments

  • Colors 1a.jpg
    Colors 1a.jpg
    57.2 KB · Views: 89
To avoid these ads, REGISTER NOW!
Top Bottom