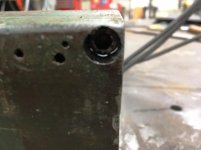
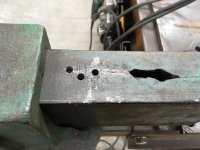
Hey guys, new to the forum so Hello! I ran across an old Prentiss Bulldog vise and wondered what would be the best way to repair a very large crack (see pic). I have a little fab shop where I make wrought iron handrails and other items so I could probably fix it if I new the correct way to go about it. Thanks

You are using an out of date browser. It may not display this or other websites correctly.
You should upgrade or use an alternative browser.
You should upgrade or use an alternative browser.
Prentiss vise repair?
- Thread starter Alabass
- Start date


Seppala
Well-known member
Hey guys, new to the forum so Hello! I ran across an old Prentiss Bulldog vise and wondered what would be the best way to repair a very large crack (see pic). I have a little fab shop where I make wrought iron handrails and other items so I could probably fix it if I new the correct way to go about it. Thanks
I've got a Prentiss vise with the almost the same problem but even worse. I'm missing half of the cracked tail. Also interested on how to best fix it.
thehorse13
Well-known member
The fix is to find a replacement dynamic jaw.
drivesitfar
Well-known member
Alabass: are you a skilled Braze welder? there are several slide repair fixes on the VISE REPAIR 101 thread so take a look and here's the link:
http://www.garagejournal.com/forum/showthread.php?t=252830
if you do end up brazing the crack I've heard heating up the cast nice and hot after cleaning the break real well and creating a nice V is one part and then so it doesn't crack have an oven preheated to 450 or so and stick the vise part in the oven and gradually turn the heat down. or have a BBQ heated up or i guess sticking it in sand works too.
or find another Prentiss with the same # on it with a bad static and a good dynamic and slide and make one good vise.
welcome to GJ and take plenty of pictures. BTW what model # is your vise?
http://www.garagejournal.com/forum/showthread.php?t=252830
if you do end up brazing the crack I've heard heating up the cast nice and hot after cleaning the break real well and creating a nice V is one part and then so it doesn't crack have an oven preheated to 450 or so and stick the vise part in the oven and gradually turn the heat down. or have a BBQ heated up or i guess sticking it in sand works too.
or find another Prentiss with the same # on it with a bad static and a good dynamic and slide and make one good vise.
welcome to GJ and take plenty of pictures. BTW what model # is your vise?
Perrorojo
Well-known member
I repaired one like that a long time ago. I ground the crack out and then I put it on the wood stove and brought it up to about 500 degrees and then welded it up. Put it back on the stove and let it cool real slow. Not restoration quality but it's certainly useable.
Alabass: are you a skilled Braze welder? there are several slide repair fixes on the VISE REPAIR 101 thread so take a look and here's the link:
http://www.garagejournal.com/forum/showthread.php?t=252830
if you do end up brazing the crack I've heard heating up the cast nice and hot after cleaning the break real well and creating a nice V is one part and then so it doesn't crack have an oven preheated to 450 or so and stick the vise part in the oven and gradually turn the heat down. or have a BBQ heated up or i guess sticking it in sand works too.
or find another Prentiss with the same # on it with a bad static and a good dynamic and slide and make one good vise.
welcome to GJ and take plenty of pictures. BTW what model # is your vise?
Model 94
drivesitfar
Well-known member
ALA: good luck on your braze or weld and like i said if you might post up more pictures over on the vise repair 101 thread or post up your repair over there when you are done it would be much appreciated. the reason i started that thread a couple years ago was because there are so many of these great little restoration projects that the members take the time to write that are too hard to find so having them all in one thread at least you can just search there even if it is getting a bit big.
here's a link to Dayid's vise wiki showing more information about your vise and maybe a few others you didn't know about.
http://scuttle.dayid.org/wiki/index.php/Prentiss_Vise
that crack you have is fairly common with Prentiss vises probably because of the way they cast the vise and because old timers used to use the back of the slide as an anvil and beat on it.
good luck
here's a link to Dayid's vise wiki showing more information about your vise and maybe a few others you didn't know about.
http://scuttle.dayid.org/wiki/index.php/Prentiss_Vise
that crack you have is fairly common with Prentiss vises probably because of the way they cast the vise and because old timers used to use the back of the slide as an anvil and beat on it.
good luck
Hey guys, new to the forum so Hello! I ran across an old Prentiss Bulldog vise and wondered what would be the best way to repair a very large crack (see pic). I have a little fab shop where I make wrought iron handrails and other items so I could probably fix it if I new the correct way to go about it. Thanks
Do you have a stick or TIG welder available?
I would everything clean, grind down to bare metal and then do some measuring. You want the end to be the correct width or it won't go back in the body of the vise.
Using clamps to hold the dimensions correctly, I'd put a bead across the vertical face of the end before doing anything else. High nickel rod and preheat, followed by slow cool (even covering it in a welding blanket, or similar will help) and it's not a bad idea to peen each bead to stress relieve it immediately. For the top where the crack is really big you'll probably need a copper backing plate on the bottom so you can get it built up properly.
In reality, if you weld across the back of the slide so it won't spread open during use, you could use it as is without issue.
drivesitfar
Well-known member
Ala: GMan's got great advice including using it without repairing it completely. some of the guys here drill a hole at the end of the crack on their slides to stop it from cracking anymore and wondering if that's maybe what your prior owner did and then it busted off a few more pieces.
in any case you have about 100 year old vise so finding parts for it are almost as rare as HEN'S TEETH are so good luck.
in any case you have about 100 year old vise so finding parts for it are almost as rare as HEN'S TEETH are so good luck.
The 'thin area' or 'weak area' of a Prentiss vise beam is thought to be a foundry error in the casting, with a bit of a 'cold shut' area down the centre of the beam, as the metal ran in around the core and congealed in place. It might be that this weakness is found in the beams which were the last poured in a pouring operation, when the iron had begun to cool slightly.
I've done a couple of those, and my own preference is for brazing with the torch, after a good preheat of the casting. Improvising any good method to slow the cooling as much as may be done is vitally important, of course. Peening the braze as it cools helps to minimise stresses. (you will hear differences of opinion about that detail......some say you should just let the braze cool, I prefer to peen a braze, myself, if its in a relatively thin section......as the old saying goes, 'ya pays yer money, and ya takes yer choice, see?)
A small drilled 'stop hole' just past the end of the crack, and a good clean 'V' are necessary. The 'V' should be finished with a clean rotary file, not a grinding wheel. The grinding wheel will leave bits of material on the ground surface, which will contaminate a braze. Clamping the end of the beam to maintain parallelism will be obvious.
If you've an open area, just form a little piece of thin (10ga. or so) sheet steel and wedge it in place as a 'backer'. It will be brazed to the casting, and left in situ.
After the brazed casting is fully cooled, chip away all the glassy flux, and set the beam up in a vertical mill. Use a feeler to set the end-mill .001-.002 clear of the undamaged surface of the beam, mill the braze down, then fair in the last thou by polishing with some fine (320, followed by 400) emery paper.
cheers
Carla
I've done a couple of those, and my own preference is for brazing with the torch, after a good preheat of the casting. Improvising any good method to slow the cooling as much as may be done is vitally important, of course. Peening the braze as it cools helps to minimise stresses. (you will hear differences of opinion about that detail......some say you should just let the braze cool, I prefer to peen a braze, myself, if its in a relatively thin section......as the old saying goes, 'ya pays yer money, and ya takes yer choice, see?)
A small drilled 'stop hole' just past the end of the crack, and a good clean 'V' are necessary. The 'V' should be finished with a clean rotary file, not a grinding wheel. The grinding wheel will leave bits of material on the ground surface, which will contaminate a braze. Clamping the end of the beam to maintain parallelism will be obvious.
If you've an open area, just form a little piece of thin (10ga. or so) sheet steel and wedge it in place as a 'backer'. It will be brazed to the casting, and left in situ.
After the brazed casting is fully cooled, chip away all the glassy flux, and set the beam up in a vertical mill. Use a feeler to set the end-mill .001-.002 clear of the undamaged surface of the beam, mill the braze down, then fair in the last thou by polishing with some fine (320, followed by 400) emery paper.
cheers
Carla
crguy
Well-known member
After the brazed casting is fully cooled, chip away all the glassy flux, and set the beam up in a vertical mill. Use a feeler to set the end-mill .001-.002 clear of the undamaged surface of the beam, mill the braze down, then fair in the last thou by polishing with some fine (320, followed by 400) emery paper.
cheers
Carla
I was with you until that last paragraph which I think is unnecessary overkill.
I would just clean up the braze with a small angle grinder and a few strokes of a file. Chances are the OP doesn't have a mill anyway.

royce
Well-known member
Great post Carla,The 'thin area' or 'weak area' of a Prentiss vise beam is thought to be a foundry error in the casting, with a bit of a 'cold shut' area down the centre of the beam, as the metal ran in around the core and congealed in place. It might be that this weakness is found in the beams which were the last poured in a pouring operation, when the iron had begun to cool slightly.
I've done a couple of those, and my own preference is for brazing with the torch, after a good preheat of the casting. Improvising any good method to slow the cooling as much as may be done is vitally important, of course. Peening the braze as it cools helps to minimise stresses. (you will hear differences of opinion about that detail......some say you should just let the braze cool, I prefer to peen a braze, myself, if its in a relatively thin section......as the old saying goes, 'ya pays yer money, and ya takes yer choice, see?)
A small drilled 'stop hole' just past the end of the crack, and a good clean 'V' are necessary. The 'V' should be finished with a clean rotary file, not a grinding wheel. The grinding wheel will leave bits of material on the ground surface, which will contaminate a braze. Clamping the end of the beam to maintain parallelism will be obvious.
If you've an open area, just form a little piece of thin (10ga. or so) sheet steel and wedge it in place as a 'backer'. It will be brazed to the casting, and left in situ.
After the brazed casting is fully cooled, chip away all the glassy flux, and set the beam up in a vertical mill. Use a feeler to set the end-mill .001-.002 clear of the undamaged surface of the beam, mill the braze down, then fair in the last thou by polishing with some fine (320, followed by 400) emery paper.
cheers
Carla
I would add that the bevels for a brazed joint differ from a welded joint in that the bevels should have a rounded profile to prevent burning the corner of the bevel when brazing.
Royce
Mark in Indiana
Well-known member
Alabas,
Welcome to the group.
I have a No.54 with a slide crack, that I bought to see if I could make that repair.
Carla's post really summed it up well.
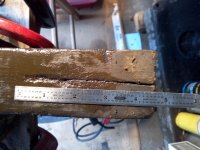
The only thing that I would like to ad is that I drilled and tapped a hole at the end of the slide. Then I installed a 1/4"-20, grade 8 socket head cap screw and gorilla tightened it to draw the crack together. In my case, the crack at caused the slide to be >.100" wider than the area near the jaw that wasn't cracked. The only other thing that I did different was that I used a portable belt sander to finish off the braze and give the overall slide a consistent brushed look.
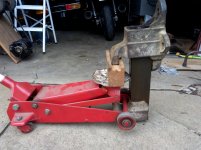
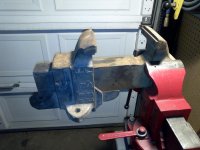
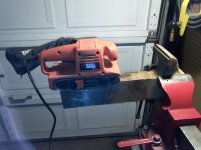
Here are some pictures below:
1st picture; The crack.
2nd picture; Using a #7 drill, I drilled almost all the way through. Then using a 1/4" drill, I drilled through the slide up to the crack. After that, using a 3/8" drill, I drilled down 1/2" to countersink the socket head cap screw. Lastly, I tapped the #7 hole with a 1/4-20 starter & bottom tap.
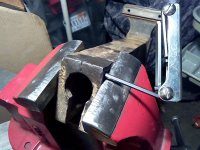
3rd picture; Heavily clamping down on the end of the slide makes it easier to gorilla tighten the screw. This will help prevent the threaded hole from being stripped out. I'll braze over the countersunk screw hole.
4th picture; I drilled some small holes at the other end of the crack to relieve any stress that would cause the crack to grow. After that, I ground a V along the crack, then brazed the crack and the screw hole.
NOTE: Sorry I don't have any pictures of the brazing at this time.
5th picture; A little time with a portable belt sander to finish out the slide. I was also able to sand down areas that were mushroomed out by using the slide as an anvil.
6th picture; Testing with the stationary body to see that the dynamic jaw will move smoothly.
7th picture; This is how I had to remove the dynamic jaw from the stationary jaw body because of the wide area in the slide caused by the crack.
At this time, the vise is all masked up in the paint room. Sorry I won't have any finished pictures until the painting is done.
Welcome to the group.
I have a No.54 with a slide crack, that I bought to see if I could make that repair.
Carla's post really summed it up well.
The only thing that I would like to ad is that I drilled and tapped a hole at the end of the slide. Then I installed a 1/4"-20, grade 8 socket head cap screw and gorilla tightened it to draw the crack together. In my case, the crack at caused the slide to be >.100" wider than the area near the jaw that wasn't cracked. The only other thing that I did different was that I used a portable belt sander to finish off the braze and give the overall slide a consistent brushed look.
Here are some pictures below:
1st picture; The crack.
2nd picture; Using a #7 drill, I drilled almost all the way through. Then using a 1/4" drill, I drilled through the slide up to the crack. After that, using a 3/8" drill, I drilled down 1/2" to countersink the socket head cap screw. Lastly, I tapped the #7 hole with a 1/4-20 starter & bottom tap.
3rd picture; Heavily clamping down on the end of the slide makes it easier to gorilla tighten the screw. This will help prevent the threaded hole from being stripped out. I'll braze over the countersunk screw hole.
4th picture; I drilled some small holes at the other end of the crack to relieve any stress that would cause the crack to grow. After that, I ground a V along the crack, then brazed the crack and the screw hole.
NOTE: Sorry I don't have any pictures of the brazing at this time.
5th picture; A little time with a portable belt sander to finish out the slide. I was also able to sand down areas that were mushroomed out by using the slide as an anvil.
6th picture; Testing with the stationary body to see that the dynamic jaw will move smoothly.
7th picture; This is how I had to remove the dynamic jaw from the stationary jaw body because of the wide area in the slide caused by the crack.
At this time, the vise is all masked up in the paint room. Sorry I won't have any finished pictures until the painting is done.
Attachments
-
 PRENTISS 54C.jpg146.4 KB · Views: 73
 -
 PRENTISS SLIDE CRACK REPAIR10.jpg141 KB · Views: 81
 -
 PRENTISS SLIDE CRACK REPAIR9.jpg136.1 KB · Views: 70
 -
 PRENTISS SLIDE CRACK REPAIR8.jpg142.3 KB · Views: 70
 -
 PRENTISS SLIDE CRACK REPAIR4.jpg89.1 KB · Views: 70
 -
 PRENTISS SLIDE CRACK REPAIR2.jpg133.8 KB · Views: 71
 -
 PRENTISS 54G.jpg141.7 KB · Views: 74
Last edited:
I was with you until that last paragraph which I think is unnecessary overkill.
I would just clean up the braze with a small angle grinder and a few strokes of a file. Chances are the OP doesn't have a mill anyway.
Hello, crguy,
Yes, you are right, as you say, cleaning up the braze with an angle grinder....or a disc-sander, for that matter, and doing a touch of filing would make an entirely adequate, serviceable repair.
Then why should anyone take the time to be 'fancy', with the technique i mentioned?.......I have to admit that there is 'no good reason' whatever, other than a bit of hobbyist grade amusement to be found in doing 'aesthetic restoration', i. e., 'making it look pretty'..... : )
cheers
Carla
yhprum
Well-known member
How about drawing the crack together, fabricate a strap to cover the crack (across the aft side), drill and tap to attach the strap with two bolts to stop the crack spreading open under load? looks like no need to stop drill the other end as it stops at the hole.
Mark in Indiana
Well-known member
Then why should anyone take the time to be 'fancy', with the technique i mentioned?.......I have to admit that there is 'no good reason' whatever, other than a bit of hobbyist grade amusement to be found in doing 'aesthetic restoration', i. e., 'making it look pretty'..... : )
cheers
Carla
For me: The repair job has to be done to the best of my abilities, both functionally and aesthetically. My Prentiss vise has to be one that I would be proud to sell.
For me: The repair job has to be done to the best of my abilities, both functionally and aesthetically. My Prentiss vise has to be one that I would be proud to sell.
Hi, Mark,
Its a subtle difference in philosophies, I suppose, but if I was repairing something to sell, I'd stop at not much beyond a 'best commercial practice' sound and serviceable repair, as all too many prospective clients are unwilling to pay for aesthetic work on a piece of industrial shop equipment. (and there are exceptions, to be sure, e. g. the mega-dollar Corvette/Porsche owners with spotless 'display garages'.......someone will, eventually, make a jolly fortune selling highly polished and chrome-plated....but with proper first-class copper/nickel/chrome work, of course.....vises to such folk.)
Restoring small equipment and tooling for my own use is a different story.....I can take the time to be finicky/perfectionistic as a hobby tweak, and call it 'amusement'.
And....in that vein, I'll offer you a suggestion, if I may.......try polishing out the beam on that vise, using 320, then 400 over a block, and then doing either engine-turning (some call it 'damascening') or ornamental half-moon flaking. Once the beam is polished a bit, hundreds of tiny scars may be noticeable.....but when the surface is flaked or engine-turned, those little scars seem to disappear, as if by 'magic'.....or, if you won't buy 'magic', how about 'optical illusion'?
Flaking is really easy, with a bit of practice......you can find videos on the internet which demonstrate the technique, using a 1" or 1-1/4" Anderson carboloy-tip scraper, and a soft hammer. (the old-time machine fitters would strike the scraper with the heel of a hand....but they were a far tougher lot than ever I was) You'll be surprised at just how quick and easy it is to run ornamental moons nicely on a part the size of your vise beam. (actually, I use a Biax flaker, myself, its even easier)
Doing engine-turning, with, say, a 1/2" abrasive pad, is another 'looks pretty' finish which is easy to do, and costs little for tooling.
cheers
Carla
Mark in Indiana
Well-known member
Thanks Carla. I'll have to look into flaking. Looks like a good challenge.


kwoswalt99
Well-known member
The 'thin area' or 'weak area' of a Prentiss vise beam is thought to be a foundry error in the casting, with a bit of a 'cold shut' area down the centre of the beam, as the metal ran in around the core and congealed in place. It might be that this weakness is found in the beams which were the last poured in a pouring operation, when the iron had begun to cool slightly.
That might be true, but I think problem was mostly their materials, and the fact that they used a hollow slide, thinner than most. The rest of the casting certainly isn't any stronger.
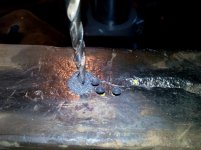
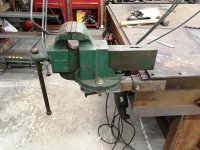
Did a little work on the vise just to avoid any further cracking while it's in use. Drilled some holes to stop the crack. Noticed the metal was pretty thick where these holes were drilled. Also, drilled out one side of the slide to accept an allen head bolt and drilled and tapped the other side to pull the crack together. The small holes on the side in the second pic looks like where there were bubbles in the original casting.