To avoid these ads, REGISTER NOW!

Suggestions for new (to me) Saylor Beall

BigBair

Well-known member
Joined
Mar 30, 2015
Messages
48
Location
PA
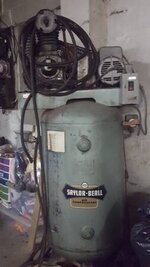
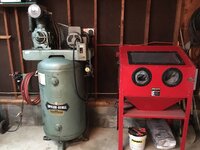
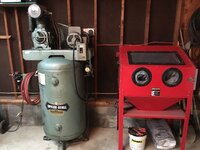
I just picked up an 80 gallon Saylor Beall off Craigslist for my garage. It's an older model but I'm not sure how old yet. It has a 3hp single phase Baldor motor on it. The previous owner told me it worked fine, then her Ex husband decided to move it across the shop and it never turned back on. Kinda sounds like he just didn't wore it up right to me.

I'm anxious to start tinkering with it, but I had to transport it on its side and did not drain the oil. I'm not sure how I should proceed. I'm thinking maybe let it sit for a couple days before even trying to get the motor running for fear of damaging the compressor if/when it does start.

Any suggestions?

Also, I know nothing about compressor wiring. I am pretty comfortable with normal household wiring and low voltage though.

Oh yeah. Best part is the price. I picked it up for $200!
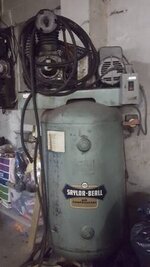
f1677fe2c09e92d46b1a7ad935cc49d6.jpg
 

Attachments

  • f1677fe2c09e92d46b1a7ad935cc49d6.jpg
    f1677fe2c09e92d46b1a7ad935cc49d6.jpg
    32 KB · Views: 3
Last edited:
To avoid these ads, REGISTER NOW!

The Tool Tyrant

ALLIANCE MEMBER
Joined
Dec 19, 2011
Messages
2,182
Location
Bonita, Ca. (San Diego)
Well as commonly stated on this site when someone makes a great score...

YOU ****!...all kidding aside, you made a great score! Believe it or not, I just picked up a Saylor -Beall 705 pump today for $100 (pump only) They're great, reliable good ol' cast iron pumps that just keep on truck'n.

I see in your photo that the oil is at the correct level in the sight glass, so I wouldn't concern yourself with letting it 'sit' before running it. I would however get the correct filter element and cover, as it needs it for pump longevity and it quiets it down considerably.

As for wiring it in, 220v single phase, just need # 10 awg wire and a 30 amp breaker and you should be pumping air. :thumbup:

I could have sworn I read 5HP when I first read this...are you screwing with me? and what happened to the second photo?
 
Last edited:
OP
B

BigBair

Well-known member
Joined
Mar 30, 2015
Messages
48
Location
PA
I did say 5HP and had a second photo originally. Lol

I had *thought* it was a 5HP when I was buying it but I finally got a chance to look it over a little better and it is a 3HP.

I deleted the second photo because I realized I had a big puddle of brake fluid in the background. Lol

0169a77f9ba27b76331c5349f90aa314.jpg90afd4f58cac7e4a6248303685254471.jpg

And I believe I found the wiring problem. According to the HIGH VOLTAGE Diagram the wiring connections are

1 -> line
2 ->3
8->9
4->5-> line

838895195bd253237aac1fc0286229bb.jpg

It was wired

1->line
2->3
5->9
4->8-> line

3409dbf9e2457f6715c3ebf29f90ad97.jpg


I have no idea why the guy would have been messing with the wires connected to the motor when he moved it but they had electrical tape that was *fairly* new over some little copper crush sleeves. I'm rewiring the connections like the diagram shows and using some wire nuts like normal.
 

Attachments

  • 838895195bd253237aac1fc0286229bb.jpg
    838895195bd253237aac1fc0286229bb.jpg
    257.8 KB · Views: 3
  • 0169a77f9ba27b76331c5349f90aa314.jpg
    0169a77f9ba27b76331c5349f90aa314.jpg
    806.6 KB · Views: 4
  • 90afd4f58cac7e4a6248303685254471.jpg
    90afd4f58cac7e4a6248303685254471.jpg
    731.1 KB · Views: 2
  • 3409dbf9e2457f6715c3ebf29f90ad97.jpg
    3409dbf9e2457f6715c3ebf29f90ad97.jpg
    600.6 KB · Views: 2
OP
B

BigBair

Well-known member
Joined
Mar 30, 2015
Messages
48
Location
PA
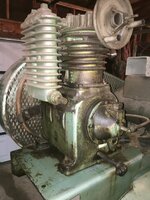
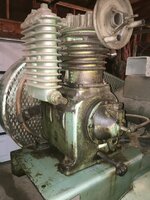
Here are a couple shots of the compressor.

Pump has numbers- 4045
Crankcase has numbers- 4048

f3e6852630f6b3102f59bdcc01e63443.jpgc59227a0d63e6e3e784a16c76c670edf.jpg738920c395228943f151f13a6c58e4c8.jpg047237d9a5b3f9a6fb73fd81b02a4269.jpg
 

Attachments

  • 047237d9a5b3f9a6fb73fd81b02a4269.jpg
    047237d9a5b3f9a6fb73fd81b02a4269.jpg
    1.2 MB · Views: 2
  • 738920c395228943f151f13a6c58e4c8.jpg
    738920c395228943f151f13a6c58e4c8.jpg
    850 KB · Views: 2
  • c59227a0d63e6e3e784a16c76c670edf.jpg
    c59227a0d63e6e3e784a16c76c670edf.jpg
    864.3 KB · Views: 2
  • f3e6852630f6b3102f59bdcc01e63443.jpg
    f3e6852630f6b3102f59bdcc01e63443.jpg
    863 KB · Views: 2

AJ1978

Well-known member
Joined
Apr 27, 2010
Messages
239
Location
Jamestown, PA
30 amp breaker and #10 wire... 30 amp is MAX breaker to install on #10 wire. And even with the draw of the compressor. 50 amp WILL not protect the circuit properly in the event of an overload.

From the looks of the serial # on the pump its a 1984
 
Last edited:

AJ1978

Well-known member
Joined
Apr 27, 2010
Messages
239
Location
Jamestown, PA
I would as others said do the following:
Make sure it pumps first
Change oil out. A good SAE 30 NON DETERGENT oil first.
Clean up the outside, (looks like at one time it was used hard)
When Cleaning up the pump, I use mineral spirits first on rags ( Do not throw in trash in garage put outside in metal can)
Then I use Go Jo wipes, don't ask me why but they clean up well
GET the correct air filter, and housings ( VERY IMPORTANT)
Once you run it, after cleaning look for where the leaks are coming from, maybe get a gasket set.

Should last quite a while.
 
OP
B

BigBair

Well-known member
Joined
Mar 30, 2015
Messages
48
Location
PA
Hopefully I will get it running today. I have a 30 amp breaker available in my panel but I need to pick up some wire.

The compressor actually come with its old power supply also- some of the old bx cable with cloth insulation and a 30 amp fused disconnect. I removed both last night when I was rewiring the motor connections.

I agree it looks like it was used hard at one time. The areas you can actually see green paint around the compressor took some scrubbing with WD40 and some scotch brite pads. I was testing to see how bad it would be to clean up. I believe I will give the mineral spirits and Go Jo wipes a try.

As far as the air filter housing goes where would I find one? I briefly looked yesterday evening but hadn't located one yet. The filter itself seemed fairly easy to locate but the housing not so much.
 

FishingMan

Well-known member
Joined
Feb 18, 2015
Messages
272
Location
PA
Man you stole that. I paid $650 for mine. I love it. It runs quiet. Plenty of air. Should last forever. Clean it off . Change the oil in it.use the right oil it's not cheap go to a compressor store or buy a gallon online. Put a new air filter on it and run it for the rest of your life.
 

IowaDon

Well-known member
Joined
Nov 2, 2016
Messages
103
Location
SW IA
Make sure you verify the diameter of the outlet pipe before you order. The version I linked to is 1", which is common for your size compressor, but definitely check.

Sent from my XT1254 using Tapatalk
 

MEngineer

Well-known member
Joined
Apr 13, 2015
Messages
345
Location
Everett, Wa
Check McMaster Carr for the air filter stuff. I believe that I have the same one on my Quincy. They had by far the best price for the filter elements. Or it may be cheaper since you are missing the cap to buy a whole new filter. Search soldberg filter on Amazon.
 

The Tool Tyrant

ALLIANCE MEMBER
Joined
Dec 19, 2011
Messages
2,182
Location
Bonita, Ca. (San Diego)
its strange that the casting on left side of casing doesn't say made in USA

I'm thinking that they started casting 'MADE IN USA' after the imported clones started showing up. I have an older (mid-seventies) 703 that I've owned since new and an older 705 pump that I scored yesterday and neither have the
'MADE IN USA' casting.
I'll shoot an e-mail to Saylor - Beall and inquire as I've seen this issue brought up a few times on GJ.
 
OP
B

BigBair

Well-known member
Joined
Mar 30, 2015
Messages
48
Location
PA
Make sure you verify the diameter of the outlet pipe before you order. The version I linked to is 1", which is common for your size compressor, but definitely check.


I will measure it. I took it off a few minutes ago and it was a pretty big diameter. I'm thinking it may be bigger than 1".

I'm thinking that they started casting 'MADE IN USA' after the imported clones started showing up. I have an older (mid-seventies) 703 that I've owned since new and an older 705 pump that I scored yesterday and neither have the

'MADE IN USA' casting.

I'll shoot an e-mail to Saylor - Beall and inquire as I've seen this issue brought up a few times on GJ.


I was wondering about that. I have no reason to believe this wouldn't be the original compressor but who knows. The paint seems to match after I take the layers of grime off of it. Lol
 
OP
B

BigBair

Well-known member
Joined
Mar 30, 2015
Messages
48
Location
PA
I have a question about the wiring- this compressor doesn't have a ground. I understand that 220v equipment doesn't require a neutral or ground, but would it be a good idea to go ahead and run a ground wire to the baseplate?
 
To avoid these ads, REGISTER NOW!

md21722

Well-known member
Joined
Nov 30, 2015
Messages
1,840
Location
Mt Juliet, TN
30 amp breaker and #10 wire... 30 amp is MAX breaker to install on #10 wire. And even with the draw of the compressor. 50 amp WILL not protect the circuit properly in the event of an overload.

From the looks of the serial # on the pump its a 1984

I think the original comment about 50 amp was deleted, but the above is also wrong. Motor circuits are wired differently than non-motor circuits. NEC states to go by their published tables based on HP. In this case, wire must be sized to 125% of 17A and breaker can be 250% of 17A as long as the motor has thermal protection. In reality a 3 HP would probably work fine on a 20A breaker, but 30A is probably most commonly used.
 

Bert_

Well-known member
Joined
Dec 24, 2016
Messages
9,766
Location
NW Iowa
I have my doubts that the wiring was at fault. It sounds like the only thing you changed was to swap 5 & 8 which, on a single phase motor, is what you do to reverse rotation. I would double check that your compressor is spinning the correct rotation.
Yes you should run a ground, it should connect to a green screw on the motor or pressure switch, If no screw is present then solidly connecting it to anything metal would be fine.

A 30A breaker would be about right. The maximize breaker size is 250% of FLA, but it is ok to go smaller.
*edit- looks like some one beat me to it.
 
Last edited:
OP
B

BigBair

Well-known member
Joined
Mar 30, 2015
Messages
48
Location
PA
I ran 10-2 on a 30 amp breaker and ran the ground wire to the base where the starter bolts on. I have not found a green screw or wire anywhere on the compressor.

So if the motor is spinning backward will the compressor build pressure? Which direction should it be turning? I ran it up to 175 psi and the pressure switch shut it off. When it got to around 150 psi this thing started bleeding some air off occasionally though. Not sure what it is but it stopped when the compressor shut off.

3b51b5da3d39bae3942174d3ad9e281b.jpg
 

Attachments

  • 3b51b5da3d39bae3942174d3ad9e281b.jpg
    3b51b5da3d39bae3942174d3ad9e281b.jpg
    776.3 KB · Views: 3

md21722

Well-known member
Joined
Nov 30, 2015
Messages
1,840
Location
Mt Juliet, TN
Yes the compressor will build pressure in either direction. There should be an arrow on the flywheel. If not, I believe all Saylor Beall's are intended to run CCW. Air should be blowing over the pump towards the air filter.
 
OP
B

BigBair

Well-known member
Joined
Mar 30, 2015
Messages
48
Location
PA
Good catch on the wires. It was spinning backward- there is an arrow on the flywheel. I just switched them back to the way they were and it is spinning the right direction now.

That makes the issue with it not running after the previous owner moved it more interesting.
 

The Tool Tyrant

ALLIANCE MEMBER
Joined
Dec 19, 2011
Messages
2,182
Location
Bonita, Ca. (San Diego)
its strange that the casting on left side of casing doesn't say made in USA

I'm thinking that they started casting 'MADE IN USA' after the imported clones started showing up. I have an older (mid-seventies) 703 that I've owned since new and an older 705 pump that I scored yesterday and neither have the
'MADE IN USA' casting.
I'll shoot an e-mail to Saylor - Beall and inquire as I've seen this issue brought up a few times on GJ.

Saylor-Beall Already got back to me, the following is their response to the above question...

You are correct in this reasoning. I asked around our factory and while I couldn't come up with an exact date, it appears we started doing it some time in the mid 80's in response to our compressor getting cloned. It's important to check the pump itself, however, because many pumps have been switched out over the years, so an original saylor-beall tank could have a newer clone compressor pump on top. There are two other easy tells for our clones (besides serial numbers). First is we believe we have always cast part numbers directly into our parts. Our part numbers are 4 digit numbers, so you should be able to find a casting somewhere on the pump with the part number. Second, all of our pump's screws and bolts are in the imperial system, while all of the clones are in the metric system.

Hope that helps!


Andrew McFee
Marketing Director
Saylor-Beall Manufacturing
 
OP
B

BigBair

Well-known member
Joined
Mar 30, 2015
Messages
48
Location
PA
Good info. Thanks!

I'm looking at pressure regulators and air filters. I would like to buy good stuff and keep the budget low. I believe a regulator should be fine used (looking at Watts R119-06C/M2) but I'm not sure about a used filter (looking at Wilkerson F30-06-000).

Thoughts?
 
OP
B

BigBair

Well-known member
Joined
Mar 30, 2015
Messages
48
Location
PA
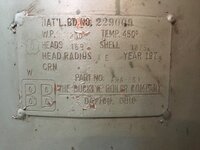
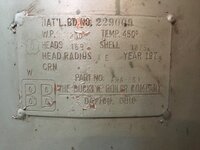
Deciding where to put it has been a much bigger decision than I think it should be, but I finally decided and moved it into place. When I finally took the dolly out from in front of it I noticed a tag on the tank that looks like it's a 1979 model.

116cc928ff7d4ceec422b0a530da91a2.jpg

I went with the used Watts regulator and Wilkerson filter off eBay. The filter was a little dirty but cleaned up nice and should still function like new. The regulator needs rebuilt though so I'll be sending it back.

I also picked up a RapidAir Home Garage Kit #90500 from TSC on clearance for $50. I believe I will be going back and getting a second one. One kit just isn't going to be enough to do my garage (40x26) the way I want it. I know this kit is only 3/8" ID but I think it should be plenty for most applications.

My blast cabinet will be coming off of the 3/4" behind the compressor and I'll setup an extra connector for when I need more air for other tools than the RapidAir kit delivers.

5ec5c4a04bad392f61ad68b6a879bfd8.jpg
 

Attachments

  • 5ec5c4a04bad392f61ad68b6a879bfd8.jpg
    5ec5c4a04bad392f61ad68b6a879bfd8.jpg
    737.4 KB · Views: 2
  • 116cc928ff7d4ceec422b0a530da91a2.jpg
    116cc928ff7d4ceec422b0a530da91a2.jpg
    665.8 KB · Views: 2

The Tool Tyrant

ALLIANCE MEMBER
Joined
Dec 19, 2011
Messages
2,182
Location
Bonita, Ca. (San Diego)
Lastly, you need to get yourself 4 vibration isolators pads and get the tank anchored down properly. I have found an easy trick for accurately drilling the mounting holes in the slab. I first place a single piece of 3/4" plywood under the compressor tank feet, next, using the appropriate sized transfer punch, mark the four holes on the plywood (write 'FRONT' on plywood to make sure you maintain correct orientation) next, use a pencil and straight edge and mark a line across the plywood, connecting the front to rear marks and then connecting the two side marks. I use these lines as reference for squaring the compressor to the wall.
Verify the correct size wedge bolt for your tank (most use 1/2") then drill a 1/2" (or appropriate size) hole through the plywood at all 4 locations. You now have your drill template. Once you have the template positioned where you want the compressor to be placed (double check clearances before drilling) while standing on the template, use a roto-hammer and drill only one of the holes. Personally, I prefer to drill through the slab completely so if I ever remove the compressor, I can then drive the bolts below the slab surface and patch the holes. At this point, I prep the hole and install the wedge anchor (set to correct height.. I suggest cutting a piece of pipe that fits over the anchor bolt, to the required height = isolator pad + tank foot + flange head nylock nut + 1/8") drive the wedge bolt in until its flush with the top of the pipe, set the anchor by installing a washer and standard nut and tighten until the bolt is secure then remove the nut and washer. Next, reinstall the template over the installed bolt, and re-square as needed. Drill the opposite side hole, clean hole and install bolt. Again, re-install the template and as it can no longer rotate, drill the 2 remaining holes. Clean, install and set the wedge bolts. Place the isolator pads over the bolts and using a level, cross check between all 4 pads and shim if necessary. I cut aluminum shims the same dimensions as the pads (including center hole) in various thicknesses (.065, .083, .095 & .125) depending on what is required. Lastly place the tank on the bolts, run the nylock nuts down until they touch the top of the feet, then back-off a half turn. Drink beer :beer:
 
OP
B

BigBair

Well-known member
Joined
Mar 30, 2015
Messages
48
Location
PA
Lastly, you need to get yourself 4 vibration isolators pads and get the tank anchored down properly. I have found an easy trick for accurately drilling the mounting holes in the slab. I first place a single piece of 3/4" plywood under the compressor tank feet, next, using the appropriate sized transfer punch, mark the four holes on the plywood (write 'FRONT' on plywood to make sure you maintain correct orientation) next, use a pencil and straight edge and mark a line across the plywood, connecting the front to rear marks and then connecting the two side marks. I use these lines as reference for squaring the compressor to the wall.

Verify the correct size wedge bolt for your tank (most use 1/2") then drill a 1/2" (or appropriate size) hole through the plywood at all 4 locations. You now have your drill template. Once you have the template positioned where you want the compressor to be placed (double check clearances before drilling) while standing on the template, use a roto-hammer and drill only one of the holes. Personally, I prefer to drill through the slab completely so if I ever remove the compressor, I can then drive the bolts below the slab surface and patch the holes. At this point, I prep the hole and install the wedge anchor (set to correct height.. I suggest cutting a piece of pipe that fits over the anchor bolt, to the required height = isolator pad + tank foot + flange head nylock nut + 1/8") drive the wedge bolt in until its flush with the top of the pipe, set the anchor by installing a washer and standard nut and tighten until the bolt is secure then remove the nut and washer. Next, reinstall the template over the installed bolt, and re-square as needed. Drill the opposite side hole, clean hole and install bolt. Again, re-install the template and as it can no longer rotate, drill the 2 remaining holes. Clean, install and set the wedge bolts. Place the isolator pads over the bolts and using a level, cross check between all 4 pads and shim if necessary. I cut aluminum shims the same dimensions as the pads (including center hole) in various thicknesses (.065, .083, .095 & .125) depending on what is required. Lastly place the tank on the bolts, run the nylock nuts down until they touch the top of the feet, then back-off a half turn. Drink beer :beer:


That sounds like very good advice, and much better than what I had in mind. I was simply going to bolt rubber pads on.

My biggest concern is trying to set the compressor back on the bolts. This thing is a beast to even move, much less sit down on bolts.
 

md21722

Well-known member
Joined
Nov 30, 2015
Messages
1,840
Location
Mt Juliet, TN
It's a vertical tank so leveling isn't that significant. You can simply rock it and put vibration pads underneath. Although perfect leveling & bolts may reduce some noise and vibration, but the vibration pads & shims will help. With horizontal tanks leveling is important to ensure water drains out.
 

The Tool Tyrant

ALLIANCE MEMBER
Joined
Dec 19, 2011
Messages
2,182
Location
Bonita, Ca. (San Diego)
That sounds like very good advice, and much better than what I had in mind. I was simply going to bolt rubber pads on.

My biggest concern is trying to set the compressor back on the bolts. This thing is a beast to even move, much less sit down on bolts.

B.B., A cherry picker works great for sitting it on the bolts. It helps to have two people, but I've sit a few by myself, just take your time and be safe.

It's a vertical tank so leveling isn't that significant. You can simply rock it and put vibration pads underneath. Although perfect leveling & bolts may reduce some noise and vibration, but the vibration pads & shims will help. With horizontal tanks leveling is important to ensure water drains out.

MD, You have a lot of good advice regarding compressors, but I'll have to disagree with you on this one. Several factors come into play when you level the compressor... pump lubrication, induced structural stress through non-uniform loading on the tank feet and lastly and most critical, being as it is a vertical tank, it is by nature very top heavy and the last thing you want is for your compressor to fall over as the ensuing damage will most likely be extensive to the machine and possibly human life.
 
OP
B

BigBair

Well-known member
Joined
Mar 30, 2015
Messages
48
Location
PA
Now that leveling and anchoring has come up I agree it is something I need to do. I'm not going to do it just yet. This is mostly because I plan to install insulation and sheeting in the near future and want to be able to move the compressor for that. I will plan to permanently secure it afterward though.
 

On-Wheel

Well-known member
Joined
Oct 6, 2014
Messages
487
I bought the same ,1979,$200. It works but has a noise till it warms up.They said it has been that way for a year with every day use.Picking it up next week.
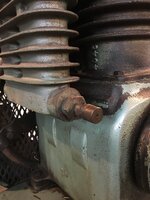
What's the part sticking out of inter cooler? I think they broke it off moving it to install a big 707 in there shop,last year.Thats when they put a new 5hp on it,Leeson.In the 10 years they had it it never had a starter.lol
Sorry to cloud your post,I just think there cool !
 

6PTsocket

Well-known member
Joined
Mar 12, 2014
Messages
4,593
I have a question about the wiring- this compressor doesn't have a ground. I understand that 220v equipment doesn't require a neutral or ground, but would it be a good idea to go ahead and run a ground wire to the baseplate?
Absolutely. 220 is two hots and no neutral but an isulation failure in the motor could make the whole outside of the compressor 'hot'. Grounding it is always a good idea.

Sent from my SM-G900V using Tapatalk
 

OccupantRJ

Well-known member
Joined
May 15, 2009
Messages
11,205
Location
Eastern North Carolina
I realize this is an older thread, but the first thing I would do is move either the compressor or blast cabinet to get them away from each other. The blasting dust that is always floating around will do wonders for the rings in that compressor.
 
To avoid these ads, REGISTER NOW!
Top Bottom