
HoosierBuddy
Well-known member
Hey guys,
I got 2 free chairs from my mother to use in our bonus room above the garage. The only problem was the 40 year-old leather was cracked pretty badly. I've never done any upholstery work before, but my wife is pretty handy with a pair of scissors, and my mother-in-law was able to loan me a pneumatic staple gun. So, after watching a couple of youtube videos from diyuphostery.com, we ordered some supplies and jumped on in.
It's harder than putting up wallpaper, but easier than doing your taxes.
I think the first chair turned out acceptable, and the second one should be a snap.
Tools required included the aforementioned pneumatic staple gun (diyupolstery considers electric staple guns to be an abomination), a staple puller, a good tack hammer, a flat bladed screw driver (to use as a substitue tack puller), my wife's pair of "SEWING SCISSORS" (which I am never allowed to touch under ANY CIRCUMSTANCES) and a razor blade.
Materials included 3/8 stainless (high quality) staples, upholstery nails, and upholstery material.
Total manhours? Maybe 8 hours on the first chair, and I think we can do the next one in about 4.
Anyway...fun project . Except for the yelling back and forth.
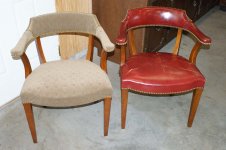
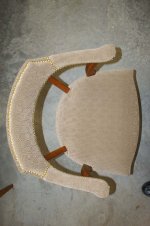
In the pictues below, the red chair is identical to our original. The chair on the left is complete. After this picture was taken, I got the chair on the right stipped down and ready for new fabric...but then was stopped as I'm not allowed to touch the sewing sizzors.
Phil
I got 2 free chairs from my mother to use in our bonus room above the garage. The only problem was the 40 year-old leather was cracked pretty badly. I've never done any upholstery work before, but my wife is pretty handy with a pair of scissors, and my mother-in-law was able to loan me a pneumatic staple gun. So, after watching a couple of youtube videos from diyuphostery.com, we ordered some supplies and jumped on in.
It's harder than putting up wallpaper, but easier than doing your taxes.
I think the first chair turned out acceptable, and the second one should be a snap.
Tools required included the aforementioned pneumatic staple gun (diyupolstery considers electric staple guns to be an abomination), a staple puller, a good tack hammer, a flat bladed screw driver (to use as a substitue tack puller), my wife's pair of "SEWING SCISSORS" (which I am never allowed to touch under ANY CIRCUMSTANCES) and a razor blade.
Materials included 3/8 stainless (high quality) staples, upholstery nails, and upholstery material.
Total manhours? Maybe 8 hours on the first chair, and I think we can do the next one in about 4.
Anyway...fun project
. Except for the yelling back and forth.In the pictues below, the red chair is identical to our original. The chair on the left is complete. After this picture was taken, I got the chair on the right stipped down and ready for new fabric...but then was stopped as I'm not allowed to touch the sewing sizzors.
Phil
Attachments
Last edited:
