To avoid these ads, REGISTER NOW!

Above 1200 Sq/FT Cleaning Up My Shop

Wokspaces above 1200 squarefeet.

1/2 Cup

Member Emeritus
Joined
Apr 28, 2012
Messages
19,283
Location
Shepparton. Victoria. Australia
Andy, blacksmithing is some thing that has always been in the background for me, as a youngster we used to spend many an hour in my grand fathers smithy and it is some thing that never leaves you..:drool:


Nice looking calves I must say..:thumbup:

Regards
 
To avoid these ads, REGISTER NOW!

bolensboneyard

Well-known member
Joined
Nov 22, 2013
Messages
3,074
Location
South East
Thank you!:bowdown: You are on my list, you know:willy_nil


I'm just cheap and want the best price I can get. I'm sure you've saved Herb's old fuel lines for me:willy_nil I need to see what scrap yards get for old aluminum blocks with heads and pistons. They are likely cheap since they have steel and other contaminants in them. I hope. And I have 1/4 mile of aluminum cable the electrical co-op left for me over by Hallett. Of course it's got a steel wire in the middle so a little work to unwind it.

Thanks again for the visits guys, days are getting longer and I'm starting to get some energy back. Most of the day in Tulsa doctoring today but I did manage a stop by Home Depot. And did some layout for a disabled ramp we're building Saturday. And did go to the shop and replaced the rivet in my crucible tongs. I embarrassed myself with the sophomoric job I did first. By the way I found them online for $225. That was worth making.

Made from a piece of 3/8" rod, insert side

IMG_0878_zpska1bstzj.jpg


IMG_0879_zpsc9hicfzd.jpg


And this side was pounded down with the red hot rivet in the tongs. Would have made a nice picture but I would have had to reheat it, there is no time to waste when heading a rivet.

IMG_0880_zpsguvl88tx.jpg


And I had already made one rivet and dropped it on the floor and could not find it:willy_nil

So I made another rivet and got a nice installation and I had the jaws facing the same way. AAArgh!!:willy_nil:willy_nil I was too aggravated to take a picture. So you are seeing the third rivet tonight. And it is a job to grind and punch a hot set rivet back out.

More distractions tomorrow and ramp build Saturday. Will I ever see the shop again?


Refinery scrap is a sensitive issue most places. In the past employees would throw stuff they wanted away then buy it from the scrap dealer. So I'm gunshy of any success there.

Not a bad idea on the gauge. Of course that's how I made it, fit it against bar stock of each size then marked the tangents.

Going to pour brass Saturday.


Alright!!!

Andy if you heat the rivet head once it is set, Just the head not the shank, then take your ball peen hammer using the peening end work the side of the rivet with the side of the peening end of the hammer around the edge you will get a head that looks like it was stamped but with little dents in it. I have done this many times with Model A chassis. It comes out nice and round.
 
OP
O

oldironfarmer

Well-known member
Joined
Jun 25, 2016
Messages
6,664
Location
Terlton, Oklahoma
Andy's Brooms and Brass has a nice ring to it. To paraphrase what someone replied in a comment to me, this board is about having a space to enjoy your hobbies and getting things where you can work on them. I drove my wife to an out of town meeting today and got a little excited to see the email from YouTube that you have a new video up. Will get a few minutes to watch it in the morning probably. What you and others are sharing are things that a year ago I might have wondered about, but did not realize the resources are here, like building a forge or making a broom. There are a bunch of people more than willing to help and share what their area of expertise is and I have seen how quick you can get a response (and most of them are not too judgmental).

Also, watch for ammo at the city auctions. My FIL picked up some of the good stuff at one not long ago.

Andy's Brooms and Brass! I like that. We have blackjack oaks that proliferate around here. They are a red oak, but split along the rings when drying and although they burn hot for firewood, they have rough bark and collect dirt in the bark and the wood is hard. So they are tough on chain saws. Not a prime wood but since they burn hot I have thought about naming my smithy the Blackjack Forge and Foundry. Gets hot but of not much value... I was going to have a tree stamp. However I settled on the AM in OK and have used it too many years to change.

We have a craft based amusement park in the Ozarks called "Silver Dollar City". Where my broom mentor had his shop, and they have valid blacksmiths, gun maker, knife maker, glass blower, candy maker, dulcimer makers, wood turners and a few crafts I've forgotten. I've threatened to name my operation "Copper Penny Village".

I hope the calf video wasn't too boring. But that's my idea of a good time on the farm.:bounce:
 
OP
O

oldironfarmer

Well-known member
Joined
Jun 25, 2016
Messages
6,664
Location
Terlton, Oklahoma
Andy if you heat the rivet head once it is set, Just the head not the shank, then take your ball peen hammer using the peening end work the side of the rivet with the side of the peening end of the hammer around the edge you will get a head that looks like it was stamped but with little dents in it. I have done this many times with Model A chassis. It comes out nice and round.

I have done that, and I have also used a setting tool to make a decorative head on a rivet. However, I have this fetish to make things entirely by hand and that does not include using a torch to heat the head only or using an electric motor. For instance, these tongs were made by hot punching the hole for the rivet. That does have an advantage, the initial punch prior to popping out the slug spreads the material so there is less lost than from drilling.

And then I got in a hurry and arc welded the jaws on.:( If I make another set they will be all hand made.

I also like the flat look of the rivet heads. They are circular enough the average guy doesn't think they were just pounded that way. Unfortunately the bar was odd size, about 0.382" and I didn't take the time to draw it down to 3/8" to go in a 3/8" hole. I used a dowel maker I made years ago to set the first head and the hole I had to use was 13/32" (0.406). Wanting to not burn the rivet I worked it just barely yellow and didn't get enough swell to make the first head with parallel sides. That bugs me. But the second head looks machine turned. It will work.

Not that anybody cares but me. Funny in twenty years those tongs may be a work of folk art or they may get into one of the loads going to scrap. But they will get some foundry use in the interim. And that twenty years will pass just like honey running off a spoon. That takes forever, until it starts to move.

Thanks for your comments! They are appreciated and are of value to those casual readers interested in learning more about this stuff. A lot of my comments are for that purpose, not really to respond to you, but to provide background information.

Happy Saturday!!
 
OP
O

oldironfarmer

Well-known member
Joined
Jun 25, 2016
Messages
6,664
Location
Terlton, Oklahoma
Andy, blacksmithing is some thing that has always been in the background for me, as a youngster we used to spend many an hour in my grand fathers smithy and it is some thing that never leaves you..:drool:


Nice looking calves I must say..:thumbup:

Regards

I don't do much blacksmithing, but it sits there and the bottles are never empty (if you know what I mean).

It takes me three minutes to get a 3/8" round red hot from striking the match so not much longer than getting your hoses unwound and regulators adjusted. Then the second heat is very quick because there is a nice hot fire there waiting when you turn back from the anvil. And coal is cheap. And you can just walk away and let the fire go out. And when you have to do one more heat after you think you're done the fire can be rejuvenated. Ever put your hoses up and then have to unwind them again? Just about every stinking time for me. Sometimes I think I use as much fuel lighting a torch and bleeding down the hoses as I do heating something. Not so in the forge. And from the forge you get the work properly hot and reheat sooner which makes for a better finished forging.

Probably should put you in a gas forge. I am surprised how quiet my burner is. I'm not sure if I'm doing something wrong but it is not louder than an engine idling and the blue flame means complete neutral combustion, so it cannot get hotter than that. Stacked fire brick do make a nice forge without the respiratory hazard of ceramic fiber blanket. And you can alter the forge size at will.

I just love my little calves.

Funniest thing, when I was younger it took forever to raise them. Now they just pop right up, six months goes right by and it's time to wean them.

Thanks for stopping by, hope the Coke was cold.

I need somebody to explain multi-quote to me, apparently:bounce:
 
OP
O

oldironfarmer

Well-known member
Joined
Jun 25, 2016
Messages
6,664
Location
Terlton, Oklahoma
Not much shop time today, but made a little progress.

Turned a plug to form a burner flare which will seal the opening between bricks in the brick furnace. Here's some detail for those who don't turn wood.

I wanted a 1:12 flare 3" long which meant 1/4" increase in radius. The burner tube is 1-1/2" so I needed a piece of wood which would turn to 2", at least on one end. Found a piece of poplar, squared it and drew in diagonals

IMG_0883_zpsska33rw5.jpg


Used the mallet to drive in the drive spur (I hit it a couple of more times to straighten it)

IMG_0884_zps68okpxsm.jpg


Mounted it in the lathe

IMG_0885_zpshvxytsqm.jpg


And started roughing it round, marked the length and third points

IMG_0886_zpsuorooptr.jpg


Then used a parting tool to size three locations (I abandoned the third points)

IMG_0887_zpscq0kmmsb.jpg


You can safely check size with calipers while the lathe is turning. These are preset a little larger than you want and pressed gently to gauge diameter.

All sized

IMG_0888_zps3ocj5dqa.jpg


Roughed close to size (I stopped to check that I had all bite and no bark)

IMG_0889_zpsjpibmiio.jpg


Finished turning, sanded, and parted almost through.

IMG_0890_zpsguxajixe.jpg


Then I started to make a pattern for practice and to have something to pour when I'm ready. Only have half of the middle rib made, and it is too thick. But all the other pieces have draft. This is going to be a lot of fun learning to keep track of the draft (taper) and still keep everything straight. I'm using 2-1/2 degree draft so I made me 2-1/2 degree shims to hold the pieces straight for rabbeting, etc.

IMG_0891_zpsjwxaaodw.jpg


Thanks for the visits!
 
Last edited:

dchance

Well-known member
Joined
Oct 3, 2016
Messages
614
Location
OKC
Andy enjoyed the calf video. Whether horses or calves they are fun to watch for the first year. I like watching the progress as you work to doing your own casting. Never know when the things I learn might be helpful.

Dwight
 
OP
O

oldironfarmer

Well-known member
Joined
Jun 25, 2016
Messages
6,664
Location
Terlton, Oklahoma
Andy enjoyed the calf video. Whether horses or calves they are fun to watch for the first year. I like watching the progress as you work to doing your own casting. Never know when the things I learn might be helpful.

Dwight

Thanks for stopping by, Dwight! All the young animals are fun to watch.

Not sure why I've been so interested in foundry work, but I am. There certainly is a lot to learn. As I keep repeating, this is how I am doing things, I can never represent that it is the right way, but if it works, it works!
 

BBChevro

Well-known member
Joined
Jan 24, 2014
Messages
2,235
Location
Brisbane, Qld., Australia
Woo Hoo, :bounce: I received a very nice gift in the mail yesterday...

View media item 68437
Thank you so much Andy, I think that plate is so cool and I feel truly honored to receive it. :)


It's already in its new home next to the Maine plate that Dan had kindly sent...
View media item 68438
I may have to give that steel C-purlin a catchy name like "Beam Of Fame" or something? :lol:

I may re-post the above on my thread too (as a defibrillator post - to shock it back to life :lol:), but I wanted to post it here first to say "Thanks Andy"


Nice work on the new rivet, I quite like watching blacksmithing in action (or just after the action). :thumbup:


Thanks again Andy (did I say that already? :headscrat). :bowdown:
 
OP
O

oldironfarmer

Well-known member
Joined
Jun 25, 2016
Messages
6,664
Location
Terlton, Oklahoma
Woo Hoo, :bounce: I received a very nice gift in the mail yesterday...

View media item 68437
Thank you so much Andy, I think that plate is so cool and I feel truly honored to receive it. :)


It's already in its new home next to the Maine plate that Dan had kindly sent...
View media item 68438
I may have to give that steel C-purlin a catchy name like "Beam Of Fame" or something? :lol:

I may re-post the above on my thread too (as a defibrillator post - to shock it back to life :lol:), but I wanted to post it here first to say "Thanks Andy"


Nice work on the new rivet, I quite like watching blacksmithing in action (or just after the action). :thumbup:


Thanks again Andy (did I say that already? :headscrat). :bowdown:

Glad you like it! Right off my farm truck and I had to get it out of the country before I got caught.:willy_nil

Andy, you are certainly very adept at wood turning, well done..:thumbup:

Thank you.:thumbup: Wood turning is fun and easy, those who have the desire should give it a try.
 
OP
O

oldironfarmer

Well-known member
Joined
Jun 25, 2016
Messages
6,664
Location
Terlton, Oklahoma
Found a problem with the Show Truck. I noticed the rubber boot around the starter pedal has failed.

IMG_0892_zpseeub7anf.jpg


I'm thinking that's why I'm feeling air movement when I drive the truck?:dunno:

My shipment of green sand arrived. 48 lbs will get me started.

IMG_0893_zps9bpln2fr.jpg


Started making a bench to ram sand in flasks and to catch sand from breaking out castings.

IMG_0894_zpsqapo0z3z.jpg


I decided to use my signature legs instead of just a piece of 2x4.

While the glue was setting I finished up my shelf bracket pattern

IMG_0895_zpscyv7w9tb.jpg


Still needs a little adjustment

IMG_0896_zpsl8ixz46g.jpg


But it would cast like this

IMG_0897_zpsee4i0nvl.jpg


Back to the bench!
IMG_0898_zpskgnpoxqw.jpg


IMG_0899_zpspqtas5ke.jpg


IMG_0900_zpss8cxmlbp.jpg


Still have to make some bars to support working boards and it needs a plastic tray inside to hold the sand.

IMG_0901_zps3imxjm7y.jpg


Painted the burner cone form, cleaned it up and made a box to fit. I have some 3,500 F refractory I'm going to pour in this box to make burner tile (proper name) the size of 1/2 fire brick to improve the performance of my brick furnace.

IMG_0902_zpslrvrmibn.jpg


Got a road trip for Sunday, back to the grind Saturday!
 
Last edited:

Terrick down Under

Well-known member
Joined
Jul 2, 2015
Messages
1,904
Location
Royalla, NSW, Aust.
Very nice work there young OIF.
BTW, I once saw an old fella gather up his wood sanding's and mix it with his white glue before pluggin holes over nail heads, when finished you could not see the filler, it was nice.
 
OP
O

oldironfarmer

Well-known member
Joined
Jun 25, 2016
Messages
6,664
Location
Terlton, Oklahoma
Nice lathe work Andy. I have put a deposit on a better lathe. Hope to go get it in the next few months when the snow clears in NE

Thanks, Bobby! I've thought about getting a new lathe. But this one keeps turning. It was in my fire and the headstock bearings have never been replaced. I never replaced the handles, I just keep 1/2 and 9/16 wrenches hanging at the lathe to make adjustments. I did make an oak tailstock adjusting handwheel. I kind of like it.

Very nice work there young OIF.
BTW, I once saw an old fella gather up his wood sanding's and mix it with his white glue before pluggin holes over nail heads, when finished you could not see the filler, it was nice.

Thank you Older Terrick! I've heard of using sawdust and it never worked for me, I might try sanding dust. Thanks!
 
OP
O

oldironfarmer

Well-known member
Joined
Jun 25, 2016
Messages
6,664
Location
Terlton, Oklahoma
Spent the afternoon at the Warthog Hidey Hole. JB has a really nice place there. And a really good looking hearse.

We were shooting some elevations to look at how much dirt we'd have to move to get the surface water from draining through his shop. Should be an easy job if Bob will just do the bulk of the work.
 
Last edited:

Bob Heine

ALLIANCE MEMBER
Joined
Oct 24, 2009
Messages
10,705
Location
Boca Raton, Florida
Spent the afternoon at the Warthog Hidey Hole. JB has a really nice place there. And a really good looking hearse.

We were shot some elevations to look at how much dirt we'd have to move to get the surface water from draining through his shop. Should be an easy job if Bob will just do the bulk of the work.
Story of my life....:lol_hitti
 

Vieux

Well-known member
Joined
Jan 31, 2014
Messages
2,522
Location
Russia
Great job on a lathe. I really liked it. :thumbup:
I made sure to replace the rubber case will be easy
 

jbmatth

Well-known member
Joined
Jun 3, 2013
Messages
5,682
Location
Northern Ok.
Andy,
I've been thinking about the foundry work some more recently and it really has peeked my interest a bit more. Everyone that fixes or restores old equipment will eventually find something that can't be repaired or at least repaired properly. With your foundry you will be able to build entirely new parts from the original pattern. That would take any restoration project to an entire new level. Heck if you wanted you could make entire machines. Think of how cool it would be to have a brass table saw. :pimpflash

As Andy mentioned he came by The Warthog Hidey Hole this weekend to have a look around and gander at my little place. He learned me a thing or two as one would expect. He brought out his transit and we took some elevations of the area around the shop. Here is what we have to work with:
attachment.php


As you can see it is pretty flat around the building and with some "minor" work on his and Bob's part it'll really help the drainage issues I've been having. Sadly neither of us took any pictures of the actual work of shooting these elevations, we were having too much fun discussing everything under the sun.

He did try to talk me out of a few pieces of equipment that I just wasn't ready to let go. One thing I would let him have was this:
attachment.php


The only stipulation is that he can't hurt the tree any. :lol_hitti Haha, sorry about that Andy but it really isn't going anywhere. He concluded it is an International Harvester wheat thrasher and explained a few things about it I'd never really thought about before. I did manage to send him home with about 50 pounds of aluminum for all of his casting adventures. All in all a great big THANK YOU is in order, he is a great guy I tell you what. :bowdown:
JB
 

Attachments

  • IMG_3380.jpg
    IMG_3380.jpg
    153.8 KB · Views: 902
  • IMG_5598.jpg
    IMG_5598.jpg
    63.9 KB · Views: 903
To avoid these ads, REGISTER NOW!
OP
O

oldironfarmer

Well-known member
Joined
Jun 25, 2016
Messages
6,664
Location
Terlton, Oklahoma
Story of my life....:lol_hitti

While Bob was not technically named in your honor, if the shoe fits, wear it! There are some general similarities past the obvious age thing, and natural beauty with the well worn look we all try so hard to aspire to. After all, Bob is the one I turn to when I need a hand, and he has not failed me yet. Laid down for a rest now and then, yes, but not failed. Thanks, Bob:thumbup:

Andy, I think you may be on to something there, your diagnostic skills never cease to amaze..:thumbup:

Regards

Thank you:bowdown: I was quite please with myself to have figured that out. It's the seemingly insignificant things we so often miss...

Great job on a lathe. I really liked it. :thumbup:
I made sure to replace the rubber case will be easy

Thanks, one of my draws to foundry work is tieing other crafts together. I need woodworking tools to make patterns, and the blacksmith shop to make tooling.

Sadly I'm not sure I can find the rubber bellows, but I will certainly look, no expense spared for an Award Winning Show Truck (1st place "Work in Progress" Division, Jennings, OK, 2016)!!

Andy,
I've been thinking about the foundry work some more recently and it really has piqued my interest a bit more. Everyone that fixes or restores old equipment will eventually find something that can't be repaired or at least repaired properly. With your foundry you will be able to build entirely new parts from the original pattern. That would take any restoration project to an entire new level. Heck if you wanted you could make entire machines. Think of how cool it would be to have a brass table saw. :pimpflash

So there's my dilemma, where do I stop?

As Andy mentioned he came by The Warthog Hidey Hole this weekend to have a look around and gander at my little place. He learned me a thing or two as one would expect. He brought out his transit and we took some elevations of the area around the shop. Here is what we have to work with:
attachment.php


As you can see it is pretty flat around the building and with some "minor" work on his and Bob's part it'll really help the drainage issues I've been having. Sadly neither of us took any pictures of the actual work of shooting these elevations, we were having too much fun discussing everything under the sun.

He did try to talk me out of a few pieces of equipment that I just wasn't ready to let go. One thing I would let him have was this:
attachment.php


The only stipulation is that he can't hurt the tree any. :lol_hitti Haha, sorry about that Andy but it really isn't going anywhere. He concluded it is an International Harvester wheat thrasher and explained a few things about it I'd never really thought about before. I did manage to send him home with about 50 pounds of aluminum for all of his casting adventures. All in all a great big THANK YOU is in order, he is a great guy I tell you what. :bowdown:
JB

Actually it is apparently a wheat harvester or shocker. The shocks are then taken to a stationary thresher to thresh out the seed. A combination of the two machines, which cuts and threshes is a combine, naturally!

I've been stewing over whether there was much interest in the sophomoric foundry work on GJ. JB encouraged me to continue posting so I will eagerly.

If it gets to be too much, a PM of "enough already" will slow down the postings!

Thanks for all the visits guys, it's Saturday and I'm ready to go!!
 

Bob Heine

ALLIANCE MEMBER
Joined
Oct 24, 2009
Messages
10,705
Location
Boca Raton, Florida
While Bob was not technically named in your honor, if the shoe fits, wear it!

I've been stewing over whether there was much interest in the sophomoric foundry work on GJ. JB encouraged me to continue posting so I will eagerly.

If it gets to be too much, a PM of "enough already" will slow down the postings!
Andy, I found this and it explains a lot. My ears were big when I was a kid but now they block the sun. My shoes no longer fit so I rarely wear them...

"The ears are made up of cartilage, a flexible connective tissue which, unlike bones, continues to grow until we die. ... Meanwhile, our feet become longer and wider with age, as the tendons and ligaments that link the many tiny bones lose elasticity. This allows the toes to spread out and the arch of the foot to flatten."

As far as the foundry, you haven't come close to posting "enough already" so you better get cracking (is that too petroleum?),
 

BBChevro

Well-known member
Joined
Jan 24, 2014
Messages
2,235
Location
Brisbane, Qld., Australia
My vote is to keep posting about the foundry progress (and everything else that you have been posting about) - it's always interesting. :bowdown:

I would strongly advise that you replace the rubber boot for the starter pedal - unless of course, there is sufficient airflow to ventilate the driver's compartment. :lol:
 

Bob Heine

ALLIANCE MEMBER
Joined
Oct 24, 2009
Messages
10,705
Location
Boca Raton, Florida
My vote is to keep posting about the foundry progress (and everything else that you have been posting about) - it's always interesting. :bowdown:

I would strongly advise that you replace the rubber boot for the starter pedal - unless of course, there is sufficient airflow to ventilate the driver's compartment. :lol:
Andy, I agree with Mark but I think replacing the boot is too short-sighted. I was hoping to see you carve a wooden pattern from the torn boot and cast a custom latex or vinyl boot. A clear vinyl would be less of a distraction down there.

Or possibly use some of that broom string to stitch the boot back together.... :confused:
 

Wpauley

Member
Joined
Sep 4, 2016
Messages
13
Location
Northern Illinois
I see this is an old thread but at a glance you have little or no shelving but very tall ceilings. You mentioned a skid steer. Get a set of pallet forks for your machine. Then You need some used commercial grade shelving and pallets and stack it up to the ceiling instead of piling it up on the floor. You would be surprised how much you can get on shelving like this. I have a picture of it but do not know how to get a "url" if that is what it is called to post a picture. I purchased mine from a Walmart store that closed and was selling all the fixtures.
 
OP
O

oldironfarmer

Well-known member
Joined
Jun 25, 2016
Messages
6,664
Location
Terlton, Oklahoma
Andy, I found this and it explains a lot. My ears were big when I was a kid but now they block the sun. My shoes no longer fit so I rarely wear them...

"The ears are made up of cartilage, a flexible connective tissue which, unlike bones, continues to grow until we die. ... Meanwhile, our feet become longer and wider with age, as the tendons and ligaments that link the many tiny bones lose elasticity. This allows the toes to spread out and the arch of the foot to flatten."

As far as the foundry, you haven't come close to posting "enough already" so you better get cracking (is that too petroleum?),

Big ears are common in my family, it is especially difficult in Oklahoma, as your head is like a weather vane and makes it difficult to face certain directions. And if you try to turn your head slightly vortex shedding sets in and the ears start vibrating like a wire on a screen door and it is so hard to see with your head vibrating. That's why I tuck the tops of my ears under my cap.

Cracking is a word we like to use when splitting heavier hydrocarbon molecules to make lighter products. However cracking is not a term we like to use in high pressure piping systems like pipelines, in fine crystal, refractory, cutting tools and ceramics. The jury is still out on the acceptability of the use of cracking when it comes to levity.

Thanks for the encouragement - I don't need much, obviously:thumbup:

My vote is to keep posting about the foundry progress (and everything else that you have been posting about) - it's always interesting. :bowdown:

I would strongly advise that you replace the rubber boot for the starter pedal - unless of course, there is sufficient airflow to ventilate the driver's compartment. :lol:

Full speed ahead!! Thanks! I was getting so few responses I thought maybe the subject should just be kept to myself.

On the boot, the fear is we might be getting fumes from the engine into the cab. I haven't smelled any, but you can never be too safe. So I'd better find or make one.

Andy, I agree with Mark but I think replacing the boot is too short-sighted. I was hoping to see you carve a wooden pattern from the torn boot and cast a custom latex or vinyl boot. A clear vinyl would be less of a distraction down there.

Or possibly use some of that broom string to stitch the boot back together.... :confused:

Custom latex boot for protection. Hmmm..... would you call that a "starter condom"? Clear vinyl I'm afraid would not be period appropriate for a classic vehicle such as this.

OK, yes, I'm thinking the broom string thing might be it, or maybe black duct tape. Duct tape is period correct for any year truck for red necks, I think:dunno: Any correct police out there who could help me on this?

I see this is an old thread but at a glance you have little or no shelving but very tall ceilings. You mentioned a skid steer. Get a set of pallet forks for your machine. Then You need some used commercial grade shelving and pallets and stack it up to the ceiling instead of piling it up on the floor. You would be surprised how much you can get on shelving like this. I have a picture of it but do not know how to get a "url" if that is what it is called to post a picture. I purchased mine from a Walmart store that closed and was selling all the fixtures.

Thanks for stopping in! Unfortunately my Bobcat seldom ventures down to the shop. And he wears steel overshoes most of the time. High storage would be good for some stuff, and I have looked for pallet racks and have not found any good deals yet. For the most part I think I'm staying with 7 ft shelving. I did get some bolt bins for storage of small stuff. It is proving to be slow to utilize.

Thanks for all the visits! I greatly appreciate the comments!

Even from Bob. What a cat!
 
Last edited:
OP
O

oldironfarmer

Well-known member
Joined
Jun 25, 2016
Messages
6,664
Location
Terlton, Oklahoma
Another short day in the old shop. I had some personal business to take care of this morning and that can drag right out and eat up your day.

But I did get some refractory mixed and put in the form for a burner tile.

IMG_0903_zpscbtibvyv.jpg


I had never mixed any of this refractory before, Greencast 94+. It is abrasion resistant and good for 3,500F. That's hotter than Cuda Chick (sorry, but it is HOT). It mixed like concrete with coarse sand and no gravel. I used three times the recommended water in order to get it to mix.

While waiting for it to set up I melted some more cans. Slowly gaining experience. As I have mentioned the cans make a lot of slag. Some literature even recommends not using them for a raw material.

I can see some aluminum in the slag so I've been wanting to reheat some to see if I can draw out some more metal. So I busted up my slag pile

IMG_0904_zpsdplo6yff.jpg


and heated it up. I couldn't get it to really melt so I started pushing down on the slush and got a little metal on top. Heated some more and tamped it gently and got a lot of metal off it. Poured that out and there was dry "dirt" under it. Here it is next to the handle of the crucible.

IMG_0906_zpsn1ajvg2y.jpg


I was quite pleased with this outcome. I also had added a can with some salt in it (salt is supposed to be a flux for aluminum) so I don't know if the salt helped. I may try salt in the initial melt. I may also try tamping instead of skimming on the initial melt. All I read says to skim.

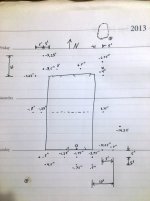
After about an hour the refractory had set enough to scratch 2-17 in it. I took a chance and twisted the pattern. It came right out and didn't damage the cone, I had a little sagging next to the date, not too much to use.

IMG_0907_zpsdbacdjd1.jpg


I was afraid I would have to drill out the pattern and I want to use it on furnace construction. so it came out and cleaned up well.

Got brave and took the forms off, then broke it loose from the base and set it in the toaster oven. I really need an oven out here. I turned the oven on to 150F then thought better of it and turned the oven off. It needs to dry 24 hours or more before starting to heat cure.

IMG_0908_zpsr80ykhe1.jpg


With today's work I have about 6 lbs of muffins.

IMG_0909_zpsze6zthoh.jpg


Saw the mayor when I was at the Post Office. She is a crafts person, artist, and town booster. Told her about my foundry and asked her to design a town heritage based trivet, told her I would cast her some. She got all mushy and told me she just adored me:) Maybe I'll get a free pattern:thumbup: Foundry is slowly getting into business.

Things to do:

1 Make a refractory lined furnace
2 Make a bigger pipe crucible (this one won't take smashed cans easily)
3 Make pouring tongs (made lifting ones)
4 Finish green sand bin (green sand is sand with enough clay to stick together to make a mold)
5 Add shevling for tools
6 Get some sand hauled in for a level work surface
7 Add a roof over the furnace area
8 Do a test pour in sand
and lots more!

Thanks for looking in!
 
Last edited:

sublime68charger

Well-known member
Joined
Sep 9, 2014
Messages
5,415
Location
SW Wisconsin
That is quite the things to due

great work on stuff as always!

And that shifter boot for now just tie a rag around it to help cut the air flow it's letting in.
You get another year or 2 out of it that way till you have time to replace it!
 

BBChevro

Well-known member
Joined
Jan 24, 2014
Messages
2,235
Location
Brisbane, Qld., Australia
...


...Things to do:

1 Make a refractory lined furnace
2 Make a bigger pipe crucible (this one won't take smashed cans easily)
3 Make pouring tongs (made lifting ones)
4 Finish green sand bin (green sand is sand with enough clay to stick together to make a mold)
5 Add shevling for tools
6 Get some sand hauled in for a level work surface
7 Add a roof over the furnace area
8 Do a test pour in sand
and lots more!

Thanks for looking in!


You know things are getting serious when "1/2cup-esque" lists start appearing. :D


The custom poured "burner tile" is very cool (although I'm sure that it will soon be very hot. :lol:). :thumbup:

My brother built a small foundry many years ago and I'm pretty sure that he drilled a hole in a fire brick for the burner to fit through (it was a long time ago, so I've forgotten most of the details :headscrat) - I do remember being very impressed at the time though.

As I am impressed now - great work Andy (I'm still interested). :bowdown:

.
 

1/2 Cup

Member Emeritus
Joined
Apr 28, 2012
Messages
19,283
Location
Shepparton. Victoria. Australia
You know things are getting serious when "1/2cup-esque" lists start appearing. :D


The custom poured "burner tile" is very cool (although I'm sure that it will soon be very hot. :lol:). :thumbup:

My brother built a small foundry many years ago and I'm pretty sure that he drilled a hole in a fire brick for the burner to fit through (it was a long time ago, so I've forgotten most of the details :headscrat) - I do remember being very impressed at the time though.

As I am impressed now - great work Andy (I'm still interested). :bowdown:

.

Andy and Mark, following on for sure now this is interesting even with a to do list..:thumbup::thumbup:
 

dlcwent

Member Emeritus
Joined
Feb 24, 2014
Messages
8,427
Location
coastal maine
Sorry I've been away so long and giving you a break. These guys are too easy on you. All they do is give you compliments. They don't see you as clearly as your cows do.

Things are happening in your world. Soon you'll be too busy to be on the GJ. That would be a BIG loss. I am another fan that would like to own a piece of OIF or AM OK whatever you decide to make and sell. I know you have my address so just let me know when you have something you want to sell. I'll try and budget the money in for it.
 

jbmatth

Well-known member
Joined
Jun 3, 2013
Messages
5,682
Location
Northern Ok.
Andy,
I'm curious about items 6 and 8 above, "Get some sand hauled in for a level work surface" and "Do a test pour in sand" respectively, could you please explain the need for the sand and the test pour in sand?

Learning more than I thought I knew but forgot I really didn't know about foundries,
JB
 
OP
O

oldironfarmer

Well-known member
Joined
Jun 25, 2016
Messages
6,664
Location
Terlton, Oklahoma
That is quite the things to due

great work on stuff as always!

And that shifter boot for now just tie a rag around it to help cut the air flow it's letting in.
You get another year or 2 out of it that way till you have time to replace it!

Thanks for the comment!

Brilliant idea! Rag!! That gives me a built-in anemometer!!! Then I'll know by checking the instruments whether I have an air leak!!!!

Is this place great or what?:thumbup::thumbup:

Kind of reminds me of the Okie Anemometer. You judge the wind speed by how big the rocks are which are blowing by. A three inch wind is a good day to stay inside. For you weather enthusiasts, the Okie rain gauge is reversed, like shotgun and wire gauges, a rain is measured by how far apart the rain drops hit. So a three inch rain is not a pretty good rain, drops three inches apart. A 1/4 inch rain, now we're talking! Those drops could spread out and actually make continuous wetness.


You know things are getting serious when "1/2cup-esque" lists start appearing. :D

Mind you, I have no intention of fulfilling anything on my list - quite un-1/2Cup-ish.

The custom poured "burner tile" is very cool (although I'm sure that it will soon be very hot. :lol:). :thumbup:

Now we're cooking!


My brother built a small foundry many years ago and I'm pretty sure that he drilled a hole in a fire brick for the burner to fit through (it was a long time ago, so I've forgotten most of the details :headscrat) - I do remember being very impressed at the time though.

Do you have pictures?

As I am impressed now - great work Andy (I'm still interested). :bowdown:

.

Thanks:bowdown::bowdown: Part of the goal with the burner tile is to eliminate the flare on the burner tube (a wear point due to thermal degradation) plus at this point I have no soft brick, only hard brick which is, ummm, hard to drill.

Andy and Mark, following on for sure now this is interesting even with a to do list..:thumbup::thumbup:

Mini thanks!! I mean many 1/2 thanks!!! Oh, you know what I mean, glad to have you stop by!:thumbup:

Keep the foundry notes coming Andy, interesting stuff.

GB

Thank you! Without Dan here irritating me I can make good progress!!


Sorry I've been away so long and giving you a break. These guys are too easy on you. All they do is give you compliments. They don't see you as clearly as your cows do.

Things are happening in your world. Soon you'll be too busy to be on the GJ. That would be a BIG loss. I am another fan that would like to own a piece of OIF or AM OK whatever you decide to make and sell. I know you have my address so just let me know when you have something you want to sell. I'll try and budget the money in for it.

Uh-oh! Spoke too soon.

Hi Dan.

Nice to see you.

Won't you stay a while?

I see your insinuation, soon I'll be too busy to be here...

Hoping, aren't you. Well I'm not going anywhere, but I do have a Craftsman tool chest I may just send you. So you'll have something productive to do.


Seriously, when I get ready to sell something the price is based on the quality so I'm thinking free shipping and I pay you to take it:dunno:


PS........The fishnets will be willed to you.:bounce:

:bowdown::bowdown: (can you please hurry?)

On a lighter note, my friend who just died, when you would say "nice to see you" always responded "better to be seen than viewed". Heaven knows what he's doing now.
 
OP
O

oldironfarmer

Well-known member
Joined
Jun 25, 2016
Messages
6,664
Location
Terlton, Oklahoma
Andy,
I'm curious about items 6 and 8 above, "Get some sand hauled in for a level work surface" and "Do a test pour in sand" respectively, could you please explain the need for the sand and the test pour in sand?

Learning more than I thought I knew but forgot I really didn't know about foundries,
JB

That was not clear, those are two totally different subjects. My work area is sloped away from the building. That's good but it is too much slope. The safest floor to work on is sand. Spills will not splash or run far and you can use it for impromptu fire control (water on liquid metal is worse than water on burning grease). So I plan to buy a load of fill sand and use it to improve my work space (after I get poles for the roof up). And as a bonus, working on sand is like beach volleyball. I'll get tanned and ripped:bounce:

I intend to do sand casting and have green sand ready to be wet up and make some molds from. That was just a reference to get my feet wet with a simple pour or two, probably just a vertical cylinder in sand to see how hard it is to pour hot metal into a sand mold without washing a lot of sand into the hot metal. The first step of learning to make sand castings. And pouring a cylinder, if successful, is one of my goals to make turning stock of 1", 1-1/2" and 3" diameter to make nicky neat things out of on the lathe.
 

bolensboneyard

Well-known member
Joined
Nov 22, 2013
Messages
3,074
Location
South East
Andy keep the foundry going. If you get back this way I will take you to see a friend of mine who runs a small foundry if he is still in operation. You can pick his brain.
 

drivesitfar

Well-known member
Joined
Oct 23, 2013
Messages
36,007
Location
Pacific Northwest
Andy: still trying to catch up after the WEDDING. looks like you've been pretty busy staring down the bull, playing with the calves and opening up OIF'S foundry.

i had to laugh about the broken rubber boot on your gear shift letting the air in. Sub's fix actually helped me too cause i've got a Stairmaster Kyak machine that has a broken rubber boot over a very greasy joint that i'll just wrap a rag around now if i end up using it or selling it. or is there a supply house for big rubber boots cause i think the Stairmaster one is maybe 3 inch diameter and UNOBTANIUM now?

yes keep the foundry talk coming in case you didn't know there are others that would like to know more about this and good to know the safety tips you know like putting sand on melted metal instead of water and things like that.

have a great day working out in the SAND PIT at the FOUNDRY while i head to the SALT MINES on my SATUR day.

cheers
 

Guster

Well-known member
Joined
Mar 11, 2012
Messages
1,543
Location
Auckland, New Zealand
I like how Bob thinks. Making a female mold for silicone or urethane boots is actually quite easy. Urethane is a little harder as it tends to be a little watery so the mold needs to be moved to keep the coating even whereas silicone can be ‘painted’ on. However knowing Andy I would up the stakes to a rubber vulcanising setup. Un-cracking some long chains eh? :thumbup:

Though boots that size can be pilfered off almost anything these days. But I have to warn you that it is a very slippery slope Andy! Once you have a new boot you find a problem with the firewall. Fix the firewall then you want to tidy up the instrument panel. Then find the front columns are draining water into the vehicle and that is why the floor pans are rusting out… where will it end? :willy_nil :willy_nil

Maybe you can just knit a little sock for it? :lol_hitti

+1 on keeping up documenting the foundry work. I like the idea of the burner tile incorporating the nozzle flare. Do you plan to build the bracketing holding the burner into the enclosure?

Since you are creating a bit of structure it may pay to think about a small casting crane to help manage the crucible by yourself. Will let you comfortably do bigger castings so you can focus on controlling the pour without trying to keep your mind of you hernia as well. Even 5lbs of metal + crucible get quite heavy on the end of pouring tongs when you are trying to tip it out slowly. Otherwise I’m all for resistance training. :lol:
 

wasfast

Well-known member
Joined
Apr 10, 2014
Messages
874
Location
San Diego CA
I like how Bob thinks. Making a female mold for silicone or urethane boots is actually quite easy.


I read "boots" as *****.......shows where my mind is I guess. I wondered why someone would make a homebrew replacement like that but I guess that's irrelevant.:thumbup:
 
To avoid these ads, REGISTER NOW!
Top Bottom