To avoid these ads, REGISTER NOW!

Craftsman block grinder restoration 397.19580

rrich1

Well-known member
Joined
Oct 7, 2015
Messages
793
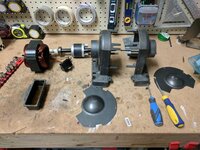
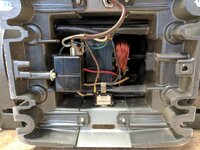
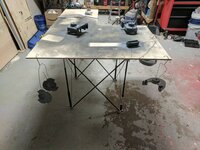
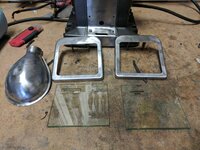
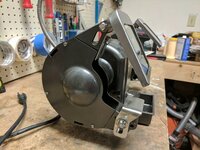
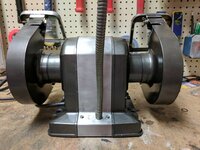
Next restoration after the drill press is Craftsman grinder model 397.19580 1/3 HP industrial. The bottom plate is stamped January 1966. It's just a baby compared to the drill press! The grinder itself is in great shape. It runs beautifully and turns so smoothly. The main issues of concern are the shield's. They are somewhat bent out of shape. The paint on the light silver does have a little chipping on it. The dark gray is pretty close to the dark shadow gray of the drill press. At the moment I am going to try and get it cleaned up the best I can and see what I am working with. I will paint the shield's for sure. Here is what I have done today to break it down. Luckily all the parts are there including the tray which is nice.

69fd3b3c84fd24927176831fbe1b7a62.jpge25c52962fd2707b1ed28759a74bfe96.jpg57d25eeaa77fb6eb1eb22e68fb817a29.jpg487b29c3aa7d4d7b36ac5088be8a5ecb.jpg133688c5741cfd47966accd17c8f7ee3.jpg28a24d03702f07576ab2750f8a2c28c5.jpg

Sent from my Pixel XL using Tapatalk
 

Attachments

  • 28a24d03702f07576ab2750f8a2c28c5.jpg
    28a24d03702f07576ab2750f8a2c28c5.jpg
    118.4 KB · Views: 15
  • 133688c5741cfd47966accd17c8f7ee3.jpg
    133688c5741cfd47966accd17c8f7ee3.jpg
    112.4 KB · Views: 12
  • 487b29c3aa7d4d7b36ac5088be8a5ecb.jpg
    487b29c3aa7d4d7b36ac5088be8a5ecb.jpg
    148 KB · Views: 15
  • 57d25eeaa77fb6eb1eb22e68fb817a29.jpg
    57d25eeaa77fb6eb1eb22e68fb817a29.jpg
    92 KB · Views: 9
  • e25c52962fd2707b1ed28759a74bfe96.jpg
    e25c52962fd2707b1ed28759a74bfe96.jpg
    115.1 KB · Views: 11
  • 69fd3b3c84fd24927176831fbe1b7a62.jpg
    69fd3b3c84fd24927176831fbe1b7a62.jpg
    119.5 KB · Views: 11
Last edited:
To avoid these ads, REGISTER NOW!
OP
R

rrich1

Well-known member
Joined
Oct 7, 2015
Messages
793
Got the rest of it apart today before work. Got the main body parts cleaned up with some simple green. I haven't cleaned the silver strip with the name plate yet though. There are some blobs or runs of paint that I don't think I can ignore. Looking more and more like a repaint job. Which is fine. Done it before obviously lol. 6e428c85312781692d8af8005f0a6285.jpgd19a93ee4f023cabcc3a318578ab5c4b.jpgc40213dd810ec443679690a8aee5c133.jpg0188dff88842b3ece01250ea38100503.jpg

Sent from my Pixel XL using Tapatalk
 

Attachments

  • 6e428c85312781692d8af8005f0a6285.jpg
    6e428c85312781692d8af8005f0a6285.jpg
    124.9 KB · Views: 8
  • d19a93ee4f023cabcc3a318578ab5c4b.jpg
    d19a93ee4f023cabcc3a318578ab5c4b.jpg
    314.1 KB · Views: 8
  • c40213dd810ec443679690a8aee5c133.jpg
    c40213dd810ec443679690a8aee5c133.jpg
    275.2 KB · Views: 8
  • 0188dff88842b3ece01250ea38100503.jpg
    0188dff88842b3ece01250ea38100503.jpg
    356.4 KB · Views: 11
OP
R

rrich1

Well-known member
Joined
Oct 7, 2015
Messages
793
The shield's were bent at the top. I was able to get them pretty much back into place. There was a small dent in the lamp that I also go out.

718630adb1e2a2ef2afbb771ba9b184e.jpga6a03adccb5a4fd61ddd7c489d0008db.jpg86d1689761ced562062b09bf19644c88.jpg5847dfdffae1e4229b120b618e6acb8b.jpg 30636a5c3fefb77afeea57e913d24c36.jpgdef4ec85f5b67ddc929b2660282f91ed.jpg43962af756afb162a82bd0170f744907.jpg553d014df044f8d42a05a46620db5ddf.jpg

Sent from my Pixel XL using Tapatalk
 

Attachments

  • 5847dfdffae1e4229b120b618e6acb8b.jpg
    5847dfdffae1e4229b120b618e6acb8b.jpg
    61.9 KB · Views: 8
  • 86d1689761ced562062b09bf19644c88.jpg
    86d1689761ced562062b09bf19644c88.jpg
    127.4 KB · Views: 11
  • a6a03adccb5a4fd61ddd7c489d0008db.jpg
    a6a03adccb5a4fd61ddd7c489d0008db.jpg
    90.9 KB · Views: 8
  • 718630adb1e2a2ef2afbb771ba9b184e.jpg
    718630adb1e2a2ef2afbb771ba9b184e.jpg
    86.7 KB · Views: 9
  • 30636a5c3fefb77afeea57e913d24c36.jpg
    30636a5c3fefb77afeea57e913d24c36.jpg
    75 KB · Views: 7
  • def4ec85f5b67ddc929b2660282f91ed.jpg
    def4ec85f5b67ddc929b2660282f91ed.jpg
    74.9 KB · Views: 6
  • 43962af756afb162a82bd0170f744907.jpg
    43962af756afb162a82bd0170f744907.jpg
    106.2 KB · Views: 6
  • 553d014df044f8d42a05a46620db5ddf.jpg
    553d014df044f8d42a05a46620db5ddf.jpg
    104.3 KB · Views: 8

mikegt4

Well-known member
Joined
Sep 12, 2005
Messages
3,265
Location
sw ohio
Looks good
My son disassembled his 397.19580 just this morning for a resto.
 

WWShop

Well-known member
Joined
Aug 25, 2015
Messages
948
Location
MN
Great start and I will definitely be following this thread. I am working on a Craftsman 1/2 hp electric motor and I emptied out about a fistful of sawdust yesterday from it. The inside of your grinder looks to be in good condition.
 
OP
R

rrich1

Well-known member
Joined
Oct 7, 2015
Messages
793
Great start and I will definitely be following this thread. I am working on a Craftsman 1/2 hp electric motor and I emptied out about a fistful of sawdust yesterday from it. The inside of your grinder looks to be in good condition.
Thanks! It was super clean on the inside. 6ae17c2a98c572a133d4a6bfc48ef5c3.jpg

Sent from my Pixel XL using Tapatalk
 

Attachments

  • 6ae17c2a98c572a133d4a6bfc48ef5c3.jpg
    6ae17c2a98c572a133d4a6bfc48ef5c3.jpg
    104.4 KB · Views: 17
OP
R

rrich1

Well-known member
Joined
Oct 7, 2015
Messages
793
Started sanding the outside for paint. Since I redid the drill press my ocd would get the better of me sooner or later if I didn't redo the outside of the grinder. Not sure how much more I will do. They are only vacuum cleaned right now. 0b80a5aa8054e481a9a1d48ea65f4886.jpg811fbddea7cc03d84bba50c8d2458300.jpg

Sent from my Pixel XL using Tapatalk
 

Attachments

  • 811fbddea7cc03d84bba50c8d2458300.jpg
    811fbddea7cc03d84bba50c8d2458300.jpg
    112 KB · Views: 9
  • 0b80a5aa8054e481a9a1d48ea65f4886.jpg
    0b80a5aa8054e481a9a1d48ea65f4886.jpg
    128.5 KB · Views: 9
OP
R

rrich1

Well-known member
Joined
Oct 7, 2015
Messages
793
Subscribed for some more good resto pics, keep up the ocd goodness!
Will do!

Started some clean up on the metal pieces today. Drill press came in handy for this! 1de5f69d66cd40c603af20f066f04264.jpgd67f02f42b0b83a07b614aff038c3cc4.jpg

Sent from my Pixel XL using Tapatalk
 

Attachments

  • 1de5f69d66cd40c603af20f066f04264.jpg
    1de5f69d66cd40c603af20f066f04264.jpg
    112.2 KB · Views: 10
  • d67f02f42b0b83a07b614aff038c3cc4.jpg
    d67f02f42b0b83a07b614aff038c3cc4.jpg
    77.7 KB · Views: 8
OP
R

rrich1

Well-known member
Joined
Oct 7, 2015
Messages
793
Dark body parts primed. I still have yet to clean up the center piece. I did clean up the lamp cover and it is ready for paint as well. I am looking to get tubular rivets to replace the ones holding on the name plate. acef863a57c48101e74a590191fe211b.jpg
d50acff5e6292ebc2bc5807c63ad04fb.jpg05f6c24ac254c4ae258ad542c7a76b0a.jpg
Sent from my Pixel XL using Tapatalk
 

Attachments

  • 05f6c24ac254c4ae258ad542c7a76b0a.jpg
    05f6c24ac254c4ae258ad542c7a76b0a.jpg
    74.4 KB · Views: 10
  • d50acff5e6292ebc2bc5807c63ad04fb.jpg
    d50acff5e6292ebc2bc5807c63ad04fb.jpg
    54.3 KB · Views: 4
  • acef863a57c48101e74a590191fe211b.jpg
    acef863a57c48101e74a590191fe211b.jpg
    102.6 KB · Views: 5
OP
R

rrich1

Well-known member
Joined
Oct 7, 2015
Messages
793
Paint went on last night and this morning! 1246ad8bfde39e6762c5030dcffb7223.jpg6fcdff0f77c050cfaf89c89fd3b21db4.jpg

Sent from my Pixel XL using Tapatalk
 

Attachments

  • 6fcdff0f77c050cfaf89c89fd3b21db4.jpg
    6fcdff0f77c050cfaf89c89fd3b21db4.jpg
    89 KB · Views: 5
  • 1246ad8bfde39e6762c5030dcffb7223.jpg
    1246ad8bfde39e6762c5030dcffb7223.jpg
    87.6 KB · Views: 8

WWShop

Well-known member
Joined
Aug 25, 2015
Messages
948
Location
MN
Wow! This is turning out really great. Maybe it was mentioned, but do you have any plans to replace the glass in the eyeshields?
 
OP
R

rrich1

Well-known member
Joined
Oct 7, 2015
Messages
793
Wow! This is turning out really great. Maybe it was mentioned, but do you have any plans to replace the glass in the eyeshields?
At the moment I am going to try and clean them up. I'll work on those when I get this put back together. Les real estate to take up. I bought tubular rivets and they will be here by Monday. I'll take the name plate off then and work on getting all the silver parts ready for paint then.

Sent from my Pixel XL using Tapatalk
 
OP
R

rrich1

Well-known member
Joined
Oct 7, 2015
Messages
793
I see the paint can but I don't see the obligatory paint code mentioned!
Ford dark shadow gray. Same as my drill press.

I have a Honda silver metallic paint for the center, eye shield's, and light.

Sent from my Pixel XL using Tapatalk
 
To avoid these ads, REGISTER NOW!

softailgarage

Well-known member
Joined
Apr 20, 2011
Messages
5,153
Location
Bullhead City, Az.
I was going to make the comment regarding not disturbing the safety glass stickers, but have the feeling now, after seeing you sent a PM, that I may be missing something (been away too long).
 
OP
R

rrich1

Well-known member
Joined
Oct 7, 2015
Messages
793
I was going to make the comment regarding not disturbing the safety glass stickers, but have the feeling now, after seeing you sent a PM, that I may be missing something (been away too long).
I have to touched the glass yet so I will see how it goes.

Third coat of clear is on. Waiting for that to dry and will most likely get it assembled tonight. Won't be completely finished but at least it can be put back together.

Sent from my Pixel XL using Tapatalk
 
OP
R

rrich1

Well-known member
Joined
Oct 7, 2015
Messages
793
Took apart the shields and got the glass cleaned up. 62cb7b0ae9b1ebb02bb14b2ad4666eb0.jpg4b2dd2882614c1d26d2d761f779501a8.jpg5cdc2a459fd68cbf12a5d1d3dbfcd3fc.jpg

Sent from my Pixel XL using Tapatalk
 

Attachments

  • 5cdc2a459fd68cbf12a5d1d3dbfcd3fc.jpg
    5cdc2a459fd68cbf12a5d1d3dbfcd3fc.jpg
    88.2 KB · Views: 5
  • 4b2dd2882614c1d26d2d761f779501a8.jpg
    4b2dd2882614c1d26d2d761f779501a8.jpg
    91.4 KB · Views: 5
  • 62cb7b0ae9b1ebb02bb14b2ad4666eb0.jpg
    62cb7b0ae9b1ebb02bb14b2ad4666eb0.jpg
    122.7 KB · Views: 6
OP
R

rrich1

Well-known member
Joined
Oct 7, 2015
Messages
793
This could look really good. No paint just wire wheeled in the center.
cbadd3b9a6ca73fede4aacf4457f92cc.jpgade1e963c919479730fc3e9ccd5fcc57.jpgd1844949772628777e36aa531d4c5346.jpg

Sent from my Pixel XL using Tapatalk
 

Attachments

  • ade1e963c919479730fc3e9ccd5fcc57.jpg
    ade1e963c919479730fc3e9ccd5fcc57.jpg
    92.9 KB · Views: 9
  • d1844949772628777e36aa531d4c5346.jpg
    d1844949772628777e36aa531d4c5346.jpg
    95.4 KB · Views: 5
  • cbadd3b9a6ca73fede4aacf4457f92cc.jpg
    cbadd3b9a6ca73fede4aacf4457f92cc.jpg
    96.2 KB · Views: 6
OP
R

rrich1

Well-known member
Joined
Oct 7, 2015
Messages
793
Got the shields and lamp cover cleaned up before the gym today. 309eec4a5a6b18153528311b48f2366d.jpga5217fa5dfdbbabc79a2933c6d2faeff.jpg

Sent from my Pixel XL using Tapatalk
 

Attachments

  • a5217fa5dfdbbabc79a2933c6d2faeff.jpg
    a5217fa5dfdbbabc79a2933c6d2faeff.jpg
    106.9 KB · Views: 7
  • 309eec4a5a6b18153528311b48f2366d.jpg
    309eec4a5a6b18153528311b48f2366d.jpg
    115.2 KB · Views: 7
OP
R

rrich1

Well-known member
Joined
Oct 7, 2015
Messages
793
Thanks. Had a set back with one of the wheel covers. the paint just rubbed off a section so I am repainting it. I brushed the metal parts and put clear on them. The center section didn't spray as clear as I wanted bit it is fine. I'll get some pics here soon.

Sent from my Pixel XL using Tapatalk
 
OP
R

rrich1

Well-known member
Joined
Oct 7, 2015
Messages
793
Here is where I am at right now. Everything besides the right wheel cover is back together. I currently have it sitting in paint stripper. While I am happy with the look of the grinder. I am not happy with how well the paint will hold up over time. It just doesn't seem to be ad durable as the drill press. Seems like anything and everything scratches it. I purchased some tube rivets for the front label off of eBay and they worked great. Perfect size and not as hard to hammer in as solid rivets. Pic posted below. The only thing not cleaned up was the light cord and label. I left the label original besides cleaning the dust off. Thought it adds a nice contrast and really can show the true age of the item. I'll get to cleaning the cord sometime. Hope you enjoyed the restoration. eb9f47350e7e32ad9ddc3740e1d3644c.jpgda3f1c83feacf9f41f0f6d1ea27682a8.jpg8ebdebb37e49857ac6dd07e838972976.jpg4e14890636e6ee54b7739ceb38e36b2c.jpg9f50a27483c9c7062c56ce4365de9141.jpg4069af4c5e0f9c25cd04c687d6328837.jpgfc6314f37813b0d0cfd05421389e66b5.jpg


Sent from my Pixel XL using Tapatalk
 

Attachments

  • da3f1c83feacf9f41f0f6d1ea27682a8.jpg
    da3f1c83feacf9f41f0f6d1ea27682a8.jpg
    100 KB · Views: 9
  • eb9f47350e7e32ad9ddc3740e1d3644c.jpg
    eb9f47350e7e32ad9ddc3740e1d3644c.jpg
    117.3 KB · Views: 6
  • 8ebdebb37e49857ac6dd07e838972976.jpg
    8ebdebb37e49857ac6dd07e838972976.jpg
    93.8 KB · Views: 5
  • 4e14890636e6ee54b7739ceb38e36b2c.jpg
    4e14890636e6ee54b7739ceb38e36b2c.jpg
    91.3 KB · Views: 3
  • 9f50a27483c9c7062c56ce4365de9141.jpg
    9f50a27483c9c7062c56ce4365de9141.jpg
    96.1 KB · Views: 5
  • 4069af4c5e0f9c25cd04c687d6328837.jpg
    4069af4c5e0f9c25cd04c687d6328837.jpg
    63.1 KB · Views: 4
  • fc6314f37813b0d0cfd05421389e66b5.jpg
    fc6314f37813b0d0cfd05421389e66b5.jpg
    85.8 KB · Views: 4
Last edited:

cajunfirehawk

Well-known member
Joined
Nov 29, 2011
Messages
2,566
Location
Ms Gulf Coast
rrich1- sorry to hear about your paint issues, wondering did you prime with a self etching primer? All of these parts except the center band is cast aluminum, correct? Consider "baking" the paint on like in an old oven?
 
Last edited:

bagged89s10

Well-known member
Joined
Mar 13, 2005
Messages
4,607
Location
CT
Looking good. I found these when I was looking for replacement rivets for reinstalling machine badges.
Took me a long time to figure out they were called hammer drive screws.

Not sure if these are the right size I purchased but just an example.
0c0ce912de188a3cc747f4fe4b128ee3.jpg
 

Attachments

  • 0c0ce912de188a3cc747f4fe4b128ee3.jpg
    0c0ce912de188a3cc747f4fe4b128ee3.jpg
    264.1 KB · Views: 5
OP
R

rrich1

Well-known member
Joined
Oct 7, 2015
Messages
793
bagged; so hammer drives just "push" in and done?
They look like it. Those were the type of screws that attach the craftsman name plates like on my drill press. You can see it just under the badge.
06d67cba9e4c19d0ad8d9faa8373d2e6.jpg

Sent from my Pixel XL using Tapatalk
 

Attachments

  • 06d67cba9e4c19d0ad8d9faa8373d2e6.jpg
    06d67cba9e4c19d0ad8d9faa8373d2e6.jpg
    118.7 KB · Views: 8

bubinga

Well-known member
Joined
Jul 26, 2014
Messages
12,744
Location
Bridgeport Ohio. (Across River From Wheeling WV)
At the moment I am going to try and clean them up. I'll work on those when I get this put back together. Les real estate to take up. I bought tubular rivets and they will be here by Monday. I'll take the name plate off then and work on getting all the silver parts ready for paint then.

Sent from my Pixel XL using Tapatalk
Believe it or not, but did you ever try about 1000 wet oo dry sandpaper, Wet , lots O water, to clean glass? Might want to even start finer if you have it.
Like about 1500,
It works.
 
To avoid these ads, REGISTER NOW!
Top Bottom