To avoid these ads, REGISTER NOW!

VISE REPAIR 101 all vise repairs, lubricants, sources for parts and the tricks to fix

mindofone

Member
Joined
Feb 17, 2010
Messages
16
Location
Dallas, Texas
That's what I was afraid of. Ok, new challenge then. Thanks!


This, I hate to have to say, is one of those not-nice 'theres no free lunch' situations.

That part can be mended, but the only reasonably good way to do it would be to clean up the ragged scars around that tapped hole with a little carbide rotary file, then braze in to fill the scars. Once cool, file to flatness, use the jaw itself as a jig to locate the hole, and drill with the drill size for a heli-coil tap. Tap for heli-coil, run the insert, and you'll have a sound repair.

In short, if you don't do welding/brazing, get someone who does to help you.

You could opt to 'mickey-mouse' the job by de-rusting the part, cleaning whatever existing threads may still be there with a tap, then run a wax (resist) coated bolt into the hole, and pack with Devcon or equivalent steel powder/epoxy putty. That wouldn't work very well, to be sure, but it might be 'better than nothing' for gentle use, or display.

cheers

Carla
 
To avoid these ads, REGISTER NOW!

KMScott

Well-known member
Joined
Feb 14, 2012
Messages
4,643
Location
Daufuskie Island, South Carolina
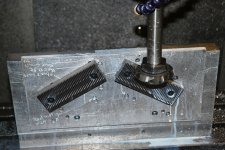
Thanks VA and Shawn, I bet your uncle could make a fly cutter setup and cut the serrations if you wanted them. I made a special holder for 1" ID carbide tipped cutters. Good luck and share his work.
 

Attachments

  • Cutting Red Seal # 64 (1).jpg
    Cutting Red Seal # 64 (1).jpg
    149 KB · Views: 64

ALLFAST

Well-known member
Joined
Feb 20, 2017
Messages
1,233
Location
Northern California
I'll definitely be posting the before, during and afters. Next week we are off to glass beading and then I will begin the meticulous grinding required to liberate the old swivel base from the vise body (it was welded).

The TLC shall commence. I'll run the flycutter info past him.

Thanks Kevin. A great weekend to all.

Shawn
 

BFBOB

Well-known member
Joined
Sep 20, 2011
Messages
5,073
After all the high-tech fixes in this thread I'm almost embarrassed to try to add anything, but here goes. I have a Reed 103S that has so far resisted my attempts to disassemble it. I have so far been unable to remove the large screw that holds the body to the swivel mount. I searched in vain for a setscrew or pin - as far as I can tell it's just really, really tight and/or rusted. I couldnt get a good dose of penetrating oil on it from below - it just leaked out. I did manage to get the nut and retaining pin out which gave access to the top of the screw. Still no way to keep a pool of penetrating oil on it, so I built a dam. I cut a piece of card stock for a close fit in the dovetail and filled the area behind it with silicone seal (after cleaning it as well as possible). I put a little piece of shafting in the pin hole just for reinforcement and let it dry overnight. Now, I can put enough Liquid Wrench, PBBlaster and/or Kroil in to to immerse the top of the screw. After two days, the LW was about 2/3 gone - I was disappointed, but soon realized it had just evaporated. No leakage.

I'll give it a week or two with different elixers and try again.

If there is some kind of a locking mechanism on Reeds, perhaps someone will clue me in! This is a heck of a big screw, around 3/4" with a slotted head close to 2" across.
 

Attachments

  • DSCN5532.jpg
    DSCN5532.jpg
    108.7 KB · Views: 55
  • DSCN5530.jpg
    DSCN5530.jpg
    93.6 KB · Views: 58
  • DSCN5529.jpg
    DSCN5529.jpg
    142 KB · Views: 63
  • DSCN5528.jpg
    DSCN5528.jpg
    127.3 KB · Views: 55
  • DSCN5527.jpg
    DSCN5527.jpg
    132.8 KB · Views: 58
  • DSCN5092.jpg
    DSCN5092.jpg
    140.9 KB · Views: 64

Carla

MEMBER EMERITUS
Joined
Nov 27, 2010
Messages
672
After all the high-tech fixes in this thread I'm almost embarrassed to try to add anything, but here goes. I have a Reed 103S that has so far resisted my attempts to disassemble it. I have so far been unable to remove the large screw that holds the body to the swivel mount. I searched in vain for a setscrew or pin - as far as I can tell it's just really, really tight and/or rusted. I couldnt get a good dose of penetrating oil on it from below - it just leaked out. I did manage to get the nut and retaining pin out which gave access to the top of the screw. Still no way to keep a pool of penetrating oil on it, so I built a dam. I cut a piece of card stock for a close fit in the dovetail and filled the area behind it with silicone seal (after cleaning it as well as possible). I put a little piece of shafting in the pin hole just for reinforcement and let it dry overnight. Now, I can put enough Liquid Wrench, PBBlaster and/or Kroil in to to immerse the top of the screw. After two days, the LW was about 2/3 gone - I was disappointed, but soon realized it had just evaporated. No leakage.

I'll give it a week or two with different elixers and try again.

If there is some kind of a locking mechanism on Reeds, perhaps someone will clue me in! This is a heck of a big screw, around 3/4" with a slotted head close to 2" across.

That large slotted screw shouldn't be all that difficult to remove, even tho its rusted a bit, but it may take a bit of torque to break it free. (edited....there isn't any locking component on a Reed swivel base screw.....they were well torqued down, when new, I suspect)

A method I've used on those, which isn't very 'elegant', to be sure, was to take a scrap of flat steel...a little left-over bit of Simonds oil-hardening flat stock, if I remember correctly, 1/2x1-1/2, maybe, or thereabouts, and mill one end down to just fit the screw slot, with a medium drive fit.

The torque was provided by my helper, with a 1900-ish vintage large heavy monkey-wrench, with a length of pipe on the wrench handle for leverage.....the so-called 'brute force and ignorance' tradition.

(there was one, tho....oh, my.....one of my friends had gotten (free for the hauling) a very large, and very thoroly rusted, old vise, which was about to be sent to scrap. He had tried welding a nut to the swivel-base shoulder-screw and 'rattling' it loose with a 3/4" drive air-impact wrench.....whereupon part of the screw head broke away.

I had him lift that great heavy lump onto a mill table for me, and I milled the remainder of the screw head away, at which point the vise base was still adhering grimly to the shank of the screw, and was not about to come free.

I freed it up by drilling/boring the screw away, out to minor dia. of the threads, and.....after he glass-blasted the parts and cleaned up the threads in the casting.....made up a replacement screw for him.....its the old line about 'one person's rusty junk is another person's treasure', or some such)

cheers

Carla
 
Last edited:

Shiftless

Well-known member
Joined
Mar 9, 2014
Messages
14,557
Location
East Bay SFO
I'm with ganymede on the drag link. I used my 1/2 inch drive drag link socket and a 24 inch breaker bar. Worked fine on my Reed 406.
If you don't have a drag link socket, Carla's suggestion works too, if you happen to have a chunk of steel like that instead.
Some auto parts stores have rental tools...maybe your local one has a drag link socket.
 
Last edited:
OP
D

drivesitfar

Well-known member
Joined
Oct 23, 2013
Messages
36,041
Location
Pacific Northwest
Bob: my Reed 404.5 and my old drag link socket on a ratchet worked, but if it's rusted i'd use a breaker bar for the drag link.
 

Attachments

  • WP_20141229_007 - Copy.jpg
    WP_20141229_007 - Copy.jpg
    112.7 KB · Views: 39
  • WP_20141229_009.jpg
    WP_20141229_009.jpg
    119.8 KB · Views: 41
  • WP_20150530_028.jpg
    WP_20150530_028.jpg
    143 KB · Views: 43
  • WP_20150530_029.jpg
    WP_20150530_029.jpg
    142.2 KB · Views: 37
  • WP_20150530_027.jpg
    WP_20150530_027.jpg
    143.6 KB · Views: 43
  • WP_20150530_012.jpg
    WP_20150530_012.jpg
    124.1 KB · Views: 38
  • user218165_pic51056_1433176540.jpg
    user218165_pic51056_1433176540.jpg
    48.5 KB · Views: 40

BFBOB

Well-known member
Joined
Sep 20, 2011
Messages
5,073
Thanks for the tips on the Reed screw. I've already tried the drag link socket/breaker bar, and improvised screwdriver - piece of full-width flat steel held in a large handscrew (wooden woodworking clamp). Applied enough torque to start distorting the edges of the screw slot.
So, I'm back to the gentle methods. Soak in penetrating oil, every few days turn it over and tap, tap, tap on the screw head. If it takes a month (or two!) no big deal. The vise is in such nice overall condition I don't want to take a chance on breaking something.
Thanks for verifying the lack of pins, setscrews etc.

I GOT IT OUT!!
A couple more days soaking in LiqWren, and on close inspection I decided rust was not the main issue-torque was. What finally worked was an improvised screwdriver. I rooted around in the scrap bin and found some steel just the right thickness to fit the slot. Looking at my previous attempt, I found the screw distortion was due to the "blade" having twisted. So this time, I sandwiched it between two thicker pieces to support it between the handscrew and the screw head. This kept the blade from twisting and camming out, and with just the little 12" long handscrew I was able to get it loose. It gave up with a very satisfying pop and unscrewed the rest of the way with fingers!
I tried driving the jaw pins out, and even using a soft grade 2 bolt for a punch they started mushrooming immediately. Guess I'll just leave them.
I'm still looking for some guidance with paint. The green paint I think is original looks like a slightly brighter version of old S-K tool boxes, wrinkle finish and all. Can anyone suggest a close rattle can equivalent?
Thanks!
 

Attachments

  • DSCN5592.jpg
    DSCN5592.jpg
    131.1 KB · Views: 35
  • DSCN5591.jpg
    DSCN5591.jpg
    143.2 KB · Views: 37
Last edited:

vintage nut

Well-known member
Joined
Mar 17, 2015
Messages
1,272
Location
west coast of canada
I'd be tempted to use the method of penetrant and a torch, combined with daily gentle beatings with a soft hammer of some sort. Pretty much anything will come out with that, just a matter of time. My big 7.5" blacksmith vise took nearly two months of torch and penetrant plus beatings with a lead sledgehammer to get freed up.
Obviously you don't want to beat the **** out of your vise, but a piece of brass round and a sharp whack with a hammer can do wonders to break free stubborn bolts

Sent from my MotoG3 using Tapatalk
 

bluebolt

Well-known member
Joined
Dec 28, 2008
Messages
5,447
Location
Benton LA
Aznboi04, your Morgan is early because it has Chicago on it, I think they moved to Aurora in the late 1940's.
 

vintage nut

Well-known member
Joined
Mar 17, 2015
Messages
1,272
Location
west coast of canada
91fbba0cfcfd0f2022196eb503836e28.jpg
I've got your morgans big brother on my bench. Not quite reed level of solid, but at 142# it's a very substantial vise.

Morgans don't handle abuse all that well though. Probably due to being grey iron instead of nodular iron. My 6" had a little crack in the static jaw. It was repairable, but show's what abuse with a hammer can do even to a big vise

Sent from my MotoG3 using Tapatalk
 

Attachments

  • 91fbba0cfcfd0f2022196eb503836e28.jpg
    91fbba0cfcfd0f2022196eb503836e28.jpg
    73.6 KB · Views: 0

jazzfiddle

Member
Joined
Mar 13, 2017
Messages
5
Location
Sterling, VA
I inherited what appears to be a Reed 202 1/2 vise. It won't swivel; taking it apart I can see why. There is a part missing - what the Reed diagram calls a locking pad. Instead there is a bolt in one of the holes in the bottom of the base that runs up through the bottom of the vise, and the swivel nut threads on to that. I can use it as a fixed vise, but it would be great if I could find a locking pad, or have one made, so it could swivel. I can post pictures if desired. Any suggestions? Thanks!
 

trijeff

Well-known member
Joined
Jan 21, 2015
Messages
1,359
Location
Northern Cali
Jazz, to me it sounds completely irreparable ... just because I take pity on you I will take it off your hands and send you a fully functioning vise for free.

All, jokes aside, I would contact KMscott on this forum, he can build you anything better than new.
 
OP
D

drivesitfar

Well-known member
Joined
Oct 23, 2013
Messages
36,041
Location
Pacific Northwest
Jazz: welcome to the forum. can you post up a bunch of pictures of your vise full view and of a few of the missing or broken part? there is a parts vise thread in general tools, but I'd post up pictures of your vise here first to see if we can either help fix it or maybe one of us has a part to fix it.

good luck

AZN: welcome to the forum and nice work spiffing up your little MORGAN. :thumbup:
 

BFBOB

Well-known member
Joined
Sep 20, 2011
Messages
5,073
91fbba0cfcfd0f2022196eb503836e28.jpg
I've got your morgans big brother on my bench. Not quite reed level of solid, but at 142# it's a very substantial vise.

Hey, Vintage - assuming that Morgan is a repaint, do you know what brand/color it is? Looks like a possibility for my Reed 103 project.
Thanks
 

jazzfiddle

Member
Joined
Mar 13, 2017
Messages
5
Location
Sterling, VA
Here are some pictures. You can see where Gramps used a square head bolt to keep the vise from swiveling. If you go here:
https://www.reedmfgco.com/assets/download/807__22-Utility-Vise.pdf
you can see the parts diagram for a modern Reed vise. Part #6 (locking pad) is what I'm missing. The newer ones are toothed to match the surface of the base, but my base does not have teeth.

Currently it's mounted on a piece of plywood, which is ok - I can clamp it to my workbench. But it would be great if I could fix the swivel function and bolt it down.

Thanks for the help!
 

Attachments

  • KIMG0651.jpg
    KIMG0651.jpg
    145.4 KB · Views: 43
  • KIMG0650.jpg
    KIMG0650.jpg
    146.6 KB · Views: 37
  • KIMG0643.jpg
    KIMG0643.jpg
    148.8 KB · Views: 39
  • KIMG0652.jpg
    KIMG0652.jpg
    148.9 KB · Views: 42
  • KIMG0653.jpg
    KIMG0653.jpg
    143.6 KB · Views: 46
  • Capture.JPG
    Capture.JPG
    131.5 KB · Views: 41
Last edited:
To avoid these ads, REGISTER NOW!
OP
D

drivesitfar

Well-known member
Joined
Oct 23, 2013
Messages
36,041
Location
Pacific Northwest
Jazz: it also looks like one of your three mounting feet is broken so maybe if you could find a swivel's base you might get lucky and find the swiveling parts you are missing too. i've seen and heard where some members are able to use other parts from other vises so that might be an option too.

good luck
 

ALLFAST

Well-known member
Joined
Feb 20, 2017
Messages
1,233
Location
Northern California
Jazz,

I second DIF on the broken ear, and sourcing a nice used base with hardware. You shouldn't have too much trouble finding one if you are persistent. I'll keep my visey senses tuned on the internet.

And DIF, it appears Jazz has the same little sets crew affair rigged up to his threaded block in the tail of the base (What is the PROPER TERM for this important little item ?!)

I'll put a base and hardware into my search net for you Jazz.

Be Well-Shawn
 

ALLFAST

Well-known member
Joined
Feb 20, 2017
Messages
1,233
Location
Northern California
Jazz,
I obviously missed (and attempted to find) the model number of your Reed. I can't read it from the photo and didn't find it in the thread. What would your budget be for a new base, including shipping ?
Do let me know. I recently had a 17 # base (20#) shipped by USPO and shipping was $20. Your base should be somewhat lighter I presume. Thanks again
 
OP
D

drivesitfar

Well-known member
Joined
Oct 23, 2013
Messages
36,041
Location
Pacific Northwest
AF: not sure exactly what you are talking about this time, but maybe the pin holding the vise nut in place?

ALL & Get and KM: do any of you have pictures handy of your improvised vise nut holders? i know a few of you have tapped the holes and put in threaded pins or bolts and also some like maybe KM put in a small sleeve with a set screw on the top of his and sorry i just don't recall when they were posted to start my searching to show Allfast and others some of the cool stuff you can do to modify a nice old vise.

thanks
 

jazzfiddle

Member
Joined
Mar 13, 2017
Messages
5
Location
Sterling, VA
Jazz,

I second DIF on the broken ear, and sourcing a nice used base with hardware. You shouldn't have too much trouble finding one if you are persistent. I'll keep my visey senses tuned on the internet.

And DIF, it appears Jazz has the same little sets crew affair rigged up to his threaded block in the tail of the base (What is the PROPER TERM for this important little item ?!)

I'll put a base and hardware into my search net for you Jazz.

Be Well-Shawn

Thanks! I saved a search on ebay for reed vise 202. I hope you're right that one will turn up. The mounting ear looks like it has enough "meat" on it to hold something down, but a replacement base would solve 2 problems.

The pin or screw that holds the lead nut (I think that's what it's called) looks like it might have squared off sides, but also looks like the top is mushroomed from someone beating on it. I'll note that there appears to be a metal shim of some kind on the right side of the lead nut - you can see it in the picture; I suppose that was added by someone.

ALLFAST: It says 202 1/2 on the body. I haven't thought about a budget for this, just seeing what can be done. I'll have to see what comes up and decide how much I'll spend. Thanks for helping with the search.
 

ALLFAST

Well-known member
Joined
Feb 20, 2017
Messages
1,233
Location
Northern California
I've read with great delight how members have freed up their taper pins and sliding rear jaws on these special vises.

My question, are any of these taper pins threaded ? I recall a member having proudly forced his pin free (with a jacking bolt/plate affair ) only to realize he had pulled the threads out ?

I think it was a Hollands 44 1/2 like I have...but I can't remember. I need to research the original thread, but this will likely lead to hours of unbridled vise surfing here, so I'm abit apprehensive !
 

ALLFAST

Well-known member
Joined
Feb 20, 2017
Messages
1,233
Location
Northern California
Jazz,
Thanks for the confirmation on 202 1/2 . I'm in Northern California and I'll put this on my search radar....we have a good amount of candidates in my parts. It shouldn't be too much. Most bases I've seen in my short vise addiction thus far have been in the 18 to 45 dollar range.

Shawn
 

GETRIDAONE

Well-known member
Joined
May 21, 2013
Messages
1,549
Location
Auburn, GA
That looks like a standard pin with a ding where the screw would go. Here is one of my homemade nut adjusters.
 

Attachments

  • IMG_20161016_103856.jpg
    IMG_20161016_103856.jpg
    140.4 KB · Views: 47
  • IMG_20161022_090034.jpg
    IMG_20161022_090034.jpg
    141 KB · Views: 45

jazzfiddle

Member
Joined
Mar 13, 2017
Messages
5
Location
Sterling, VA
Jazz,
Thanks for the confirmation on 202 1/2 . I'm in Northern California and I'll put this on my search radar....we have a good amount of candidates in my parts. It shouldn't be too much. Most bases I've seen in my short vise addiction thus far have been in the 18 to 45 dollar range.

Shawn

Much obliged, Shawn. That seems like a reasonable price range to get this vise up to speed.
 

vintage nut

Well-known member
Joined
Mar 17, 2015
Messages
1,272
Location
west coast of canada
Hey, Vintage - assuming that Morgan is a repaint, do you know what brand/color it is? Looks like a possibility for my Reed 103 project.
Thanks
I probably won't be much help. It was a house paint chip from a local hardware store that I had them tint rust oleum to match. Even if I still had the can I couldn't be any help in finding you that color.
It was thinned and brushed on. If I'm not using a rattle can, I usually use a brush for smaller castings. It looks every bit as good, and saves cleaning the sprayer

Sent from my MotoG3 using Tapatalk
 

Carla

MEMBER EMERITUS
Joined
Nov 27, 2010
Messages
672
Here are some pictures. You can see where Gramps used a square head bolt to keep the vise from swiveling. If you go here:
https://www.reedmfgco.com/assets/download/807__22-Utility-Vise.pdf
you can see the parts diagram for a modern Reed vise. Part #6 (locking pad) is what I'm missing. The newer ones are toothed to match the surface of the base, but my base does not have teeth.

Currently it's mounted on a piece of plywood, which is ok - I can clamp it to my workbench. But it would be great if I could fix the swivel function and bolt it down.

Thanks for the help!

Hello, Jazz,

I'd suspect, based on the photos, that your cute little vise was built sometime in the 1920's to mid-1930's, and that your chance of finding serviceable used original parts would be pretty close to nil, as a practical matter.

The 'good news' is that your vise is readily repairable. I've had good luck in repairing broken feet on small vises by simply brazing on a suitable little piece of steel, shaping it to suit, and re-establishing the original hole size/position with plunge cuts using small, then larger, end-mills. Thats actually a much easier job than it would seem, at first glance. (edited....one must take care to have the broken part well 'V-ed', to certainly have a full depth of braze to the repair part.)

Re-making the 'locking pad' part would be a bit more work, but not really difficult.

Envision, if you will, forming little pieces of sheet metal, or even thin wood, to form 'dams' at the extremities of the large opening in the swivel base, waxing (resist) the interior taper of the base, then pouring a casting resin to form a 'dummy part'. This 'dummy' could then be used as a 'pattern' for a casting in one of the high-strength bronzes.

With the 'pad' cast and fettled nicely to suit the radius and taper of the base casting, then one could use a transfer-punch to locate the tapped hole for a stud, just a suitable length of all-thread, actually, with the back jaw casting assembled to the base.

There would be another, better, way to make the replacement swivel lock part, which I wouldn't care to tackle, myself, but I would propose this to Mr Scott, as being feasibly do-able with his CNC mill.

Envision brazing some little sheet-metal 'ears' to a suitable size of pin, or bolt, which suits the back jaw, then hand-filing to a fit with the interior taper of the swivel base. With those angles, and their distance from centre-line known, and the radius of the base interior known, the tapered radii could be generated.

Then, one could turn up and thread a part which would look like a bolt, with a greatly over-size head, with a little locating-nib on the end of the head. With this part set up in the CNC mill, the nib could be dialled-in as a reference datum, and the program run.

(yes, I know perfectly well that such a part was routinely done with a Bridgeport class mill and rotary-table in times past, and could well be done the now if one was willing to invest that much working time in that part.....but, these days, having CNC capability makes such parts so much easier to do.)

cheers

Carla
 
Last edited:

Carla

MEMBER EMERITUS
Joined
Nov 27, 2010
Messages
672
I've read with great delight how members have freed up their taper pins and sliding rear jaws on these special vises.

My question, are any of these taper pins threaded ? I recall a member having proudly forced his pin free (with a jacking bolt/plate affair ) only to realize he had pulled the threads out ?

I think it was a Hollands 44 1/2 like I have...but I can't remember. I need to research the original thread, but this will likely lead to hours of unbridled vise surfing here, so I'm abit apprehensive !

This is actually an important caveat, which the folks who repair/restore old vises should know. I've only seen the swivel jaw pins threaded in on the old Athol make of vises, but were there other makes fitted up this way?

cheers

Carla
 

ALLFAST

Well-known member
Joined
Feb 20, 2017
Messages
1,233
Location
Northern California
DIF,

This is the bolt that someone put in. I'm most sure it's not OEM, and it has a ltitle tube shim. The threads appear perfectly centered and are beautifully tapped. Maybe it had an original pin and someone tapped the hole and added this later.

I plan to find a nice vintage bolt and keep this setup.


Shawn
 

Attachments

  • 20170312_145652.jpg
    20170312_145652.jpg
    156.1 KB · Views: 37

DFB

Well-known member
Joined
Sep 7, 2016
Messages
5,765
Location
Southern VT/Western Mass
Here are some pictures. You can see where Gramps used a square head bolt to keep the vise from swiveling. If you go here:
https://www.reedmfgco.com/assets/download/807__22-Utility-Vise.pdf
you can see the parts diagram for a modern Reed vise. Part #6 (locking pad) is what I'm missing. The newer ones are toothed to match the surface of the base, but my base does not have teeth.

Currently it's mounted on a piece of plywood, which is ok - I can clamp it to my workbench. But it would be great if I could fix the swivel function and bolt it down.

Thanks for the help!


I was just looking the 403 I'm doing over (oh boy I'm almost ready for paint) and that's similar no teeth, So the piece on mine just acts as a wedge as you tighten it up and looks to be all its really is. I just dropped a half inch bolt in and it snugged it up and seems to me that maybe if you taper the flats on the bolt head some it would pull in nicely and probably hold the position decent enough even the smaller contact point . Obviously the original piece is a longer curved shape wedge which you could probably duplicate a similar piece out of some material easy enough. drill a hole in counter sink a bolt head. If you weld weld as stud to it :D

Look like you have the original nut?

Ok now I have a question with out delving to this further myself at the moment the original stud looks be a coarse 1/2 in dia thread but it doesn't match 1/2 X 13. At least I couldn't tread a nut on and visually you can quickly see the pitch doesn't match after lining up a few threads. :headscrat:
 

Attachments

  • wedge 1.jpg
    wedge 1.jpg
    74.3 KB · Views: 27
  • wedge.jpg
    wedge.jpg
    81.9 KB · Views: 27
OP
D

drivesitfar

Well-known member
Joined
Oct 23, 2013
Messages
36,041
Location
Pacific Northwest
Jazz: you are not expected to fix the Reed 202.5 like new or even fix it at all, but i'm guessing you are liking the answers you are getting in case you want to. yes? again welcome to the Forum and at Garage Journal we like our vises, old tools and other members that participate.

Carla: it's always a pleasure reading your posts. thanks again!!

Get: thanks for the spot on pictures and quick too I might add.

ALLFAST: i'm guessing that is the Rock Island 577 still or are we talking about your Athol is it a Hollands? in any case it looks like a grade 8 bolt and with the proper shim that should work just fine. maybe find a square headed 80 year old bolt to replace the grade 8 when you can, but it doesn't show while the vise is working so probably not a big deal. good luck on the restore and sounds like you maybe have the swivel base.

ALL: since i don't have the ability to Sandblast, but i hear using glass beads is the way to go on these old cast iron vises does any of you use this method? or do most of you use Electrolysis? which is better? i get a lot of emails and Pm's asking about this and i'm certainly not the guy restoring all his vises yet, but i do want to pass on the best information to those that want to restore vises or just fix up the ones on theirs or their dad's or gramp's benches.
thanks
 

ALLFAST

Well-known member
Joined
Feb 20, 2017
Messages
1,233
Location
Northern California
If anyone needs a Reed 204 1/2 body ( I think it's a 204 1/2) this is over on ebay for cheap.

I couldn't find the vise parts thread or I would post it there.

Gotta Run !

Shawn
 

Attachments

  • $_1 (9).JPG
    $_1 (9).JPG
    33.1 KB · Views: 52

Carla

MEMBER EMERITUS
Joined
Nov 27, 2010
Messages
672
ALL: since i don't have the ability to Sandblast, but i hear using glass beads is the way to go on these old cast iron vises does any of you use this method? or do most of you use Electrolysis? which is better? i get a lot of emails and Pm's asking about this and i'm certainly not the guy restoring all his vises yet, but i do want to pass on the best information to those that want to restore vises or just fix up the ones on theirs or their dad's or gramp's benches.
thanks

Hi, DIF,

The glass-blast cabinet I have was bought for a machine business in 1982, and I kept it when we later closed down the business. Over the years, it has been the most cost-effective tool I could have, for repair and restoration work. If you ever decide to 'get serious' about restoration work, you really should consider owning one.

There is a detail to consider, tho, in that there are different versions of blast cabinets available.

Some are the simple and cheaper 'entraining' type, in which the abrasive media is simply fed into the air stream, which does work well for the generality of work on iron or steel.

The more sophisticated type uses a 'pressure pot' to hold the media, and is much more controllable, allowing lower blast pressures and very fine media feed, which makes it possible to clean such parts as delicate cast brass antiques, or die-cast zinc-alloy carburetter components whilst preserving the smooth finish of the part surfaces.

Its my opinion that a controllable media blast is the only practical, cost-effective way to clean rusted parts for restoration. With good equipment, one may vary the blast pressure and media level of the blast stream to suit the work at hand, either turning up the pressure and media to save time with deeply pitted steel parts, or down for delicate castings.

The catch, of course, is that a best quality blast cabinet, with a suitable compressor to drive it, is a substantial first-cost investment. The one I have amortised its first-cost in six months of operation, doing a finish-blending operation on runs of castings. It has paid for itself many times over, since then, on repair and restoration work, and now is just a 'retirement hobby' tweak, but ever so useful.

If you become interested in small media-blast equipment, look up 'Aboytes' on the internet. Mr Aboytes builds an excellent line of best quality blast cabinets, here in California.

With some looking, you may be able to find a really good deal on a used blast cabinet, but do be careful......the abrasive media wears the plumbing thin, and parts for some makes may be unobtainable.

cheers

Carla
 
To avoid these ads, REGISTER NOW!
Top Bottom