You are using an out of date browser. It may not display this or other websites correctly.
You should upgrade or use an alternative browser.
You should upgrade or use an alternative browser.
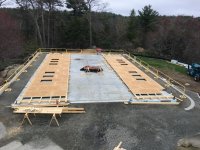
50 by 60 design and layout... 48 by 68 build
- Thread starter stamanti
- Start date

zmotorsports
ALLIANCE MEMBER
Re: 50 by 60 design and layout
Looking good. Hope all goes well and the weather cooperates for you.
Mike.
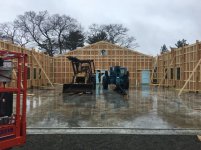
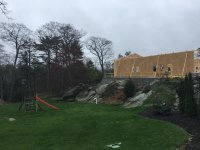
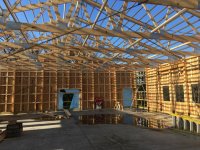
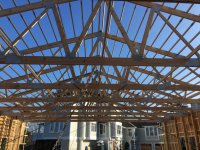
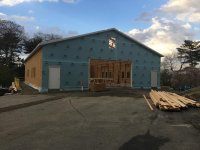
Rear gable wall was framed and sheathed today.
Looks like everyhing is set to stand up the walls tomorrow.
Hopefully weather will not be an impediment.
Looking good. Hope all goes well and the weather cooperates for you.
Mike.


Re: 50 by 60 design and layout
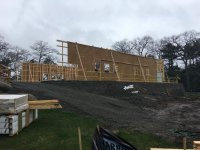
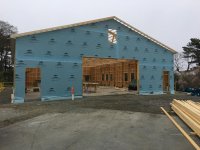
Posting a few more photos.
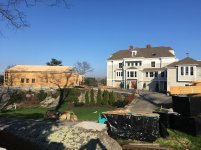
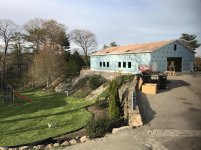
Now that the walls are up, it seems massive in person standing next to it. 12 foot walls seemed small lying down, but seem very tall standing next to them.
I thought this would translate to looking massive from the driveway, however since the garage is set back slightly from the front of the house, and at a 20* angle to the house this does not seem to be the case.
That all may change when the roof is up, but I suspect that it won't since the pitch is 4/12 and the view from the driveway is looking up at it, you may not be able to see anything other than the dormers.
Posting a few more photos.
Now that the walls are up, it seems massive in person standing next to it. 12 foot walls seemed small lying down, but seem very tall standing next to them.
I thought this would translate to looking massive from the driveway, however since the garage is set back slightly from the front of the house, and at a 20* angle to the house this does not seem to be the case.
That all may change when the roof is up, but I suspect that it won't since the pitch is 4/12 and the view from the driveway is looking up at it, you may not be able to see anything other than the dormers.
Attachments


Last edited:
OH_Varmntr
Well-known member
Re: 50 by 60 design and layout
I'm so jealous! Looking good!
I'm so jealous! Looking good!
zmotorsports
ALLIANCE MEMBER
Re: 50 by 60 design and layout
Hey looky there. Walls are standing. WooHoo.
Looking good.
Mike.
Hey looky there. Walls are standing. WooHoo.
Looking good.
Mike.
colt zantop
Well-known member
That rock landscape is killer!
Thanks for the comments, and for following along.
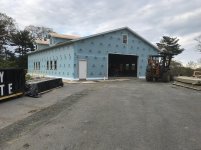
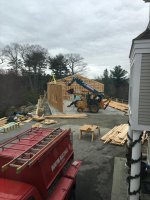
There are dormers yet to be installed centered over each group of 3 windows that should help break things up as well, but I also like the idea of a small roof over the windows if needed.
Due to the orientation of the building, there are only a few viewpoints on the property where you see the full side of the building head-on. The common viewpoints yield 3/4 views, which I think lessens the impact.
rs1968ss
Well-known member
Very nice!


ALinCarolina
Well-known member
What a beautiful setting!
Radix2
Well-known member
Can you comment on your findings going with the Morton style building rather than conventional framing? With your final finishes,insulation, etc. it would seem that it would be a better fit to do it the standard way. I know that the original elaborate building was very costly, but this solution looks a little hard to finish out perhaps. I assume you looked at a normal stick frame option too, and that is a common question here.
Anyway, great project and beautiful site!
Anyway, great project and beautiful site!
cros13
Well-known member
Just found your build mate! awesome looking shed, i wish i could have gone that big on mine! cant wait to see more progress.
As soon as i saw the zed i hit subscribe, ive got one too!
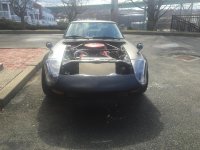
I have to say, did you mention yours was a track car?
Because your nuts if your racing her with a G nose front and headlight covers! The front 12 inches of the car is worth more than the rest of it!!!
G nose conversions are few and far between here In Australia, you usually have to import them from Japan. The lens covers are even rarer, and I've seen people asking 1k for a set
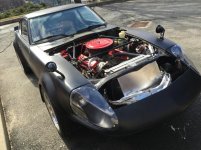
From the photo of your fuel pump set up, i can see it looks like you have polly bushes in the moustache bar? I bought some when i got a rebuild kit for the rear end of mine, but the shoulder of the bush looks way too thick compared to the originals. Did you shave yours down?
What V8 is in her? I plan on throwing a 327 chev or 308 holden V8 in mine, currently she is on a rotissarie as i fix the rust.
Check out my garage build, few photo's and links to my old girl in there.
Rudi.
As soon as i saw the zed i hit subscribe, ive got one too!
I have to say, did you mention yours was a track car?
Because your nuts if your racing her with a G nose front and headlight covers!
The front 12 inches of the car is worth more than the rest of it!!!G nose conversions are few and far between here In Australia, you usually have to import them from Japan. The lens covers are even rarer, and I've seen people asking 1k for a set
From the photo of your fuel pump set up, i can see it looks like you have polly bushes in the moustache bar? I bought some when i got a rebuild kit for the rear end of mine, but the shoulder of the bush looks way too thick compared to the originals. Did you shave yours down?
What V8 is in her? I plan on throwing a 327 chev or 308 holden V8 in mine, currently she is on a rotissarie as i fix the rust.
Check out my garage build, few photo's and links to my old girl in there.
Rudi.
Can you comment on your findings going with the Morton style building rather than conventional framing? With your final finishes,insulation, etc. it would seem that it would be a better fit to do it the standard way. I know that the original elaborate building was very costly, but this solution looks a little hard to finish out perhaps. I assume you looked at a normal stick frame option too, and that is a common question here.
Anyway, great project and beautiful site!
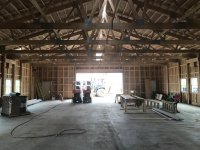
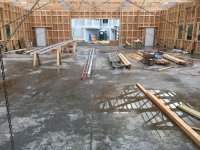
Radix2 - The reasons I went with a Morton building over conventional framing mostly comes down to cost and interior design. First about the interior design. I want a building with a large interior space, and mostly open to the bottom of the roof line. Conventional framing would have resulted in trusses about 2 foot on center, so for my 68 foot building that would have been 33 trusses and two gable end trusses. With Morton the truss spacing is 7.5 foot on center, so there are only 8 trusses and two gable end trusses / walls. This results in a great deal more open space. This space isn't really useable, but I like the look of it. I didn't want a full second floor, which would have been easy to do with conventional framing, as well as Morton.
Another benfit of going with Morton is that the erection process is pretty rapid. I believe it is about half the time of a conventionally framed building. The speed of erection wasn't a main reason for going with them, but it is benefical.
As far as cost goes, Morton priced out less than a conventionally build structure with equivalent materials from builders in my area. I went with hardie plank cement siding, and a conventional shingle roof, but the added cost over a metal siding and metal roof from Morton was around 7k.
For finishing the interior, I am going to leave the columns and trusses exposed. In between the columns I will add 2x4 and spray foam that cavity. I will probably pre paint 1/2" plywood and attach that to the strapping.
The underside of the roof will be Done in a similar manner, with sheetrock instead of plywood.
Attachments
Last edited:
Just found your build mate! awesome looking shed, i wish i could have gone that big on mine! cant wait to see more progress.
As soon as i saw the zed i hit subscribe, ive got one too!
I have to say, did you mention yours was a track car?
Because your nuts if your racing her with a G nose front and headlight covers!
G nose conversions are few and far between here In Australia, you usually have to import them from Japan. The lens covers are even rarer, and I've seen people asking 1k for a set
From the photo of your fuel pump set up, i can see it looks like you have polly bushes in the moustache bar? I bought some when i got a rebuild kit for the rear end of mine, but the shoulder of the bush looks way too thick compared to the originals. Did you shave yours down?
What V8 is in her? I plan on throwing a 327 chev or 308 holden V8 in mine, currently she is on a rotissarie as i fix the rust.
Check out my garage build, few photo's and links to my old girl in there.
Rudi.
Cros13, Cool shed you have there. Yours looks similar in construction to the shop homebuiltbyjeff youtube porche guy.
About the Z, I had a 327 in it, but that siezed on the track. I am putting a 350 with aluminum heads in its place. Real headlight covers for the G nose is big money, but the ones I have a crafter our of some 3/16" polycarbonate and a heat gun. I made a template out of cardboard, cut the polycarb to fit, and then rivited the one side of the flat polycarbonate sheet to the car, and used a heatgun, a glove, and the nose of the car as a buck to bend the plastic to fit. The key was to go slow.
After loosing the 327 at the track, I have decided to make the it back into a street car. I now have an unmodified C7 corvette to take to the track. The goal is to spend more time driving and less time wrenching at the track.

OH_Varmntr
Well-known member
Love seeing this come together for you!
Sent from my iPhone using Tapatalk
Sent from my iPhone using Tapatalk
cros13
Well-known member
Cros13, Cool shed you have there. Yours looks similar in construction to the shop homebuiltbyjeff youtube porche guy.
Real headlight covers for the G nose is big money, but the ones I have a crafter our of some 3/16" polycarbonate and a heat gun. I made a template out of cardboard, cut the polycarb to fit, and then rivited the one side of the flat polycarbonate sheet to the car, and used a heatgun, a glove, and the nose of the car as a buck to bend the plastic to fit. The key was to go slow.
Yeah Homebuiltbyjeff is on my local Aussie Zed forum. he signed up and linked to his channel, i have followed him since. I like his Video's. He lives in a Beautiful part of NSW, the southern Highlands, in Bowral.
Most of our Sheds in Australia are metal colorbond or bluescope steel. You will find if you see any aussie garage build on here, it will 90% be a bluescope construction. But to be completely honest, I don't know why. Perhaps Cost is the major factor? I know they tend to outlast the equivalent wooden building, and i know they are fire resistant, which is a necessary out here with our bush fires. And are cyclone rated too.
I'd love a big American Style barn, if i had the room!
I'd love to see some more photo's of your headlight covers close up if you have them!
I went on my honeymoon to Japan last year with my wife, I was there a month. I stopped over at Star road, it was my pilgrimage. They had some awesome gear there, i was in Zed heaven. I spoke to the owner Shoji, even he said repo headlight covers, non genuine are around $600, before shipping!!

If you like to see some nice zed photo's, I made a small thread on my trip and all the car related photo's while i was there. I did it on the zed forum im on, check it out:
http://www.viczcar.com/forum/topic/15121-rudis-honeymoon-in-japan-went-to-a-few-workshops-still-married/
Rudi.

zmotorsports
ALLIANCE MEMBER
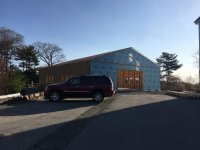
Looks great.
I have never seen the soffit and trim work done prior to the roof being completed before. That's a different approach.
Mike.
Sent from my iPhone using Tapatalk
I have never seen the soffit and trim work done prior to the roof being completed before. That's a different approach.
Mike.
Sent from my iPhone using Tapatalk
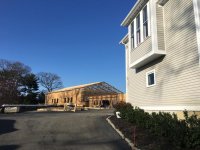
Talked with the guys in the field today. We have had high winds this week, so they have been postponing the roof plywood, and kept busy on other stuff that also needs to get done.
Where I am located on a hill we have some wind every day. Hopefully the wind laid down this afternoon and they made progress.
Where I am located on a hill we have some wind every day. Hopefully the wind laid down this afternoon and they made progress.

Roof sheathing was completed today. This also means that the squaring and support chains are now gone.
The avb on the side walls is now almost done.
Heavy rain is predicted for Friday into the weekend. I'm wondering if I should tie the roof drains in temporariarly.
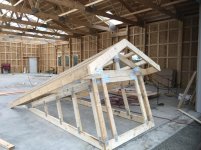
I'm hoping the dormers go up starting tomorrow.
The avb on the side walls is now almost done.
Heavy rain is predicted for Friday into the weekend. I'm wondering if I should tie the roof drains in temporariarly.
I'm hoping the dormers go up starting tomorrow.
Attachments

zmotorsports
ALLIANCE MEMBER
Looks great.
Mike.
Sent from my iPhone using Tapatalk
Mike.
Sent from my iPhone using Tapatalk
Anyone keep a warehouse ladder in their garage? Do you use it, or does it just take up space?
I started looking for some on craigslist, and found a couple so-so options.
I plan on building two at least two levels of shelving above the windows along the full length of the garage. The rolling ladder would be good for access to those upper shelves and then I could also use the warehouse ladder / rolling stairs for access to the storage above the bathroom / mechanical room / storage area at the rear of the building.
Mike.ASC
Well-known member
That looks amazing sir!
forAK
Well-known member
What a great build and setting!