To avoid these ads, REGISTER NOW!

Greene and Tweed "Defense Hammer"

jimreed2160

Well-known member
Joined
Aug 7, 2016
Messages
3,589
Location
Tallahassee FL
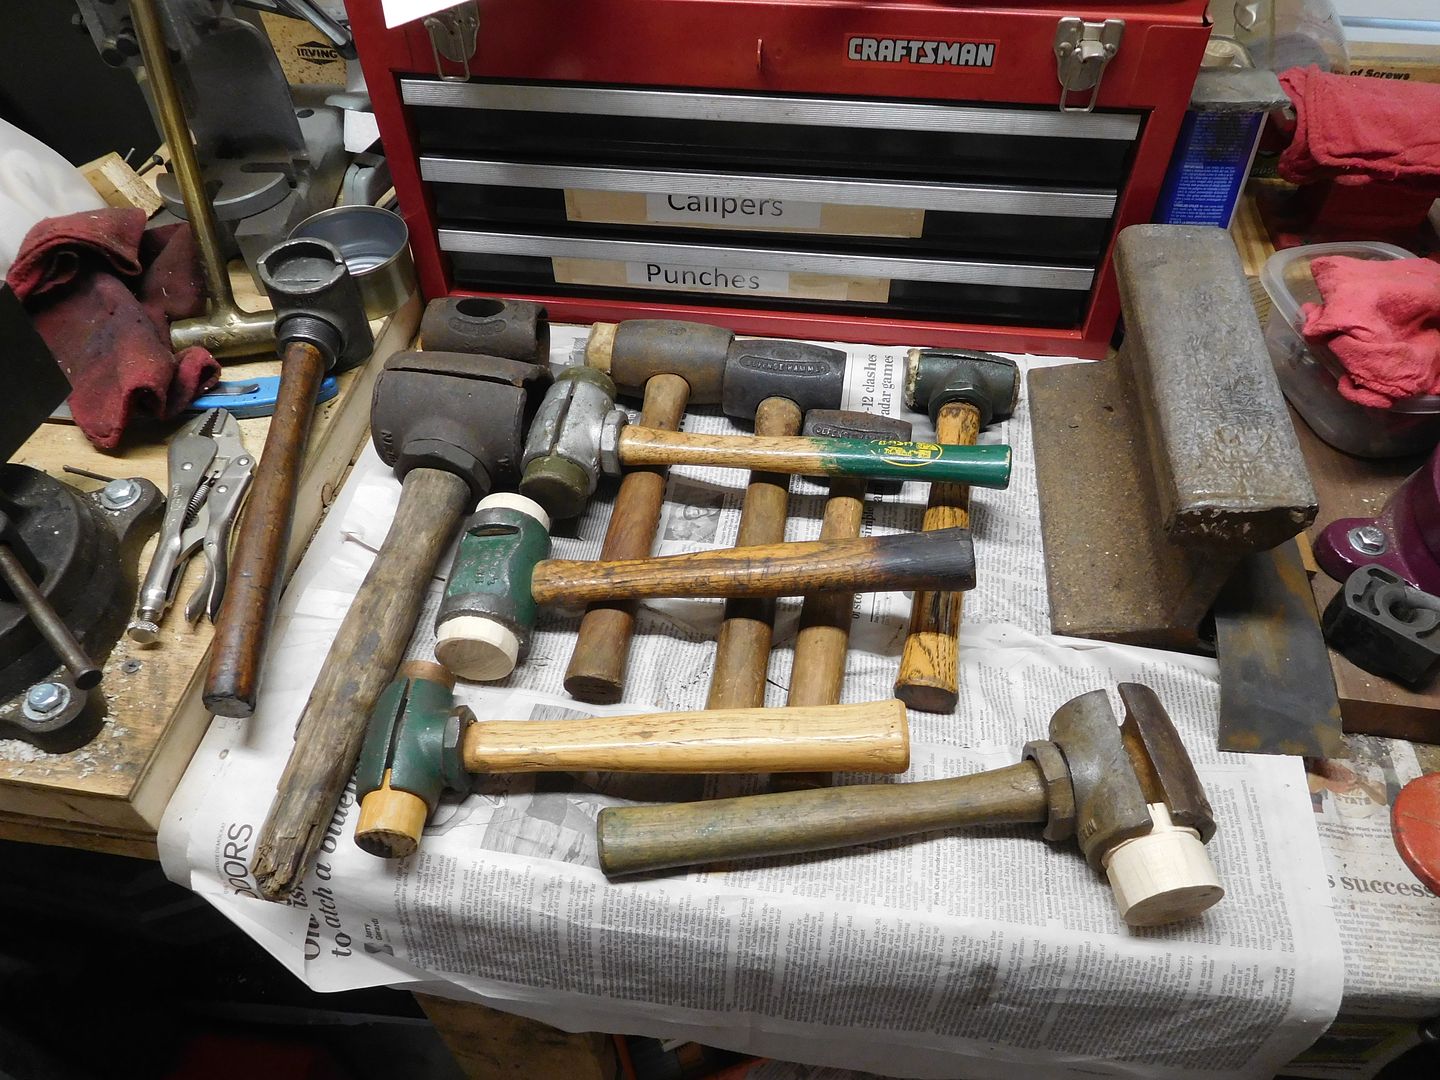
I picked this up recently. Some sellers say the "Defense Hammer" was a label used to support the war (WWII) effort. Anyone know the real story?

DSCN3135.jpg


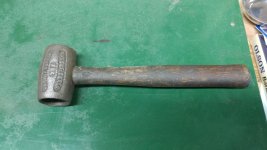
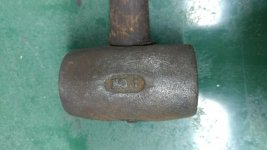
It was made by Greene and Tweed.

DSCN3134.jpg


This is a number 1 (small).

DSCN3133.jpg


There are cups on the ends. It originally had rolled up rawhide or wood inserts.

DSCN3131.jpg


The handle is in nice shape.

DSCN3130.jpg


I will make a nice pair of hickory faces for it after I prep and paint it. But its future life in my shop will not be defense--it is slated to become an offensive beater.
 
To avoid these ads, REGISTER NOW!

woody 73

Well-known member
Joined
Apr 14, 2009
Messages
11,546
Location
The Great State Up North
Sorry I know nothing about the story but...They are still in business Today:

http://www.gtweed.com/

Wish I could help you out; I am working on a story about another hammer and I am so in the dark without any light at the end of the tunnel as they say, At least you know the company name.
 

Private Lugnutz

Well-known member
Joined
Mar 30, 2012
Messages
30,606
Location
The Authentic Jersey Shore
Splendid find, Jim. It was a body hammer, most likely with rawhide inserts, used in Army and Navy stateside production plants.

http://www.company-histories.com/Greene-Tweed-Company-Company-History.html
“With another world war on the horizon, the company was well positioned to meet the challenge of supplying America's defense needs…[ ]…The Bronx plant concentrated on braided packings and tools, producing vast quantities of rawhide hammers for aircraft makers and the U.S. Navy...”

Here is a list of their wartime contracts:

Left to right, read:
Product and Contract number (with agency abbreviation embedded) | Service | | Value of contract ($K) | Start Month | Start Yr | End Month | End Yr
 

Attachments

  • Greene Tweed.jpg
    Greene Tweed.jpg
    90 KB · Views: 101

Private Lugnutz

Well-known member
Joined
Mar 30, 2012
Messages
30,606
Location
The Authentic Jersey Shore
I'll help you out...

The first "TOOLS" contract is US Army Ordnance Dept (ORD)
The second and third "TOOLS" contracts are Navy Bureau of Supplies & Accounts (XSX) and Navy Bureau of Ships (XSS)
The "HAMMERS" contract is Navy Special (S)
The "RAWHIDE MALLETS" contract is US Army Air Corps (AC)
 

Private Lugnutz

Well-known member
Joined
Mar 30, 2012
Messages
30,606
Location
The Authentic Jersey Shore
Pvt Lug--Thanks for the info. Nice to know it has a military heritage. Now I need to get it back into action.
My pleasure, Jim.

I read that you want to use hickory inserts, and who am I to argue with a man with a hammer, but note that those pockets took rolled-up and seasoned rawhide. Depending on the size, you could probably by a replacement from a modern hammer outfit like Garland.
 
OP
J

jimreed2160

Well-known member
Joined
Aug 7, 2016
Messages
3,589
Location
Tallahassee FL
My pleasure, Jim.

I read that you want to use hickory inserts, and who am I to argue with a man with a hammer, but note that those pockets took rolled-up and seasoned rawhide. Depending on the size, you could probably by a replacement from a modern hammer outfit like Garland.

Hickory only because that is what I have on hand. But I am certainly open to rawhide. I have both types of hammers around the shop. Are there any areas where rawhide would be superior to hickory?
 

notlob

Well-known member
Joined
Aug 19, 2013
Messages
1,384
Location
norcal
I have a GT defense hammer as well, and I found out that replacing the faces is more involved than expected. Here is a link to Thor Hammer's instructions on how to replace rawhide and copper faces, which includes a diagram of the special tool they recommend:

http://aws1.sitewizard.co.uk/~thormag/media/wysiwyg/combined-replacing-faces-and-opening-and-closing-tool.pdf

Here are some guides re: recommended uses for various types of soft face hammers.

http://www.garlandmfg.com/mallets/brochures.html

F26995686.jpg


:pimpflash
 
Last edited:

Private Lugnutz

Well-known member
Joined
Mar 30, 2012
Messages
30,606
Location
The Authentic Jersey Shore
If you had a Greene Tweed & Company split-head hammer (they were the first company to make them!) those face replacements would be a lot easier!:lol_hitti

View media item 73996
View media item 73993
View media item 73995
View media item 73994
Bluebolt just found a Greene Tweed DEFENSE HAMMER with no number on it, which we both thought was odd, so I went to check on this one and decided to take some photos as long as I had it out.

The head markings read 'BASA HAMMER', 'GREENE, TWEED & CO.', 'NEW YORK' ,and 'NO. 2' around the eye

The original handle marking (tough to see in photos) reads 'BASA No. 2' and 'MFD. BY GREENE, TWEED & CO.' and 'NEW YORK U.S.A.'

It’s funny, GT&CO started out in 1863 making “packings” (which we would call seals today) from leather and asbestos fiber for the water pumps on primitive engines, and today they are still one of the world’s leading producers of high-performance thermoplastic seals for the aerospace industry and many others. Hammers and some other tools were a branch out during WWII that they dropped shortly thereafter.

I believe BASA was their brand name for the inserts that went in this hammer, some kind of material they invented, but I’m not sure, it could just be the brand name for the hammer itself. The name BASA became so synonymous with this type of hammer that GT&Co still owns the trademark that Garland uses in their marketing of a split-head hammer face called BASA.
 

Packard V8

Well-known member
Joined
Mar 16, 2009
Messages
7,380
Location
Spokane, WA
I've restored three rawhide head hammers and unfortunately, the replacement rawhide faces are REALLY EXPENSIVE.

Another downside to rawhide in our dry climate, if not used regularly, the rawhide dries and gets loose in the head. I've been told the best way is to soak the rawhide, install it in the head and pound the stuffing out of something hard. The goal is to mushroom the rawhide seating surface inside the head and have it conform to the head, locking it in place.
 

jeeper46

Well-known member
Joined
Dec 6, 2016
Messages
479
Location
Canton, Mi
Here's another, with the rawhide rolls still (more or less) present in the hammer heads.
 

Attachments

  • IMG_2815.jpg
    IMG_2815.jpg
    144.4 KB · Views: 107
OP
J

jimreed2160

Well-known member
Joined
Aug 7, 2016
Messages
3,589
Location
Tallahassee FL
Yeah, I have "a few" of them now.

DSCN3828.jpg


The very large #5 needs a handle. I found a replacement at HD. It is a sledge handle. Should be OK after shortening and shaping.

DSCN3829.jpg


I replaced the faces on one with hickory. It works well for beating on vintage vises with stuck dynamics. The others are in varying states but look like great projects.

I like to use a rawhide hammer when replacing paint can tops.

DSCN3826.jpg


When I fix up the others, I plan to use BLO with no paint. Seems to me that the paint might mark up a project. Sometimes all blows are not on the face.
 

michaelwolson

Well-known member
Joined
Mar 20, 2017
Messages
163
Location
San Jose, CA
I picked one of those up not too long ago at a $1 garage sale. Guy cringed when I brought it to him for payment...Oh well he still sold it.

Mines been drilled through the middle I believe. Maybe to fit new inserts? Not sure here are the pictures.
 

Attachments

  • 20170827_195053.jpg
    20170827_195053.jpg
    147.5 KB · Views: 71
  • 20170827_195059.jpg
    20170827_195059.jpg
    142 KB · Views: 65
  • 20170827_195103.jpg
    20170827_195103.jpg
    141.5 KB · Views: 63
  • 20170827_195132.jpg
    20170827_195132.jpg
    148 KB · Views: 68
  • 20170827_195136.jpg
    20170827_195136.jpg
    147.5 KB · Views: 63

cbacres

Well-known member
Joined
May 28, 2010
Messages
5,998
Location
SW Florida
Yeah, I have "a few" of them now.

DSCN3828.jpg


The very large #5 needs a handle. I found a replacement at HD. It is a sledge handle. Should be OK after shortening and shaping.

DSCN3829.jpg


I replaced the faces on one with hickory. It works well for beating on vintage vises with stuck dynamics. The others are in varying states but look like great projects.


I like to use a rawhide hammer when replacing paint can tops.

DSCN3826.jpg


When I fix up the others, I plan to use BLO with no paint. Seems to me that the paint might mark up a project. Sometimes all blows are not on the face.


No wonder we have such a hard time finding these in FL.
Nice collection!

A word to the wise, keep them out of view if Shirty visits and make sure you have some kind of a detector to check him when he leaves.:lol_hitti:lol_hitti
 

Jon_E

Well-known member
Joined
Aug 19, 2015
Messages
575
Location
Southwestern Vermont
I bought a brand new Garland a few years back, building a timber-frame home. Most of the timber framers I knew were using them to pound in the wood pegs, or 'trenails' into the frame. Very expensive but the split head makes face replacement easy. We had one face with rawhide and the other was a turned round of elm. Faces can be anything - lead, copper, rubber, rawhide, wood, whatever fits the recess in the head.
 
OP
J

jimreed2160

Well-known member
Joined
Aug 7, 2016
Messages
3,589
Location
Tallahassee FL
No wonder we have such a hard time finding these in FL.
Nice collection!

A word to the wise, keep them out of view if Shirty visits and make sure you have some kind of a detector to check him when he leaves.:lol_hitti:lol_hitti

Ha! I will keep that in mind. Maybe I should send one to Mrs. Shorty. She could use it to keep him in line.
 
To avoid these ads, REGISTER NOW!

cbacres

Well-known member
Joined
May 28, 2010
Messages
5,998
Location
SW Florida
Please post up the handle replacement, with all of you other wood projects, I'm sure you'll make a easy one for us.:beer:
 
OP
J

jimreed2160

Well-known member
Joined
Aug 7, 2016
Messages
3,589
Location
Tallahassee FL
Please post up the handle replacement, with all of you other wood projects, I'm sure you'll make a easy one for us.:beer:

As luck would have it, I got some precious shop time this afternoon after my morning grass chores. Here is what I started with.

DSCN3843.jpg


I slapped it in the vise and used one of the other hammers to persuade it.

DSCN3844.jpg


But of course the easy way was a no go. I needed help.

DSCN3845.jpg


The threads sucked up the LW, so I tried again. A little bashing each way and it began to give.

DSCN3846.jpg


And then just gave up.

DSCN3847.jpg


Mr bandsaw helped.

DSCN3848.jpg


What a shame. The wood up here is pristine.

DSCN3849.jpg


Time to drill some holes.

DSCN3850.jpg


DSCN3852.jpg


It is nice to have some beater chisels. I felt some metal (?) in the wood.

DSCN3853.jpg


Here is the other hammer at work with a brass punch.

DSCN3854.jpg


What the?

DSCN3855.jpg


So to keep this massive head in place, they drilled and installed a rod through the head body (!).


DSCN3856.jpg


I need to punch out the rod and clean up the pieces before their Evaporust spa treatment. Stay tuned for more fun.
 

Billythekid1

Well-known member
Joined
Jun 30, 2015
Messages
240
That's what I read, Btk, but do you know what they're made of? Photos look like some kind of composite almost like a synthetic rubber.


:lol:

I do not know what the heads r made from I got one at a yard sale and did a little looking online that's where I found the info sorry
 

cbacres

Well-known member
Joined
May 28, 2010
Messages
5,998
Location
SW Florida
Jim, I was looking at the Garland web site, that is a roll pin. Don't know if I would of caught that before removing the handle.
 
OP
J

jimreed2160

Well-known member
Joined
Aug 7, 2016
Messages
3,589
Location
Tallahassee FL
Jim, I was looking at the Garland web site, that is a roll pin. Don't know if I would of caught that before removing the handle.

I-Thought it might have a metal wedge so I drilled carefully. Then I hit the pin. It certainly did its job because it took me a while to work around it. THEN I saw it on the handle under the rust. Anyway, it popped right out with an appropriately sized punch. Live and learn. Now I have to figure out how to replace it. Drilling the hole will not be easy.
 

cbacres

Well-known member
Joined
May 28, 2010
Messages
5,998
Location
SW Florida
I-Thought it might have a metal wedge so I drilled carefully. Then I hit the pin. It certainly did its job because it took me a while to work around it. THEN I saw it on the handle under the rust. Anyway, it popped right out with an appropriately sized punch. Live and learn. Now I have to figure out how to replace it. Drilling the hole will not be easy.

Is the hole for the pin in both sides of casting?

If so, what about jigging it up in your drill press where you know you have perfect alignment of the holes before you insert handle, then drill through handle..
Just my lunch time thoughts:lol_hitti
 
OP
J

jimreed2160

Well-known member
Joined
Aug 7, 2016
Messages
3,589
Location
Tallahassee FL
Is the hole for the pin in both sides of casting?

If so, what about jigging it up in your drill press where you know you have perfect alignment of the holes before you insert handle, then drill through handle..
Just my lunch time thoughts:lol_hitti

Thanks for pondering, I was thinking around the same lines. Apparently, great minds think alike! I just need to get the handle in place without blowing out the jig.

BTW, I worked on another one today. I think you need one of these hammers to work on another one. The split nut was jammed on very tight.

DSCN3858.jpg


And the little rawhide nubbins are toast.

DSCN3859.jpg


The larger hammers cry out for hickory but the smaller ones like this seem to need rawhide. Must find inexpensive source of same.
 

SAA44-40

Well-known member
Joined
Jan 20, 2017
Messages
199
Location
West Texas
Fellas- this inspired me to pick up a tweede and green no 1.
Nutz- thanks for the coaching.
Jim Reed- I have a slight amount of play in my hammer. After reading your post about refitting the handle, I tried using a punch to remove the stake- with no joy. Handle is pristine and I don’t want to ****** it up. As a result, I stumbled across a product called swell lock. Allegedly, I can strategically drop a few drops on the hammer end. The wood is supposed to swell and dry. It’s $8 for 2oz bottle on Amazon so not much risk. Stay tuned for feedback.
 
OP
J

jimreed2160

Well-known member
Joined
Aug 7, 2016
Messages
3,589
Location
Tallahassee FL
Fellas- this inspired me to pick up a tweede and green no 1.
Nutz- thanks for the coaching.
Jim Reed- I have a slight amount of play in my hammer. After reading your post about refitting the handle, I tried using a punch to remove the stake- with no joy. Handle is pristine and I don’t want to ****** it up. As a result, I stumbled across a product called swell lock. Allegedly, I can strategically drop a few drops on the hammer end. The wood is supposed to swell and dry. It’s $8 for 2oz bottle on Amazon so not much risk. Stay tuned for feedback.

I would try soaking the end of the head in 50/50 mix of boiled linseed oil and turpentine. That's what I use on Japanese chisels after I set the hoops and it works well.
 

tym

Well-known member
Joined
Mar 5, 2016
Messages
2,438
Location
MA
I would try soaking the end of the head in 50/50 mix of boiled linseed oil and turpentine. That's what I use on Japanese chisels after I set the hoops and it works well.
+1 in trying BLO. I've had success using it to help snug up loose wood handles.
 

SAA44-40

Well-known member
Joined
Jan 20, 2017
Messages
199
Location
West Texas
Thanks Jim, I was aware of the linseed tip. However, unaware of the turpentine mix. What is the value of adding the turpentine?
 
OP
J

jimreed2160

Well-known member
Joined
Aug 7, 2016
Messages
3,589
Location
Tallahassee FL
Thanks Jim, I was aware of the linseed tip. However, unaware of the turpentine mix. What is the value of adding the turpentine?

Well, for one, it smells really good. But the real reason is to dilute the BLO. For me it dries too quickly and gets gummy and thick. I would rather give things multiple treatments or soak longer to avoid heavy build up. Over time, the BLO will turn wood very dark. Diluting it minimized that effect.
 

notlob

Well-known member
Joined
Aug 19, 2013
Messages
1,384
Location
norcal
I've done this with straight BLO on numerous occasions with good results, but it can get quite gummy. I think I'll try out thinning it with turpentine next time.
 

Private Lugnutz

Well-known member
Joined
Mar 30, 2012
Messages
30,606
Location
The Authentic Jersey Shore
Yes.

My dad would fill in gouges in wooden handles with a mixture of uncut BLO, sawdust, and varnish. He'd mix that up into a thick pasty gunk in a bowl or whatever like a mortar and pestle, and just dab it in the gouge with his thumb and let it set. Then sand it flush. I imagine it's what they did before it came in a can as filler.
 
To avoid these ads, REGISTER NOW!
Top Bottom