shortykorte
Well-known member
Those yard tools are in my price range, yay!
That Bugatti project wow.
Sent from my iPhone using Tapatalk
That Bugatti project wow.
Sent from my iPhone using Tapatalk

Those yard tools are in my price range, yay!
That Bugatti project wow.
Sent from my iPhone using Tapatalk
I would like to see more pics of the red chevy pick up, please
I was humbled by the Bugatti project.
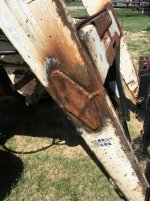
It's a 1966, if I heard right. That place is only five miles form my house but it is straight into the wilderness down by the river. I doubt I'll get back out there. It's complete, with a 400 small block. Kid bought it when he was 14 and disassembled it before he was 16. Fenders and hood are in the back, wood bed well rotted. Custom trim, all straight, no rust, he's about 35 now and works 60 hours a week, truck is not for sale. Maybe I asked. They also have a pristine 73 Chevy pickup sitting in the trees. Not for sale.
Thanks for the comments!
No pictures today: had a busy day but nothing photoworthy. Finished up the hydraulic repair on the Massey Ferguson and it runs like it should. The internal lift cylinder had been misinstalled previously and had a blown seal. It was also cracked. So a new seal, cylinder, and piston and lots of assembly time fixed the issue. I really wasn't wanting to split it to change the pump.
Then my HVAC buddy came by with some copper tubing to melt and wanted his front tires balanced. So I drug my Don Long look alike tire balancer out of the attic and we rebalanced his tires statically. They were definitely out of balance, with new weights. We got them close and he was on his way. I really need to buy a selection of tire weights if I'm going to be balancing tires.
Got the tractor done so I've got Saturday off tomorrow. Time to clean up and put away, and maybe melt a bit of aluminum.
Thanks for dropping in!
Now when I see cars/trucks out in a field or on blocks I think that it is either not for sale or the owners will want more than I'm willing to pay.
Also I'm a little afraid to ask because they may be willing to part with it for I am willing to pay and I don't the room to store things like you do Andy.
There are plenty of projects inside my shop to keep me busy for quite a while anyway.
I pass by a 1961 Chevy Impala two door hardtop setting is a field regularly. It looks good from the road and has been there several years. It is considered a test for me to not stop even when I see people in the yard when I pass by. So far I'm still holding out.
Andy: is it a fun day with your kids and/or grandkids, buying another cool truck or tools or just melting aluminum and making muffins? AREN'T SATURDAYS GREAT??
RealVC: another member made a quote that i put in my sig line yesterday that might follow along with your thinking. best of luck holding out, but what's the harm in asking unless you know the guy's got a shotgun and he's crazy? at least you can know if it's even for sale or work on making room for it by finishing up other projects if you do like it.
cheers
thanks ,enjoy seeing ypur pics
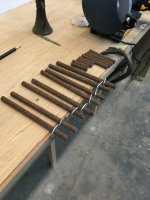
Just catching up on your thread Oldironfarmer, I really do enjoy it. What a great idea strengthening a shovel that way and a good use for worn out sickle blades. Thank You
Andy it hurts to see all those great tools rusting away outside. I was going to ask about the 66. Which you are right you can tell by the factory backup lights. 66' was the first year they were mandatory on all vehicle by Federal law. Before that they were dealer options installed at least on trucks.
Bret
")
 It looks like somebody had added a sump and there's a jagged hole in it.
Andy,
Thanks for the link to the Bugatti. When you look at what he is going through to create a casting and the French were doing this in the 30's. It makes you realize that amazing things were done in the past that we at times still do not comprehend.
Great work on your continuing casting and don't let the Kiwi get you down. The things you do fit what you want and need.
Great to see the tractor finished and the help that you gave your friends.
Dwight
Andy, I am doing much the same tackling those annoying jobs this weekend and it like a cleansing of the soul let me tell you...
Your back slash is a winner...
Regards
So good to get nagging little tasks out of the way.
What bead roller? I must have missed something?
My dad kept his 69 Camaro (purchased new) on blocks under a tarp for about 30 years. With a little nudging and a lot o' cash, it's at least running and in the garage. It's the car in my avatar.Now when I see cars/trucks out in a field or on blocks I think that it is either not for sale or the owners will want more than I'm willing to pay.
What bead roller? I must have missed something?
Got a little behind again! It's almost like a year's worth of Saturdays since I've last had a little time here. Doesn't help getting sidetracked with phenomenal stories like that Bugatti project right here in my backyard! I really need to know where he gets his casting done.
Kiln is coming along and I see inklings of sheet metal work! Are you planning to dish one face on that stump Andy?
Yes... inquiring minds n'all!
My dad kept his 69 Camaro (purchased new) on blocks under a tarp for about 30 years. With a little nudging and a lot o' cash, it's at least running and in the garage. It's the car in my avatar.

What bead roller? I must have missed something?

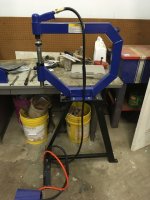
Here's the bead roller, as promised

...Love that bead roller
...
Quite a project on the Bugatti. I haven't found his Lotus build yet. Apparently he's in LA working on a space related project but should be online to ask him which foundry he is using. They seem to be pretty agreeable. He seems to be in a business that makes patterns, as well, so he may have an inside track with the foundry.
In researching English wheels I came across the use of a stump. Now that's something I understand. From what I've seen mine is probably a bit large but I don't think that's a detriment. What I read recommended a small dish, large dish, and a groove. Next step is to install feet on the bottom then make the depressions.
It's still "his." Had I waited much longer for the prising, the New England winters would have ensured there was nothing left.Cool avatar car. Good job skinning the old man out of his prized possesion
Andy
A planishing hammer, a bead roller, a stump, a TIG welder, what excuse are you going to give your granddaughter for not making progress on the Studebaker?
It is looking great, glad that you have another Sat. tomorrow so you can start (except which project will you pick first).
Dwight
Me too.
Me too.
I think so too... Those are all very professional looking moulds and cores. Right down to the rock foam/ceramic filter in the runner.
Stump is likely a bit large for your wood lathe. They make a very nasty little TCT wood carving disc that fits small angle grinders that is perfect for power carving the dished shape. There's is also one that looks like it has a chainsaw chain fitted to the periphery.
A set of UHMWPE teardrop hammers work very well when dishing. Next is to make a set of heads and dies for your plannishing hammer. Ron Covell amongst others has some nice videos on the topic.
I could really use a bead roller with a tipping die right now!
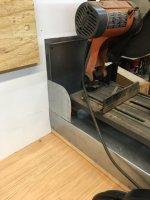
I need to make a stand and shield setup for my saw, it makes a mess every time I use it. Looks like you are having some fun with the bead roller!
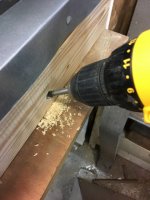
Man now I need a bead roller and maybe a planishing hammer. Looks good Andy. I like your pocket hole method.
Bret

It's still "his." Had I waited much longer for the prising, the New England winters would have ensured there was nothing left.
 As long as it's in the family and being saved that is great. I hope you can get it into shape and enjoy it for many years.
I did.I hope you know I was joking.
 I forgot to put in an emoji.
I did.
Still in my folks' backyard is a '74 Mustang II in much worse shape. Can't wait for the Earth to absorb that one.
Here is a video from Robert MP&C, fellow GJ member on tips for shaping a stump.
Sent from my iPhone using Tapatalk


Many moons ago I was talking to a body shop owner and mentioned the factory gussets Dodge used to strengthen their van frames. He didn't know what a gusset was.
I also mentioned I have ecletic hobbies, all over the place. He told me to quit using "big words" and get out of his shop!
Andy, top idea on the material supports.
They should work well given you have the chops saw bolted down
Regards
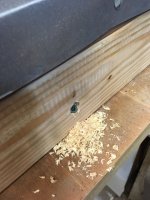
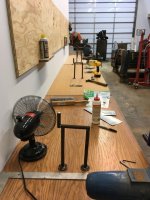
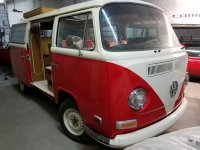
I do have to do something. I'm leaning toward two big washers to capture to of the feet. I still need to be able to lift it off and onto the floor to cut something which is inconvenient to lift to the table. I occasionally cut 6" WF beam with it, and have been know to chew through a railroad rail. However since I rarely cut big stuff it may get some kind of clamp. It was a challenge cutting the sucker rod in mid-air with the saw moving around on the table. But I needed to cut up there to look at where the sparks were going. I still need some more spark baffles to minimize the grit going down the bench.Went down to help my son in law trim some trees. Noticed a friend's VW bus. It's just sitting, BugThug.

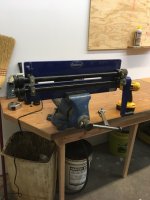
Then started on the work bench. Wall support

Framed

And... we have a bench.

I modified my design because the bench was going to be too close to the door to carry things through.

I'm thinking about trimming it off on a 45.
It doesn't take long to find stuff to go on a new bench

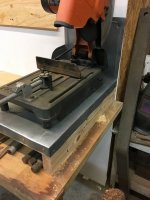
The right end is going to get my cutoff saw on a pedestal. No more squatting down to cut.
My bullet vise likes it there. I've been wondering where it would wind up.

Thank you for stopping in!
Dont waste a lot of money on those plastic tools, they have their place, but not really heavy enough or shaped right for moving a lot of metal. Good Luck!
What an interesting thread, you surely have a lotta room in the shop. I've read the beginning & the end, some of the middle, all interesting to me.
The talk about trains makes me a bit sad, my oldest brother was an engineer for Conrail and Amtrak, he started in the 1960's as a fireman on the Penn Central in Syracuse NY. He retired as, I believe, the senior engineer (or very close to it) in Boston for Amtrak. When I would visit him in Boston, he would invite me to ride his shift, the evening shift, overnight, which he seemed to prefer. It was a lot of fun to ride in the engine, and to feel the torque of those engines, coursing through the cab.
I recall as a kid in the mid-1950's riding a Pullman from NY to Chicago, having the porter come by and turn-down the beds. The dining car was always a treat.
That 'picture-window' windshield VW bus, a friend is going through a restoration of a '74 Westfalia camper now, it's been in the family since new. It's turning out gorgeous, but since it's being done by a shop, it's very expensive. The way it's turning-out, I haven't seen one nicer at any local car shows.
My train engineer brother's wife had a split-window Westfalia camper in Boston she had as a daily-driver for many years, and after she bought a new car with a heater, and the VW van sat, they eventually sold it for very cheap. Now those restored are selling for stupid money. Hers was a tin-worm victim, but everything is restorable with enough time and money, right?
The VW camper in Boston sat in the driveway in-front of a early 1950's Hudson 3-side window-coupe, my brother had acquired but never got around to doing anything with. They sold both the split-window VW camper and the Hudson when he was getting ready to retire, and they moved from Boston to Milwaukee.
I had a great uncle and his wife, and a great aunt and her husband, who left Missouri in the 30's and drove a Model T to California. My mom remembered waving goodbye. They were driving down railroad tracks in Nevada when their car broke down. When the train came they rolled the car off the tracks and the train stopped and offered them a ride. The men wound up being offered jobs with the railroad and worked there until retirement. We visited them in about 1960. They were old and retired but my uncle George took me on a train ride. Super cool. They had no negative things to say about the railroad.
Andy: i love the new chop saw set up and those new lifts you fabbed up are D'Bomb. very cool. are you getting set up to maybe do some fab work on the STUDY/DODGE (any name from your Grand daughter yet?) or maybe you'll start an assembly line and start working on your OWN tractors and get them all running. damn that would be a lot of tires and rubber to keep air in.
have another great SATURDAY and i'll do the same.
DRIFT: if you read all of Andy's thread i have to almost give you an award. i can't recall when he started it, but i have a hard time catching up with all the activity if i miss a day. WELL DONE!!
Make sure you pay real good attention to the shape of the depression in the stump in the video. Also take note of the fact that its not really symmetrical at all. Its deeper at the back, tapering to nothing at the front, and also one side is deeper that the other. The notch itself doesnt matter, its made for making tucks. Just dont make it round, unless all you plan to make is bowls. I didnt watch the whole thing, but I saw Peter Tomassini work on a similar one at the class I took at Will Cronckrite's place last year. Amazing man, amazing what can be done with metal, not very many tools.
Dont waste a lot of money on those plastic tools, they have their place, but not really heavy enough or shaped right for moving a lot of metal.
Good Luck!
Excellent work!!

Andy: i forgot to add in my post that i hadn't thought of that kind of 3 feet when you said you were going to add 3 feet to your 36 inch piece of oak log.
what is even better is i have about a 200 pound Madrona stump i was going to have to level up and now i think i can do it with 2 by material on the bottom in different widths. thanks
Absolutely and comes down to moving vs stretching. The way it was explained to me is that with steel hammers it is hard to avoid contact stretching when dishing material. Whereas wood and plastic mallets are more likely to move the metal allowing you to control the stretching as needed while plannishing or rolling. Same way blacksmiths switch to wooden mallets to straighten material on the anvil to avoid 'stretching' it more. The difference is also much more apparent working with aluminium than steel.
UHMWPE mallets are cheap enough but you have a fair point and maple makes a very nice cost effective alternative for lighter weight shaping mallets. Being slightly heavier that UHMWPE also offers an inbetween option.