Ditch
Banned
if you can't just look at that and copy it, you should probably not use tools


You all need to stop buying these cabinets. I'm having $99 cabinet envy.
So am I, even though I really don't have a use for one right now.
Great build! Do you still have the specs from when you built it out?
Probably still have the sketch in my shop. I'll try to remember to look. Only dimension that is really key though is the width for each slot so that your drills fit properly. The rest could all be modified to whatever size you want.
There are a bunch of similar drill storage build videos on youtube Jay bates is the one I copied ish
Sent from my Moto G (4) using Tapatalk
You all need to stop buying these cabinets. I'm having $99 cabinet envy.
Bought some space on the workbench with scrap wood that was about to be trashed. Piece of oak veneer plywood, off-cut walnut scraps, a handful of small used screws and stapler brads and the phone and tablet are out of the way while charging.

") To the right of my bigger toolboxes is the welding cart and fabrication table/drill press/belt sander/metal racks..... need some more ideas on storage ideas.
To the right of my bigger toolboxes is the welding cart and fabrication table/drill press/belt sander/metal racks..... need some more ideas on storage ideas.I need ideas for a possible backsplash of sorts or maybe pegboard I'm not sure.

Is the 32 inch spacing between the workbench and the bottom of the cabinets adequate or do you wish you had more?
Couple of scraps of plywood and 1/2 conduit. Wire dispensing rack where a microwave used to be.
I posted this on another thread but it seems appropriate here:
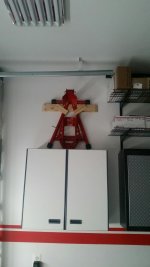
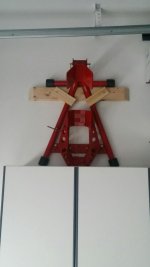
racor ladder lift


That's Closed Cell Spray Polyurethane Foam.
Unfortunately it looks like whoever sprayed it didn't know what they were doing.


There are a lot of pages on this thread, so I do not know if anyone posted something similar.
I got tired of the small area behind the door (service door in my garage), which usually gets filled with a bunch of brooms, or levels, piping or anything that stands off the floor and doesn't take so much room that the door can still be opened.
I had seen this in stores for displaying tools and built this behind my door. This allows much more "stuff" in an organized manner. Just needed 2 feet x 6 feet of pegboard, 2x3 to frame it, 2x4's on the wall and hinges + whatever pegs or hooks needed.
This has worked out pretty good for me.
got me one yesterday
Sent from my iPad using Tapatalk
Could you explain further please? I'm unclear what you're saying. Thanks.Just FYI, that Ryobi 6-port will deplete your batteries over time. It doesn't matter if it's plugged in or not. They have a smart logic board that continually communicates when plugged in. I had one of each, to see which I preferred, but ended up returning both. Other than using them for transport to a jobsite, I just didn't see the upside.
Could you explain further please? I'm unclear what you're saying. Thanks.
... my Ryobi charger has ruined two batteries that I left in it for too long...
Sure. I'm saying that the 6-port unit charges one battery at a time, in sequence, which is fine. However, once the batteries are charged, if they are left in the charger, they will deplete over time. A few weeks and they'll start depleting. So in a couple months?, they're dead again. It doesn't matter if the charger is plugged in or not, they will continue to deplete. In my mind, that means that the batteries will wear out prematurely, since you have to keep recharging them, even though you haven't used them.
I contacted Ryobi and they confirmed my suspicion, without hesitation or debate. They do NOT recommend that you store the batteries in the charger for more than a couple weeks, or really at all as far as I'm concerned.

Thanks for this info. I thought it was ok to leave the batteries on the charger, especially since every other consumer device allows you to do so (phones, laptops & tablets, etc). I will start removing the batteries from now on. I have two little and two big ones, and until now have left them on 24/7.