To avoid these ads, REGISTER NOW!

Texas 30x40x14 Budget Post Frame Self-Build

MrSurly

Well-known member
Joined
Jan 15, 2014
Messages
1,671
Location
East Texas
Howdy! After lurking here forever I'm *finally* building the shop I've been pining for. I've mentioned in someone else's "Pole barn Woes" thread some of the difficulty I've met with the City (Longview, TX) but I have gotten past that and proceeded with the project. At first, I hired a "Barn Builder" from a CL ad and it turned out the guy was a thief/scammer. I lost some bucks to the guy but thankfully saw the light before getting MUCH deeper.
EDITING TO ADD: Two Years Later: the dirtbag scammer Marcus Sample Thompson was finally caught, charged and is in the Texas State Prison system for TEN YEARS.
Anyway, after firing him, lawyer fees and the 'down payment' that I'll never recoup, the shop build I had been angling for for years now was on the line. It was already on a shoestring but these losses now meant that I could no longer pay someone to build it. The only way to save the project was to just do it myself....so that's the new plan.

My property is just a residential lot in an older neighborhood. No HOA, just the city to deal with.

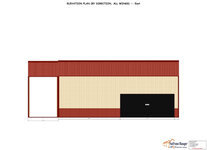
Due to lot size and utility easements, I can't build it much bigger or place it differently. I'm building a 30 by 40 by 14H with a 10' gable extension (a porch) on one end. The footprint is 30 x 50.

This is a pole barn (post frame they call 'em now) and the city isn't really well versed on them. All that is settled, though, permit issued, construction is under way.

I will attach some pics as soon as I can.

I'm reminded that working essentially alone results in really slooooow building! It's alright, though. I like to be a bit meticulous, anyway.

I'm *almost* ready to start the metal, hopefully this weekend(!)
The online "visualiser" apps didn't really work for the plan.
128256ab4552b3c15979093104d31886.jpg
064bf34fd5d4305a6e0d0c31276ec80a.jpg
Having the pad built... one of the first "sticker shock" moments. I never could've guessed how many dump truck loads would go here!
b2dedcad232de50526929671a8ff4a73.jpg
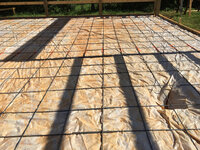
So I got the big dirt pile done and the rains started. Visqueen to the rescue!
d01fcd3a3bf3ddb595f54c8240858a89.jpg
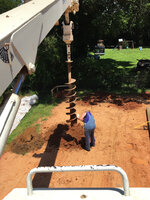
Once the Monsoon took a break, I borrowed a truck to start the project.
Along with my daughter (the best helper, ever) and a couple of others, we set the posts.
f6a33aae1aa40ece870b5c56ec729f44.jpg
4fb6ce980019d47591cdfbd40d2a2a15.jpg
I sourced the materials from various vendors.
Lumber: McCoy's (price matched Cassidy)
Posts from Arnold Forest Shreveport

Trusses from Panel Truss Henderson
4ea6e533db4d8d0c5609717ca3db46c4.jpg

537058a226b5f804e3aa6cfa4bcb7403.jpg
d508c09a46dc4c1b94ad95195af86848.jpg
I hired Arturo's crew to spread the mud
0b1f053a5bc2a80b79a002d4bf3b5afb.jpg
0f54ddd9f0fba2515b2bc8f68bf983a3.jpg
042496c71aca126932ae5919844bdd03.jpg
4fc06ac98a23c9b1ff04f5fc644bb971.jpg
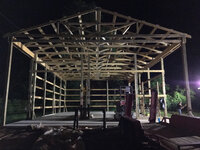
Just a few more boards!!
 

Attachments

  • 537058a226b5f804e3aa6cfa4bcb7403.jpg
    537058a226b5f804e3aa6cfa4bcb7403.jpg
    1 MB · Views: 1
  • 0f54ddd9f0fba2515b2bc8f68bf983a3.jpg
    0f54ddd9f0fba2515b2bc8f68bf983a3.jpg
    1,014.7 KB · Views: 0
  • 042496c71aca126932ae5919844bdd03.jpg
    042496c71aca126932ae5919844bdd03.jpg
    821.3 KB · Views: 0
  • 4fc06ac98a23c9b1ff04f5fc644bb971.jpg
    4fc06ac98a23c9b1ff04f5fc644bb971.jpg
    767.5 KB · Views: 1
  • 0b1f053a5bc2a80b79a002d4bf3b5afb.jpg
    0b1f053a5bc2a80b79a002d4bf3b5afb.jpg
    1.1 MB · Views: 1
  • d508c09a46dc4c1b94ad95195af86848.jpg
    d508c09a46dc4c1b94ad95195af86848.jpg
    1.2 MB · Views: 1
  • 4fb6ce980019d47591cdfbd40d2a2a15.jpg
    4fb6ce980019d47591cdfbd40d2a2a15.jpg
    900.7 KB · Views: 0
  • f6a33aae1aa40ece870b5c56ec729f44.jpg
    f6a33aae1aa40ece870b5c56ec729f44.jpg
    974.2 KB · Views: 0
  • d01fcd3a3bf3ddb595f54c8240858a89.jpg
    d01fcd3a3bf3ddb595f54c8240858a89.jpg
    756.5 KB · Views: 1
  • b2dedcad232de50526929671a8ff4a73.jpg
    b2dedcad232de50526929671a8ff4a73.jpg
    929.5 KB · Views: 0
  • 064bf34fd5d4305a6e0d0c31276ec80a.jpg
    064bf34fd5d4305a6e0d0c31276ec80a.jpg
    70.1 KB · Views: 2
  • 128256ab4552b3c15979093104d31886.jpg
    128256ab4552b3c15979093104d31886.jpg
    21.7 KB · Views: 2
  • 4ea6e533db4d8d0c5609717ca3db46c4.jpg
    4ea6e533db4d8d0c5609717ca3db46c4.jpg
    828.3 KB · Views: 1
Last edited:
To avoid these ads, REGISTER NOW!
OP
M

MrSurly

Well-known member
Joined
Jan 15, 2014
Messages
1,671
Location
East Texas
In keeping with the budget theme, once I decided to actually do this, I've been watching Craigslist/facebook etc for various items. I found a used lift, used garage doors; two 10 x 10s and one 18 x 8. These were the sizes I had originally spec'ed (planning to buy new) and I never thought I'd find an 18-8 secondhand but about three weeks ago one popped up on CL about twelve miles away(!) In my scrounging I've also come up with openers. Yesterday I picked up a Delta Radial Drill Press... a weird little thing that, once I saw it, I just had to have for the new shop.
My plan for the shop is to have it spray-foam insulated and leave the interior unfinished, at least for the foreseeable future.
I am put off by the high cost of the spray foam and I may possibly do a hybrid approach i.e. maybe foam the roof but look at alternative or re-purposed materials for the walls.
Of note: an outfit in DFW area has rigid polyiso foam board in various thicknesses for relatively cheap. Still looking for ideas.
I will also need to insulate the garage doors.
I found a good deal on a two post lift (Worth 9000ACF) and I included footings in the slab pour for its location.

I intend to include a loft, supported by I-beams. I'm going to be looking for some "how-to" on that part!
 
OP
M

MrSurly

Well-known member
Joined
Jan 15, 2014
Messages
1,671
Location
East Texas
In the last few days I've *almost* finished the wood parts, finishing up the roof purlins and the fascia board.
805999023410896c01e2a0b53fc82452.jpg
Well, I was sure caught off guard a bit ago.
It is swelteringly hot so I got an early start; I eventually got to the point of putting up metal (YaY) and with six sheets up (but not fully screwed down) I decided to take a break and a nap. I'll hit it later after the worst heat passes. What I did NOT know (hadn't checked) was that there was a *storm* coming. I slept about fifteen minutes when My daughter woke me to say the wind was trying to tear it down!
Sideways rain and gusts nearing 60mph. Crapshit. Had to go out in it to try to batten things down.
Worst was over in twenty minutes. Avoided damage somehow.
17c06e4c5d89294931ab3f2ec15016c5.jpg
Just a little excitement.
I think I'll go take a nap, now.


Sent from my iPhone using Tapatalk


Sent from my iPhone using Tapatalk
 

Attachments

  • 17c06e4c5d89294931ab3f2ec15016c5.jpg
    17c06e4c5d89294931ab3f2ec15016c5.jpg
    981.3 KB · Views: 0
  • 805999023410896c01e2a0b53fc82452.jpg
    805999023410896c01e2a0b53fc82452.jpg
    1,005.2 KB · Views: 0
Last edited:
OP
M

MrSurly

Well-known member
Joined
Jan 15, 2014
Messages
1,671
Location
East Texas
Over the holiday long weekend I made some progress despite the heat...
45032c80277dc6b4b8ec743a614b4816.jpg
60fbca6d13b3e8a1bb28c8863458d792.jpg
eb686d5383293091a03a20369d5da77c.jpg
35560f9ad4646c39e9dec98dcab17113.jpg

West, North and East walls completed.
Headers and window box completed, fascia trim, soffit, roof edge done.
I still need to do the South wall, of course, but I'm starting on the roof at this point. I seriously need a shaded area!!!
It's starting to actually resemble a shop, now!
The roof panels are stupid-heavy (26ga, 17' long) and I had a man lift rented. Without the machine, the roof is going to definitely be a challenge!
 

Attachments

  • 35560f9ad4646c39e9dec98dcab17113.jpg
    35560f9ad4646c39e9dec98dcab17113.jpg
    211.4 KB · Views: 0
  • eb686d5383293091a03a20369d5da77c.jpg
    eb686d5383293091a03a20369d5da77c.jpg
    968.1 KB · Views: 0
  • 45032c80277dc6b4b8ec743a614b4816.jpg
    45032c80277dc6b4b8ec743a614b4816.jpg
    832.3 KB · Views: 0
  • 60fbca6d13b3e8a1bb28c8863458d792.jpg
    60fbca6d13b3e8a1bb28c8863458d792.jpg
    968.1 KB · Views: 0
Last edited:

rebelranger

Well-known member
Joined
Sep 18, 2012
Messages
188
Did you concrete around the posts? 6x6 posts?
Trusses 4feet on center?
How deep did you set the posts?
How much are you in for materials alone at thus point?
I'm looking to do almost exactly as you but 32x40.
 
OP
M

MrSurly

Well-known member
Joined
Jan 15, 2014
Messages
1,671
Location
East Texas
Did you concrete around the posts? 6x6 posts?
Trusses 4feet on center?
How deep did you set the posts?
How much are you in for materials alone at thus point?
I'm looking to do almost exactly as you but 32x40.

Good questions;

The trusses are 5' o.c.
Posts (6x6) are 10' o.c.
The holes I drilled to 4' (minimum)
Two bags of Sakrete were used to provide a base and then the holes were backfilled with tamped soil. Later, the concrete slab (4" with rebar) was poured using the skirt board as the form.
Note that the original plan was to backfill with poured concrete as the slab was poured... but due to weather-caused delays of everyone's projects causing a backlog, there was no concrete delivery available at the right time for me. I decided to resort to dirt fill to avoid significant delay of the frame-up.
The overall footprint is 30 x 50, but the enclosed building is actually 30' x 40' 5"
Posts and skirt, all treated ".60/UC4B" _____ 1600
Other lumber__________________________ 1600
Trusses ______________________________ 1600
Concrete (1500 sf poured/finished) ________ 3800
Steel Package (26ga roof) _______________ 5600
The dirt work (pad) was _________________ 4000
The building design is mine, but as the city required "engineer stamped" I had to have a P.E. go over it and amend/modify the plan.
He added more beef and drove the costs up some...but that's OK. The point is only that your material list may be cheaper, using the more 'typical' build specs.
 
Last edited:
OP
M

MrSurly

Well-known member
Joined
Jan 15, 2014
Messages
1,671
Location
East Texas

Attachments

  • b546ec8462411194c89b84f413ae0d65.jpg
    b546ec8462411194c89b84f413ae0d65.jpg
    725.5 KB · Views: 0
  • 019c24fb6a178d8278b77bf661fc7003.jpg
    019c24fb6a178d8278b77bf661fc7003.jpg
    741.3 KB · Views: 0
  • 2a11e59fe60a6614f642f21096eb9d8f.jpg
    2a11e59fe60a6614f642f21096eb9d8f.jpg
    883.9 KB · Views: 0
Last edited:
OP
M

MrSurly

Well-known member
Joined
Jan 15, 2014
Messages
1,671
Location
East Texas
I now have an appointment with a spray foam insulation company for next Tuesday. Now, I've got to decide which option I'm going to go with:
1" of closed cell, roof and walls;
3.5" of open cell, roof and walls;
A combo of of those;

Or 5.5" open cell on either or both.
Or (more options) 2" of closed cell.

I do wish the reasoning behind the material type selection were more clear.
Different sprayers disagree on which type is better for my application.


Sent from my iPhone using Tapatalk
 

Riley

Well-known member
Joined
Feb 18, 2007
Messages
398
Closed cell is going to be moisture resistant. Open cell not. Another option is what is called "flash and batt".

Essentially a "skim coat" maybe an inch or so of closed cell is applied to provide the air transfer resistance, think drafts, then the cavity is filled with the usual batt insulation. Keeps the cost down, improves the effectiveness of the batt because you don't have air moving through it which helps it's ability to maintain a stable temperature.

The other development is adding some sort of layer against the exterior surface to allow replacement in the future without disturbing the building envelope. Practically anything I'd imagine, that the foam will stick to that is not permanently bonded to the exterior skin of the building.

Anyway, my two cents....
 
OP
M

MrSurly

Well-known member
Joined
Jan 15, 2014
Messages
1,671
Location
East Texas
Major progress today!
Today, spray foam!.
I have been debating/questioning every source on all aspects of the foam process.
I decided (finally) on what I wanted to do.
I had them spray 1" of Closed Cell floor to 7' on the walls.
Then 3-1/2" Open Cell from 7' up to the roofline.
Then the roof received 5-1/2" of Open Cell.
I had to really hustle to get all the trims done in time for the spray appointment but the result is worth it. The foam looks amazing, the building is now much further along as all the trims are completed on the enclosed portion. The porch area still needs trimming out.
The foam took about three hours. The crew was very professional and did a great job.
I got what was promised, and more.
It looks like I could make a meat locker out of the place!

b2f18f45d91de91bc92f615603001f2f.jpg
b1651868d02951149f6d12ee924e06c1.jpg

Sent from my iPhone
 

Attachments

  • b1651868d02951149f6d12ee924e06c1.jpg
    b1651868d02951149f6d12ee924e06c1.jpg
    391.1 KB · Views: 0
  • b2f18f45d91de91bc92f615603001f2f.jpg
    b2f18f45d91de91bc92f615603001f2f.jpg
    778 KB · Views: 0
Last edited:

mrpizza

Well-known member
Joined
Nov 1, 2011
Messages
2,935
Location
IL
Looks good! Did you put anything under the foam between the metal? If not, watch that the metal doesn't warp or anything.

I did housewrap under all my metal, or my warranty was void on the metal with spray foam on it.
 

hake

Active member
Joined
Oct 5, 2009
Messages
34
Major progress today!
Today, spray foam!.
I have been debating/questioning every source on all aspects of the foam process.
I decided (finally) on what I wanted to do.
I had them spray 1" of Closed Cell floor to 7' on the walls.
Then 3-1/2" Open Cell from 7' up to the roofline.
Then the roof received 5-1/2" of Open Cell.
I had to really hustle to get all the trims done in time for the spray appointment but the result is with it. The foam looks amazing, the building is now much further along as all the trims are completed on the enclosed portion. The porch area still needs trimming out.
The foam took about three hours. The crew was very professional and did a great job.
I got what was promised, and more.
It looks like I could make a meat locker out of the place!

b2f18f45d91de91bc92f615603001f2f.jpg
b1651868d02951149f6d12ee924e06c1.jpg

Sent from my iPhone


Looks great, what was the reason for closed cell for the first 7'? What was the cost? Keep up the good work!


Sent from my iPhone using Tapatalk
 
To avoid these ads, REGISTER NOW!
OP
M

MrSurly

Well-known member
Joined
Jan 15, 2014
Messages
1,671
Location
East Texas
nice progress, any spray foam quotes yet?

Quotes were all over the map.
From 3 to 7 thousand (!)

For the roof did you do the fasteners on the ridge or flat? Looking good so far!

The screws are on the flats. I tried to follow the manufacturer's instructions at every step.

Another option is what is called "flash and batt". Essentially a "skim coat" maybe an inch or so of closed cell is applied to provide the air transfer resistance, think drafts, then the cavity is filled with the usual batt insulation. Keeps the cost down....

I didn't find that to be the case. Adding a skim coat of closed cell will essentially double the cost of a batt install. Certainly no doubt about the performance boost, though!

The other development is adding some sort of layer against the exterior surface to allow replacement in the future without disturbing the building envelope. Practically anything I'd imagine, that the foam will stick to that is not permanently bonded to the exterior skin of the building.

Anyway, my two cents....


I couldn't find enough info about the pros and cons of adding a substrate. I think concern about difficulty of metal replacement are sort of overwrought. I'll take the odds I guess.
I would be more concerned that whatever substrate I used causing some unexpected issue later.


Sent from my iPhone using Tapatalk
 
OP
M

MrSurly

Well-known member
Joined
Jan 15, 2014
Messages
1,671
Location
East Texas
I did housewrap under all my metal, or my warranty was void on the metal with spray foam on it.

I couldn't find anything in writing from the mfr stating this. If you have a link to this info, please post it.


Looks great, what was the reason for closed cell for the first 7'? What was the cost?


The reason for the foam selection was this:
The price from this contractor was the same per square foot for either 1" of closed OR 3-1/2" of open cell.
So I could choose type based on R value or other aspect.
I leaned toward the open for the R value (per dollar) but had concern about durability since I don't plan to finish the walls.
For this reason I had the lower area done in closed. Because of pets, kids, sparks, general mucking about in the shop, the slight improvement in durability seemed worthwhile.
In the roof area I opted for the open with an up-charge for 5-1/2" to get more "R" up there.

For the record, the quoted thicknesses were exceeded significantly in the finished product.

The amount of structural stiffness provided is very noticeable along with the thermal barrier.

I'm liking this, a lot!

Quotes were all over the place but surprisingly (to me at least) was that the best price was provided by the 'big' company that does a lot of radio ads.
Price: $3500 total


Sent from my iPhone using Tapatalk
 
Last edited:

LXCam

ALLIANCE MEMBER
Joined
Apr 23, 2013
Messages
19,070
Location
AZ
Looking really good. And I'm wondering the same thing about the bottom 7ft. Are you planning on cooling the shop?
 
OP
M

MrSurly

Well-known member
Joined
Jan 15, 2014
Messages
1,671
Location
East Texas
Looking really good. And I'm wondering the same thing about the bottom 7ft.
Explained the post above (right when you posted)


Are you planning on cooling the shop?

Yes/no. I want to be ABLE to cool it if i have work to do, but generally, no, it will be just garage duty day to day. The great benefit of all this insulation is that without actively cooling the place, it will be imminently more comfortable just as-is, so the perceived need to turn on the AC should be reduced, a lot.
 
Last edited:

hake

Active member
Joined
Oct 5, 2009
Messages
34
I couldn't find anything in writing from the mfr stating this. If you have a link to this info, please post it.


The reason for the foam selection was this:
The price from this contractor was the same per square foot for either 1" of closed OR 3-1/2" of open cell.
So I could choose type based on R value or other aspect.
I leaned toward the open for the R value (per dollar) but had concern about durability since I don't plan to finish the walls.
For this reason I had the lower area done in closed. Because of pets, kids, sparks, general mucking about in the shop, the slight improvement in durability seemed worthwhile.
In the roof area I opted for the open with an up-charge for 5-1/2" to get more "R" up there.

For the record, the quoted thicknesses were exceeded significantly in the finished product.

The amount of structural stiffness provided is very noticeable along with the thermal barrier.

I'm liking this, a lot!

Quotes were all over the place but surprisingly (to me at least) was that the best price was provided by the 'big' company that does a lot of radio ads.
Price: $3500 total


Sent from my iPhone using Tapatalk


Thanks for the information! That's cheap for spray foam, really cheap. I expected it to be $8k. Are you worried about the form catching fire, especially the lower 7 ft? A ring of drywall all the way around may be relatively cheap insurance, fire barrier, even if it does get beat up a little.


Sent from my iPhone using Tapatalk
 
OP
M

MrSurly

Well-known member
Joined
Jan 15, 2014
Messages
1,671
Location
East Texas
Thanks for the information! That's cheap for spray foam, really cheap. I expected it to be $8k. Are you worried about the form catching fire, especially the lower 7 ft? A ring of drywall all the way around may be relatively cheap insurance, fire barrier, even if it does get beat up a little.

I agree, the quotes I had back you up; These guys had the best price by a long shot. Other quotes were 4500 to 7300. I can't explain it, but I got these guys over here to do this before they changed their minds!
I agree on the drywall as well and I do expect to eventually finish at least the lower 8' or so. For budget reasons, it will likely have to wait a while. Once I get "moved in" and sort out where things will be located, I will put up at least a few sheets of drywall or OSB in the work area. I constantly watch Craigslist, etc and if a bargain pops up on something interesting, I'm open to looking at various materials. I'd love to put up metal panels, but it will stay as is for a while.
Thanks!
 
OP
M

MrSurly

Well-known member
Joined
Jan 15, 2014
Messages
1,671
Location
East Texas
Decided to update this a bit.
*exactly a year since previous post*
I started this build June 9, 2017, got to the spray foam part late July and then I was gone for four months. Returning home around Thanksgiving and resuming, I installed electric and doors (10x10, 10x10, 18x8) then finally “finished” the building and cleared inspections in Feb ‘18. Of course, it’s never truly finished(!)
Since then I installed a window unit in a through-wall arrangement, 25,600 btu.
In my use of the AC (only when needed, not constant) I have been pleasantly surprised how well it has performed. It has been able to bring the room down to 75 even when outdoors is mid nineties.
Today, however, July 22, 2018 it’s 105 outdoors; the unit is just not *quite* enough as inside is stubbornly refusing to get below 81* but the good news it that 81 feels damned good!!
I may yet add another window unit just for rapid cool down and for extreme days. The outside metal in the sun reads 131* on the temp gun.

The other big change is that I’ve now added a loft.
The loft is 15x20 and is constructed with 10” S25.4 I-beam and 6x2” steel purlins decked with 3/4” sturdifloor ply.
Due to the garage doors and other considerations I built an I-beam false header just inside the 18’ door, freestanding on two 4-1/2” drill casing (heavy stuff) clearing 8’ to match the door. This header is there solely to support the East end of the loft beam. The other end of the loft beam has a matched casing leg. Each leg has a one-square-foot sized steel foot. These two beams and three legs are freestanding on the concrete slab and together provide the support of the interior side of the loft purlins.
The other side of the loft purlins are welded into a 20’ long channel that is screwed to a 2x8 header that is then screwed to three of the 6x6 timbers of the North gable wall.
So the loft is “freestanding” (bearing on the slab) on the South and supported by the timbers on the North.
Nothing at all connects to or involves the trusses.

a1986b90af800b945e54ac55cd2d4b15.jpg
9e088ea9800e8c471080d872d77328fe.jpg
74a4ea66979b4464ffe7985a48bb92b6.jpg
Clearance under the loft is just under 8’ and the truss chords above are 5-9 (ouch, ouch again )

When I hung the big beam I recorded the measurement to the floor mid-span so that I can note later if it has deflected and how much as it is used.
f5fa9f9b4c9f0666df2711ee44c76246.jpg
933d69c167dd77256050be967ff03737.jpg


Sent from my iPhone using Tapatalk
 

Attachments

  • 9e088ea9800e8c471080d872d77328fe.jpg
    9e088ea9800e8c471080d872d77328fe.jpg
    862.6 KB · Views: 0
  • 74a4ea66979b4464ffe7985a48bb92b6.jpg
    74a4ea66979b4464ffe7985a48bb92b6.jpg
    857.2 KB · Views: 0
  • f5fa9f9b4c9f0666df2711ee44c76246.jpg
    f5fa9f9b4c9f0666df2711ee44c76246.jpg
    796.5 KB · Views: 0
  • 933d69c167dd77256050be967ff03737.jpg
    933d69c167dd77256050be967ff03737.jpg
    640.2 KB · Views: 0
  • a1986b90af800b945e54ac55cd2d4b15.jpg
    a1986b90af800b945e54ac55cd2d4b15.jpg
    863.5 KB · Views: 0
Last edited:
OP
M

MrSurly

Well-known member
Joined
Jan 15, 2014
Messages
1,671
Location
East Texas
iAny update ? , can't wait to see more progress !!


Thanks for asking; I need to take more pics, for certain. I’m not sure how much qualifies as progress. Mostly (since the previous update) I’ve been just putting way too much junk inside(!).
I still need to build a stair for the loft, just using ladders for now. I added a ladder rack to the I-beam (handy as a safety wall). All electrical is in EMT conduit, permitted/inspected/gfci-ed etc. Samsclub put some LED shop lights on sale (twice) so I put of twenty of their linkable Honeywells.... still, I need more since adding the loft. I put in a compressor and later installed a piping system of welded 1” stainless that I made a thread about around here. Hung two electric shop heaters that I will replace with gas when I can get the piping in.
Love the place and I *Love* spray foam. We had high winds with the recent cold front and inside the shop you could hear the wind howling but none of the “oil canning” sounds that you normally hear in metal buildings. The sounds inside a foamed building are dramatically different than any other type of install. Wind, rain, storms, thunder, train horns, hail, pecans, everything is very muted in comparison to the ‘glas insulated buildings.
I’ve added a few shelves, much more storage needed and a great deal more stuff will be going up to the loft.
In recent Lowes clearance sales I grabbed another AC unit that I will install as a supplemental, as well as some more lights.
The two post lift has been a godsend and I’ve already had Kubota, Duramax, Mini, Saturn, Harley, John Deere and Dodges take a ride on it.
I LOVE my shop!


Sent from my iPhone using Tapatalk
 
Last edited:
OP
M

MrSurly

Well-known member
Joined
Jan 15, 2014
Messages
1,671
Location
East Texas
f26ff6c316b18ba25013f4f28a4c1ab3.jpg
bf747b39423d067315c7e4c7d5657e62.jpg
e7b2a016d47bd6d8ed5443fa66d4a570.jpg
8af2f9ae487cceaf58cea5fca2f9c08b.jpg
b23780c584806c12c149ab5179cd0bc0.jpg
9af9b96d22d5787c66c699c2650079a2.jpg
13a3c94ddb7e09d3bad539fa6f9445cc.jpg


Sent from my iPhone using Tapatalk
 

Attachments

  • e7b2a016d47bd6d8ed5443fa66d4a570.jpg
    e7b2a016d47bd6d8ed5443fa66d4a570.jpg
    380.6 KB · Views: 0
  • 8af2f9ae487cceaf58cea5fca2f9c08b.jpg
    8af2f9ae487cceaf58cea5fca2f9c08b.jpg
    385.5 KB · Views: 0
  • b23780c584806c12c149ab5179cd0bc0.jpg
    b23780c584806c12c149ab5179cd0bc0.jpg
    440 KB · Views: 0
  • bf747b39423d067315c7e4c7d5657e62.jpg
    bf747b39423d067315c7e4c7d5657e62.jpg
    440.4 KB · Views: 0
  • f26ff6c316b18ba25013f4f28a4c1ab3.jpg
    f26ff6c316b18ba25013f4f28a4c1ab3.jpg
    398.2 KB · Views: 0
  • 13a3c94ddb7e09d3bad539fa6f9445cc.jpg
    13a3c94ddb7e09d3bad539fa6f9445cc.jpg
    247.7 KB · Views: 1
  • 9af9b96d22d5787c66c699c2650079a2.jpg
    9af9b96d22d5787c66c699c2650079a2.jpg
    382.4 KB · Views: 1
OP
M

MrSurly

Well-known member
Joined
Jan 15, 2014
Messages
1,671
Location
East Texas
FYI...Change that welded line from the compressor to a 2-3 foot flex line and you will be quite surprised at the noise reduction....Right now, all the compressor vibration is being coupled to the piping and the building.


Yes, absolutely planning to do that. The rigid connection was 'available' and is intended as temporary. But then, I'm real bad about temporary things being allowed to go permanent...

Edited: after two years, I finally put it the flex! 6edd8626c1a9f9862f1663156d763de9.jpg
 

Attachments

  • 6edd8626c1a9f9862f1663156d763de9.jpg
    6edd8626c1a9f9862f1663156d763de9.jpg
    144.9 KB · Views: 1
Last edited:

JoeyB

Member
Joined
Oct 31, 2019
Messages
12
Location
Alabama
Did you consider doing scissor trusses on one end to give you more headroom for a the loft?

I am working on designing my office / woodshop / garage right now and have started to look in that direction for increasing floor space and utilizing the vertical space.
 
OP
M

MrSurly

Well-known member
Joined
Jan 15, 2014
Messages
1,671
Location
East Texas
Did you consider doing scissor trusses on one end to give you more headroom for a the loft?

I am working on designing my office / woodshop / garage right now and have started to look in that direction for increasing floor space and utilizing the vertical space.

I thought about it.... way too late.
I really didn't contemplate a loft until I had built the basic building and only then after I noticed some long I-beams at work that were sort of hiding in the grass. The light went on at that point, and the boss said "take 'em" then the die was cast. In hindsight I could've use scissors for the whole thing and built slightly lower walls. I HAD in fact discussed scissor trusses with some people beforehand; the message I got was that with a low pitch (3-1/2 to match the house) scissors don't gain much. Way more effective on steeper roofs.
To meet local wind load requirements, the engineer said he would require more of the already more costly scissors. My regret on my loft build: I used 6" purlins for floor joists in the loft, placed at garage door height. My ceiling chord to loft floor height is one damned inch less than needed to keep from bumping my head! If I had only used 4" purlins (and doubled for overkill) I wouldn't need to stoop just that little bit.
 

karoc

Well-known member
Joined
Dec 19, 2017
Messages
1,986
Location
Hemphill Tx
This deserves a bump for us guys who are going through or thinking about pole barn such as myself. Mr Surely I see that you got the poles that has that .60 rating marine grade. But you had to get them from Arnold Forest in Shreveport, did you drive there cause they were cheaper or they are the only ones that has the .60 rating? I guess looking at the 1600 was about the price? I google marine grade but big box stores keep popping up and McCoys. For the piece of mind its worth the drive to get the best
 
OP
M

MrSurly

Well-known member
Joined
Jan 15, 2014
Messages
1,671
Location
East Texas
I went there specifically because
1.) They treat everything greater than 060/ UC-4B
2.) they are the actual treater facility, they are NOT a lumber yard, they are not a mill.
3.) Their biggest customers are the states of Texas and Louisiana. all of those treated guardrail posts and bridge pilings and pier and dock pilings... that's what they do.
4.) They only have *one* treatment regimen, no light duty, no ground contact ****. every timber gets their 'full Monty" to the same time/ pressure/ temperature/retention standard as every other piece they do, to the state engineered contract specs whether the job is for the state or whomever.
5.) the very LAST thing I asked was 'how much'.
6.) there are many other treaters, no doubt some closer to you. I THINK there is one in Woodville. When you Google, specify marine piling or pier and skip right past the first dozen paid ads to get to the actual results.

A footnote specific to Arnold Forest products: Arnold (to my chagrin) does not actually 'stamp' the individual timbers as normal practice, which I didn't notice until I got them home. I think that they WILL stamp them if the customer states the stamp is needed. I did not know to request this, I just ASSumed. I called and sort of bitched (Ok, I whined) because I thought I had been shorted somehow, but I came to find *without question* that I was not. I received a letter from them explaining, certifying the treating process and putting my mind at ease. Their primary business is filling government contracts to specified engineered standards and they certify (as I understand it) entire batches or orders. They also get routinely inspected/monitored by the state(s). Stamping of individual timbers is pointless as they are not going into some warehouse for individual retail sale. They also don't 'stock' anything; they don't even stock untreated wood waiting to get orders. You call 'em and place your order, they order the timbers from the mill for your job and then they treat your timbers in the same massive drum along with tons of timbers and pilings that they are treating for the state jobs. No short cutting for small loads, they all get the same. They do NOT sell to lumber yards or box stores. During my shop build I saw (no pun intended) the proof when I first cut a chunk off of the first timber. If you cut even a little four-by-four from Lowes you will likely see that the center on the lumber is still yellow. The treatment never penetrated deeper than an inch, the center is untreated. The timbers from Arnold, despite being six-by-six, were saturated all the way through, no change of color out to inside. This proved to me that the time/pressure/retention claimed was real.
 
To avoid these ads, REGISTER NOW!
Top Bottom