To avoid these ads, REGISTER NOW!

Above 1200 Sq/FT Cleaning Up My Shop

Wokspaces above 1200 squarefeet.

bolensboneyard

Well-known member
Joined
Nov 22, 2013
Messages
3,074
Location
South East
:lol::lol::lol: They want to come back and bring more friends.:bounce::bounce

You know, it just depends on which 49 miles you drove. One mile in the right place can be a good thing.:thumbup:

Of course these ladies are great friends and spend a lot of time together. There was no jealousy or tension, just laughter and fun. They do a lot of cross stitching and knitting, and since I inexplicably knew some things about fiber arts that they didn't know they were eager to watch and learn.

I always thought a chick magnet was a refrigerator thingy.


My Zumba teacher is the one in the green top. The third lady is her life long friend and learning to be a ReFit instructor, and we go to her classes sometimes. I had just met the lady in the middle, my Zumba teacher told me I would like her. And I did, she was unassuming and did the best as closing toes in the socks I had knit for them. You can barely see the socks in their hands behind their phones.


It was a great day, rarely do I have visitors who are interested in such a wide variety of my hobbies. They were up for tractor driving lessons and green wood woodworking but we ran out of time. They also wanted to see sand casting but all we had time for was to make half a sand mold to demonstrate how well the sand holds up. I invited them back with their families for a cool weather hay ride and cookout. They also want to see where I dig the clay in the creek bed.

The pies, unfortunately, didn't last long. The ladies ate more pie than I expected and claimed they enjoyed them. I think I make good pies but I can only attribute it to using the recipe on the canned pumpkin instead of trying to make something special.:eyecrazy:


Interesting how intense aerobic exercise goes. It's a little like car racing. If you get to enjoying the scenery you'll inevitably wind up wrecking.

I don't take too many "how to do it" type courses, I pretty much learn on my own. I'm not really sure what a *** editorial course would entail.:headscrat


:bounce::bounce::bounce::bounce:

(note to everyone else: Bobby's a big one to talk, check out him with his chick magnet, Miss Vicky. Hasn't turned out that well for me:lol:)

attachment.php


I'm so embarrassed, apparently I spent the whole day and never thought of you:lol_hitti:lol_hitti


:lol::lol::lol:


Yeah boy:lol::lol::lol:

It was a good day.

:dunno:
 
To avoid these ads, REGISTER NOW!
OP
O

oldironfarmer

Well-known member
Joined
Jun 25, 2016
Messages
6,664
Location
Terlton, Oklahoma
I had to read that a few times to get it. (Okay I'm a little slow) So you're saying that MF didn't have good luck with power steering???

Your bracket looks like it might be the right color.:dunno:

I think MF makes fine tractors. The power steering in the column, however, was not one of their best ideas, and for the MF 235 it is a weak point. The tractors with valve in the steering column and assist cylinder is much better, I think.

MF are gray and red, however this bracket won't be seen by the user. I almost painted it AC orange like my shear stand.:D
 
OP
O

oldironfarmer

Well-known member
Joined
Jun 25, 2016
Messages
6,664
Location
Terlton, Oklahoma
Installed the battery tray support bracket. Everything fits!

attachment.php


Then I started trying to put the rear cowl back on. The new steering gear interferes. So I trimmed.

attachment.php


And had one rusted and twisted off bolt to remove. For those who haven't tried to weld a nut on a broken bolt, you should, it works so well.

attachment.php


The heat from welding swells the bolt, breaking the rust bond, and it will usually come right out.

attachment.php


Test fit the cowl and it has a long way to go.

attachment.php


Trimmed the mounting brackets off the steering column and cut the cowl twice more to get it to fit. Not much material left.

attachment.php


The front of the cowl is where it mounts to a bracket from the engine, and the fuel tank is mounted to the engine at the front. However, the hood will not mount onto the cowl, the fuel filler nozzle keeps it from going back further. I'm not sure what is wrong, and not all the sheet metal was on the tractor when they brought it to me. However the cowl is at the proper angle, so I'm calling it good.

attachment.php


This is turning into more than a little mechanic job.
 

Attachments

  • IMG_2100.JPG
    IMG_2100.JPG
    113.5 KB · Views: 765
  • IMG_2101.JPG
    IMG_2101.JPG
    101.8 KB · Views: 771
  • IMG_2102.JPG
    IMG_2102.JPG
    115.2 KB · Views: 769
  • IMG_2103.JPG
    IMG_2103.JPG
    99.5 KB · Views: 770
  • IMG_2104.JPG
    IMG_2104.JPG
    86.7 KB · Views: 775
  • IMG_2105.JPG
    IMG_2105.JPG
    77.4 KB · Views: 767
  • IMG_2106.JPG
    IMG_2106.JPG
    81.4 KB · Views: 770
OP
O

oldironfarmer

Well-known member
Joined
Jun 25, 2016
Messages
6,664
Location
Terlton, Oklahoma
The tractor rear cowl had to be trimmed so much to fit around the replacement manual steering gear (not for this model tractor) it will probably vibrate and crack so it needs reinforcement. Started by rolling a piece of 18 gauge (cowl is 17 gauge) so it will span the steering column. Then trimmed it in two steps with the throatless shear. Very easy.

attachment.php


Then proceeded to cold fold the end and shrink the flange to stiffen the piece. A little rough, but it's my first time. It will do the job.

attachment.php


I need to work on the corner radius a bit then get it welded on.

attachment.php


Like Lyndon said: "Gee, things are easy with the right tools!"

Thanks for visiting!
 

Attachments

  • IMG_2109.JPG
    IMG_2109.JPG
    81.9 KB · Views: 772
  • IMG_2108.JPG
    IMG_2108.JPG
    86.2 KB · Views: 766
  • IMG_2107.JPG
    IMG_2107.JPG
    98.8 KB · Views: 768

RickP

Well-known member
Joined
Jan 15, 2013
Messages
1,547
Location
Annapolis, MD
The tractor rear cowl had to be trimmed so much to fit around the replacement manual steering gear (not for this model tractor) it will probably vibrate and crack so it needs reinforcement. Started by rolling a piece of 18 gauge (cowl is 17 gauge) so it will span the steering column. Then trimmed it in two steps with the throatless shear. Very easy.

Then proceeded to cold fold the end and shrink the flange to stiffen the piece. A little rough, but it's my first time. It will do the job.

I need to work on the corner radius a bit then get it welded on.

Like Lyndon said: "Gee, things are easy with the right tools!"

Thanks for visiting!

Wow, look at you forming sheet metal like you've been doing it for years. Nice job - it looks like it was made that way.

And +1 to Lyndon about having the right tools.
 

dlcwent

Member Emeritus
Joined
Feb 24, 2014
Messages
8,427
Location
coastal maine
I'm starting to think (I know, should have done it long ago) that there isn't much you can't do Andy. That looks really good. I'm impressed. And that little tip about welding a nut to a broken bolt is a good one. It's worked for me many times, not every time but enough to always make it my first try with a broken bolt. And even when the bolt is broken flush, using a nut lets you weld to the bolt and not any surrounding metal.

Carry on..............................
 
OP
O

oldironfarmer

Well-known member
Joined
Jun 25, 2016
Messages
6,664
Location
Terlton, Oklahoma
Wow, look at you forming sheet metal like you've been doing it for years. Nice job - it looks like it was made that way.

And +1 to Lyndon about having the right tools.

Thanks! I've got a lot to learn but have had some beginner's luck. Time to break in the new TIG welder now, I don't want to gas weld that piece on.

Thanks for the visit!

I'm starting to think (I know, should have done it long ago) that there isn't much you can't do Andy. That looks really good. I'm impressed. And that little tip about welding a nut to a broken bolt is a good one. It's worked for me many times, not every time but enough to always make it my first try with a broken bolt. And even when the bolt is broken flush, using a nut lets you weld to the bolt and not any surrounding metal.

Carry on..............................

Thanks for the kind words! The formed metal was smoother but I worked it too much :( Maybe I learned something :)

Welding a big nut on a big stud is no issue. This was a 5/16" stud with a 3/8" nut. Welding a small nut is a job for me because I'm usually trying to use 1/8" stick rod and I have to burn down one side of the nut to get to the stud and often melts the side of the nut off. I've got a little flux core welder I need to move into my welding area. I think that would work well turned up HOT. I've just never used it much, mainly bought it for building up shafts to be turned back down.

Thanks for stopping by, guys!
 
Last edited:

sawduststeve

Well-known member
Joined
Oct 7, 2016
Messages
2,121
Location
Havering-Atte-Bower,London/Essex boarders, England
HI Andy

Great metal/fab work, looks like a factory piece.
I agree, the correct tools certainly move things along quicker. :thumbup:
So, when this MF is up and running will you be using it to entice more birds round your gaff, with the tried and tested, "would you like a ride on my tractor/loom/broom maker/sock darner ". Your pictures suggest it works, and as a line I'm nicking it. It gets better results than my " would you like to see my etchings"

Good work Sir. :beer:
Regards
Steve.
 
OP
O

oldironfarmer

Well-known member
Joined
Jun 25, 2016
Messages
6,664
Location
Terlton, Oklahoma
HI Andy

Great metal/fab work, looks like a factory piece.
I agree, the correct tools certainly move things along quicker. :thumbup:
So, when this MF is up and running will you be using it to entice more birds round your gaff, with the tried and tested, "would you like a ride on my tractor/loom/broom maker/sock darner ". Your pictures suggest it works, and as a line I'm nicking it. It gets better results than my " would you like to see my etchings"

Good work Sir. :beer:
Regards
Steve.

Thanks for the kind words!

The MF belongs to the people who insulated my shop. I'm fixing it for them as a favor.

However, I have other tractors, and an award winning show truck.:D

Thanks for looking in!
 
OP
O

oldironfarmer

Well-known member
Joined
Jun 25, 2016
Messages
6,664
Location
Terlton, Oklahoma
Congratulations on the excellent purchase!

Thanks!:thumbup:

That repair patch looks to have promise, well done on the forming for your first attempt.
JB

Thanks, JB!

I am, however, learning what I don't know about TIG welding. I'm doing something wrong. 40 years ago it was easier than gas. Now I'm wishing I was gas welding, just making a mess.:mad:
 

sawduststeve

Well-known member
Joined
Oct 7, 2016
Messages
2,121
Location
Havering-Atte-Bower,London/Essex boarders, England
Thanks for the kind words!

The MF belongs to the people who insulated my shop. I'm fixing it for them as a favor.

However, I have other tractors, and an award winning show truck.:D

Thanks for looking in!


I've seen your award winning show truck, what type of show did it win awards in, exactly. ;) and I know you own others. :)
My neighbour has a" lil gray " MF which is quite surprising as he lives in an end of terrace and has no land, but he knows people who do. It sounds sweet when it's fired up.

Regards
Steve.
 

Rex_A_Lott

Well-known member
Joined
Jul 27, 2011
Messages
167
Location
Upstate South Carolina
Nice job on the patch panel.
Sometimes gas welding is better, especially welding on old metal, and paint. The TIG likes to be clean, I almost always have porosity except when working with new stuff. I have a regular MIG too, same thing. Let us know how the flux core goes. Good Luck.
Did you feel the ground shake this morning?
 

madoc1

Well-known member
Joined
Dec 11, 2012
Messages
1,242
Location
spicewood, tx
andy, i think you are using flux core , right ? i was told a long time ago when i was having probs that the wire ages poorly and makes welding hard. it helped with me when i used new stuff. practice and set you amps low on the sheet metal.. you want to hear the bacon fry!

jim
 
OP
O

oldironfarmer

Well-known member
Joined
Jun 25, 2016
Messages
6,664
Location
Terlton, Oklahoma
I've seen your award winning show truck, what type of show did it win awards in, exactly. ;) and I know you own others. :)
My neighbour has a" lil gray " MF which is quite surprising as he lives in an end of terrace and has no land, but he knows people who do. It sounds sweet when it's fired up.

Regards
Steve.

It was a local car show. I didn't intend to enter, just drive it around. They gave me a form, the entry fee supports the local volunteer fire department so you need to enter and pay the fee. They have a "Work in Progress" category so they put mine there. Entrants vote for three in each category and my award Winning Show Truck was almost unanimous. :bounce:

You really don't need to have land to own a tractor, just like you don't have to have a railroad to own a caboose.:bounce::bounce:

Nice job on the patch panel.
Sometimes gas welding is better, especially welding on old metal, and paint. The TIG likes to be clean, I almost always have porosity except when working with new stuff. I have a regular MIG too, same thing. Let us know how the flux core goes. Good Luck.
Did you feel the ground shake this morning?

In part I'm practicing. I did grind to bright metal but it does still seem to be contaminated.

I'd like to have a MIG. We bought one in 1974 and soon learned that it would make a beautiful weld on structural steel which would not penetrate the mill scale. Members would fall apart when unclamped but the mill scale would stay with the weld.

I was wishing I'd gas welded it. I'm not planning to use the little flux core for sheet metal, but have thought about trying it.

Hey, you get a good feeling when you can make something like that and make it look like it was supposed to be there from the factory. Well done.

Thank you!! Very kind words:bounce:

andy, i think you are using flux core , right ? i was told a long time ago when i was having probs that the wire ages poorly and makes welding hard. it helped with me when i used new stuff. practice and set you amps low on the sheet metal.. you want to hear the bacon fry!

jim

No, I'm trying out my new inverter TIG. Last time I welded much with TIG was 1974. I didn't know flux core wire ages. :( I'm saving some:eyecrazy:

Thanks for all the comments, guys.

I've also been getting advice from my custom hay baler. He happens to be an expert welder who used to work for me, and later, I for him. He welded up the rings on my new Chevelle upper control arms. He promised to come over and get me started however I put him off and now he is working a job in Sidney, MT. I've worked there, it's a far out place!! So he's been helping by texting.

He asked about my foot pedal and I told him it was on/off. It's not. It varies the amperage and I had been welding without having the pedal all the way down.:wtf: 
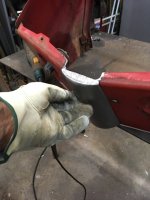
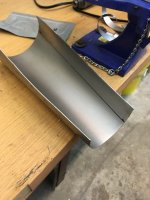
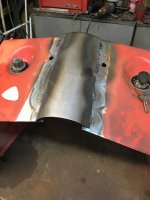
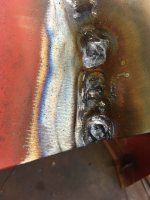
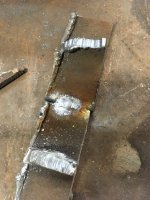
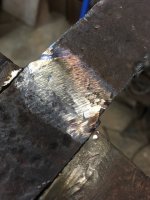
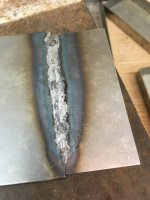
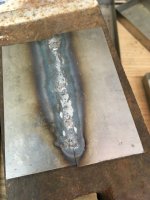
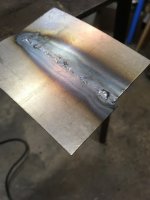
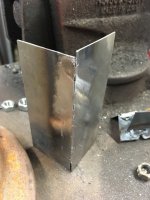
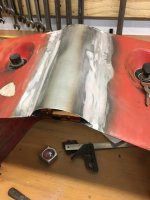
I only had a short time to try that but finished the welding and was able to drag a puddle around. On top of that, I didn't have enough argon flow and the weld was foaming. Novice mistakes but he suggested a test for me to do tomorrow. (heavy plate ground shiny and just weld a bead on it). At this point it's promising to me, 43 years ago we didn't have high frequency start or foot control. And I never did much, but I remember it being compared to gas welding.

This morning I ground the bird droppings off and was pleased with the results.

attachment.php


However I got lots of splatter on the cup, and he told me I had an argon leak. I think I had it turned down too low but will check the system.

attachment.php


I'm thinking this looks like too little argon.

attachment.php


Future is looking bright:thumbup:
 

Attachments

  • IMG_2117.JPG
    IMG_2117.JPG
    83.1 KB · Views: 524
  • IMG_2123.JPG
    IMG_2123.JPG
    70.1 KB · Views: 521
  • IMG_2124.JPG
    IMG_2124.JPG
    105.7 KB · Views: 518

dchance

Well-known member
Joined
Oct 3, 2016
Messages
614
Location
OKC
Andy I like the progress. You are helping your friends and practicing for the studebaker for your grand daughter. Not a bit of wasted time.

Keep it going.

Dwight
 
To avoid these ads, REGISTER NOW!

Rex_A_Lott

Well-known member
Joined
Jul 27, 2011
Messages
167
Location
Upstate South Carolina
I agree w/ your buddy, the Argon isnt getting there for whatever reason. I usually set mine on about 30 cfh, but that's in the shop, out of the wind, no fan blowing on it. Also once you contaminate the tungsten, it will look bad until you grind it sharp again. I usually have several pieces, ground sharp on both ends, so I dont have to wear out a path to the grinder. I have a short piece of 1/2" copper pipe with a two caps, one soldered on , one loose that I use to keep track of these.
Because its sheet metal, you dont have to deposit so much filler rod. Run with it way faster than if you were welding anything structural, or pipe...not much more than fused together, just a drop or two of filler every little bit. Yes, I know, it will look weak, almost what you would call undercut, but it will hold up. Less heat is better when it comes time to do the metal finishing and painting.
Make a couple of test pieces, then beat on it, bend it, run it through the planishing hammer until you convince yourself its strong enough.:)
I felt it too...it goes against everything I ever learned about welding pipe and having enough penetration.
Looking good, every time you will get better.
Good Luck
 
OP
O

oldironfarmer

Well-known member
Joined
Jun 25, 2016
Messages
6,664
Location
Terlton, Oklahoma
Andy I like the progress. You are helping your friends and practicing for the studebaker for your grand daughter. Not a bit of wasted time.

Keep it going.

Dwight

Thanks Dwight! I am ready to get the Massey home :)

looking good Andy.

Thanks Bobby!:bowdown:

I agree w/ your buddy, the Argon isnt getting there for whatever reason. I usually set mine on about 30 cfh, but that's in the shop, out of the wind, no fan blowing on it. Also once you contaminate the tungsten, it will look bad until you grind it sharp again. I usually have several pieces, ground sharp on both ends, so I dont have to wear out a path to the grinder. I have a short piece of 1/2" copper pipe with a two caps, one soldered on , one loose that I use to keep track of these.

Thanks for that advice! I'm now up to 20 cfh and doing better, so I need to quit being stingy with argon. I spent most of the day looking for argon leakage. With no tungsten I was getting flow with my thumb over the cup, and no flow with the quick disconnect disconnected.

attachment.php


It seemed like the leak was at the disconnect, so I took it apart to see if there was a damaged or missing o-ring. Which means taking the housing off to get to the nut inside.

attachment.php


Took it apart and figured out how it works, and everything was fine.

attachment.php


So then I took everything else apart, and finally submerged everything in a bucket of water which showed the cup was leaking a lot right at the torch. I had bought some cups yesterday when I got the ER70S-6 and they fit a lot better. I had been running 10 cfh and upped that to 20, and at my buddy's suggestion, welded some strings on plate.

attachment.php


The bead in the middle was 60 amps with ER70S-2, 80 amps on the left, and the one on the right is baling wire with 80 amps. Everything has bug holes except the baling wire.

My first problem was not knowing the foot pedal varied the amperage. Second problem was setting argon per a book, too low, third problem was not recognizing I had a bad arc (no argon) and the fourth problem was a defective cup. So I went to grinding the welds I made. If you're not good a welding you learn to get good at grinding:willy_nil

attachment.php


Because its sheet metal, you dont have to deposit so much filler rod. Run with it way faster than if you were welding anything structural, or pipe...not much more than fused together, just a drop or two of filler every little bit. Yes, I know, it will look weak, almost what you would call undercut, but it will hold up. Less heat is better when it comes time to do the metal finishing and painting.
Make a couple of test pieces, then beat on it, bend it, run it through the planishing hammer until you convince yourself its strong enough.:)
I felt it too...it goes against everything I ever learned about welding pipe and having enough penetration.
Looking good, every time you will get better.
Good Luck

More good advice! I know I was welding way way too heavy, but without pushing the foot pedal down and not enough argon, I was really struggling to get a puddle to start with, and then struggling to get the puddle to fuse to the base metal. And with a lot of heat I started warping the metal and had a 1/8" gap to weld across without burning up the add-on piece. Gas welding would have been a lot easier.

On the tailgate it should be mostly **** welds and I'm expecting to do a lot of small tacks. I understand minimum filler metal and have fused wiht out filler metal before, so that will be a goal.

My helper has been trimming out windows and wiring for three lights under the new mezzanine walkway. So I had to buy lights.:willy_nil

More lights:rocker::rocker:

attachment.php


When 1/2 Cup gets better he'll be laughing at my buying more lights.
 

Attachments

  • IMG_2127.JPG
    IMG_2127.JPG
    86.5 KB · Views: 671
  • IMG_2128.JPG
    IMG_2128.JPG
    114.3 KB · Views: 672
  • IMG_2130.JPG
    IMG_2130.JPG
    113.1 KB · Views: 669
  • IMG_2132.JPG
    IMG_2132.JPG
    108.5 KB · Views: 669
  • IMG_2134.JPG
    IMG_2134.JPG
    136.6 KB · Views: 693
  • IMG_2133.JPG
    IMG_2133.JPG
    97.6 KB · Views: 670

bolensboneyard

Well-known member
Joined
Nov 22, 2013
Messages
3,074
Location
South East
Andy much of what has already been said is good advice for sure. Only know what I see I would add that the little bug holes are what we call porosity. It can also be caused by too much moisture in the metal or even rust as it burns. The gas flow can also be too high and create a turbulence which can **** in ox. When you stop your arc you should also hold the cup/gas over the crater until the puddle cools (a few seconds.) Your wire should also be kept in a place where it cannot absorb moisture. "Rarely" you can get a bad bottle of gas but not likely. You will fare better with MIG on sheet metal of that caliber and function.
 
OP
O

oldironfarmer

Well-known member
Joined
Jun 25, 2016
Messages
6,664
Location
Terlton, Oklahoma
Andy much of what has already been said is good advice for sure. Only know what I see I would add that the little bug holes are what we call porosity. It can also be caused by too much moisture in the metal or even rust as it burns. The gas flow can also be too high and create a turbulence which can **** in ox. When you stop your arc you should also hold the cup/gas over the crater until the puddle cools (a few seconds.) Your wire should also be kept in a place where it cannot absorb moisture. "Rarely" you can get a bad bottle of gas but not likely. You will fare better with MIG on sheet metal of that caliber and function.

Thanks for the comments, Bobby! In pipe welding we get small porosity often not visible on the surface. I think I might have had some deep pitting which was not ground out before welding. But that is a LOT of giant bug holes, just never seen that in a weld before. Something was boiling out of the weld.

I do know to let the post flow flood the puddle, but I forget.:D Of course, the worst of this weld is right along the bead. I was a welding engineer in an ASME Code shop and I've never seen a welder do this bad:lol: If I saw this on the job I'd suggest the guy go back to flipping hamburgers...

(Note: You don't have to know how to weld to be a welding engineer, as I am eloquently demonstrating. However my boss thought it would be a good idea to send me to welding school to learn TIG root beads so I could "help the welders". He knew even less than I did, but I enjoyed learning to TIG but that was 43 years ago and I didn't retain everything. I can still write a welding procedure and have given welding engineers fits for years:lol_hitti)

I didn't think welding wire would absorb moisture like a coated rod will. I usually have s difference of opinion with folks on moisture in steel. Steel just does not absorb water, in any form, that's why it makes such nice vessels. When you preheat a plate with oxyacetylene you gets lots of moisture, which is commonly assumed to be water driven from the steel. But they are the products of combustion (water vapor) condensing on the cold steel away from the heating. All you have to do is look at the bottom of the plate to see there are no droplets. Moisture is not being driven out of the plate or it would be on the bottom too. Now hit me:lol_hitti:lol_hitti Of course the surface must be dry, and this plate was stored inside, but a little preheat might make a big difference.

If I had a MIG setup I'd try to use it, and if I could just buy a wire feeder to go on another welder I might do that, but I'm just not ready to spend the money on a MIG. The flux core might do the job, so I guess I need to experiment with it as well.

I had been worried about turbulence from too much argon flow but so far everybody is telling me I don't have enough. I did go from a No 6 cup to a No 8 cup to slow the exit velocity.

Looks like I'm not short of options:willy_nil
 

Rex_A_Lott

Well-known member
Joined
Jul 27, 2011
Messages
167
Location
Upstate South Carolina
Looking at your test piece with the 3 beads, I see a couple of things. The bead on the left with all the porosity, can be caused by contamination as Mr Bolens stated, whether from something on the metal, lack of Argon or whatever. It can also be cause by too much heat concentrated in one place, from slow travel, too little filler, or just too much current. It causes the puddle to “boil”, for lack of a better term. If you see it start, and you will learn to recognize it, the only way to get it to stop is to stop, grind it out and start over. You will continue to fight this phenomenon as long as you TIG weld, so learn to deal with it.
On the other two beads, the little hole at the end is caused by jerking your foot off the pedal to stop. You can ease off the pedal and make the puddle shrink down to nothing and go out , or you can pick up your travel speed so much that the puddle shrinks down, sort of in a funnel shape until the arc goes out. This is the way its done if you don’t have a foot pedal.
AS to the setting and the foot pedal, what you have the machine set on is the maximum you will get with the pedal mashed all the way down. You don’t have to run this way, you can vary it anywhere. You work it just like the foot pedal on your car. I prefer to set the machine a little higher than I will weld and if I need a little extra, its there. All that is personal preference and you will just have to practice enough to get to know what you like….welding is 20% know-how and 80% practice.
I have to admire you for trying to learn to TIG. I learned this when I was a teenager, and I still had good vision, good reflexes and steady nerves. I also had some good teachers, right at hand to answer any questions and to say “ here, watch this”. I don’t think I would pick it up as quick today. Also its much easier to weld something thicker, the sheet metal is tough to get the hang of.
Some of the best car restoration people prefer gas welding. It has a sort of self-annealing quality, plus it was the way thing were done “way back when”. The welds are much easier to finish than a MIG weld, and out of position welds are a little easier too. If you don’t feel you are making good enough progress on your TIG welding, nobody’s going to fault you for “going with what you know” to get the project done. Good Luck!
 

realvc

Well-known member
Joined
Jan 7, 2011
Messages
394
Location
Lake Norrell, AR
With everything else you have in your shop why not get a MIG welder? You could buy, barter or trade for one.:lol:

Do you not have the space for one in your welding room? How many brooms and pairs of socks would you have to sell to buy one?:bounce:

After buying a brand new welder and letting it set for over 2 years. I had not ever welded before and was having trouble with my MIG welds the first time I used my new welder and found that letting my argon set for over 2 years is not a good idea. After the bottle was laid on it's side and rolled across the shop floor my welds looked a whole lot better even for a rooky. They had all looked worse than your weld on the left with lots of holes/porosity.I was welding angle iron and flat plate so I think it must be pretty forgiving metal to work with.:thumbup:
 
OP
O

oldironfarmer

Well-known member
Joined
Jun 25, 2016
Messages
6,664
Location
Terlton, Oklahoma
Looking at your test piece with the 3 beads, I see a couple of things. The bead on the left with all the porosity, can be caused by contamination as Mr Bolens stated, whether from something on the metal, lack of Argon or whatever. It can also be cause by too much heat concentrated in one place, from slow travel, too little filler, or just too much current. It causes the puddle to “boil”, for lack of a better term. If you see it start, and you will learn to recognize it, the only way to get it to stop is to stop, grind it out and start over. You will continue to fight this phenomenon as long as you TIG weld, so learn to deal with it.
On the other two beads, the little hole at the end is caused by jerking your foot off the pedal to stop. You can ease off the pedal and make the puddle shrink down to nothing and go out , or you can pick up your travel speed so much that the puddle shrinks down, sort of in a funnel shape until the arc goes out. This is the way its done if you don’t have a foot pedal.
AS to the setting and the foot pedal, what you have the machine set on is the maximum you will get with the pedal mashed all the way down. You don’t have to run this way, you can vary it anywhere. You work it just like the foot pedal on your car. I prefer to set the machine a little higher than I will weld and if I need a little extra, its there. All that is personal preference and you will just have to practice enough to get to know what you like….welding is 20% know-how and 80% practice.
I have to admire you for trying to learn to TIG. I learned this when I was a teenager, and I still had good vision, good reflexes and steady nerves. I also had some good teachers, right at hand to answer any questions and to say “ here, watch this”. I don’t think I would pick it up as quick today. Also its much easier to weld something thicker, the sheet metal is tough to get the hang of.
Some of the best car restoration people prefer gas welding. It has a sort of self-annealing quality, plus it was the way thing were done “way back when”. The welds are much easier to finish than a MIG weld, and out of position welds are a little easier too. If you don’t feel you are making good enough progress on your TIG welding, nobody’s going to fault you for “going with what you know” to get the project done. Good Luck!

Thanks for taking the time to study the welds. I appreciate that. I was going slow and didn't know you could boil the puddle. I'll run a few more beads this morning. My buddy said it might be from holding the cup too vertically. That would put more heat in as well. I was going slowly, enjoying making a relatively clean bead. And I know I was making a hot weld, hotter than I would normally want.

I was surprised how well the baling wire did. I use it routinely in gas welding.

Thanks for the advice on the exit crater. I'm used to running a stick backwards while drawing it off to avoid a crater. Learning to do it with TIG will take some practice.

43 years ago there were no foot pedals. I appreciate your description. It will take some time to get used to coordinating both hands and a foot. I had been operating it partway intentionally on one of the test strips but I'm really not comfortable with that.

I thought I wanted to TIG sheet metal because I thought I could put less heat in than gas, therefore getting less warpage (time to get a puddle started seems longer with gas to me). I do OK on thin metal with gas and I'm not discouraged yet with TIG since I had some real errors to start with (I gas weld when it's too thin for 1/8" stick since I **** at 3/32" and a cracker box). I remember it being a struggle to start the arc without contacting the tungsten years ago and the high frequency start has totally eliminated that.

Thanks for staying with me, I would appreciate more advice as I go along:thumbup:
 
OP
O

oldironfarmer

Well-known member
Joined
Jun 25, 2016
Messages
6,664
Location
Terlton, Oklahoma
With everything else you have in your shop why not get a MIG welder? You could buy, barter or trade for one.:lol:

Do you not have the space for one in your welding room? How many brooms and pairs of socks would you have to sell to buy one?:bounce:

After buying a brand new welder and letting it set for over 2 years. I had not ever welded before and was having trouble with my MIG welds the first time I used my new welder and found that letting my argon set for over 2 years is not a good idea. After the bottle was laid on it's side and rolled across the shop floor my welds looked a whole lot better even for a rooky. They had all looked worse than your weld on the left with lots of holes/porosity.I was welding angle iron and flat plate so I think it must be pretty forgiving metal to work with.:thumbup:

Thanks for mentioning your experience. I've got room and I've got money. But my experience with MIG years ago was not great on thin metal. And I've not had great success with my flux core welder. It seems the setting is too sensitive to get a spot that will work. Seems when I get it cold enough to weld on thin metal it tends to pile up wire instead of weld.

And there are things I want to TIG, like build up for equipment parts I want to machine later.

However I'm open to ideas and experience. I really want to be able to weld patch plates in successfully.

Thanks again!!
 

bolensboneyard

Well-known member
Joined
Nov 22, 2013
Messages
3,074
Location
South East
Thanks for the comments, Bobby! In pipe welding we get small porosity often not visible on the surface. I think I might have had some deep pitting which was not ground out before welding. But that is a LOT of giant bug holes, just never seen that in a weld before. Something was boiling out of the weld.

I do know to let the post flow flood the puddle, but I forget.:D Of course, the worst of this weld is right along the bead. I was a welding engineer in an ASME Code shop and I've never seen a welder do this bad:lol: If I saw this on the job I'd suggest the guy go back to flipping hamburgers...

(Note: You don't have to know how to weld to be a welding engineer, as I am eloquently demonstrating. However my boss thought it would be a good idea to send me to welding school to learn TIG root beads so I could "help the welders". He knew even less than I did, but I enjoyed learning to TIG but that was 43 years ago and I didn't retain everything. I can still write a welding procedure and have given welding engineers fits for years:lol_hitti)

I didn't think welding wire would absorb moisture like a coated rod will. I usually have s difference of opinion with folks on moisture in steel. Steel just does not absorb water, in any form, that's why it makes such nice vessels. When you preheat a plate with oxyacetylene you gets lots of moisture, which is commonly assumed to be water driven from the steel. But they are the products of combustion (water vapor) condensing on the cold steel away from the heating. All you have to do is look at the bottom of the plate to see there are no droplets. Moisture is not being driven out of the plate or it would be on the bottom too. Now hit me:lol_hitti:lol_hitti Of course the surface must be dry, and this plate was stored inside, but a little preheat might make a big difference.

If I had a MIG setup I'd try to use it, and if I could just buy a wire feeder to go on another welder I might do that, but I'm just not ready to spend the money on a MIG. The flux core might do the job, so I guess I need to experiment with it as well.

I had been worried about turbulence from too much argon flow but so far everybody is telling me I don't have enough. I did go from a No 6 cup to a No 8 cup to slow the exit velocity.

Looks like I'm not short of options:willy_nil

It is the oxidization on the surface of the wire that creates the porosity not moisture absorbed. However, I have experienced steel that had been urinated on, as an example, the night before, smell real bad when welded on the next day. For the record, and no other reason, I taught welding in the shipyard for four years and before that welded every discipline available on the construction of nuclear submarines, as a civilian. Everything from mechanized pulse arc on down. I was also certified nuclear and non-nuclear. Once I became a quality control specialist my primary focus was sub safe systems and hull integrity. I am a certified radiographer for all sub safe systems and qualified to do every non destructive test in the books. We did not use eddy current so that was not offered. For what all that is worth, and I could go into phase shifts, grain structures, destructive tests and metrology, but who cares? My only desire, as I am sure you know, is to help where I can, and learn more. "Every man is my superior in that I may learn from him." Don't remember who said that but I'll never forget the message. Bobby
 
OP
O

oldironfarmer

Well-known member
Joined
Jun 25, 2016
Messages
6,664
Location
Terlton, Oklahoma
It is the oxidization on the surface of the wire that creates the porosity not moisture absorbed. However, I have experienced steel that had been urinated on, as an example, the night before, smell real bad when welded on the next day. For the record, and no other reason, I taught welding in the shipyard for four years and before that welded every discipline available on the construction of nuclear submarines, as a civilian. Everything from mechanized pulse arc on down. I was also certified nuclear and non-nuclear. Once I became a quality control specialist my primary focus was sub safe systems and hull integrity. I am a certified radiographer for all sub safe systems and qualified to do every non destructive test in the books. We did not use eddy current so that was not offered. For what all that is worth, and I could go into phase shifts, grain structures, destructive tests and metrology, but who cares? My only desire, as I am sure you know, is to help where I can, and learn more. "Every man is my superior in that I may learn from him." Don't remember who said that but I'll never forget the message. Bobby

I always take your advice very seriously, Bobby. We had discussed your background when I was staying at your house and I remember it. I hope my response did not come off as cavalier. But I have to discuss issues to learn, so when I comment on your advice I'm really asking for more information.

Speaking of wire, the clean copper coated wire is pretty easy to see whether it's clean. And baling wire I have to sand because it is rusty, but better rusty than oily.

Obviously I'm trying to learn and appreciate your help!!

Words to live by, Bobby!

:thumbup::thumbup:
 
OP
O

oldironfarmer

Well-known member
Joined
Jun 25, 2016
Messages
6,664
Location
Terlton, Oklahoma
More welding stuff.

Based on comments I made a few more test welds. I need to practice a lot more.

So I flipped the piece of steel over and ground it. Lots of deep pits. Welding faster with less filler metal resulted in less porosity. I'm happy with that.

attachment.php


The end of each weld is a mound, not a crater.

Then I picked up two cutoffs from the shear frame copes. Ground the ends and welded across the vee.

attachment.php


Flipped it over, back ground the vee, and ran a bead across. Left side was not full and I went over it twice.

attachment.php


Then ground it flat. A little undercut but no obvious porosity.

attachment.php
 

Attachments

  • IMG_2135.JPG
    IMG_2135.JPG
    99.4 KB · Views: 562
  • IMG_2136.JPG
    IMG_2136.JPG
    121.8 KB · Views: 562
  • IMG_2137.JPG
    IMG_2137.JPG
    96.4 KB · Views: 561
  • IMG_2138.JPG
    IMG_2138.JPG
    108.7 KB · Views: 561
OP
O

oldironfarmer

Well-known member
Joined
Jun 25, 2016
Messages
6,664
Location
Terlton, Oklahoma
Yet more welding stuff:bounce:

Thought I'd better try some sheet metal. This is 18 gauge. Using the TIG made a few spot welds.

attachment.php


Didn't burn through but close, here's the back.

attachment.php


So I tried a quick pass with little or no filler metal.

attachment.php


Here's the back, not full penetration of course.

attachment.php


So I ground off the high spots and took it to a little HF anvil and flattened it.

attachment.php


And the back

attachment.php


And then ground it smooth. I think it looks good enough to fill and paint. Rather not have the skips but it is progress.

attachment.php
 

Attachments

  • IMG_2145.JPG
    IMG_2145.JPG
    97.4 KB · Views: 553
  • IMG_2144.JPG
    IMG_2144.JPG
    102.5 KB · Views: 557
  • IMG_2143.JPG
    IMG_2143.JPG
    105.7 KB · Views: 556
  • IMG_2142.JPG
    IMG_2142.JPG
    97.8 KB · Views: 555
  • IMG_2141.JPG
    IMG_2141.JPG
    78.4 KB · Views: 553
  • IMG_2140.JPG
    IMG_2140.JPG
    95.2 KB · Views: 555
  • IMG_2139.JPG
    IMG_2139.JPG
    80.2 KB · Views: 555
OP
O

oldironfarmer

Well-known member
Joined
Jun 25, 2016
Messages
6,664
Location
Terlton, Oklahoma
Almost done with welding updates!

Took the sheet metal coupon to the brake to break it. Did almost 90 degree bend right along the seam expecting it to break, but each tack held, the superficial welds cracked open. That's a pretty severe bend. Closer tacks may be in order.

attachment.php


Then went back to the tractor, put some Bondo on the cowl

attachment.php


And painted it. Looks better painted than I thought it would.

attachment.php


One last test fit, and it seems to fit OK.

attachment.php


Also got the starter pulled to remove the power steering pump (making a blanking plate) and put the starter back on. Just about out of things to do on the tractor.:rocker::rocker::rocker:
 

Attachments

  • IMG_2146.JPG
    IMG_2146.JPG
    93.4 KB · Views: 553
  • IMG_2147.JPG
    IMG_2147.JPG
    94.5 KB · Views: 554
  • IMG_2148.JPG
    IMG_2148.JPG
    93.7 KB · Views: 556
  • IMG_2149.JPG
    IMG_2149.JPG
    98 KB · Views: 553

BBChevro

Well-known member
Joined
Jan 24, 2014
Messages
2,235
Location
Brisbane, Qld., Australia
Nice work on the cowl Andy. :thumbup:

Most of those welds look quite OK, as with most skills - the more you practice, they better you get.

Occasionally, I'll weld a bead that I'm really happy with - the irony of it is that it's nearly always in a place that it will never be seen. :sad:

For most of my welding though, I can proudly refer to myself as a "reasonably competent grinder". :lol:


The old "welding a nut on a broken bolt" trick (best said in a Maxwell Smart voice) reminds me of the time I welded a bolt to a particularly stubborn counter-sunk screw* that refused to budge with an impact driver - it came straight out (welding the bolt to it gave me a hex head to put a wrench on - but the heating probably freed it up too).

(* the counter-sunk screw was holding the back door hinge on a '64 Chevy wagon for anyone not familiar with them - they can be a real PITA).


Is today Saturday?
 

Rex_A_Lott

Well-known member
Joined
Jul 27, 2011
Messages
167
Location
Upstate South Carolina
Looking a lot better.:) Just keep at it.
Listen to Mr. Bolens, they dont hire hacks at the shipyard, and they dont even let all of them weld on the subs. As a whole some of the best I've ever seen worked in the yards.
One of my instructors at tech had worked in Charleston Naval Shipyard for a while and he told me about the test he took to get the job. They put the test coupon in the corner, an "Arkansas bellhole", (45deg), 6" off the floor and 6" or so from each wall. It was an xray test. This would have been sometime in the 70's, they may do it different now. And some of the places they have to work on the ships and the subs are even worse than that. My experiences with the yards were not as a weldor, I was in the Navy, but I saw some of the work they did and I was duly impressed. I never managed to get the hang of the mirror, but there are many that can.
When you're damn near perfect on the table in the shop, you're just getting ready to start thinking about trying to begin to learn to weld in the field:willy_nil That rusty old Studebaker is going to put you to the test, but you'll make it. Good Luck
 
OP
O

oldironfarmer

Well-known member
Joined
Jun 25, 2016
Messages
6,664
Location
Terlton, Oklahoma
Nice work on the cowl Andy. :thumbup:

Most of those welds look quite OK, as with most skills - the more you practice, they better you get.

Occasionally, I'll weld a bead that I'm really happy with - the irony of it is that it's nearly always in a place that it will never be seen. :sad:

For most of my welding though, I can proudly refer to myself as a "reasonably competent grinder". :lol:


The old "welding a nut on a broken bolt" trick (best said in a Maxwell Smart voice) reminds me of the time I welded a bolt to a particularly stubborn counter-sunk screw* that refused to budge with an impact driver - it came straight out (welding the bolt to it gave me a hex head to put a wrench on - but the heating probably freed it up too).

(* the counter-sunk screw was holding the back door hinge on a '64 Chevy wagon for anyone not familiar with them - they can be a real PITA).


Is today Saturday?

Thanks for the comments!

I firmly believe the flat head screws holding old Chevrolet door hinges were never intended to be removed.:willy_nil

OIF, just remember " a bit of bondo and paint makes a welder what he ain't!"

:lol_hitti:lol_hitti Not sure anyone even read that little ditty :thumbup:

Looking a lot better.:) Just keep at it.
Listen to Mr. Bolens, they dont hire hacks at the shipyard, and they dont even let all of them weld on the subs. As a whole some of the best I've ever seen worked in the yards.

Ever since I spent a day with Bobby he has my highest admiration.


One of my instructors at tech had worked in Charleston Naval Shipyard for a while and he told me about the test he took to get the job. They put the test coupon in the corner, an "Arkansas bellhole", (45deg), 6" off the floor and 6" or so from each wall. It was an xray test. This would have been sometime in the 70's, they may do it different now. And some of the places they have to work on the ships and the subs are even worse than that. My experiences with the yards were not as a weldor, I was in the Navy, but I saw some of the work they did and I was duly impressed. I never managed to get the hang of the mirror, but there are many that can.

Never heard it called "Arkansas Bellhole" but we have had restricted 6G tests. Refinery work is likely not as restricted as ships and submarines (they cram a lot of stuff into small spaces) but there are routine jobs which require mirror welding. I have never tried it, but have seen guys who were as quick with a mirror as out in the open.


When you're damn near perfect on the table in the shop, you're just getting ready to start thinking about trying to begin to learn to weld in the field:willy_nil That rusty old Studebaker is going to put you to the test, but you'll make it. Good Luck

I have been around some real welders, and my buddy is one of them. When he gets back from Montana he promised to come over and give me some pointers. I've seen him make some amazing repairs, and he was in management at the time. Also worked with some guys who were aces at buddy welding water wall tubes in large steam generation boilers. A four foot wide panel of 2" tubes 40 ft long are manufactured with the tubes welded side to side. One guy inside the boiler and one guy outside with the tube panel hanging start at one side and weld across without much communication, and they have to stay together and pass x-ray. In fireboxes the tubes can be a few inches from the refractory, with most on the wall and some overhead. Some real welding.

When I went to TIG school 43 years ago I had one root bead x-rayed and it passed. I never considered myself a quality welder and never did any TIG other than in school and one demonstration in the refinery I worked in.

Nope, I'm just struggling to make sheet metal welds out in the open. But it sure helps to have argon flooding the work.:rocker:

I've stick welded and gas welded under lots of farm equipment, but the Studebaker is different. Appearance counts. However I can have my way with it and get it on the welding table if necessary!

Thanks for your comments!!
 

jimreed2160

Well-known member
Joined
Aug 7, 2016
Messages
3,589
Location
Tallahassee FL
More lights:rocker::rocker:

attachment.php


When 1/2 Cup gets better he'll be laughing at my buying more lights.


Based on your last purchase of lights, I am glad you gave the factory time to catch up and build inventory. Of course, my tired eyes think there can never be too much light. This time I am sure it will be nice to point and have helper install. :thumbup:
 
OP
O

oldironfarmer

Well-known member
Joined
Jun 25, 2016
Messages
6,664
Location
Terlton, Oklahoma
Based on your last purchase of lights, I am glad you gave the factory time to catch up and build inventory. Of course, my tired eyes think there can never be too much light. This time I am sure it will be nice to point and have helper install. :thumbup:

Thanks for stopping in!

for a short time our Walmart was carrying several dozen of these lights. Now they are back to two or three but they had four that day. The full pallet I bought was special order and discounted price. I need three or four more to replace those with failing ballasts.

I can only imagine how many thousand they produce a day, it must be quite an operation.
 
To avoid these ads, REGISTER NOW!
Top Bottom