To avoid these ads, REGISTER NOW!

What did you do "IN" your garage today?

fordkid88

Well-known member
Joined
Nov 10, 2013
Messages
680
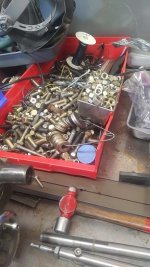
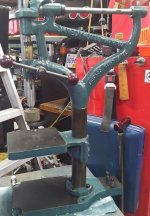
Whipped up a prybar holder holder out of some scrap gas pipe and flat stock, paint will probably come tomorrow.

<a href="http://imgbox.com/4NG5AhTt" target="_blank"><img src="https://9-t.imgbox.com/4NG5AhTt.jpg" alt="image host"/></a>

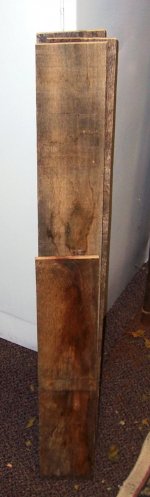
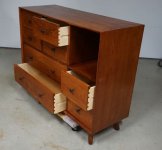
Painted a pintail styled leg that I bent and welded up earlier this month for a live edge table the wife wanted.

<a href="http://imgbox.com/M8xgxv2b" target="_blank"><img src="https://4-t.imgbox.com/M8xgxv2b.jpg" alt="image host"/></a>

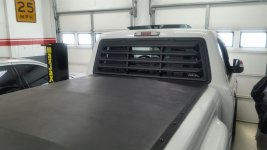
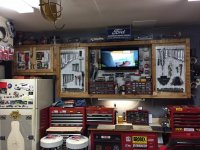
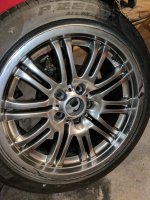
Got that couch in the background from my coworker today and threw on some casters I had floating around. Also picked up that rim and started turning it into an air hose reel.

<a href="http://imgbox.com/2a4iq2Ne" target="_blank"><img src="https://2-t.imgbox.com/2a4iq2Ne.jpg" alt="image host"/></a>

Gotta run to menards tomorrow and grab some odds and ends to prevent kinks.
<a href="http://imgbox.com/9VryqkbH" target="_blank"><img src="https://9-t.imgbox.com/9VryqkbH.jpg" alt="image host"/></a>

Next get the frame figured out and get it on 2 carrier bearings.
 
To avoid these ads, REGISTER NOW!

Sawdustmaker

Well-known member
Joined
Jan 15, 2017
Messages
928
Location
Placentia, Orange Co., California
Made a shelf unit from scraps for the two planes I recently refurbished. Notched the shelves under the blades rather than store them on their sides. A 5/16" hole in the shelf under the rabbet plane keeps the fence handy without being mounted.
attachment.php

Nice job on the refurbishing. I have 3 that I need to refurbish, but other projects are taking priority. Glad to see that you know NOT to set a plane on its blade. Have seen many woodworkers leave them on a bench without putting them on their side.
 

Outlander

Well-known member
Joined
Jul 30, 2010
Messages
5,154
Location
Quebec, Canada
Nice job on the refurbishing. I have 3 that I need to refurbish, but other projects are taking priority. Glad to see that you know NOT to set a plane on its blade. Have seen many woodworkers leave them on a bench without putting them on their side.

I remember my dad telling me that when I was barely able to lift the plane off the bench!
 

PhantomEB

Well-known member
Joined
Feb 6, 2006
Messages
6,787
Location
Medicine Hat, AB, Canuckistan
Tidying up as soon as my dead diesel that I am tired of chasing gremlins on leaves for its new home tomorrow, I am headed over to moms place to get my 72 Bronco over to my garage before I take off for work again.
 

Bob Heine

ALLIANCE MEMBER
Joined
Oct 24, 2009
Messages
10,706
Location
Boca Raton, Florida
Bob,
That looks excellent! :beer:
Thanks Jon, it came out better than I expected.
Nice job on the refurbishing. I have 3 that I need to refurbish, but other projects are taking priority. Glad to see that you know NOT to set a plane on its blade. Have seen many woodworkers leave them on a bench without putting them on their side.
SDM, I'm embarrassed to say I did not know that until I joined Garage Journal. My grandfather was a butcher, my father-in-law was an office worker and my father was a teacher. None of them did much woodworking and I never actually saw my father use that Stanley rabbet plane (I thought the fence was to guide it while planing the bottom of a door).
I remember my dad telling me that when I was barely able to lift the plane off the bench!
I remember my friends on Garage Journal telling me that (I'm at that age when lifting the plane may soon be a challenge).
 

isb cornbinder

Well-known member
Joined
Nov 3, 2010
Messages
7,073
Location
Pacific South West, BC, Canada
I have not made it out to the garage today, The time is 10:45h. I am on my way.
Today's task is to sort and put hundreds of fasteners away.
Yesterday, I went around the shop collecting nuts, bolts and washers wherever I could find them.
When we had to blow my son's mocked up 1952 IHC pickup apart, to make space for another project, the kid dropped all of the fasteners on the floor and swept them up then dumped the lot in a vintage Radio Flyer Wagon.
BTW, the Old IHC will be a Cummins 4bta/TH475/NVG 241c powered 4X4 on DANA axles.
 

Attachments

  • nuts and bolts.jpg
    nuts and bolts.jpg
    80.7 KB · Views: 115
Last edited:

555

Well-known member
Joined
Nov 10, 2007
Messages
2,302
Location
Nomad-Arkansas & Georgia
My youngest and his wife are moving. Some of their stuff has ended up at our house and I spent a bit of time putting everything into storage tubs. Finished the last of them today. I then started the tear down of a ratty old 51 HD Panhead chopper that a friend intends to restore.
 

TractorJeff

Well-known member
Joined
Dec 8, 2013
Messages
3,309
Location
Elkhorn, WI
Spent all day Saturday welding a broken/cracked Bulldozer Frame. Welding overhead *****! Its done, all put back together, moved out of the way. Next Project?
 

Outlawmws

Well-known member
Joined
Aug 9, 2011
Messages
39,258
Location
The Badlands
Picked up this wool carpet during yesterday's Yardsailing. It needed cleaned, so I laid it in the driveway, wet it real good (and verified its real wool...), and scrubbed both sides with my hunting "no scent" laundry detergent, and a stiff broom.

let it set, scrubbed again then started power wash rinsing. Man that took a lot! I finished with it suspended over two pipes, across two ladders and its there now, drying out (I have a big blower on too) and I also wet vacuumed it to **** out as much water as possible for a head start. (I got a gallon or more out, even after 30 min or so of draining!)

It's been drying all night with the blower up the center, I moved the blower to the side and between it and the sun, I'm hoping it get closer to it drying out today. It's supposed to be sunny and a decent breeze... :dunno:

its real thick, and real dense...

My plans for this are the base pad for the car top tent. More on that in the Camp Gear thread (See my sig)
 

EOC_Jason

Well-known member
Joined
Jun 25, 2012
Messages
11,388
Location
Bentonville, AR
Yesterday I replaced the handle on an old Craftsman engineer's hammer, sanded the handle smooth and put a nice coat of stain/poly on it to give the wood a little more depth and color. Need to put another coat of clear on it today and then I can call it good.

A younger individual I sold a chainsaw to months ago stopped by. It worked great he said and then it sat for a few months and now he couldn't get it started. I gave it a couple pulls and it started but would hardly run like it was starved for fuel or something. Pulled the spark plug, cleaned it off... gap was off by like .010 so after fixing that I put it back in and it fired right up like a champ. Tweaked the H/L a smidge and called it good.
 

bpj71

Well-known member
Joined
Dec 28, 2013
Messages
145
Location
Baiting Hollow, NY
Re: What did you do &amp;quot;IN&amp;quot; your garage today?

Been working on converting a speaker tripod to a projector/bluray player stand. Except for speakers and screen everything mount neatly to the stand.

The goal is to have a sweet set up for back yard movies for my daughter and maybe a couple of football games.

I have a 10ft Camp Chef screen and the sound is through a Bluetooth sound bar with wireless subwoofer.
61dc7677b5e304fd1145eb6ffc346beb.jpg


Sent from my SM-G935V using Tapatalk
 
Last edited:

NewShockerGuy

Well-known member
Joined
Oct 12, 2010
Messages
2,481
Location
Northern Virginia / DC
Officially mounted my rear window louver. I'm happy with the fitment compared to how it should have been from the manufacture. They had these hinge brackets up top which then created a horrible gap in the upper top portion. I tapped out the hinge pins, then dremeled off the hinges, then added a couple extra mounting on the sides/bottom so that it sits flush against the window. Looks much better. Visibility out the back is definitely affected but not drastic. It's darker in the cabin too which is nice.

w00t w00t for 70's retro vibe!

-Nigel
 

Attachments

  • 1.jpg
    1.jpg
    135 KB · Views: 108
  • 2.jpg
    2.jpg
    134.1 KB · Views: 104
  • 3.jpg
    3.jpg
    131.3 KB · Views: 109
  • 4.jpg
    4.jpg
    134.6 KB · Views: 103

chrismenke

Well-known member
Joined
Mar 2, 2014
Messages
1,131
Location
Sam's Clam Disco, CA
Got the clock running for the 59 Ford Ranchero. Ultrasonic bath plus a long slow drying in the oven got the electric winder working. The mechanical clock worked as soon as I got it out off the dash and spun the escapement. Now it will only run for 3 minutes when cold, but with one electrical wind happening. Will run indefinitely if I blow warm air over it. Hoping the clock oil I've ordered will fill in for heat expansion.
 

firworks

Well-known member
Joined
Jun 29, 2015
Messages
4,079
Location
IL
Officially mounted my rear window louver. I'm happy with the fitment compared to how it should have been from the manufacture. They had these hinge brackets up top which then created a horrible gap in the upper top portion. I tapped out the hinge pins, then dremeled off the hinges, then added a couple extra mounting on the sides/bottom so that it sits flush against the window. Looks much better. Visibility out the back is definitely affected but not drastic. It's darker in the cabin too which is nice.

w00t w00t for 70's retro vibe!

-Nigel

Hey that louver is pretty cool!
 

srr

Well-known member
Joined
Jul 10, 2015
Messages
111
Location
San Diego
I've started operation clean up. Neighbor has a 20' dumpster for scrap metal and I made a large donation of metal that has collected over the years. Now I'm going through the stuff labeled as why the heck did I save this??? lol and tossing stuff out and will be selling off use car parts..never any tools. ;-)
 

bmxdad

Well-known member
Joined
Feb 18, 2014
Messages
2,539
Location
Puyallup, WA
Pressure washed the expansion joint, in the driveway, and sealed it up with some crack sealer. Did an oil and filter change on the DD and the K2500. Next job for that is to replace the Glow Plugs and injectors. Hopefully none of the GP's have swollen up.
 

polexican23

Banned
Joined
Jun 11, 2013
Messages
2,168
Location
burbs-Illinois
My storage location aka deceased grandmas garage had to be cleared out. So i had to speed up my garage flooring. Did it over the last we so i could roll in my project.


8679bb60f3a3bad3dda207aab388ef2e.jpg


I used Rustoleum epoxy shield gray with the flakes, then a coat of the Rustoleum clear coat.
A lot of people have said the product is ****, but I wasnt in a position (time or money) to do what I planned with the ghostshield sealer.
 
Last edited:
To avoid these ads, REGISTER NOW!

DCarr2

Banned
Joined
Dec 12, 2015
Messages
1,339
Location
Akron NY
Built another shelf for more stuff. And in the process put together my welding station...
6373ab58714cbe7fb436157af52f648e.jpg
3c519c37b0375187df31fa097033df55.jpg


Sent from my iPhone using Tapatalk
 

Outlawmws

Well-known member
Joined
Aug 9, 2011
Messages
39,258
Location
The Badlands
Finally setup the tiny 1936 table saw for milling some very un-straight oak pallet wood into straight pieces.

First cut them a bit over size for length for the best sections, then setup the saw with a LONG angle as the fence, and trimmed off the "hump" (riding the "high" ends against the overlong fence)

Then I set it up for 4-5/8" and cut them straight with the no straight edge against the long fence.

I also trimmed a LOT of split ends and other damage. they are still not perfect, but its not going to be furniture, these will hopefully become the sides to a box for camp gear...

The saw setup:

attachment.php


And the "roughed out" milled boards:

attachment.php
 

Attachments

  • Milling saw setup.jpg
    Milling saw setup.jpg
    115.6 KB · Views: 9,422
  • Milled oak.jpg
    Milled oak.jpg
    102.6 KB · Views: 2,016

Jazz1

Well-known member
Joined
Jan 3, 2016
Messages
4,188
Location
Thunder Bay On.
Read the instructions for my weedwacker. Should have read them 40 years ago would not have been such a PIA loading string,,,been doing it wrong all these years.
 

jthomas944

Active member
Joined
Aug 28, 2013
Messages
27
Finished my new tool cabinet.
 

Attachments

  • IMG_2773.jpg
    IMG_2773.jpg
    146.4 KB · Views: 141
  • IMG_2774.jpg
    IMG_2774.jpg
    148.7 KB · Views: 184

xyster101

Well-known member
Joined
Jul 3, 2013
Messages
640
Location
Upstate NY
Built a spray can rack. Holds 56 cans. Almost filled it when I went looking for cans hidden all over the shop.
8082dae99f042a71ce4e984c28fa9268.jpg


Sent from my iPhone using Tapatalk
 

fordkid88

Well-known member
Joined
Nov 10, 2013
Messages
680
Tire rotation, started fabbing up a mini air hose spool, and cleaned up a bit.

Hung this bitching clock from the wife.
<a href="http://imgbox.com/UejQjNCb" target="_blank"><img src="https://4-t.imgbox.com/UejQjNCb.jpg" alt="image host"/></a>
 

gazza

Well-known member
Joined
Dec 24, 2009
Messages
364
Location
Melbourne Aust
Read the instructions for my weedwacker. Should have read them 40 years ago would not have been such a PIA loading string,,,been doing it wrong all these years.

After about 15 years of use I have finally found the best head unit for my brush cutter (weed wacker)
Not only does it use the largest multi edge nylon cord but you can load it the easiest way.
Just unroll 2 arms lengths of cord, fold it in half, put a kink in it halfway, roll it up and stick it in your pocket, because you never run out of cord when you just start using it its always when you at the other end of your block.
So when you do run out, align the marks on the head and feed the cord thru the holes in the head to the half way kink then simply wind it up inside by holding the top of the head stationary and turning the base to suit. Its so easy you can even do it without turning the machine off, although I dont do it this way for safety reasons.
 

isb cornbinder

Well-known member
Joined
Nov 3, 2010
Messages
7,073
Location
Pacific South West, BC, Canada
I bought a SPEEDBALL soft rubber BRAYER. I intend to use it to roll paint onto the raised letters on my camel-back drill presses.
I started making a plan to reorganize the shop for better use of the space. As many as five toolboxes could go for sale, including the Craftsman I bought in 1962.
 

Attachments

  • CANEDY OTTO WITH HANDLE.jpg
    CANEDY OTTO WITH HANDLE.jpg
    123 KB · Views: 118
  • SPEEDDBALL BRAYER.jpg
    SPEEDDBALL BRAYER.jpg
    53.6 KB · Views: 97
Last edited:

LeonardY

Well-known member
Joined
Apr 16, 2011
Messages
5,058
Location
Southern California
Finished this.
A changing table for a very good friend.

Then I cleaned the garage for the next project.
 

Attachments

  • 1.JPG
    1.JPG
    54.5 KB · Views: 68
  • 2.JPG
    2.JPG
    46.2 KB · Views: 62
  • 3.JPG
    3.JPG
    45.1 KB · Views: 63

rayra

Well-known member
Joined
Dec 1, 2014
Messages
4,724
Location
Escaped from Los Angeles
Fell into a large quantity of 'defective' 9mm ammunition and am breaking it all down into components at the rate of about 250rd / hour. Things got a good bit faster and easier once I figured out the proper adjustment on the collet puller die and then made a wood handle for the 1/4" steel dowel it came with, which was beating my hands up pretty good.
I'm keeping half in exchange for my labor. Not a bad deal for me, I've got more time than money, lately.

I first did a rough count by volume (~6800 rounds), then did a sort; empty brass, odd calibers, .380, loaded rounds with plated LRN and proper primers, loaded rounds with plated LRN with missing or flipped primers. And rounds loaded with golden saber JHP bullets. Then I set about processing it all. Breaking it down, resizing the brass, punching the improper primers, disposing of the unknown and mixed powders as garden fertilizer. Still have about ~2300 rounds to go. Once it's all broken down and parceled out, I'll get busy turning my half back into good ammo.

bucketsogold.jpg
bucketsogold2.jpg
bucketsogold3.jpg
bucketsogold4.jpg
bucketsogold6.jpg
bucketsogold7.jpg
bucketsogold8.jpg
 
Last edited:

ChaseDE

Well-known member
Joined
Aug 25, 2016
Messages
2,178
Location
Delaware
For the last few days I have been working on cleaning up these wheels I bought.

Last night I rigged up some extra light above the bench I am using to clean them, worked out pretty well.

These are OEM E46 BMW M3 18" wheels, they were plastidipped twice, curb rash everywhere, brand new Pirelli P-Zero's on them, got them for $300

I have been trying to figure out the best way to get this plastidip off, googone and a plastic panel scraper seems to be the best so far. Once they are all clean I am going to fill all the curb rash, sand and then paint everything.....lots of work left to do.
 

Attachments

  • WHEEL.jpg
    WHEEL.jpg
    100.2 KB · Views: 74
To avoid these ads, REGISTER NOW!
Top Bottom