To avoid these ads, REGISTER NOW!

ZMotorsports Shop Projects 2.0

OP
Z

zmotorsports

ALLIANCE MEMBER
Joined
Oct 20, 2009
Messages
21,477
Location
Northern Utah
Mike, I know you're a Harley guy, but thought you might like to know that BMW has brought out its own K1600 Bagger. Saw the first one last weekend, and I'm kind of impressed. It's a 6 cylinder 1600 cc, and makes 160 hp. My dealer's having an introduction and demo rides on Saturday, and I think I'll stop by.

http://byo.bmwmotorcycles.com/18K1?...3D0gJ6oLMvWWKgr_CDlZBoC_RgQAvD_BwE#model-info

I'm not just a Harley guy. I like most all two-wheeled vehicles.:D I'm just a bit partial to the bar and shield I guess.

Thanks for the link, I may have to test ride one. It has some nice lines. The one thing I like about the Harley's are that you seem to sit down into them more vs. sitting on, if that makes sense. Nothing against the BMW or any other bike for that matter but the few BMW's that I have ridden don't fit me as well as I feel much like sitting on a floating log. I prefer to sit down into and become one with the bike if you will.

I am interested though as I like to test ride a wide range of bikes when given the chance.

Thanks again.
 
To avoid these ads, REGISTER NOW!

nollij

Active member
Joined
Dec 3, 2015
Messages
26
Your rod guards all look the same size. I bought rod guards at (2) different times and just recently noticed that I have a variety of lengths and cap sizes...

What a GREAT Saturday!

TIG Rod Guards loaded into their new home.
d0ed6c364f7879faf3a816bab991bbcc.jpg
 

Attachments

  • d0ed6c364f7879faf3a816bab991bbcc.jpg
    d0ed6c364f7879faf3a816bab991bbcc.jpg
    133 KB · Views: 1

macgyver

Well-known member
Joined
Feb 13, 2008
Messages
45
Location
Big Bear Lake
We have been using our Miller 251 pretty much every work day since 2003. A lot of those years were full production welding 8+ hours a day. A darn good machine. Mine isn't as clean and new looking like yours though!
 

Ohmthis

Well-known member
Joined
Jan 20, 2013
Messages
3,021
Location
Outside of Louisville KY
Mike, those holders look good. Not that I want a detailed list of rods, but what kind do you have? I have only 5 and covers 85% of what I would think I would do. Also I made a cart for my welders and made a cover for it to keep the **** off of them. I use Lincoln, so I made the cover red and black. It's quick to remove and replace and does a great job of keeping things clean. Your shop is spotless, but it all helps and is a good sewing project.
 
OP
Z

zmotorsports

ALLIANCE MEMBER
Joined
Oct 20, 2009
Messages
21,477
Location
Northern Utah
Your rod guards all look the same size. I bought rod guards at (2) different times and just recently noticed that I have a variety of lengths and cap sizes...

I didn't realize they varied in size. I know they make the shorter/larger diameter ones for stick electrodes as we have a few at work but the TIG Rod Guards I always assumed were one size. I didn't purchase these all at one time, they were purchased over a period of 10-15 years and all seem to be the same size.
 
OP
Z

zmotorsports

ALLIANCE MEMBER
Joined
Oct 20, 2009
Messages
21,477
Location
Northern Utah
Looking forward to the result. How big are you going to make it?

Justin, the rack is approx. 4' tall and there will be enough of the 4' tall verticals to accommodate full sticks although most of what I stock is 10' or less. I will store 6-10 foot lengths on two halves of it thus allowing full sticks if/when the need arises. I am also planning on incorporating some shorter sections, probably 24" tall or so, along the middle in between the 4' tall verticals and space them a bit closer to allow storing of materials 2'-6'. Anything less than that is slowly going into my drawer cabinets that I purchased earlier in the year from the Geology department from the local University.

I hope that makes sense. I will definitely post some pictures when it is complete. I hope to have it done this weekend so I can get my truck out of the shop and start parking it in the attached third bay garage.
 
OP
Z

zmotorsports

ALLIANCE MEMBER
Joined
Oct 20, 2009
Messages
21,477
Location
Northern Utah
We have been using our Miller 251 pretty much every work day since 2003. A lot of those years were full production welding 8+ hours a day. A darn good machine. Mine isn't as clean and new looking like yours though!

Thanks Quinn. Yes, the Miller MM251 is a great machine as well as the new model MM252 which is basically the same machine with the new front panel. I was not happy with the older Miller 250 that was out. We had one at work and it was a bit problematic but I had heard there were some issues plaguing that model. During that time I actually had one of those "red" machines.:lol: It was a pretty good welder as well but when the MM251 came out I watched it for a bit on the market and demoed one before purchasing and haven't looked back.
I did however, help a friend get his new Lincoln PowerMig 256 up and running a while back and I played with it a bit. That too is a very nice machine. Lincoln should be proud of that one as well but I tend to lean to the Blue machines. Which is probably the only thing I lean towards blue on.;)
 
OP
Z

zmotorsports

ALLIANCE MEMBER
Joined
Oct 20, 2009
Messages
21,477
Location
Northern Utah
Mike, those holders look good. Not that I want a detailed list of rods, but what kind do you have? I have only 5 and covers 85% of what I would think I would do. Also I made a cart for my welders and made a cover for it to keep the **** off of them. I use Lincoln, so I made the cover red and black. It's quick to remove and replace and does a great job of keeping things clean. Your shop is spotless, but it all helps and is a good sewing project.
Thanks for the comments. I had a cover on my previous two welders but overall ended up ceasing to use them due to convenience issues. I got tired of installing and removing covers all the time as I started welding more and more. I have found a quick PM annually and an occasional shot of compressed air seems to keep the dust off and that has worked for me for the past nearly 15 years now. If I were in a much more dirty environment maybe I would have a different mindset.

As for the TIG rods, I have quite a variety and not all of them are used all the time. Some very seldom but enough that I like to have the option to walk over and grab the necessary and correct rod when a job comes through the door.

Some of the ones off the top of my head are as follows: ER70-S2 (in .045", .062", .093" and .125"), ER80S-D2 for welding 4130 chromoly (.045" and .062"), Ni-55 for welding cast iron which is also machineable (.062" and .093"), a few sizes of ER70S-6 with the higher silicon and manganese content (.062" and .093"), 4043 aluminum (.062", .093" and .125"), 5356 aluminum (.062", .093" and .125"), silicone-bronze (.093"), ER308L (.062" and .093") and ER309L for dissimilar metals (.062" and .093"). I might be missing something somewhere because I built locations for 18 tubes on my welding cart and I think I have three that I very, very seldom use that I stored in a cabinet.

Thanks again for following along on my Projects Thread.
 
OP
Z

zmotorsports

ALLIANCE MEMBER
Joined
Oct 20, 2009
Messages
21,477
Location
Northern Utah
I was able to finish fabricating, installing and loading my metal storage rack today. This allowed me to finally get my third bay cleaned out and park my truck in the attached garage thus freeing up a space in the shop.

faf7d919ea45fed11c02ce5e2a61075d.jpg

42f6d4b75513dcd50b5b881e3712c7d0.jpg

e88a4fbcd7d292cf41b062839634bfef.jpg

2bee791e961dcc46a5704da6ca754251.jpg

91dd41387febd8370e67995f69422f57.jpg

227205ddfb1923e9f1e961469433f130.jpg

297da8cf9c5054cc19c4e3e1cd58e8ae.jpg

It's amazing how much material a person collects over the years by merely purchasing a little extra from various jobs to ensure you have some on hand when needed. I think I need to use some of my on hand material for a while and use up some supply.
53b0e20882d66ae315f38ef6d4a6ac7d.jpg


Sent from my iPhone using Tapatalk
 

Attachments

  • faf7d919ea45fed11c02ce5e2a61075d.jpg
    faf7d919ea45fed11c02ce5e2a61075d.jpg
    859.9 KB · Views: 1
  • 53b0e20882d66ae315f38ef6d4a6ac7d.jpg
    53b0e20882d66ae315f38ef6d4a6ac7d.jpg
    732 KB · Views: 1
  • 297da8cf9c5054cc19c4e3e1cd58e8ae.jpg
    297da8cf9c5054cc19c4e3e1cd58e8ae.jpg
    666.2 KB · Views: 0
  • 227205ddfb1923e9f1e961469433f130.jpg
    227205ddfb1923e9f1e961469433f130.jpg
    703.8 KB · Views: 0
  • 91dd41387febd8370e67995f69422f57.jpg
    91dd41387febd8370e67995f69422f57.jpg
    820.1 KB · Views: 0
  • 2bee791e961dcc46a5704da6ca754251.jpg
    2bee791e961dcc46a5704da6ca754251.jpg
    654.6 KB · Views: 0
  • e88a4fbcd7d292cf41b062839634bfef.jpg
    e88a4fbcd7d292cf41b062839634bfef.jpg
    805.5 KB · Views: 0
  • 42f6d4b75513dcd50b5b881e3712c7d0.jpg
    42f6d4b75513dcd50b5b881e3712c7d0.jpg
    831.1 KB · Views: 0
Last edited:
OP
Z

zmotorsports

ALLIANCE MEMBER
Joined
Oct 20, 2009
Messages
21,477
Location
Northern Utah
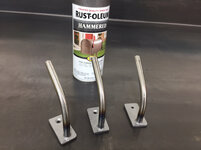
While I was in the zone fabricating, I decided to fab up a few more hangers for items around the shop to add to the organization process and help me feel like I'm gaining ground.

I made a few hangers for my spare welding helmets and face shield out of 3/8" rod and flat strap.
4a6064e823c3518f27bbbf7c85a8dafa.jpg

263ef85df4b36805ff1ec72592613b73.jpg

241153b1aac0e2b2a6ea9ed6186254b0.jpg

faf60b6f385c697732d4bf724f29ace3.jpg

4c351dcdf934d4000b337c4fe3ab8cda.jpg

93d640912f2a36418b1cb0d524301026.jpg

fab63109aad922335a1508d47e311c19.jpg

627017823fd2048a0d7162c2b1e9a790.jpg

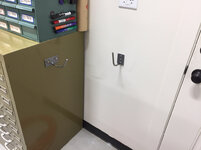
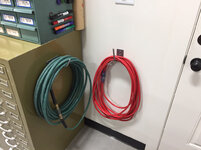
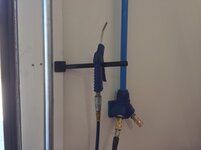
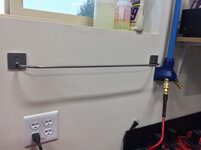
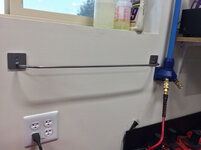
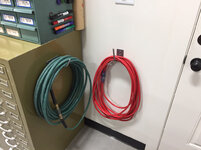
Next I was tired of looking at my spare air hoses and extension cords sitting on the floor so I decided to utilize the empty space under one of my windows.
dbdb1380fdc7ab7e0292eb69c077462f.jpg

8cfa09ad17abc9985bc7353e7eecbef3.jpg

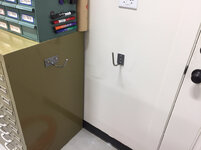
Next up was to build one specific hanger for single air hose and single extension cord on the opposite side of the shop within easy reach/access.
24b24d70e06316b946620571644eb6b6.jpg

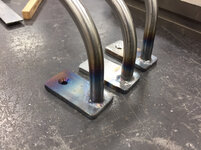
A little TIG weave.
204c4f65a043d4c35f64972a383c2edc.jpg

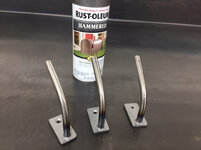
Again, painted with Rustoleum Hammered paint. This color seems to be my shop signature color with my workbenches as well as my drawer organizers and lockers that are all the same color and hammered or wrinkle finish.
d0a01abaf3e10cf55ed7ab2074b09942.jpg

5e5b0f90cf5f0130ed764f4e3c91b1c5.jpg

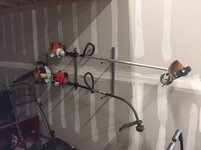
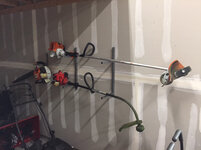
Lastly I decided to build some hangers for my lawn equipment like I had at my last home. I hate having these sitting on the floor in the garage but I was planning on building hangers after mudding and painting my attached garage, however, I don't think that is going to happen until spring due to setting up the shop and finishing the yard taking a bit longer than I originally thought it would so I'm not waiting any longer.
307500a2da9d8e54d248e547f7aaae2e.jpg

2481cf21be0a7aad9f2f26c7d51b9912.jpg

And I painted them with the same Rustoleum Hammered paint.
fe30b6fd355560009977061b0b8914f1.jpg

Thanks for looking.


Sent from my iPhone using Tapatalk
 

Attachments

  • fe30b6fd355560009977061b0b8914f1.jpg
    fe30b6fd355560009977061b0b8914f1.jpg
    730.7 KB · Views: 0
  • 2481cf21be0a7aad9f2f26c7d51b9912.jpg
    2481cf21be0a7aad9f2f26c7d51b9912.jpg
    770.9 KB · Views: 0
  • 307500a2da9d8e54d248e547f7aaae2e.jpg
    307500a2da9d8e54d248e547f7aaae2e.jpg
    806.3 KB · Views: 0
  • 5e5b0f90cf5f0130ed764f4e3c91b1c5.jpg
    5e5b0f90cf5f0130ed764f4e3c91b1c5.jpg
    712.8 KB · Views: 0
  • d0a01abaf3e10cf55ed7ab2074b09942.jpg
    d0a01abaf3e10cf55ed7ab2074b09942.jpg
    619.7 KB · Views: 0
  • 204c4f65a043d4c35f64972a383c2edc.jpg
    204c4f65a043d4c35f64972a383c2edc.jpg
    751.6 KB · Views: 0
  • 24b24d70e06316b946620571644eb6b6.jpg
    24b24d70e06316b946620571644eb6b6.jpg
    818.3 KB · Views: 0
  • 8cfa09ad17abc9985bc7353e7eecbef3.jpg
    8cfa09ad17abc9985bc7353e7eecbef3.jpg
    65.2 KB · Views: 0
  • dbdb1380fdc7ab7e0292eb69c077462f.jpg
    dbdb1380fdc7ab7e0292eb69c077462f.jpg
    722.6 KB · Views: 0
  • 627017823fd2048a0d7162c2b1e9a790.jpg
    627017823fd2048a0d7162c2b1e9a790.jpg
    605.6 KB · Views: 0
  • fab63109aad922335a1508d47e311c19.jpg
    fab63109aad922335a1508d47e311c19.jpg
    615.7 KB · Views: 0
  • 241153b1aac0e2b2a6ea9ed6186254b0.jpg
    241153b1aac0e2b2a6ea9ed6186254b0.jpg
    810.4 KB · Views: 0
  • 93d640912f2a36418b1cb0d524301026.jpg
    93d640912f2a36418b1cb0d524301026.jpg
    682.5 KB · Views: 0
  • 4c351dcdf934d4000b337c4fe3ab8cda.jpg
    4c351dcdf934d4000b337c4fe3ab8cda.jpg
    699.8 KB · Views: 0
  • faf60b6f385c697732d4bf724f29ace3.jpg
    faf60b6f385c697732d4bf724f29ace3.jpg
    805.2 KB · Views: 1
  • 263ef85df4b36805ff1ec72592613b73.jpg
    263ef85df4b36805ff1ec72592613b73.jpg
    764.8 KB · Views: 1
  • 4a6064e823c3518f27bbbf7c85a8dafa.jpg
    4a6064e823c3518f27bbbf7c85a8dafa.jpg
    752.6 KB · Views: 1
Last edited:

NASTYZEN

Well-known member
Joined
Jun 11, 2010
Messages
2,823
Location
St-Colomban,Que. Canada
Your place is coming together quite nicely Mike! Great that your already making hangers for things in your shop.
I've been here for 21 years and have yet to finish so many things around here... I guess a YOU **** is quite deserving right now.
In the best possible way of course.:lol:
 
OP
Z

zmotorsports

ALLIANCE MEMBER
Joined
Oct 20, 2009
Messages
21,477
Location
Northern Utah
Your place is coming together quite nicely Mike! Great that your already making hangers for things in your shop.
I've been here for 21 years and have yet to finish so many things around here... I guess a YOU **** is quite deserving right now.
In the best possible way of course.:lol:

Thanks Claude, I really appreciate that. I feel like I am getting there as I had my last shop completely set up and organized and thought once I get this shop and my yard to the point I had my last one I could take a breath and relax. I'm ALMOST there.:bounce:

Thanks for following along Claude.
 

NUTTSGT

Super Moderator
Staff member
Joined
Sep 14, 2009
Messages
51,159
Location
Northern Central Ohio
Nice work Mike. I see alot of what you have been doing is just to clean things up and make life easier. Sometimes it's the simple projects that put the biggest smile on your face.

I like the steel rack and agree how much one can accumulate. I used to have a few pieces here and there but once I got a spot dedicated to storing steel, it's made life easier. Instead of buying just what I need, I generally buy a few pieces to make the trip worthwhile.
 
OP
Z

zmotorsports

ALLIANCE MEMBER
Joined
Oct 20, 2009
Messages
21,477
Location
Northern Utah
Nice work Mike. I see alot of what you have been doing is just to clean things up and make life easier. Sometimes it's the simple projects that put the biggest smile on your face.

I like the steel rack and agree how much one can accumulate. I used to have a few pieces here and there but once I got a spot dedicated to storing steel, it's made life easier. Instead of buying just what I need, I generally buy a few pieces to make the trip worthwhile.

Thanks Eric. I even commented to my wife Saturday afternoon when she came out to the shop that I really didn't get anything done this past week except make the shop more work flow friendly and organize a bit but it sure put a grin on my face and made it feel so much more completed.

I hope to be able to use my metal off my metal rack more now as in my last shop I had it standing in the corner not sorted or anything, just standing in the corner. Many times I thought I had the metal that I needed but it was just easier to stop by and pick up exactly what I needed from my supplier than dig through the pile and have to move a bunch of sticks. Now with things spread out and more easily viewed I am sure I will use what I have on hand.

Thanks again for following along on my projects and commenting Eric.
 

NUTTSGT

Super Moderator
Staff member
Joined
Sep 14, 2009
Messages
51,159
Location
Northern Central Ohio
Thanks Eric. I even commented to my wife Saturday afternoon when she came out to the shop that I really didn't get anything done this past week except make the shop more work flow friendly and organize a bit but it sure put a grin on my face and made it feel so much more completed.

I hope to be able to use my metal off my metal rack more now as in my last shop I had it standing in the corner not sorted or anything, just standing in the corner. Many times I thought I had the metal that I needed but it was just easier to stop by and pick up exactly what I needed from my supplier than dig through the pile and have to move a bunch of sticks. Now with things spread out and more easily viewed I am sure I will use what I have on hand.

Thanks again for following along on my projects and commenting Eric.

Honestly Mike, I'm a little surprised you didn't put the metal rack in the bay with the RV. Granted, I know you are very careful as to not hit your RV with a stick of square tubing but putting the metal rack in the shop is taking up valuable wall space. In the RV bay, that area is mostly just a storage area.

:drink:
 
OP
Z

zmotorsports

ALLIANCE MEMBER
Joined
Oct 20, 2009
Messages
21,477
Location
Northern Utah
Honestly Mike, I'm a little surprised you didn't put the metal rack in the bay with the RV. Granted, I know you are very careful as to not hit your RV with a stick of square tubing but putting the metal rack in the shop is taking up valuable wall space. In the RV bay, that area is mostly just a storage area.

:drink:

Eric, the metal rack is actually in the RV/storage bay. It is on the wall separating the shop and RV bay. You can't see the RV in the picture because it is still about 10' from the wall where the metal rack is. Many of my larger mobile tools/equipment are stored under the metal rack in the RV/storage bay so they have easy access but don't clutter up the working area in the shop.

Yes, I am very careful when getting steel off of the metal rack but still feel even with the coach in there that I have plenty of room to not even come close to the side of the coach. I will try to get a picture showing the coach in there as well as the metal storage rack.
Thanks again Eric.
 

NUTTSGT

Super Moderator
Staff member
Joined
Sep 14, 2009
Messages
51,159
Location
Northern Central Ohio
I guess I wasn't paying much attention Mike. I saw the tools and figured it was the shop yet the compressor is there also. I knew that was in the RV bay. I guess the brackets for the OPE and the taped and mudded walls which you mention are in the attached garage, got me confused as I thought you meant the RV garage.

Eric just wasn't paying enough attention, looking more at the great pics and less at the text.
 
OP
Z

zmotorsports

ALLIANCE MEMBER
Joined
Oct 20, 2009
Messages
21,477
Location
Northern Utah
I guess I wasn't paying much attention Mike. I saw the tools and figured it was the shop yet the compressor is there also. I knew that was in the RV bay. I guess the brackets for the OPE and the taped and mudded walls which you mention are in the attached garage, got me confused as I thought you meant the RV garage.

Eric just wasn't paying enough attention, looking more at the great pics and less at the text.

No problem Eric. Just happy to have you follow along. The painted OSB walls did turn out quite well in the storage bay but I really need to get my attached garage finished. I loved having my last one done with the epoxy floors and such, this one is just not feeling completed when I pull in each day. Hopefully I can get caught up, save up and do the attached garage come next spring.

Thanks again for following and commenting on my projects.
 

Wanna Ride

Well-known member
Joined
Jul 28, 2010
Messages
2,790
Project #2 for this Sunday afternoon.

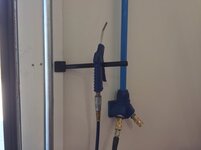
I needed a place to hang my air blow gun on just inside my shop door. I use this quite a lot to blow off line trimmer and mower after finishing the lawn each time before putting the lawn equipment back into the garage. I've become used to having one there after installing one at my last shop so I made sure to run an air drop in the new shop as well but didn't like not having a place to hang the blow gun.

A quick down & dirty little hanger. I used a piece of angle iron with a couple of countersunk holes for grabber screws. I also used a piece of .625" 4130 from my drop box and ground an angle on it. This will attach to the framework just inside the overhead rollup door.

655907eee412963fbc52d1592bd87c6a.jpg

Funny how a simple little hanger can make you grin with excitement and look forward to using.

Very nice!
Couldn't help but chuckle... it reminded me of this little basket I made for my shop compressor to store a tire chuck, a blow gun, etc. All of the little things that just make an average shop day easier and more accessible. In my shop, I have about a dozen or so tape measures and utility knives (all the same size/type), so I always have one of each within arm's reach, regardless where I'm working in the shop. After building this, I revised the clip that the tape's on to also accommodate a utility knife. Seems like knives and tapes have a way of never being where you need them.

36649477363_7dcc09bb27_z.jpg


36649477703_867f1c7496_z.jpg
 

Attachments

  • 655907eee412963fbc52d1592bd87c6a.jpg
    655907eee412963fbc52d1592bd87c6a.jpg
    52.3 KB · Views: 2
Last edited:
To avoid these ads, REGISTER NOW!
OP
Z

zmotorsports

ALLIANCE MEMBER
Joined
Oct 20, 2009
Messages
21,477
Location
Northern Utah
Very nice!
Couldn't help but chuckle... it reminded me of this little basket I made for my shop compressor to store a tire chuck, a blow gun, etc. All of the little things that just make an average shop day easier and more accessible. In my shop, I have about a dozen or so tape measures and utility knives (all the same size/type), so I always have one of each within arm's reach, regardless where I'm working in the shop. After building this, I revised the clip that the tape's on to also accommodate a utility knife. Seems like knives and tapes have a way of never being where you need them.


Very nice and great idea.


Sent from my iPhone using Tapatalk
 
OP
Z

zmotorsports

ALLIANCE MEMBER
Joined
Oct 20, 2009
Messages
21,477
Location
Northern Utah
Knocked out a few more hangers tonight in the shop.

First was a hanger made of 5/16" O1 drill rod bent between two brackets to attach to the wall above my solvent tank and bench below my window to hang my under hood light on and spray bottles rather than having them sit on the bench.
cb76a8db17df5d3089229667c4ebef59.jpg

72537652a08a0c3b7369156ca20c0a20.jpg

b836fe0ea326604baa28806f6dae6333.jpg

c0e9b8f0b8bec5c90864516c3ead9814.jpg

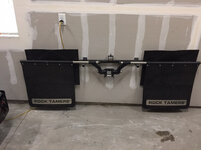
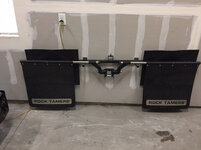
Then made a pair of brackets to hang mine and my son's mud flaps on in the attached garage to get them up and off the floor.
91da682b6a7132d6287c361233b19d4d.jpg

db42f003b6f49e14939baed7be6afade.jpg

67c429febd3010efd415e3a6f7395a9a.jpg

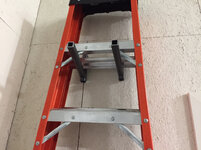
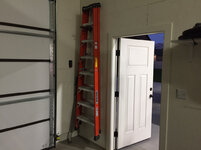
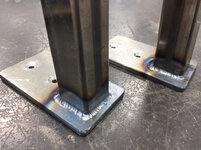
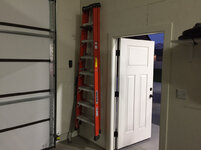
I then decided to build a pair of brackets to hang my 10' fiberglass step ladder on in the RV/storage bay.
7f8418750b69c5b0cd2cce0ec3f16fb8.jpg

ef0988f910776802351f8f3b249d0ce1.jpg

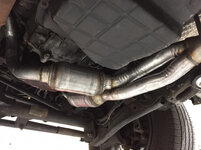
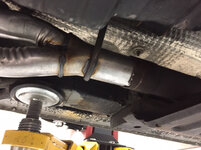
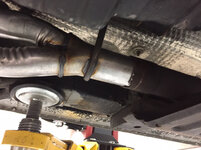
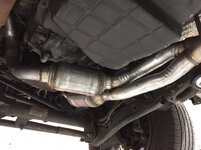
After completing my hangers I helped my son install his new Y-pipe/cats on his WJ.
073ecfe7cc4494367bf609b66301a994.jpg

f5f7ff47ae9250cc4a285f92e108f195.jpg

16084a4a38e1083848f5aae7946ac318.jpg

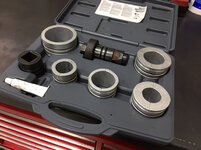
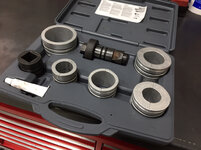
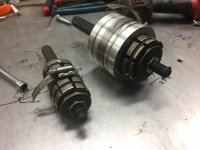
As much as I despise doing exhaust work in order to expand a tube for a slip fit this Lisle exhaust pipe expander works great. It is not a tool that I use very often but when I do it is invaluable.
390cf2b5b6376f62e61889c4421f418a.jpg

Thanks for looking.


Sent from my iPhone using Tapatalk
 

Attachments

  • 91da682b6a7132d6287c361233b19d4d.jpg
    91da682b6a7132d6287c361233b19d4d.jpg
    794.5 KB · Views: 0
  • db42f003b6f49e14939baed7be6afade.jpg
    db42f003b6f49e14939baed7be6afade.jpg
    677.6 KB · Views: 0
  • 390cf2b5b6376f62e61889c4421f418a.jpg
    390cf2b5b6376f62e61889c4421f418a.jpg
    773.5 KB · Views: 0
  • 16084a4a38e1083848f5aae7946ac318.jpg
    16084a4a38e1083848f5aae7946ac318.jpg
    765.5 KB · Views: 0
  • c0e9b8f0b8bec5c90864516c3ead9814.jpg
    c0e9b8f0b8bec5c90864516c3ead9814.jpg
    640.3 KB · Views: 0
  • b836fe0ea326604baa28806f6dae6333.jpg
    b836fe0ea326604baa28806f6dae6333.jpg
    677.5 KB · Views: 0
  • 72537652a08a0c3b7369156ca20c0a20.jpg
    72537652a08a0c3b7369156ca20c0a20.jpg
    826.2 KB · Views: 0
  • cb76a8db17df5d3089229667c4ebef59.jpg
    cb76a8db17df5d3089229667c4ebef59.jpg
    766.9 KB · Views: 0
  • 67c429febd3010efd415e3a6f7395a9a.jpg
    67c429febd3010efd415e3a6f7395a9a.jpg
    696.8 KB · Views: 0
  • 7f8418750b69c5b0cd2cce0ec3f16fb8.jpg
    7f8418750b69c5b0cd2cce0ec3f16fb8.jpg
    791.5 KB · Views: 0
  • ef0988f910776802351f8f3b249d0ce1.jpg
    ef0988f910776802351f8f3b249d0ce1.jpg
    661.5 KB · Views: 1
  • 073ecfe7cc4494367bf609b66301a994.jpg
    073ecfe7cc4494367bf609b66301a994.jpg
    766.7 KB · Views: 1
  • f5f7ff47ae9250cc4a285f92e108f195.jpg
    f5f7ff47ae9250cc4a285f92e108f195.jpg
    724.6 KB · Views: 5
Last edited:

LXCam

ALLIANCE MEMBER
Joined
Apr 23, 2013
Messages
19,206
Location
AZ
As always it just keeps getting better n better Mike. Like yourself I enjoy making all that weird **** that really makes a difference how functional the shop or areas become.

Hey I got a question. I do a **** load of exhaust work on a regular basis. Most all of it is 16g stainless. All I have for expander are these lisle bolt style from 1.5" to 2" and a 2" - 3" along with these adapters I made for 3.5" systems. My ? Is im sure youve wasted your time before with the style I have. They're fine for rejuvenating an existing sleeve but to create my own 100% from scratch is a major PITA, lots of heat and lots of messaging and cussing. It works, but it ain't fun.

That set that you have, will it actually do a decent job for what I described? Hopefully ya know :D

IMG_1638.jpg
 
OP
Z

zmotorsports

ALLIANCE MEMBER
Joined
Oct 20, 2009
Messages
21,477
Location
Northern Utah
As always it just keeps getting better n better Mike. Like yourself I enjoy making all that weird **** that really makes a difference how functional the shop or areas become.

Hey I got a question. I do a **** load of exhaust work on a regular basis. Most all of it is 16g stainless. All I have for expander are these lisle bolt style from 1.5" to 2" and a 2" - 3" along with these adapters I made for 3.5" systems. My ? Is im sure youve wasted your time before with the style I have. They're fine for rejuvenating an existing sleeve but to create my own 100% from scratch is a major PITA, lots of heat and lots of messaging and cussing. It works, but it ain't fun.

That set that you have, will it actually do a decent job for what I described? Hopefully ya know :D

IMG_1638.jpg

Thanks for the comments Cam. I agree, those little tweaks or finishing touches to the shop sure add to the level of enjoyment I get every time I walk into my shop. Seeing things on the floor or on workbenches that I know should be hung on the wall drive me up the wall.:willy_nil It takes time as you know but at least I feel like I am gaining ground on getting the shop setup the way I want. Every time I walk in I almost have to grin to myself I am so happy with the way it has turned out. I still have my mezzanine in the attached garage to unload and organize in the shop but I will tackle a little at a time. Things like my K&L engine stand and other fairly large tools will be hung on the walls as well seeing as how I have a lot of wall space that is not being utilized.

As for the question about the exhaust expander, my Lisle set does what I would call a "fair" job. Not fantastic by any means. The only way I think to get the kind of results I would like, and possibly the kind you are after, is the hydraulic version like most exhaust shops have. I have however seen a small portable hydraulic version that uses an air over hydraulic pump that has various sized inserts and operates similar to the large floor mounted versions but I don't even want to price one of those out because I don't do exhaust work enough to worry about. With my Lisle set I still have to heat up the end if I am stretching from start but it does a pretty good job of fixing a flare such as where a U-clamp has dented the pipe with merely an impact gun.

When I was building my race cars and street rods, I would get everything laid out, marked and then take them to a friends exhaust shop to expand the pipe before reinstalling and clocking the components only to remove and final weld. That way is a PITA but the only way I could get a high quality job without having that big expensive exhaust bender and flaring tool taking up valuable floor space in my shop.

Thanks for following along on my projects Cam.
 

LXCam

ALLIANCE MEMBER
Joined
Apr 23, 2013
Messages
19,206
Location
AZ
Damn, I had high hopes off getting of cheap....like that ever happens. ;)

Well I do appreciate you taking the time to answer and one of these days maybe I'll get lucky and come across a deal on a legitimate mandrel bender combo unit to make room for.
 
OP
Z

zmotorsports

ALLIANCE MEMBER
Joined
Oct 20, 2009
Messages
21,477
Location
Northern Utah
Damn, I had high hopes off getting of cheap....like that ever happens. ;)

Well I do appreciate you taking the time to answer and one of these days maybe I'll get lucky and come across a deal on a legitimate mandrel bender combo unit to make room for.

That would be sweet. I don't have that kind of room plus I don't do enough exhaust work to justify. I actually try to avoid exhaust work if at all possible.:lol:
 

joe49

Well-known member
Joined
Sep 25, 2009
Messages
1,883
Location
Tonica, Il
As always it just keeps getting better n better Mike. Like yourself I enjoy making all that weird **** that really makes a difference how functional the shop or areas become.

Hey I got a question. I do a **** load of exhaust work on a regular basis. Most all of it is 16g stainless. All I have for expander are these lisle bolt style from 1.5" to 2" and a 2" - 3" along with these adapters I made for 3.5" systems. My ? Is im sure youve wasted your time before with the style I have. They're fine for rejuvenating an existing sleeve but to create my own 100% from scratch is a major PITA, lots of heat and lots of messaging and cussing. It works, but it ain't fun.

That set that you have, will it actually do a decent job for what I described? Hopefully ya know :D

IMG_1638.jpg

I also use those expanders. But I don't use heat. I tighten it up then use it as a dolly and peen along the segments moving from one side to the opposite and tightening as I go.
 

yaidunno

Well-known member
Joined
Feb 10, 2011
Messages
1,336
Location
WI
Mike,

The new shop looks like its coming along nicely! The WJ looks pretty good with the WK2 wheels on it. Don't believe I've ever seen that done yet.

Maybe I missed it, but do you have any info on the tig rod tubes?

Keep up the good work!
 
OP
Z

zmotorsports

ALLIANCE MEMBER
Joined
Oct 20, 2009
Messages
21,477
Location
Northern Utah
Mike,

The new shop looks like its coming along nicely! The WJ looks pretty good with the WK2 wheels on it. Don't believe I've ever seen that done yet.

Maybe I missed it, but do you have any info on the tig rod tubes?

Keep up the good work!

Thanks for the comments. He picked up the tires/wheels temporarily until he gets the axles and suspension built then will be purchasing new ones. I believe he is planning on running some 33" BGF KO2's like he had on his LJ and on his D-Max. He is just working on getting everything mechanically sound and proper maintenance performed before tackling the upgrades on the suspension and then bumpers.

As for the TIG Rod Guards, here is a link to their website.
http://www.rodguard.net/products.htm

I would check with your local welding supply as they may save you some freight but the price has really came down on them over the years. I also believe there are even some knockoff's available for closer to the $10 range but most of the ones I have seen have been in the $14-18 range. I bought four or so at a time from my local supplier rep years ago and he made me a pretty good deal.

Thanks for following along on my project thread.
 

Wanna Ride

Well-known member
Joined
Jul 28, 2010
Messages
2,790
Love the brackets and hangers. Sometimes, I'll get on a roll and make all kinds of doo-dads for the shop. Anything to get stuff up off the floor or benches, and increase valuable floor real estate!

I've got ladder hangers, propane torch bottle hangers, grease gun hangers, a rack for my Harley Tour-pak, and a set of saddlebag racks for when I wash the bike. An d everything in the shop that can (or should) be moved, is built on casters.
 
OP
Z

zmotorsports

ALLIANCE MEMBER
Joined
Oct 20, 2009
Messages
21,477
Location
Northern Utah
Love the brackets and hangers. Sometimes, I'll get on a roll and make all kinds of doo-dads for the shop. Anything to get stuff up off the floor or benches, and increase valuable floor real estate!

I've got ladder hangers, propane torch bottle hangers, grease gun hangers, a rack for my Harley Tour-pak, and a set of saddlebag racks for when I wash the bike. An d everything in the shop that can (or should) be moved, is built on casters.

Thanks. I couldn't agree more about taking the time to make brackets and hangers to get items up off of the floor. Things just sitting on the floor taking up space that don't need to be there is one of my pet-peeves.

I too fabricated a mounting system for the saddlebags on my Wide Glide a few years ago but after selling it my son took over the saddlebags so we need to mount that back on the wall in the garage but want to wait until I get my attached garage completed next spring.

Thanks for following along on my projects.
 
OP
Z

zmotorsports

ALLIANCE MEMBER
Joined
Oct 20, 2009
Messages
21,477
Location
Northern Utah
Move-In Complete

Well it has been a long as hell nearly 11-months since I shut down my last shop but as of last night I think my new shop move-in is complete. I was waiting on some parts that didn't show up yesterday so rather than stand around being pissed, I took the time to remove the last 15-18 boxes from my mezzanine in the attached garage that yet needed to be put in the shop and organized. Several hours later I put the contents of the last box away and called it complete.

I can't believe that I actually still have space left in one of my double door storage cabinets and quite a bit of growing room in my drawer organizers.:thumbup:

Now I can really start chopping away at my "to do" list and crossing items off of my white board.

More projects to come, I promise.

Thanks to everyone for taking the time to follow along.
 

C_F

ALLIANCE MEMBER
Joined
Jan 21, 2005
Messages
9,675
Location
Utah...SNOW BLOWS!
Mike, I really like how your shop is shaping up! It looks really nice in there. Your various brackets & holders sure do a good job of keeping things organized. I was puttering around in my garage last night, when I stopped, looked around & thought myself "it looks like a damned bomb went off in here". :wtf: I really need to take some time & un-clutter the place, to preserve my sanity.
Anyway, I'm looking forward to continue following along with the goings-on in your schnazzy new BIG shop.:thumbup:
 
OP
Z

zmotorsports

ALLIANCE MEMBER
Joined
Oct 20, 2009
Messages
21,477
Location
Northern Utah
Mike, I really like how your shop is shaping up! It looks really nice in there. Your various brackets & holders sure do a good job of keeping things organized. I was puttering around in my garage last night, when I stopped, looked around & thought myself "it looks like a damned bomb went off in here". :wtf: I really need to take some time & un-clutter the place, to preserve my sanity.
Anyway, I'm looking forward to continue following along with the goings-on in your schnazzy new BIG shop.:thumbup:

Thank you. I appreciate that. I reached a point in my last shop about 10 years or so prior to selling that I had to de-clutter and get it more organized. Once I did that I find it easier to go through and routinely 5-S my shop on a regular basis. I thought while I was setting up my new shop I would just do a 5-S from the beginning and move a little at a time and organize vs. dumping everything in the shop and then trying to organize.

I too thought about preserving my sanity.:lol:

I appreciate you taking the time to follow along. I hope you find it interesting.
 

Thumper68

Well-known member
Joined
May 16, 2013
Messages
5,134
Location
Duluth MN
Good job getting the shop set up, it looks amazing!!

Now please take a bit of a break and quit making the rest of us look lazy.
 
OP
Z

zmotorsports

ALLIANCE MEMBER
Joined
Oct 20, 2009
Messages
21,477
Location
Northern Utah
Good job getting the shop set up, it looks amazing!!

Now please take a bit of a break and quit making the rest of us look lazy.

Sorry, no can do. I have quite a few items to cross off my to do list on my white board.;)

I am excited to finally be able to start working on things in the shop vs. working on items for the shop though. I'm very much looking forward to helping my son work on his WJ and start chopping away at a few projects that I have put off.

Thanks for checking in on my projects thread.
 
OP
Z

zmotorsports

ALLIANCE MEMBER
Joined
Oct 20, 2009
Messages
21,477
Location
Northern Utah
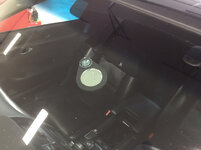
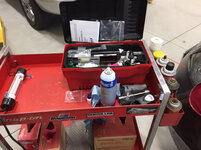
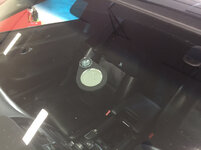
So the wife pulled in tonight after work and informed me that a truck flipped a rock up and put a nice chip in the windshield of her Acura. Luckily I just purchased a windshield repair kit so I was able to pull it back into the shop and fix it.

Prepping the area so everything is within easy quick reach/access.
ac723208ef122893611676baee8e61f4.jpg

Small mirror place on inside so I can see the resin flowing into the chip as well as watch for air bubbles.
7e3dd718deaa3dadba401fd1f8859667.jpg

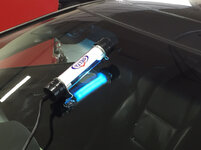
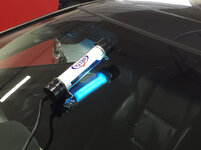
After pit resin is applied and film I placed the UV light in place to cure the resins.
e376e4ea5228094afcad319bed865a2f.jpg

Sorry, I forgot to take a picture with the bridge and injector in place during the resin injection process.

While her car was in the shop I gave the interior a good wipe down, vacuum, cleaned the inside of the windows and checked tire pressures.


Sent from my iPhone using Tapatalk
 

Attachments

  • e376e4ea5228094afcad319bed865a2f.jpg
    e376e4ea5228094afcad319bed865a2f.jpg
    650.8 KB · Views: 2
  • 7e3dd718deaa3dadba401fd1f8859667.jpg
    7e3dd718deaa3dadba401fd1f8859667.jpg
    636.1 KB · Views: 1
  • ac723208ef122893611676baee8e61f4.jpg
    ac723208ef122893611676baee8e61f4.jpg
    813.2 KB · Views: 1

LXCam

ALLIANCE MEMBER
Joined
Apr 23, 2013
Messages
19,206
Location
AZ
That's pretty neat. How much is that kit and where'd ya get it. I wouldn't mind having that in the least.

My wife picked up a small chip with one leading edge. So I asked her nicely to please get that fixed the next day right around the corner from the house, they only charge like $30. Ya think Ms. unemployed princess could manage 30 minutes out of her busy day between hair and and manicure appointments......nope. Now it's gonna cost me $275 to replace it.


But I digress, I gotta get me one of those ;)
 
Last edited:

shortykorte

Well-known member
Joined
Sep 1, 2014
Messages
8,039
Location
Tallahassee, Fl
That's pretty neat. How much is that kit and where'd ya get it. I wouldn't mind having that in the least.

My wife picked up a small chip with one leading edge. So I asked her nicely to please get that fixed the next day right around the corner from the house, they only charge like $30. Ya think Ms. unemployed princess could manage 30 minutes out of her busy day between hair and and manicure appointments......nope. Now it's gonna cost me $275 to replace it.


But I digress, I gotta get me one of those ;)


That's funny is what that is. Sound like my EX-wife.


Sent from my iPhone using Tapatalk
 
OP
Z

zmotorsports

ALLIANCE MEMBER
Joined
Oct 20, 2009
Messages
21,477
Location
Northern Utah
That's pretty neat. How much is that kit and where'd ya get it. I wouldn't mind having that in the least.

My wife picked up a small chip with one leading edge. So I asked her nicely to please get that fixed the next day right around the corner from the house, they only charge like $30. Ya think Ms. unemployed princess could manage 30 minutes out of her busy day between hair and and manicure appointments......nope. Now it's gonna cost me $275 to replace it.


But I digress, I gotta get me one of those ;)

Cam, I looked at kits from Delta kits but their basic kit that I wanted was just $610.00. The kit I ended up purchasing was from Amazon for $299.00. It states it will do 100 windshield repairs which should be plenty for many years for my stable of vehicles.

That being said, I didn't particularly care for the UV light in the kit I purchased. It is powered by two AA batteries and I don't think it has enough output or pattern to cure properly. I ended up purchasing a 110vac UV light from Delta kits for $90.00 plus a suction cup mirror for $8.95 and now have a very similar kit as the one I was looking at for $610 for around $400.00 total.

Also a UV light is not necessarily required as you could always just pull the vehicle into the sun and cure naturally but I wanted the UV light for two reasons, firstly I wanted to be able to do the repair in my shop and not in the driveway, secondly much of the time I am working in the shop after dark and won't have the sun as an option. Having a UV light eliminates both of those scenarios.
 
To avoid these ads, REGISTER NOW!
Top Bottom