To avoid these ads, REGISTER NOW!

Methods For Easily Positioning Vehicle And Arms On 2-Post Lift

Spencer Was Here

Well-known member
Joined
Jan 2, 2006
Messages
327
Location
Western Michigan
I'm looking for tips on what methods you have used to easily and quickly position your vehicles on your two-post lifts.

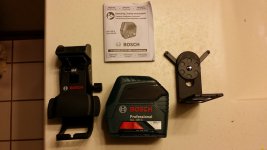
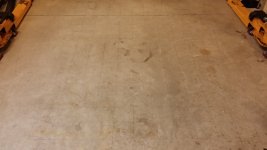
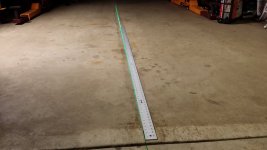
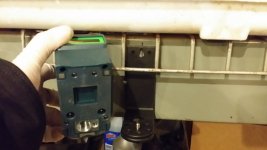
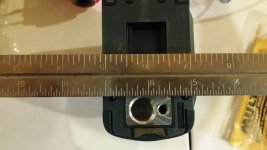
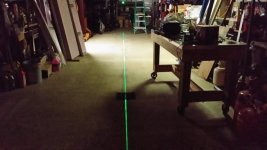
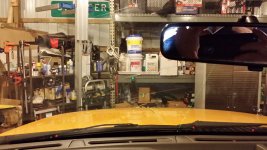
A few years ago I drew a series of lines on my floor, creating a grid pattern, to help ensure I had things as centered and even as possible. I'm considering taking that a step further by numbering, lettering, and or coloring each grid.

My thinking is that once I was happy with how I've positioned a particular vehicle, I could keep a record of how I had it, so next time it would be quicker to get everything positioned the same way.

Before I go this route, I thought I'd check here to see if anyone else has come up with a better method. I know some of this should be fairly intuitive, and maybe it is just me that has to sometimes make multiple attempts to get everything just right before I raise the vehicle up.
 
To avoid these ads, REGISTER NOW!

Coloshaver

Well-known member
Joined
Apr 4, 2011
Messages
911
Location
Northern Colorado
I have a 6" piece of 2x4. Once I figure out the correct position of each of my vehicles, I put the 2x4 in front of the left front tire and a piece of duct tape right behind it. I label the tape with the vehicle name.

When it is time to put a car on the lift, I postion the 2x4 at the appropriate tape mark, drive in lining up on the 2x4 and stop when the tire touches.

$0, quick and easy.
 

T_R

Well-known member
Joined
Jul 2, 2015
Messages
902
Location
Maine
I just remember where to line up the side view mirror in relation to the post.
 

Lelandwelds

Well-known member
Joined
Sep 6, 2017
Messages
2,443
Location
Central Texas
I have a 6" piece of 2x4. Once I figure out the correct position of each of my vehicles, I put the 2x4 in front of the left front tire and a piece of duct tape right behind it. I label the tape with the vehicle name.

When it is time to put a car on the lift, I postion the 2x4 at the appropriate tape mark, drive in lining up on the 2x4 and stop when the tire touches.

$0, quick and easy.

That sure beats in and out, on hands and knee on concrete, and repeat because it moves when I shake it. I figured I would learn eventually when I got my own lift.

Smart and inexpensive. Great combo.
 

lakeroadster

Well-known member
Joined
Jan 19, 2015
Messages
5,166
Location
Central Colorado
Mirror, mirror, on the wall.

I salvaged the mount from an abandoned Dish TV to make a bracket to hold a mirror for my 2 post lift.

Makes getting the vehicle centered a piece of cake since I also had the control joint on the floor cut in the centerline of the hoist.

When you pull in you center the front license plate over the control joint.
 

Attachments

  • Mirror Mirror.jpg
    Mirror Mirror.jpg
    77.6 KB · Views: 105
  • OGITB 004.jpg
    OGITB 004.jpg
    133.5 KB · Views: 111
Last edited:

Ironcrow

Well-known member
Joined
Sep 30, 2005
Messages
1,169
Location
Arizona
Rotary Lifts have a laser pointed at the ground from the cross brace. Line up the projected centerline of the lift with the center of your car.
 

Aberdale

Well-known member
Joined
Mar 13, 2009
Messages
1,380
Location
Ohio
I have a Rotary assymetrical. It's pretty easy to eyeball how far to pull in based on the angle of the lift columns and the angle of the door open position for most of my vehicles. As far as pad placement, I just memorize the lift locations for each vehicle. Not that big of a deal unless you have 20 vehicles, or your pulling a different vehicle in every time.
 

firebirdparts

Well-known member
Joined
Jun 8, 2016
Messages
10,633
Location
Kingsport, TN
You're really not talking about "ease and speed". At home there's no need to get in a hurry. Better to do it well. Your method really is about doing it well and then repeating that. Which is good.

Location of the car I find not to be much of an issue, as the lift is disadvantaged and has to hold up no matter where the car is. it's the location of the arms that I have to remember each time. Especially on the F250, they are really a pain to pick up.
 

brownbagg

Well-known member
Joined
Mar 20, 2006
Messages
5,208
i got a pot hole. when the front tire hits the pot hole, its in the right place
 

pattenp

Well-known member
Joined
Jun 4, 2008
Messages
10,175
Location
Virginia - USA
My problem is I have two cars that have to be almost exactly straight for the arms to hit correctly. I use 3 orange balls hanging on string from the ceiling to get the car perpendicular and centered between the post. Forward positions are marked on floor for each car.
 
OP
S

Spencer Was Here

Well-known member
Joined
Jan 2, 2006
Messages
327
Location
Western Michigan
With adjustable arms that pivots it shouldn't be that hard...no?

It is easier with some vehicles than others. As "Firebirdparts" mentioned, his F250 is a challenge. I just recently got a 2005 F350 and it was ridiculous to try and get positioned correctly. It literally took me 10-15 minutes of farting around with it and it still wasn't as perfect as I would have liked it to be.

I like the suggestions I've received so far and will definitely try to incorporate some of them into my routine. I'm searching the Internet right now for a decent vertical laser level that I'd like to semi-permanently mount to the pallet racking that I have in front of my lift. Getting the vehicle perfectly centered between the posts is half the challenge. The smaller the vehicle, the easier that seems to be, for me at least.

As T_R mentioned, for many of my vehicles I can pull forward based on the position of the door and mirror in relation to the lift itself. That is not always foolproof though, and I'm just looking to create a foolproof system that will be repeatable and save time.
 

gungatim

Well-known member
Joined
Jan 8, 2013
Messages
8,101
Location
west mich
I made a "V" on my horizontal cross beam with electrical tape to mark the center. that way I can pull in and stay straight. my lift is asymmetrical, so if I am not in far enough I can't swing the arms, so I just look where the tire/door is in relation to the side post.

for my personal vehicles, especially the enclave which has exactly one position it can be lifted (even 1" off the arms don't reach), I took a can of yellow spray paint and when on the lift, I just spray painted around the lift pads so I can always see the exact location...did that with the kids cars as well.

my floor would never stay clean enough for any grids or lines to last.
 

bd8134

Well-known member
Joined
Oct 16, 2008
Messages
219
Location
Franklin, MA
I use a ball on a string which is attached to the garage door, one like these https://www.amazon.com/dp/B009VUGP9A/ref=psdc_15707951_t1_B000H5QTNK. The final eyelet I positioned in the center of the lift about where its cross bar runs across. Open the garage door, ball drops down, just aim your vehicle to hit the ball in the center of the windscreen. It helps when moving your vehicle in, to keep it square. Close the garage door and the ball retracts to the ceiling.. Simple ha?
 

ZipSnafu

Well-known member
Joined
Mar 8, 2011
Messages
410
Location
Virginia
I have a big mirror in the front of my shop so I can try to center up as well as possible.
 

493 scamp

Well-known member
Joined
Aug 9, 2012
Messages
284
Location
Kirkwood,Illinois
Fore and aft positions it helps to have the Rotary yellow plate like in the above pictures. At work mine is set so that most FWD cars will be correct,most short trucks are right past the plate. My biggest gripe is the owner mounted the lift at about 50* angle to the door. I have to hug the left wall and turn into the lift. Cars are not too bad but Trucks are terrible!
Almost always the weight is more to the right side and those hard to lift trucks usually have to be jacked up at rear and slid over because the left rear arm will not reach.
The owner tried to make 3 stalls by putting the lift in this way,but the right stall is too hard to get in (90* turn 4 feet in the door). The left stall is better but again at an angle with a alignment lift on one side and a 2 post behind it as well. We also have a door opener with the switch at 6 foot level 30 feet from door and on a wall behind a podium so we made a metal poking stick to push buttons. He is tall and has long arms and can reach it but we can't.
 

BigNuge

Well-known member
Joined
Feb 23, 2015
Messages
608
Location
Live Free or Die
Great thread! I think I’ll adopt the vertical laser idea. I find that centering the vehicle is most difficult. Fore and aft are easy. I always leave the vehicle in neutral, so pushing in/out for adjustment is quick and easy. I worry more about centering the weight of the vehicle. I try to keep the engine/transmission as close to the uprights as practical.


Sent from my iPhone using Tapatalk
 
To avoid these ads, REGISTER NOW!

rsanter

Well-known member
Joined
Dec 22, 2007
Messages
18,521
Location
visalia ca
If ispts just your vehicles, how about drawing a box where all the wheels should be at in different colors for each vehicle.
Then use a mirror or video camera system to help you position it there by yourself.

Bob
 

Texsun

Well-known member
Joined
Mar 23, 2012
Messages
148
I make a note of where the post is in relationship to me while I'm still in the car.
 

Lelandwelds

Well-known member
Joined
Sep 6, 2017
Messages
2,443
Location
Central Texas
I have a 6" piece of 2x4. Once I figure out the correct position of each of my vehicles, I put the 2x4 in front of the left front tire and a piece of duct tape right behind it. I label the tape with the vehicle name.

When it is time to put a car on the lift, I postion the 2x4 at the appropriate tape mark, drive in lining up on the 2x4 and stop when the tire touches.

$0, quick and easy.

One of those handyman magazines suggested a ceiling mounted laser shining on the dash for tight garages. That would work for left/right and for/aft vehicle placement. You wouldnt need to move anything. You could remember each car or use an in the car variation of the 6" 2x4
 

Attachments

  • 333b779a-478b-458e-a467-d7b998555a21.jpg.w960.jpg
    333b779a-478b-458e-a467-d7b998555a21.jpg.w960.jpg
    8.5 KB · Views: 104

Ign

Well-known member
Joined
Jul 7, 2006
Messages
12,769
Location
Butte Peak ND
I just painted three T's on my floor which are where the center of the driver's front tire should be and the tire should be right next to the T.

One for shorter trucks like most RC, one for longer trucks like most EC, and one for CC's. Of course you gotta fudge it a tiny bit for bed length.

If it's a car or mini-van it hardly freaking matters, those things are sooooo light compared to what I usually pick that the lift doesn't care where the hell it's located.

If you've ever done any 'wheeling you're used to leaning out the driver's window spotting the LF tire, which is exactly what I do..........."' wheeling" between my columns :D Seriously though, I come from a long history of rock-crawling fullsize trucks, but I'm amazed at how few people understand how to look out the driver's window.
 
OP
S

Spencer Was Here

Well-known member
Joined
Jan 2, 2006
Messages
327
Location
Western Michigan
I settled on a Bosch laser that was locally available at Home Depot. The green lasers are supposed to have better visibility than the red, so I paid the extra for a green cross beam laser. I got the Bosch GLL 100 GX model for $229.
 

Attachments

  • 20171111_175105.jpg
    20171111_175105.jpg
    48.4 KB · Views: 86
OP
S

Spencer Was Here

Well-known member
Joined
Jan 2, 2006
Messages
327
Location
Western Michigan
The grid pattern that I marked on the floor years ago with a Sharpie marker is pretty worn away. It is not really visible in the first photo, but you can see it in the second one.
 

Attachments

  • 20171111_180257.jpg
    20171111_180257.jpg
    40.1 KB · Views: 106
  • 20171111_180243.jpg
    20171111_180243.jpg
    103.2 KB · Views: 99
OP
S

Spencer Was Here

Well-known member
Joined
Jan 2, 2006
Messages
327
Location
Western Michigan
I first used the laser to see how well I did years ago with layout out the original grid pattern. When I lined up the laser with the center line that I had originally drawn, things seemed to be pretty square. I was coming up with a variance of about 3/16" of an inch or so in about 8'.
 

Attachments

  • 20171111_180635.jpg
    20171111_180635.jpg
    87.8 KB · Views: 63
OP
S

Spencer Was Here

Well-known member
Joined
Jan 2, 2006
Messages
327
Location
Western Michigan
I then turned the laser around and repositioned it at the far end of the lift, pointing towards the garage door. This is really the layout that matters the most.

I measured the exact center of the garage door, which is where the laser target is sitting. I also measured the exact center of the two posts, which are 16' in from the garage door. I tried positioning the laser where it intersected those two exact center points along with the exact center between the Mohawk lift.

That took a bit of time, but I was very happy with the end results. In the photo below, the laser is exactly centered on that target at the base of the garage door, centered exactly between the Mohawk lift, and within an 1/8" of those two posts that are positioned 16' in from the garage door.
 

Attachments

  • 20171111_191812.jpg
    20171111_191812.jpg
    56.1 KB · Views: 72
OP
S

Spencer Was Here

Well-known member
Joined
Jan 2, 2006
Messages
327
Location
Western Michigan
While the laser was still positioned right where I wanted it, I took an 8' aluminum rule and created a new line with a larger Sharpie. This time starting all the way down at the garage door.
 

Attachments

  • 20171111_192223.jpg
    20171111_192223.jpg
    43.4 KB · Views: 50
OP
S

Spencer Was Here

Well-known member
Joined
Jan 2, 2006
Messages
327
Location
Western Michigan
Once I had the new Sharpie line established, I once again turned the laser around, positioning it near those two posts that are 16' away from the garage door. It was very easy and quick to line up the laser with the new Sharpie line.

I then marked both shelves of the pallet racking that sits in front of my Mohawk lift. I wasn't sure if positioning the new Bosch laser on the bottom shelf would give me enough laser coverage, so I marked the top shelf too.
 

Attachments

  • 20171111_194129.jpg
    20171111_194129.jpg
    69.5 KB · Views: 47
  • 20171111_194136.jpg
    20171111_194136.jpg
    59.2 KB · Views: 48
OP
S

Spencer Was Here

Well-known member
Joined
Jan 2, 2006
Messages
327
Location
Western Michigan
The three vertical lines I marked on the pallet shelves were so I could easily place the magnetic mounting bracket for the laser in the exact spot (left to right), so all I would have to do is tweak the laser slightly to get it lined up with the Sharpie line going down the center of the door.

I ended up having to make a fourth line, as even though the 1/4-20" mounting stud on the mounting bracket is perfectly centered on the mounting bracket, the threaded socket on the bottom of the laser is not perfectly centered on the laser, as they had to make room for the 5/8-13" socket too.

Adding the fourth line about 5/16" further to the right on the pallet rack was simple enough.
 

Attachments

  • 20171111_194654.jpg
    20171111_194654.jpg
    30.2 KB · Views: 40
  • 20171111_194327.jpg
    20171111_194327.jpg
    38.3 KB · Views: 42
  • 20171111_194512.jpg
    20171111_194512.jpg
    43.9 KB · Views: 40
OP
S

Spencer Was Here

Well-known member
Joined
Jan 2, 2006
Messages
327
Location
Western Michigan
Here is what it looked like after getting the laser set up on the pallet rack. I was originally planning on pretty much leaving the laser in place full-time, but it was so easy to get it lined up, that I'll have no concerns taking it down and storing it when it is not needed.
 

Attachments

  • 20171111_195123.jpg
    20171111_195123.jpg
    49.7 KB · Views: 50
  • 20171111_195209.jpg
    20171111_195209.jpg
    90.5 KB · Views: 49
OP
S

Spencer Was Here

Well-known member
Joined
Jan 2, 2006
Messages
327
Location
Western Michigan
Here you can see I tried to clean off the old Sharpie line that was going down the center of the original grid pattern I made. In the end that original 3/16" variance I found in a distance of 8' ended up about the same.

It is not even really noticeable here in the 3.5' or so you can see in this picture (each square is 6"). Going out 4' from the center of the lift each way would show just under an 1/8" from the original line. Not enough that I'll probably even end up changing the grid pattern.

I haven't decided what I want to do with that grid pattern yet, if anything.
 

Attachments

  • 20171111_195409.jpg
    20171111_195409.jpg
    36.2 KB · Views: 43
OP
S

Spencer Was Here

Well-known member
Joined
Jan 2, 2006
Messages
327
Location
Western Michigan
The moment of truth. The first photo is not real clear, but the green laser is lined up centered on the groove going down the center of the hood of my F350. What a treat is was to pull up to the doors using the laser as a guide. You can see my shop is pretty full, so it is hard enough pulling in without hitting something anyway.
 

Attachments

  • 20171111_200031.jpg
    20171111_200031.jpg
    65.5 KB · Views: 77
OP
S

Spencer Was Here

Well-known member
Joined
Jan 2, 2006
Messages
327
Location
Western Michigan
Here it is with the truck pulled in about 12' or so. Again, what a treat to be able to keep the vehicle perfectly centered. It was easy as pie to keep that laser lined up with the groove in the middle of the hood.
 

Attachments

  • 20171111_200126.jpg
    20171111_200126.jpg
    74.7 KB · Views: 62
OP
S

Spencer Was Here

Well-known member
Joined
Jan 2, 2006
Messages
327
Location
Western Michigan
Here is the truck pulled as far forward on the lift as it needed to be. I actually ended up backing up about 8" or so from here, but this photo showed the green laser the best.
 

Attachments

  • 20171111_200241.jpg
    20171111_200241.jpg
    88 KB · Views: 72
OP
S

Spencer Was Here

Well-known member
Joined
Jan 2, 2006
Messages
327
Location
Western Michigan
Just a couple of final photos to share. Thanks to everyone for their suggestions in this thread, but I'd especially like to send a BIG thank you out to Ironcrow for first mentioning the laser idea.
 

Attachments

  • 20171111_202310.jpg
    20171111_202310.jpg
    71.3 KB · Views: 76
  • 20171111_203745.jpg
    20171111_203745.jpg
    93.5 KB · Views: 81
  • 20171111_200546.jpg
    20171111_200546.jpg
    52.6 KB · Views: 72
  • 20171111_203811.jpg
    20171111_203811.jpg
    84.9 KB · Views: 85

Ironcrow

Well-known member
Joined
Sep 30, 2005
Messages
1,169
Location
Arizona
I glad it worked out for you. Looks like you worked pretty hard to get it all squared away. If you have various vehicles to pull in the spotting dish may not work depending on car CG, lift points, and location of front wheel. You could add a perpendicular laser to the system and just make a note of where it falls on each car hood/dash. :beer:
 
To avoid these ads, REGISTER NOW!
Top Bottom