To avoid these ads, REGISTER NOW!

VISE REPAIR 101 all vise repairs, lubricants, sources for parts and the tricks to fix

OP
D

drivesitfar

Well-known member
Joined
Oct 23, 2013
Messages
36,023
Location
Pacific Northwest
BMR: i couldn't find a couple of the other member's posts where they repaired their cracked slides, but maybe if you do a PRENTISS search a few might come up cause that is more common on those vises than any of the other ones.

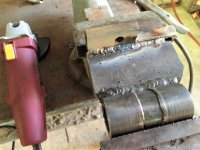
do you own a mill? I recall seeing a member put the dynamic slide on his mill after welding or brazing it to really spiff it up or some of the guys just use a belt sander.

good luck
 
To avoid these ads, REGISTER NOW!

BMR24

Well-known member
Joined
Oct 2, 2017
Messages
234
Location
Rocky Mountains Colorado
Thank you all for the advice, I really like the cap screw idea as opposed to just brazing. Does anyone recommend a specific brazing rod / flux? All of my experience is with pipe in hydronic and refrigeration applications, none of which is cast iron.
Drives I wish I had a mill. I do have a newly aquired industrial drill press that I saved off of a demolition job, and I had considered getting an x/y axis vise for it but I read that the bearings and quill would likely not be up to the task of milling and may wear out. maby someday I'll find a good deal on a quality mill that I can actually afford.
 

Mark in Indiana

Well-known member
Joined
Aug 11, 2010
Messages
3,057
Location
Southern Indiana
BMR:
As far as the threaded hole went, I had to use the drill press. The chuck on my mill is too large to hold a #7 drill bit (for a 1/4-20 tap). I would advise that you keep the slide clamped on the drill press table to drill all of the holes needed. Then put the tap in the chuck, lower it in the hole and turn the chuck (with tap) by hand. After the tap has started, release it and finish cutting your threads. This way you'll keep everything straight.

I assume that you know not to try to "power tap" the hole. Results will be bad.
 

G-ManBart

Well-known member
Joined
Jan 24, 2015
Messages
2,059
Location
Michigan
What's the best way to clean up the slide on a Wilton C-1 vise? Doesn't need to be a mirror finish but I'd like it to be somewhat nice looking. Unfortunately I only have access to an angle grinder with a wire wheel, scotch bright and some various wire brushes. Looking to do the same finish on the lead screw as well.

I use a unitized wheel on an angle grinder. It gets the slide clean and pretty shiny, but doesn't remove any metal. Sometimes they call them a surface conditioning wheel, but it's pretty much compressed scotchbrite and almost looks like a sponge.

I didn't take the before picture with this in mind, but you get the idea...dirty, but not terrible. The after pic gives you an idea...it looked a little cleaner before I put grease on it. I just lightly run the unitized wheel over the slide with pretty light pressure since I'm really just trying to get it clean rather than polish it.
 

Attachments

  • IMG_4970.jpg
    IMG_4970.jpg
    139.1 KB · Views: 47
  • IMG_5042.jpg
    IMG_5042.jpg
    140.2 KB · Views: 45
Last edited:

live311

Well-known member
Joined
Sep 25, 2017
Messages
45
Location
Middletown, CT
So I really screwed up.

I picked up a worse-for-wear 950 and got new parts, stripped it, and filled in some big gouges with some JB Weld. It was progressing really well. I was reassembling the end cap but didn't realize that the main nut was off by 90 degrees. I hammered in the pins as hard as I could and ended up mushrooming them to the point where they were stuck forever.

I managed to get the main nut out (with some ugly dimples in it) then tried to drill out one of the pins. I made it through then the drill bit snapped off. So I tried it with the other side and, well, you can guess what happened.

So now what? I have 2 mushroomed pins with hardened bits through the middle of them and they won't budge. Should I try heating them with a torch and let them cool slowly to soften them, then try hammering them out again? Should I go crying to a local machine shop? Do I have any options?
 

Mark in Indiana

Well-known member
Joined
Aug 11, 2010
Messages
3,057
Location
Southern Indiana
So I really screwed up.

I picked up a worse-for-wear 950 and got new parts, stripped it, and filled in some big gouges with some JB Weld. It was progressing really well. I was reassembling the end cap but didn't realize that the main nut was off by 90 degrees. I hammered in the pins as hard as I could and ended up mushrooming them to the point where they were stuck forever.

I managed to get the main nut out (with some ugly dimples in it) then tried to drill out one of the pins. I made it through then the drill bit snapped off. So I tried it with the other side and, well, you can guess what happened.

So now what? I have 2 mushroomed pins with hardened bits through the middle of them and they won't budge. Should I try heating them with a torch and let them cool slowly to soften them, then try hammering them out again? Should I go crying to a local machine shop? Do I have any options?

Live:
Please post some detailed photos of your occupational misadventure. There's a lot of good experience here that should be able to get you out of your jam.
 

live311

Well-known member
Joined
Sep 25, 2017
Messages
45
Location
Middletown, CT
It’s not easy to see, but both pins have a black oxide drill bit through their centers, in addition to being deformed from my caveman hammer whacks. Any suggestions?
 

Attachments

  • A1FF9298-634B-40EB-9055-82F4E1748403.jpg
    A1FF9298-634B-40EB-9055-82F4E1748403.jpg
    17 KB · Views: 68
  • BDFE3C1A-5243-426A-8526-E232EEB1BD0F.jpg
    BDFE3C1A-5243-426A-8526-E232EEB1BD0F.jpg
    15.2 KB · Views: 64
  • 307F965F-6C27-475A-9F84-D8B23E5F1D4E.jpg
    307F965F-6C27-475A-9F84-D8B23E5F1D4E.jpg
    14 KB · Views: 64
OP
D

drivesitfar

Well-known member
Joined
Oct 23, 2013
Messages
36,023
Location
Pacific Northwest
LIVE: i can't see the drill bits that you broke off and guessing they are small ones. yes?

maybe since it looks like you PEENED the pins flat that if you use a drill bit that is the size of the peened pin head and drill into your Wilton say a 16th to eliminate the peen so you can use a punch to push your pins into the middle and maybe remove your vise nut.

then some members have put in hex (allen wrench to remove and install) headed screws in place of the pins to make for easier removal and replacement later?

good luck
 

Outlawmws

Well-known member
Joined
Aug 9, 2011
Messages
39,244
Location
The Badlands
I'm thinking your idea of getting them hot and cooling slow may be the best option. Then stay on the bits with your punch.
 

Hiatt1991

Well-known member
Joined
Jul 16, 2017
Messages
180
Location
Prescott, AZ
So here's he vise all buttoned up. Was a very fun project overall. Can't wait to get it mounted and put to use! Sorry about the weird photo sizing.

<a href='http://i.imgur.com/S2vuBZJ' title=''><img src='http://i.imgur.com/S2vuBZJ.jpg' alt='' title='Hosted by imgur.com' /></a>

<a href='http://i.imgur.com/uvaxXMv' title=''><img src='http://i.imgur.com/uvaxXMv.jpg' alt='' title='Hosted by imgur.com' /></a>

<a href='http://i.imgur.com/asYQsL3' title=''><img src='http://i.imgur.com/asYQsL3.jpg' alt='' title='Hosted by imgur.com' /></a>

Before
<a href='http://i.imgur.com/fvOQwxE' title=''><img src='http://i.imgur.com/fvOQwxE.jpg' alt='' title='Hosted by imgur.com' /></a>
 

Mark in Indiana

Well-known member
Joined
Aug 11, 2010
Messages
3,057
Location
Southern Indiana
So here's he vise all buttoned up. Was a very fun project overall. Can't wait to get it mounted and put to use! Sorry about the weird photo sizing.

<a href='http://i.imgur.com/S2vuBZJ' title=''><img src='http://i.imgur.com/S2vuBZJ.jpg' alt='' title='Hosted by imgur.com' /></a>

<a href='http://i.imgur.com/uvaxXMv' title=''><img src='http://i.imgur.com/uvaxXMv.jpg' alt='' title='Hosted by imgur.com' /></a>

<a href='http://i.imgur.com/asYQsL3' title=''><img src='http://i.imgur.com/asYQsL3.jpg' alt='' title='Hosted by imgur.com' /></a>

Before
<a href='http://i.imgur.com/fvOQwxE' title=''><img src='http://i.imgur.com/fvOQwxE.jpg' alt='' title='Hosted by imgur.com' /></a>

Hiatt:
Awesome restoration. I really like how sharp you painted the embellishments and how well the polished bare metal details compliment the orange. Well done sir! :thumbup:
 
To avoid these ads, REGISTER NOW!
OP
D

drivesitfar

Well-known member
Joined
Oct 23, 2013
Messages
36,023
Location
Pacific Northwest
Hiatt: yep i have to say you have skills and WELL DONE!

is Chevy Orange the same as SNAP ON Orange cause some of the guys have painted a few that color?

Live: i know it's only been a couple days, but just curious if you managed to get the pins to move yet and how did you manage to do that? or do you still need some help?
 

Hiatt1991

Well-known member
Joined
Jul 16, 2017
Messages
180
Location
Prescott, AZ
Hiatt the little decal is a nice touch. Was that on the vise or did you have to find one?

It wasn't on the vise when I got it. When I ordered some parts from Kevin at wiltonviseparts.net, he very thoughtfully included a couple. I wasn't even going to find a replacement decal but I think it makes the vise look a lot better.
 

Hiatt1991

Well-known member
Joined
Jul 16, 2017
Messages
180
Location
Prescott, AZ
Hiatt:
Awesome restoration. I really like how sharp you painted the embellishments and how well the polished bare metal details compliment the orange. Well done sir! :thumbup:

Thanks! I kinda wanted it to look like a Dodge hemi engine so I wanted some parts polished metal and the body to match the Orange paint they used on those blocks. I decided to not polish the handle just because I thought it showed some cool patina but I might fully polish it one of these days. I'm really happy with how it came out.
 

Hiatt1991

Well-known member
Joined
Jul 16, 2017
Messages
180
Location
Prescott, AZ
Hiatt: yep i have to say you have skills and WELL DONE!

is Chevy Orange the same as SNAP ON Orange cause some of the guys have painted a few that color?

Live: i know it's only been a couple days, but just curious if you managed to get the pins to move yet and how did you manage to do that? or do you still need some help?

Thanks! I believe the two colors are pretty close. Snap-On Orange may be just a touch darker.
 

live311

Well-known member
Joined
Sep 25, 2017
Messages
45
Location
Middletown, CT
Live: i know it's only been a couple days, but just curious if you managed to get the pins to move yet and how did you manage to do that? or do you still need some help?

Yup, I got 'em! I heated them with a torch, let them cool enough to handle, tried drilling them out again unsuccessfully, tried hammering them out with a small punch which broke, then tried a larger punch and it worked! I replaced the mangled pins with 1/4" rod stock, buttoned it up, and got it painted and reassembled already! Pics to come soon! :beer:
 
OP
D

drivesitfar

Well-known member
Joined
Oct 23, 2013
Messages
36,023
Location
Pacific Northwest
Hiatt: thanks for the 411

Live: BIG CONGRATS!!

ALL: here's a nice old REED that became YARD ART and is advertised as such cause some prior owner thought it was OK to HAMMER on it.

Sad to see and he probably could have used a piece of RR track and accomplished the same thing on his project.

i was considering buying it and keeping the handle with main screw and vise nut, but the screw even looks short. GEESH!!
 

Attachments

  • 00Y0Y_iGKaNdMfTMt_1200x900.jpg
    00Y0Y_iGKaNdMfTMt_1200x900.jpg
    46.5 KB · Views: 50
  • 00u0u_hCUoLP0ooqd_1200x900.jpg
    00u0u_hCUoLP0ooqd_1200x900.jpg
    79.7 KB · Views: 46
  • 00G0G_l65YTGkTlxY_1200x900.jpg
    00G0G_l65YTGkTlxY_1200x900.jpg
    52.8 KB · Views: 49
  • 00C0C_4K2JVsdeePe_1200x900.jpg
    00C0C_4K2JVsdeePe_1200x900.jpg
    46.4 KB · Views: 54

Oregon rock crusher

Well-known member
Joined
Jun 28, 2016
Messages
1,908
Location
West of Salem
Last summer I picked up this 6” American scale pattern swivel base, swivel back jaw vise. It had some pretty serious issues but I went ahead and bought it anyway because I had never seen another like it. I am just now getting around to addressing the problems and getting the vise back together and here is a quick rundown of the major issues. For starters the spindle screw was broken off about half way down the thread so it would need a new screw. Also the nut was not just damaged, it was missing so it needed a new nut also. Most troubling of all was the nut retaining dovetails had broken out in the base of the static jaw casting leaving no easy means of attaching a new nut.

I started with the screw repair. I picked up a piece of 1-1/4” x 5tpi alloy ACME threaded rod from the local supply shop. I also got a few mild steel ACME nuts to fit it. It is important later on in the repairs that the threaded rod be harder than the nuts. The spindle had a few inches of shaft which was not threaded or damaged attached to the handle knob so I cut it off square keeping as much of the undamaged shaft as I could and cut my threaded rod so the total length of the new screw would be flush with the end of the slide when installed. After tapering both pieces I clamped them solidly in line for tack welding. As the welding progressed I used a variety of methods but always kept it clamped tightly while welding. I used 7018 rod and knocked the slag off the end of the rod between starts so I could better control the start arc ensuring good penetration. Now there might be a few ready to raise the big hairy eyeball at this approach to a spindle thread repair but have some faith....it will work out.

I kept turning the spindle and checking it by rolling it on a flat surface always putting the next pass where it would pull the screw straight if it got off a bit and clamping it straight for every pass so it was held firmly as the weld puddle froze helping minimize the pulling effect of the weld. I also ground to perfectly clean metal after every pass making sure no slag or any other defects were in the previous weld. Final beads made the shaft over diameter and I took it to the lathe to turn it to the final size. If I didn't have a lathe I probably would have trued it up with a grinder getting nearly as good a result. The new screw is perfectly straight and I believe this to be a very sound repair. Here are a few pics of the screw welding process.
 

Attachments

  • IMG_1497.jpg
    IMG_1497.jpg
    143.3 KB · Views: 49
  • IMG_1498.jpg
    IMG_1498.jpg
    142.7 KB · Views: 53
  • IMG_1487.jpg
    IMG_1487.jpg
    143.1 KB · Views: 48
  • IMG_1486.jpg
    IMG_1486.jpg
    140.1 KB · Views: 44
  • IMG_1484.jpg
    IMG_1484.jpg
    141.1 KB · Views: 47
  • IMG_1476.jpg
    IMG_1476.jpg
    142.9 KB · Views: 43
  • IMG_1474.jpg
    IMG_1474.jpg
    142 KB · Views: 43

Oregon rock crusher

Well-known member
Joined
Jun 28, 2016
Messages
1,908
Location
West of Salem
After I had the screw done it was time to focus on a suitable nut. I really wanted a longer contact patch than a single nut could provide so I decided to weld two nuts together with a spacer between to get the total length out to at least 3”. There's those raised eyebrows again....Oh well here goes. I used a little bit of the threaded rod left over from the new spindle screw to align two nuts with a piece of tubing between them. The tubing was first welded to one nut and before attaching the remaining nut to the other end I wedged them as far apart as I could get them while they were both threaded on the acme stub. Clamps on the nuts also help hold them in alignment for welding. Short welds side to side. After welding the 2nd nut to the center tube the acme rod I use for alignment was pretty damn tight just as I expected but....not so tight I couldn't back it out of the now welded together nuts.

Next up was to turn the now free stub of Alloy acme rod I'd used for aligning the nuts into a tap. I simply cut it across the thread profile with a cut off wheel on opposing sides and ground in a little relief in front of the new thread cutting faces. I ground the opposite end to a square profile for driving my new ACME “tap”. Lots of cutting oil was used and the first few passes through the tap would get pretty tight when it started into the second nut. After several passes feeding from both ends of the nut stack the “tap” freed up to the point I could start feeding it in and out with my cordless drill. Soon I had to push the drill to one side or the other to feel any resistance at all. After that good tapping it was time for a quick trip to the lathe to knock the flats off. I now have a nice ACME threaded nut 3” long that fed onto the spindle screw as easily as a single nut did. I also drilled a hole in the center of the nut spacer tube for oiling. The tube will act as a small central lube reservoir for the screw. As few pics of the nut project so far.
 

Attachments

  • IMG_1500.jpg
    IMG_1500.jpg
    143.2 KB · Views: 37
  • IMG_1499.jpg
    IMG_1499.jpg
    141.4 KB · Views: 36
  • IMG_1496.jpg
    IMG_1496.jpg
    139.6 KB · Views: 37
  • IMG_1494.jpg
    IMG_1494.jpg
    141.9 KB · Views: 35
  • IMG_1492.jpg
    IMG_1492.jpg
    140 KB · Views: 36
  • IMG_1481.jpg
    IMG_1481.jpg
    146.3 KB · Views: 36

Oregon rock crusher

Well-known member
Joined
Jun 28, 2016
Messages
1,908
Location
West of Salem
Phase 3 of this vises repair was to address the broken dovetails and make a new mount to secure the new vise nut to. As this area of a vise is quite difficult to machine I decided a little bench and chisel work would have to be done so I tightly bolted the vise base to my bench. The key to getting good results while chipping is to take small bites and take short breaks to sharpen the chisels frequently. I kept the front part of the dovetails as they were intact and I planned to use them to partially secure the new nut base.

After a couple hours of chipping I had plenty of flat surface cut to allow a new nut mounting base to be secured. For the plate I used a small piece of 1/2” mild steel and cut the rough shape of the front dovetail with a hand held band saw. A little grinding, filing, and fitting and soon enough it fit into the base well enough. I decided to bolt it in with four 1/2” x 13 bevel headed screws coming in from under the base into threads cut in the new nut bottom plate. The bolt heads will be slightly recessed in the vise body and will not interfere with the swivel base at all. Fixturing on the drill press wasn't too bad but if necessary this probably could have been done with a hand drill. Here are a few pics showing the prep work and drilling and taping for the nut base fitting.
 

Attachments

  • IMG_1679.jpg
    IMG_1679.jpg
    150 KB · Views: 40
  • IMG_1680.jpg
    IMG_1680.jpg
    147.9 KB · Views: 42
  • IMG_1677.jpg
    IMG_1677.jpg
    147.4 KB · Views: 43
  • IMG_1672.jpg
    IMG_1672.jpg
    137.2 KB · Views: 43
  • IMG_1671.jpg
    IMG_1671.jpg
    147.9 KB · Views: 46
  • IMG_1669.jpg
    IMG_1669.jpg
    148.6 KB · Views: 44
  • IMG_1666.jpg
    IMG_1666.jpg
    146.2 KB · Views: 46

Oregon rock crusher

Well-known member
Joined
Jun 28, 2016
Messages
1,908
Location
West of Salem
A few more pics of the base fitting....
 

Attachments

  • IMG_1695.jpg
    IMG_1695.jpg
    134 KB · Views: 38
  • IMG_1681.jpg
    IMG_1681.jpg
    145.1 KB · Views: 36
  • IMG_1682.jpg
    IMG_1682.jpg
    151.1 KB · Views: 36
  • IMG_1683.jpg
    IMG_1683.jpg
    148.3 KB · Views: 42

Oregon rock crusher

Well-known member
Joined
Jun 28, 2016
Messages
1,908
Location
West of Salem
The last tricky part of this repair is getting the new nut set on it's new base in perfect plane with the spindle screw. This took quite a bit of measuring and I got to use my adjustable paralles but eventually I came up with a width for the riser and welded it to the nut. Next I lined everything up with the vise basically assembled. There was just room to put a small tack weld at the base of the nut riser securing it to the nut base. Then it was just a matter of running the spindle and slide in and out tacking and adjusting until it was as straight as I could get it. I quit when with the nut secured I could turn the spindle in and out pulling the slide with it full travel only by hand with no handle.

I had originally considered leaving the nut free to wobble around a little to maintain alignment through the travel but by getting it in true plane that wasn't necessary. If I decide to take on another vise with the dovetails broken out I may just bolt in new dovetail sections and fully dovetail the nut base but I think the approach I took is probably stronger. A few more pics....The rest of this restoration is pretty basic and I still need to make a bushing to lock the spindle to the slide but mostly just cosmetic work from here on out.....might get started on that this weekend. A few pics of the nut weldment and fitting. Ed.
 

Attachments

  • IMG_1694.jpg
    IMG_1694.jpg
    143.9 KB · Views: 50
  • IMG_1692.jpg
    IMG_1692.jpg
    112.4 KB · Views: 42
  • IMG_1691.jpg
    IMG_1691.jpg
    143.8 KB · Views: 50
  • IMG_1686.jpg
    IMG_1686.jpg
    144.8 KB · Views: 53
  • IMG_1685.jpg
    IMG_1685.jpg
    144.5 KB · Views: 48
OP
D

drivesitfar

Well-known member
Joined
Oct 23, 2013
Messages
36,023
Location
Pacific Northwest
ORC: you sir HAVE SKILLS!!

VERY WELL DONE and a great save of another old vise that was mis used.

thanks for taking the time to write up all the good information and taking and posting all the pictures cause i know i'll need them some day when i try to fix a few of mine if i do.

cheers
 

Oregon rock crusher

Well-known member
Joined
Jun 28, 2016
Messages
1,908
Location
West of Salem
Thanks Drives. I think the nut probably let loose first and then they may have broken the screw as the whole mess got wedged up crooked. Hard to say but I suspect the dovetail design on this AS pattern was a little weak and prone to failure. Hopefully a little stronger now. One other problem this vise had was that the end of the slide where the screw knob bears was not machined square to the sides of the slide. That meant when the vise was tightened it would force the screw in a bind. I trued that up before aligning the nut. A few more pics...should be all done with repairs now. Ed.
 

Attachments

  • IMG_1697.jpg
    IMG_1697.jpg
    148.7 KB · Views: 40
  • IMG_1699.jpg
    IMG_1699.jpg
    148.5 KB · Views: 41
  • IMG_1703.jpg
    IMG_1703.jpg
    140 KB · Views: 38
  • IMG_1705.jpg
    IMG_1705.jpg
    148.6 KB · Views: 36
Last edited:
OP
D

drivesitfar

Well-known member
Joined
Oct 23, 2013
Messages
36,023
Location
Pacific Northwest
ORC: VERY NICE SAVE of a very cool old vise.

did you weigh your American Scale #79? i think they weigh about 180 pounds, but i don't have that to memory cause i'm still looking for one.

thanks for taking the time to show us how to make a vise nut cause i'm sure there are more than a few old vises that could use one and i think i own a big one that does now.

ALL: so guessing SHATTERED vise nuts and main screws are from hammering or using a big pipe cheater bar on your old vise so think of another option before breaking your old vise that wasn't probably meant for the job you are using it for when doing those sort of jobs.

cheers
 

Oregon rock crusher

Well-known member
Joined
Jun 28, 2016
Messages
1,908
Location
West of Salem
Thanks Drives, I'm pretty sure I did weigh this "AS #79 Pattern" vise when I brought it home but I didn't write it down. If I remember right it was around #175 or so but was missing a few bits. I'm not sure I would have put the effort into it for a standard American scale even with the swivel back jaw....but for a Wilton 600 SJ it seemed worthwhile. Ed.
 

Attachments

  • IMG_1435.jpg
    IMG_1435.jpg
    148.7 KB · Views: 69
  • IMG_1436.jpg
    IMG_1436.jpg
    147.5 KB · Views: 54

GETRIDAONE

Well-known member
Joined
May 21, 2013
Messages
1,549
Location
Auburn, GA
Thanks Drives. I think the nut probably let loose first and then they may have broken the screw as the whole mess got wedged up crooked. Hard to say but I suspect the dovetail design on this AS pattern was a little weak and prone to failure. Hopefully a little stronger now. One other problem this vise had was that the end of the slide where the screw knob bears was not machined square to the sides of the slide. That meant when the vise was tightened it would force the screw in a bind. I trued that up before aligning the nut. A few more pics...should be all done with repairs now. Ed.

I had the same problem with this AS #25 The dovetail was broken in the rear and it had been bored way off of center. The nut was OK because a piece of the broken dovetail jammed under the nut to bind the screw tight and the guy put it outside, never to use it again. I should have done like you suggested and left it alone, but no I said to my self I can fix this rusted piece of junk.
Nice repair on the Wilton.
 

Attachments

  • 20171112_154724.jpg
    20171112_154724.jpg
    136.6 KB · Views: 38
Last edited:

ALLFAST

Well-known member
Joined
Feb 20, 2017
Messages
1,233
Location
Northern California
Anyone have a line on, or personally have for sale a vintage Columbian 203-1/2 M2 ? I have a strong hankering for any similiar type vise with pipe jaw inserts, except for a Wilton.

Thanks in advance ,

Shawn
 
OP
D

drivesitfar

Well-known member
Joined
Oct 23, 2013
Messages
36,023
Location
Pacific Northwest
AF: are you sure you only want a 3.5 inch wide jaw vise with pipe jaws cause that is a bit small? if you were closer i'd probably have something to offer you, but shipping might throw pricing out of whack.

good luck in your search!!
 
To avoid these ads, REGISTER NOW!
Top Bottom