
You are using an out of date browser. It may not display this or other websites correctly.
You should upgrade or use an alternative browser.
You should upgrade or use an alternative browser.
ZMotorsports Shop Projects 2.0
- Thread starter zmotorsports
- Start date
OP
zmotorsports
ALLIANCE MEMBER
I don't know if you've mentioned it previously, is that a Precision Mathews lathe? I'm going to buy a 13 or 14 inch lathe this year and looking for feedback.
I do not want to deal with old iron.
Yes it is. I have owned my PM1340GT for 3-1/2 years now and love it.
I would have loved to have found an old American iron lathe that was in good shape but here in Utah I pretty much live in a machinery desert and not many around, those that do pop up on occasion are pretty clapped out units and like you, I didn't want a project. I wanted a good quality lathe that I could set up and start making chips.
In my signature I have a couple of links. One of them is to my original Shop Projects thread where on about page 8 I show the arrival and setup of my Precision Mathews PM1340GT lathe followed by my PM935TV mill shortly after. There is also a link to my youtube channel where I do a very detailed review of the lathe, as well as the mill. The lathe was actually the first youtube videos that I did because I had people asking me about it and at that time there was not much, if any, information about Matt's products. Also on my video I and my Shop Projects thread I show some of the modifications I have done to my lathe to suit it to my needs. Items like replacing the socket head bolts for the carriage lock with an actual handle, installation of the Dorian QCTP, machining and adding the adjustable soft stop and back splash toolholder.
I hope that information is helpful.
Last edited:
C_F
ALLIANCE MEMBER


OP
zmotorsports
ALLIANCE MEMBER
Wow, those handles are great! So much better than having to grab a wrench each time you want to tighten one down.
Looking forward to seeing how your current creation ends up.
Thanks. I really like these handles and seem to use them on various items just for that reason, not having to grab a wrench each time.
Plus they look cool.
Thanks for checking in.
Thanks for the reply and the video review, there aren't very many.
The Grizzly G4003G would probably be enough machine for my needs, but I don't want a Chinese lathe and it's not available in 3 Phase. The PM-1340GT with an added VFD is on the top of my list, but it's hard to justify (expensive).
The Grizzly G4003G would probably be enough machine for my needs, but I don't want a Chinese lathe and it's not available in 3 Phase. The PM-1340GT with an added VFD is on the top of my list, but it's hard to justify (expensive).
OP
zmotorsports
ALLIANCE MEMBER
am I the only one that's surprised he didn't make his own handles?!?!?!
I guess I could have made the handles but they probably wouldn’t have looked as nice, and taken a bit more than the reasonable cost of the handles but I appreciate the sentiment. [emoji1]
Thanks for stopping by my projects thread.
Last edited:
OP
zmotorsports
ALLIANCE MEMBER
Thanks for the reply and the video review, there aren't very many.
The Grizzly G4003G would probably be enough machine for my needs, but I don't want a Chinese lathe and it's not available in 3 Phase. The PM-1340GT with an added VFD is on the top of my list, but it's hard to justify (expensive).
I agree they both will get the job done but like you, I wanted the higher quality of fit & finish that the Taiwanese machines offer.
I don’t regret the PM1340GT one bit. Used it today and then my son used it for some RC parts and we both commented on what a nice machine it is to run.
Good luck in your search.
OP
zmotorsports
ALLIANCE MEMBER
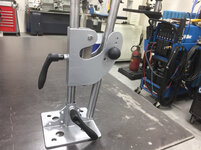
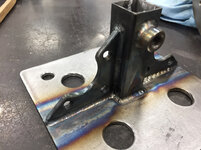
So here’s where I left off on my latest project, a support or steady rest for TIG welding.
I cut two pieces of 3/16” plate to 6” square. I think this is a bit overkill but I didn’t have enough 1/8” for the job.
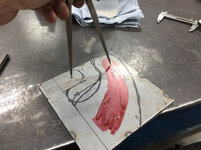
I then marked out where I needed to cut and drill.

I tacked the two pieces together around the perimeter so when cutting they will both be exactly the same.

Scribed a line in an arc so the arm will be adjustable.
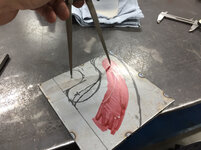
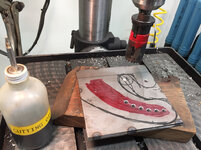
Drilled 1-1/4” hole to be the inner radius.
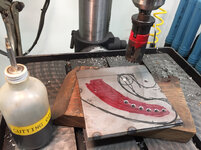
Also drilled the arc holes for adjustability.

I then moved to the bandsaw to begin cutting.
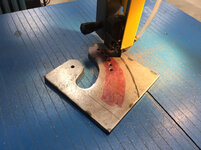
After deburring and blending I knocked the tack welds off the remaining edges and separated the two pieces.

Next getting ready to weld the two remaining threaded bungs on that I machined the other night.
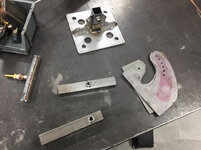
Bungs welded.


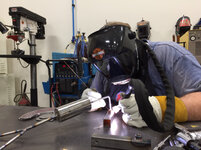
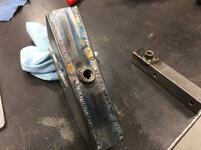
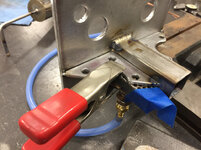
I then proceeded to weld the gussets on the base. Whenever I plan to weld both sides of a bracket or tab I always do a little back-purging.
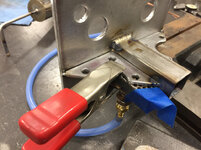

Then welded the other sides.
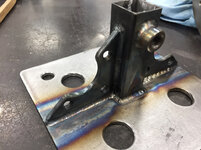
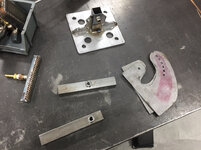
Now that the base is completely welded I turned my attention to the upper support and welded the two plates cut earlier to either side of a piece one of the square tubes that I just welded a bung on.
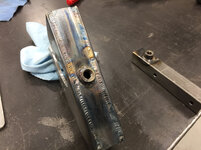
Assembly mocked up and everything test fit. Pieces fell right together almost like they were meant to.

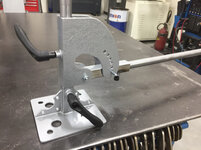
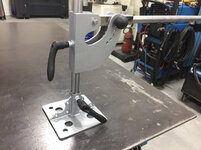
Bead blasted, painted and assembled for the final time.
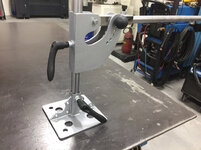
Arm adjusted in an angled position by merely putting the 1/4” pull pin in a different hole.
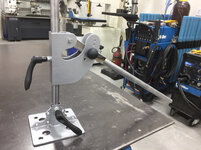
The upper support can be inverted to allow the arm to be lower and closer to the table for shorter jobs.
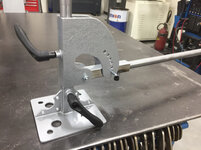
Arm removed and stored closer to the vertical support to achieve a little smaller footprint for storage.
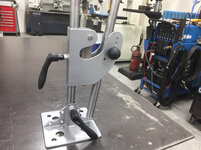
Now to clean up the mess in the shop and my TIG support/steady rest is ready for hopefully many years of use.
Thanks for looking.
I cut two pieces of 3/16” plate to 6” square. I think this is a bit overkill but I didn’t have enough 1/8” for the job.
I then marked out where I needed to cut and drill.
I tacked the two pieces together around the perimeter so when cutting they will both be exactly the same.
Scribed a line in an arc so the arm will be adjustable.
Drilled 1-1/4” hole to be the inner radius.
Also drilled the arc holes for adjustability.
I then moved to the bandsaw to begin cutting.
After deburring and blending I knocked the tack welds off the remaining edges and separated the two pieces.
Next getting ready to weld the two remaining threaded bungs on that I machined the other night.
Bungs welded.
I then proceeded to weld the gussets on the base. Whenever I plan to weld both sides of a bracket or tab I always do a little back-purging.
Then welded the other sides.
Now that the base is completely welded I turned my attention to the upper support and welded the two plates cut earlier to either side of a piece one of the square tubes that I just welded a bung on.
Assembly mocked up and everything test fit. Pieces fell right together almost like they were meant to.
Bead blasted, painted and assembled for the final time.
Arm adjusted in an angled position by merely putting the 1/4” pull pin in a different hole.
The upper support can be inverted to allow the arm to be lower and closer to the table for shorter jobs.
Arm removed and stored closer to the vertical support to achieve a little smaller footprint for storage.
Now to clean up the mess in the shop and my TIG support/steady rest is ready for hopefully many years of use.
Thanks for looking.
Attachments
-
 1d2585e1837f5282108c0dfebdf2b8a3.jpg770.2 KB · Views: 0
 -
 5e721534e662be11d14b4a24ce3b17c3.jpg835.6 KB · Views: 0
 -
 e55278125ebbdce92a4ee43fd272c660.jpg737.1 KB · Views: 0
 -
 bf04cd226309aac0363fe77a5715d7f7.jpg796 KB · Views: 0
 -
 40e99189acbaa6ef3cdfc5616990d383.jpg819.7 KB · Views: 0
 -
 c07ad6be7ddff892364e6fcd46c42670.jpg810.5 KB · Views: 1
 -
 18bd805aa7d1c8a138a8ad0990448c22.jpg756.1 KB · Views: 1
 -
 2df04e8e4517bfffad59549162cb176b.jpg781 KB · Views: 1
 -
 5907085de77b7598b5a1b872379df0b2.jpg757 KB · Views: 1
 -
 bb7a8ab8926d39e989cfc375529bb6e7.jpg823.1 KB · Views: 1
 -
 5a39c1bc61c16a18e68102a48710564f.jpg971.5 KB · Views: 1
 -
 ea9c9c1d2ffc315e44e6884666f7f730.jpg752.5 KB · Views: 1
 -
 7d79d59e8d62a96d25f92134834ebefd.jpg771.6 KB · Views: 1
 -
 bbde60cd35394c1979ff23eb66455bd3.jpg795.3 KB · Views: 0
 -
 00f0d156ef3bdcf4c75fdb60a1fa3a1f.jpg691.4 KB · Views: 0
 -
 974fc9af208c8eda31e896c075205544.jpg718.5 KB · Views: 0
 -
 d19979962cc85a556fa6dc45c57dcaab.jpg788.9 KB · Views: 0
 -
 7433e848210151a2a0b4bb51ff1eb7c8.jpg774.6 KB · Views: 0
 -
 1e1bd2b0e3a52fc548f4717464ab10c1.jpg778.4 KB · Views: 0
 -
 0b7f49b4979199b8efe567baea0436b3.jpg777.1 KB · Views: 0
Last edited:
littleponderosa
Well-known member
Your skill set combined with a well equipped shop produce fantastic results. I salute you.
Bill
Bill
bmxdad
Well-known member
BY steady rest, do you mean for your arm or wrist ... or for a part?
OP
zmotorsports
ALLIANCE MEMBER
Your skill set combined with a well equipped shop produce fantastic results. I salute you.
Bill
Thank you Bill.
Fortunately capitalizing on my skillset, and the continual improvement upon that skillset, is what has allowed me to purchase the tools, equipment and build the new shop (oh, and the house). I am fortunate to be able to have the opportunity to continually work on fine tuning my skills. Unfortunately I feel I will never be as good as I want to be. Seems like the more I progress, the higher I raise my standards and I always seem to be chasing that carrot.
Again, thanks for the comments and for stopping by my projects thread.
OP
zmotorsports
ALLIANCE MEMBER
BY steady rest, do you mean for your arm or wrist ... or for a part?
By steady rest I am referring to a place to rest my TIG hand that is adjustable for height and angle. At bench level it isn’t much of an issue but more than a few inches above the bench surface I find myself stacking blocks or other items to position my hand(s).
I really took notice of this dilemma a couple years ago when I purchased my aircraft positioner that is about 12” above the workbench. I’ve wanted to fabricate something like this ever since but I just haven’t had the time to build it, until now.
Thanks for checking in.
Boosted1
Well-known member
Wow! That steady rest is so nice. I bet you could sell those.
Maybe a DIY weld and paint kit.
Maybe a DIY weld and paint kit.
OP
zmotorsports
ALLIANCE MEMBER
Nice brace. Do you have any plans to build a large magnetic base to stabilize it? Electromagnet from a security door perhaps.
Thank you. The original plan is to just clamp it in position wherever I need it. I think that makes it the most versatile.
Thanks for following and commenting.
OP
zmotorsports
ALLIANCE MEMBER
Wow! That steady rest is so nice. I bet you could sell those.
Maybe a DIY weld and paint kit.
Thanks. I can’t take credit for the overall design though. I got the idea from Instagram a while back. Besides, too many other irons in the fire and I have just wanted one for a while.
Thanks for stopping by my projects thread.
Very cool steady rest. Your talents and attention to detail are often noted but the sheer volume of projects that you're able to complete is almost incomprehensible to me. I guess that's what happens when commitment, energy, organization, and skill all converge. Well done!
I'm planning to organize some various shop fluids using poly bottles like you've done. I noticed your cutting oil bottle has a steel applicator tip. Is that something you made or purchased?
I'm planning to organize some various shop fluids using poly bottles like you've done. I noticed your cutting oil bottle has a steel applicator tip. Is that something you made or purchased?
OP
zmotorsports
ALLIANCE MEMBER
Very cool steady rest. Your talents and attention to detail are often noted but the sheer volume of projects that you're able to complete is almost incomprehensible to me. I guess that's what happens when commitment, energy, organization, and skill all converge. Well done!
I'm planning to organize some various shop fluids using poly bottles like you've done. I noticed your cutting oil bottle has a steel applicator tip. Is that something you made or purchased?
Thank you very much for the comments, I am flattered.
I am surprised that you think I complete a lot of projects because in my head they all take much longer than when originally conceived and I should be completing more than I do.
As for the bottle and applicator, I purchased a few of them years ago at an estate/yard sale and would love to be able to find some more like it. Most of the ones I’ve seen available have the plastic tips and don’t seem to be nearly as durable nor last as long.
Thank you very much for stopping by my projects thread and commenting.
OP
zmotorsports
ALLIANCE MEMBER
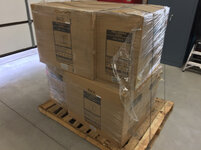
I received my 30-minutes courtesy call from the R&L Freight driver around 11:45am today. I ran home for my lunch hour to find him lowering my pallet of New Age Pro 3.0 overhead cabinets from his truck. The driver was nice enough to place them right in my shop.
They appeared to be well paletized and strapped.
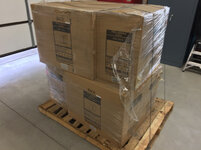
Upon opening the individual boxes they appeared to be just as well cared for inside the boxes. Plastic wrapped and generous use of styrofoam placed at the corners and top & bottom


All six unboxed, inspected for damage and ready to be installed over my workbenches.

I hope to be able to get away from work early enough this evening to be able to get at least a couple of them hung, then finish up the installation tomorrow evening.
A big thank you to John (aka dittle fart around) for working with me and hooking me up.
They appeared to be well paletized and strapped.
Upon opening the individual boxes they appeared to be just as well cared for inside the boxes. Plastic wrapped and generous use of styrofoam placed at the corners and top & bottom
All six unboxed, inspected for damage and ready to be installed over my workbenches.
I hope to be able to get away from work early enough this evening to be able to get at least a couple of them hung, then finish up the installation tomorrow evening.
A big thank you to John (aka dittle fart around) for working with me and hooking me up.
Attachments


quadrcr87
Well-known member
I figured you had plans for overhead cabinets. I was going to comment on that when I saw all your chemicals on the shelf over the bench. The place looks great and I am inspired every time I follow one of your projects. Keep up the attention to detail. It gives us hacks something to strive for!
OP
zmotorsports
ALLIANCE MEMBER
I figured you had plans for overhead cabinets. I was going to comment on that when I saw all your chemicals on the shelf over the bench. The place looks great and I am inspired every time I follow one of your projects. Keep up the attention to detail. It gives us hacks something to strive for!
Thanks for stopping by.
The chemicals over the one bench will remain on that particular shelf. The newly purchased cabinets will be over the other leg of the L-shaped bench (qty. of 4) and over my 6' workbench (qty. of 2) between the toolbox and lathe. I also plan on adding some 4' LED strip lights that I purchased a few months back under the cabinets and the chemical shelf once the cabinets are hung.
The overhead cabinets and over-bench LED lights are the last two pieces of the shop puzzle. Once those last two items are crossed off of the white board the shop is officially done and I can move forward to some vehicle projects that I have been delaying.
Thanks again for following and taking the time to comment.
C_F
ALLIANCE MEMBER
I apologize for my ignorance, I'm not aware of back purging. I assume this item clamped here blows air on the back side of the piece being welded? If so, is this done to reduce the chance or warping?Whenever I plan to weld both sides of a bracket or tab I always do a little back-purging.

Boosted1
Well-known member
I hung 4 of those same cabinets in my garage / shop last year.
They are very nice for the $
They are very nice for the $
mbaulfinger
Member
- Joined
- Aug 27, 2012
- Messages
- 17
I've been looking at those New Age Pro cabinets for a while now. Glad to see that you guys like them.
OP
zmotorsports
ALLIANCE MEMBER
I apologize for my ignorance, I'm not aware of back purging. I assume this item clamped here blows air on the back side of the piece being welded? If so, is this done to reduce the chance or warping?
Actually it is back-purged using argon. I have a dual meter setup and when needed I use the second one for back-purging. It is the one with the 1/4” blue silicone hose. You mostly see purging when welding stainless steel but I also purge the back side of carbon steel IF I am going to weld the backside (both sides). This allows a much cleaner and better weld on the opposite side.
OP
zmotorsports
ALLIANCE MEMBER
I hung 4 of those same cabinets in my garage / shop last year.
They are very nice for the $
Nice. Thanks for the feedback. I’m pretty happy with them as well. I think they are a good value and quality.
OP
zmotorsports
ALLIANCE MEMBER
My set of E-Z Drivers showed up today. I’ve been eyeballing this set for a couple of years now when they were being marketed/sold under the Mayhew label. I waited to order them until I had the new shop completed and then I couldn’t find them by Mayhew. Upon calling Arizona Transmission and Machine I found out Mayhew is no longer in the picture and they are being sold by ATM (Arizona Transmission & Machine) who are the inventors.


I had to do a little rearranging in the tool cabinet.

Can’t wait to try them out now.
I had to do a little rearranging in the tool cabinet.
Can’t wait to try them out now.
Attachments


Last edited:
OP
zmotorsports
ALLIANCE MEMBER
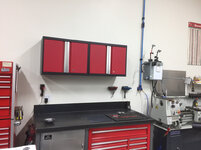
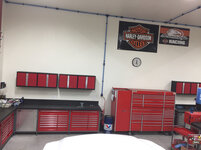
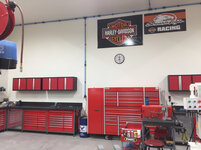
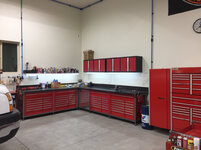
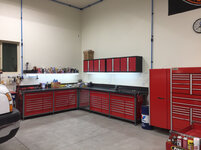
I was able to get all of my New Age Pro 3.0 overhead cabinets hung tonight.
Two cabinets hung over the 6’ bench.
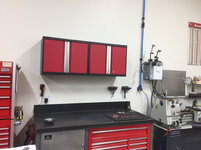

Four of them hung over the 12’ bench.
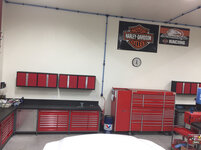
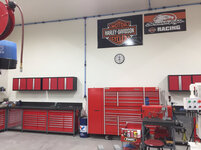

Started putting some of my service manuals away in one of them.

I hope to be able to start mounting my LED lights under them tomorrow night. These Pro 3.0 cabinets also come with a light deflector or shield that I will install as well.
Two cabinets hung over the 6’ bench.
Four of them hung over the 12’ bench.
Started putting some of my service manuals away in one of them.
I hope to be able to start mounting my LED lights under them tomorrow night. These Pro 3.0 cabinets also come with a light deflector or shield that I will install as well.
Attachments
-
 633140a3a8019cb21eb67e467a718288.jpg728.3 KB · Views: 2
 -
 5f54dce604cde04663721c472c8c6d90.jpg678.8 KB · Views: 0
 -
 6a321c5ecac2a8f61cd903e371574b17.jpg681.2 KB · Views: 0
 -
 cb8514cb6327bf927ce03e25a4cb8778.jpg742.7 KB · Views: 0
 -
 4043dc6fb9307b23989e0b93050bcad9.jpg585.5 KB · Views: 0
 -
 5ad6fdf12936625be1d17ccd5cd6e061.jpg749 KB · Views: 0
Last edited:
dittle fart around
Well-known member
I was able to get all of my New Age Pro 3.0 overhead cabinets hung tonight.
Two cabinets hung over the 7’ bench.
Four of them hung over the 12’ bench.
Started putting some of my service manuals away in one of them.
I hope to be able to start mounting my LED lights under them tomorrow night. These Pro 3.0 cabinets also come with a light deflector or shield that I will install as well.


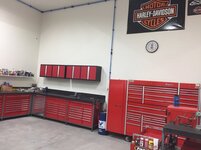

Cabinets look great. How do you like the textured paint? Not the exact color as the rest of your cabinets, but they look close.

Attachments
-
 5ad6fdf12936625be1d17ccd5cd6e061.jpg105 KB · Views: 0
 -
 cb8514cb6327bf927ce03e25a4cb8778.jpg106.7 KB · Views: 0
 -
 6a321c5ecac2a8f61cd903e371574b17.jpg92.6 KB · Views: 0
 -
 633140a3a8019cb21eb67e467a718288.jpg107 KB · Views: 0
 -
 5f54dce604cde04663721c472c8c6d90.jpg89.3 KB · Views: 0
 -
 4043dc6fb9307b23989e0b93050bcad9.jpg59.4 KB · Views: 1
OP
zmotorsports
ALLIANCE MEMBER
I've been looking at those New Age Pro cabinets for a while now. Glad to see that you guys like them.
I highly recommend them.
Contact John's website, aka dittle fart around, and he will treat you right.
Thanks for stopping by my projects thread.
OP
zmotorsports
ALLIANCE MEMBER
Cabinets look great. How do you like the textured paint? Not the exact color as the rest of your cabinets, but they look close.
Thanks again John, I appreciate that.
The color isn't an exact match but they still look pretty good. I guess I didn't realize that the door's would be textured paint, but it isn't a heavy texture so they should be fairly easy to keep clean.
They sure feel like a solid, quality built cabinet and I am really impressed with how well thought out the mounting brackets were. They make for quite and easy installation as well as a very solid mount to the wall. I am also digging the soft close feature on the doors. I was also very impressed by the way they came packaged and secured to the pallet. Hell, I think they were more secured than my lathe was when it arrived.

Thanks again John.
Once again Mike the place is looking stellar. I really like the new overhead cabinets.
Your ez driver set reminds me of my large tap and die set. The case is so massive it didn't fit just right anywhere and it drove me nuts dedicating a space to it. When I built my lista set up it just so happened that it fit perfectly with the lid opened up and the upper tray sitting in the lid in one of my 42" x 24" x 3" drawers. It was great finally having the entire kit laid out and could just grab what I needed.
Your ez driver set reminds me of my large tap and die set. The case is so massive it didn't fit just right anywhere and it drove me nuts dedicating a space to it. When I built my lista set up it just so happened that it fit perfectly with the lid opened up and the upper tray sitting in the lid in one of my 42" x 24" x 3" drawers. It was great finally having the entire kit laid out and could just grab what I needed.
OP
zmotorsports
ALLIANCE MEMBER
Once again Mike the place is looking stellar. I really like the new overhead cabinets.
Your ez driver set reminds me of my large tap and die set. The case is so massive it didn't fit just right anywhere and it drove me nuts dedicating a space to it. When I built my lista set up it just so happened that it fit perfectly with the lid opened up and the upper tray sitting in the lid in one of my 42" x 24" x 3" drawers. It was great finally having the entire kit laid out and could just grab what I needed.
Thanks Cam. Thankfully, I think this is the last of the actual shop additions and don't see the shop changing or looking any different from this point on for a very long time. Now to move onto vehicle related projects.

Like you, I too had to get creative with my overly large tap & die set as I was tired of stacking it on a cabinet top and having to get it down and remove the die tray to get to the taps. I now cut the lid off of the blow molded case, took the tap section and put it in one drawer of the 6' workbench next to the lathe and put the die lift out tray in the drawer right below it. The bad thing is that now it takes up two drawers, the nice thing is the taps and dies are SO much more readily available for use. I should have done that years ago, but didn't have the drawer space to sacrifice.
C_F
ALLIANCE MEMBER
Actually it is back-purged using argon. I have a dual meter setup and when needed I use the second one for back-purging. It is the one with the 1/4” blue silicone hose. You mostly see purging when welding stainless steel but I also purge the back side of carbon steel IF I am going to weld the backside (both sides). This allows a much cleaner and better weld on the opposite side.
Very interesting, thanks for the reply.
Oh, and the new cabinets look...

OP
zmotorsports
ALLIANCE MEMBER
Very interesting, thanks for the reply.
Oh, and the new cabinets look...
Thanks for following along and commenting.
OP
zmotorsports
ALLIANCE MEMBER


HEEP
Well-known member
Looks great. Always a good day to get a notice about this thread and to see one of your projects.
OP
zmotorsports
ALLIANCE MEMBER
Looks great. Always a good day to get a notice about this thread and to see one of your projects.
Thank you. I appreciate you taking that much of an interest and following along.