To avoid these ads, REGISTER NOW!

Above 1200 Sq/FT Speed Metal Garage - rattle_snake’s 34x40 shop build in AZ

Wokspaces above 1200 squarefeet.
OP
R

rattle_snake

Well-known member
Joined
Jun 25, 2015
Messages
5,207
Location
Chandler, AZ
In an effort not to start any more big projects over the holidays, I got back around to finishing some neglected items. Perfect time of the year to remove and paint exterior doors. I used an HVLP gun and thinned the latex as needed.
142cdc77cc6089e3bee5adb2ea6359da.jpg969f347338d0fcc1c9e229efa17a8861.jpg

Now all 5 home/shop exterior doors actually match, so the dogs can scratch them up.
 

Attachments

  • 969f347338d0fcc1c9e229efa17a8861.jpg
    969f347338d0fcc1c9e229efa17a8861.jpg
    107.6 KB · Views: 4
  • 142cdc77cc6089e3bee5adb2ea6359da.jpg
    142cdc77cc6089e3bee5adb2ea6359da.jpg
    95.3 KB · Views: 4
Last edited:
To avoid these ads, REGISTER NOW!

89GLH

Well-known member
Joined
Mar 24, 2011
Messages
1,057
Location
Westminster, MD
Awesome build. I like the idea of bringing the drops up first, when the drainage is away from the tank. That way all condensation stays in the pipe and not down each leg or drop. Less to burp when you need to.

Also love the entry awning!
 
OP
R

rattle_snake

Well-known member
Joined
Jun 25, 2015
Messages
5,207
Location
Chandler, AZ
Awesome build. I like the idea of bringing the drops up first, when the drainage is away from the tank. That way all condensation stays in the pipe and not down each leg or drop. Less to burp when you need to.

Also love the entry awning!

Thanks. it's been quite an experience. The hood gets some interesting looks.

Looks awesome Justin.

Although your perfect time of year to paint doors and my perfect time of year to paint doors don't jive.:lol_hitti

Haha. I thought someone may bite on that one. December is sunny and in the 70s. Just not everywhere.
I will admit that I waited till noon to lay paint, which was dry to touch in 10 min. Since the garden hose is in the sun I had warm water to clean stuff up with!
Only issue was my wash cloth kept drying out so I had to keep it in a bucket of water.
:D
 
OP
R

rattle_snake

Well-known member
Joined
Jun 25, 2015
Messages
5,207
Location
Chandler, AZ
Somehow these hf44s followed me home the other day. I don't need any more projects but i should build a steevo bench before putting anything in them456925c1adc4df5d6b01bceae767f451.jpg

Sent from my SM-G930V using Tapatalk
 

Attachments

  • 456925c1adc4df5d6b01bceae767f451.jpg
    456925c1adc4df5d6b01bceae767f451.jpg
    102.8 KB · Views: 4

zmotorsports

ALLIANCE MEMBER
Joined
Oct 20, 2009
Messages
21,405
Location
Northern Utah
Somehow these hf44s followed me home the other day. I don't need any more projects but i should build a steevo bench before putting anything in them456925c1adc4df5d6b01bceae767f451.jpg

Sent from my SM-G930V using Tapatalk

Nice Justin. Looking forward to seeing the new work bench you come up with, Steevo-style.:beer:
 

Attachments

  • 456925c1adc4df5d6b01bceae767f451.jpg
    456925c1adc4df5d6b01bceae767f451.jpg
    102.8 KB · Views: 4

Finallygotit

ALLIANCE MEMBER
Joined
Jul 6, 2013
Messages
4,083
Location
Tucson, AZ
Congrats on the new boxes.

Those HF boxes have surprised me with their quality. So far I like them very much.
36075469293_76d85a925e_b.jpg


:beer:
 
OP
R

rattle_snake

Well-known member
Joined
Jun 25, 2015
Messages
5,207
Location
Chandler, AZ
Completed the last* exterior item of the shop build, the protruding firewood logs. I wasn't a big fan of the faux poles, so I omitted them from the plans and build thinking that 'someday' I would remove them from the home and do something else for style. Well someday passed some time ago and it remained obvious that they were missing, and I wasn't going to get around to a new plan any time soon. Simple enough to add, right? I found a local lumber yard that could get hand peeled poles and ordered one 8"d x 8'l
I saw how the ones on the garage were done when up in the attic. There is an equal amount of length of pole on either side of the wall, supported with some 2x6 blocking in the attic. I measured the garage locations and made some scale sketches of the shop which is same width but with taller doors.
To get the vertical placement I wanted, it put them right in the middle of the shop attic space, which is only 2' tall and inaccessible. The whole building is sheathed in OSB, but I wanted the heavy logs attached to 2x6s. Since this wall had no attic vents, all the studs should be 16"OC across the whole width. I calculated the possible pole spacing/locations aligned to integer stud spacing, and the distance error compared to that of the garage positions. I picked the best fit which are 8" farther apart.
I found a picture I took of the parapet wall before drywall that had a few stud locations relative to the door frame. This allowed me to find the first (center) one which is only 4" off center, and to locate the rest.

To mount the logs, I made some brackets out of flat bar and pipe that fit into holes drilled in the back of the poles. I cut a hole in the stucco, so the brackets could be fully torqued without distorting and cracking the stucco.
e42fdf6b0ac3f3676162e81f011bb5d6.jpg

Didn't think I could get a decently straight cut with a chain saw so I made multiple rotate/cut with a 12" chop. Each pole chunk is 10" long.
0998f163f599d08aa946e7016a57a120.jpg
Painted them to match and secured/sealed to wall with a ring of caulk.
55cc082e1a0bc390d5404361cbb6c6cc.jpg
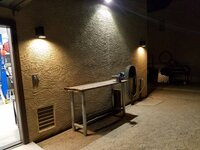
Now they match better. From afar the 0.9/11% offset/gain errors aren't too bad.
cd4ea60645e7bc3016fd889c6d427f1d.jpg
Now the missing light between the garage doors is more noticeable... when does it end?
 

Attachments

  • cd4ea60645e7bc3016fd889c6d427f1d.jpg
    cd4ea60645e7bc3016fd889c6d427f1d.jpg
    47.2 KB · Views: 4
  • 55cc082e1a0bc390d5404361cbb6c6cc.jpg
    55cc082e1a0bc390d5404361cbb6c6cc.jpg
    61 KB · Views: 3
  • 0998f163f599d08aa946e7016a57a120.jpg
    0998f163f599d08aa946e7016a57a120.jpg
    83.6 KB · Views: 3
  • e42fdf6b0ac3f3676162e81f011bb5d6.jpg
    e42fdf6b0ac3f3676162e81f011bb5d6.jpg
    162.8 KB · Views: 2
Last edited:

zmotorsports

ALLIANCE MEMBER
Joined
Oct 20, 2009
Messages
21,405
Location
Northern Utah
Those turned out nice Justin.

Stupid question, so are the fake looking logs protruding out of the stucco just supposed to give it the look of a log supported structure? They don't actually do anything on the other side of the parapet wall do they? Just a "looks" thing?
 

TurtleValley

Well-known member
Joined
Dec 4, 2017
Messages
253
Location
BC. Canada
Been lurking for a while on your thread. I have to say that you have a lot of good ideas to borrow from here. Keep 'em coming!:3gears:
 
OP
R

rattle_snake

Well-known member
Joined
Jun 25, 2015
Messages
5,207
Location
Chandler, AZ
Those turned out nice Justin.

Stupid question, so are the fake looking logs protruding out of the stucco just supposed to give it the look of a log supported structure? They don't actually do anything on the other side of the parapet wall do they? Just a "looks" thing?
Yes they are just for looks. The buildings have engineered trusses.

Back in the day they would have been the Vigas (aka roof or floor joists) in a Pueblo/Sante Fe style building

The home has some way up high over the front entry on the parapet wall, above the actual roof. They look out of place to me.

Been lurking for a while on your thread. I have to say that you have a lot of good ideas to borrow from here. Keep 'em coming!:3gears:

Well, thanks for lurking. You're welcome to borrow anything you wish. My wife wishes they would stop including the expenditures :)
 

zmotorsports

ALLIANCE MEMBER
Joined
Oct 20, 2009
Messages
21,405
Location
Northern Utah
Yes they are just for looks. The buildings have engineered trusses.

Back in the day they would have been the Vigas (aka roof or floor joists) in a Pueblo/Sante Fe style building

The home has some way up high over the front entry on the parapet wall, above the actual roof. They look out of place to me.


Well, thanks for lurking. You're welcome to borrow anything you wish. My wife wishes they would stop including the expenditures :)

Thanks for the reply Justin. I pretty much assumed it was a cosmetics thing but curiosity got the better of me.

Looks great, I'll bet you're happy with the way everything has turned out.
 

LSVLance

Well-known member
Joined
Jul 17, 2010
Messages
298
Location
Peoria, AZ
So I stumbled into this thread while searching for some info on lifts and have been reading it for a couple of hours now. Love every part about the new shop Justin, and it's good to see others also afflicted with the OCD. Also good to see so many members in here from the Phoenix area.

We just moved to NW Peoria area from Kansas City and I'm working on laying out my new shop. Was active on GJ many years ago but a new project has brought me back. Glad to see it is still hopping and creating way more ways to spend my time and money. I'll get busy updating my shop thread as soon as I can.
 

MrBreeze

Well-known member
Joined
Sep 1, 2014
Messages
329
Location
Scottsdale, AZ
Somehow these hf44s followed me home the other day. I don't need any more projects but i should build a steevo bench before putting anything in them456925c1adc4df5d6b01bceae767f451.jpg

Sent from my SM-G930V using Tapatalk

I've got 3 of them, with the top chests in my garage - a good quality value.
 

Attachments

  • 456925c1adc4df5d6b01bceae767f451.jpg
    456925c1adc4df5d6b01bceae767f451.jpg
    100.6 KB · Views: 3
OP
R

rattle_snake

Well-known member
Joined
Jun 25, 2015
Messages
5,207
Location
Chandler, AZ
So I stumbled into this thread while searching for some info on lifts and have been reading it for a couple of hours now. Love every part about the new shop Justin, and it's good to see others also afflicted with the OCD. Also good to see so many members in here from the Phoenix area.

We just moved to NW Peoria area from Kansas City and I'm working on laying out my new shop. Was active on GJ many years ago but a new project has brought me back. Glad to see it is still hopping and creating way more ways to spend my time and money. I'll get busy updating my shop thread as soon as I can.

Thanks for stopping by to check things out. The build has been a lot of work but I try to enjoy the ride and be creative where I can.
What exactly do you mean by "afflicted with the OCD"? Me? Haha well maybe just a little bit here and there, it's my curse.:lol:

Anyhow welcome to AZ. Guessing from the dates in your thread the building is built by now?
 
OP
R

rattle_snake

Well-known member
Joined
Jun 25, 2015
Messages
5,207
Location
Chandler, AZ
I've got 3 of them, with the top chests in my garage - a good quality value.

I've had a set for about 5-6 years now and it has held up well. Not sure how long HF is going to make this same box in the same color, so I figured it would be a 'good idea' to get another pair for a bench. I waited and watched the price go up for a long time, so when they went on sale for $350 I bought them and asked my financial manager for forgiveness.
 
Last edited:

ASHMAN_AZ

Well-known member
Joined
Jun 17, 2015
Messages
182
Location
Vail, AZ
Logs look good, Ill have to do the same thing to make my shop match the house. We had a neighbor take them off and the stucco patch job was good but still noticeable, the patch job would bug me more than keeping them.
 

MrBreeze

Well-known member
Joined
Sep 1, 2014
Messages
329
Location
Scottsdale, AZ
I've had a set for about 5-6 years now and it has held up well. Not sure how long HF is going to make this same box in the same color, so I figured it would be a 'good idea' to get another pair for a bench. I waited and watched the price go up for a long time, so when they went on sale for $350 I bought them and asked my financial manager for forgiveness.

Smart man.

I've been lucky my "financial manager" doesn't pay that close attention to the tool-stuff that is in the garage...
 

LSVLance

Well-known member
Joined
Jul 17, 2010
Messages
298
Location
Peoria, AZ
Anyhow welcome to AZ. Guessing from the dates in your thread the building is built by now?

Thanks, we are loving it so far.

We are building a brand new house next to the new shop so it'll be a bit longer still. Hope to be in by first of April. The shop is just about finished though except for finishing up the inside of the bathroom and a clean up.
 
To avoid these ads, REGISTER NOW!

rixtrix1

Well-known member
Joined
Aug 25, 2013
Messages
3,010
Location
Chandler, AZ (from west NE)
Shop is coming along fantastically, Justin! Nice new metal melters. I just made separate carts: Eastwood TIG200 AC/DC(Xmas present), Lincoln Sp-175 Plus and GE buzzbox I used in high school(ought to let everyone know how long ago that was!)

How about a Dodge ProStock truck motor in a Fox Body? Our son's godfather is doing that right now

I have an old S10 hood I may just have to put over the side mandoor in my garage. Thanks for designing and testing the brackets!
 
Last edited:
OP
R

rattle_snake

Well-known member
Joined
Jun 25, 2015
Messages
5,207
Location
Chandler, AZ
Shop is coming along fantastically, Justin! Nice new metal melters. I just made separate carts: Eastwood TIG200 AC/DC(Xmas present), Lincoln Sp-175 Plus and GE buzzbox I used in high school(ought to let everyone know how long ago that was!

How about a Dodge ProStock truck motor in a Fox Body? Our son's godfather is doing that right now

I have an old S10 hood I may just have to put over the side mandoor in my garage. Thanks for designing and testing the brackets!

Thanks! sounds like a fun fox project, and is not just another LS swap. What trans?
Get that hood hung up and take some pics. maybe add a scoop to it?
 
OP
R

rattle_snake

Well-known member
Joined
Jun 25, 2015
Messages
5,207
Location
Chandler, AZ
That aught to be enough drawer space for awhile!
Depends on rate of tool purchases... My existing box was overfilled from day 1. I found tools in it I forgot I had. Bought some organizers but need to get high level plan in place of what to put where so I can't find anything for a half a year.

Damm that’s pretty, in the most manly of senses.
Thank you Sir.... The ladies think my bench is **** too.:D
 
OP
R

rattle_snake

Well-known member
Joined
Jun 25, 2015
Messages
5,207
Location
Chandler, AZ
Tackled the TV wiring job. Used 1.5" pipe to fit a VGA connector in addition to 4 pairs of speaker wire and power. Behind the TV I used ABS, and in the corner I used a piece of SCH40 galv fence post. To secure I welded up a lower mounting bracket.
5596cef81e0e3572c30ab9f0b569b25b.jpg899e6b64a6cf3b0ac434b42b4bc4bf42.jpg

Hideous wires hang about no more. TV over a workbench that is actually used as a workbench is not ideal when grinding and whatnot. Need to build that welding table on the other side of the door...
06a6185d3d21dc0cf829b7e66227681d.jpg

The (free) TV is really just a monitor for this sad old laptop, but good enough to stream heavy metal and look up parts diagrams.
f8ce00cd1224081ba9b7317e19a10c93.jpg
"All fishermen are liars, except you and me, and I don't know about you"
 

Attachments

  • 5596cef81e0e3572c30ab9f0b569b25b.jpg
    5596cef81e0e3572c30ab9f0b569b25b.jpg
    35.3 KB · Views: 3
  • 899e6b64a6cf3b0ac434b42b4bc4bf42.jpg
    899e6b64a6cf3b0ac434b42b4bc4bf42.jpg
    48.4 KB · Views: 3
  • 06a6185d3d21dc0cf829b7e66227681d.jpg
    06a6185d3d21dc0cf829b7e66227681d.jpg
    60.6 KB · Views: 3
  • f8ce00cd1224081ba9b7317e19a10c93.jpg
    f8ce00cd1224081ba9b7317e19a10c93.jpg
    92.9 KB · Views: 4
Last edited:
OP
R

rattle_snake

Well-known member
Joined
Jun 25, 2015
Messages
5,207
Location
Chandler, AZ
My cabinet door debacle has become the great fail of my shop build. Given how many other things could have gone horribly wrong I guess that's not so bad.

The silicon can't get a good grip on the clear coated steel and the panels are falling out. Its just not robust enough for the vertical cabinet doors if something is protruding off the shelf or if the door is slammed. I though it may be OK for the bypass shelf doors up high, but those failed as well, likely due to thermal expansion differences.

I pondered various schemes & techniques, and tried welding tabs and bolting hardboard on one door. It ended up wavy so it was apparent that a full length attachment was needed.
I picked up a bunch of 1/2 x 1x8 flat bar and welded to the long edges. This gives a decent amount of surface area to adhere to and keeps panel flat.
0b135f1588f5ddc5baf70ffee3e70043.jpg
Finally have a flat work surface and a decent welder that doesn't make a mess.
0a6365863f061d76bc2c621498a032e9.jpg24e6d4c7abba20a0318c501054ff5f2b.jpg
 

Attachments

  • 0b135f1588f5ddc5baf70ffee3e70043.jpg
    0b135f1588f5ddc5baf70ffee3e70043.jpg
    88.7 KB · Views: 2
  • 0a6365863f061d76bc2c621498a032e9.jpg
    0a6365863f061d76bc2c621498a032e9.jpg
    40.7 KB · Views: 2
  • 24e6d4c7abba20a0318c501054ff5f2b.jpg
    24e6d4c7abba20a0318c501054ff5f2b.jpg
    65.6 KB · Views: 2
Last edited:

StormcrowAz

Well-known member
Joined
Nov 3, 2011
Messages
750
Location
Phoenix, AZ
My cabinet door debacle has become the great fail of my shop build.

Unless you chopped the doors up and sold it for scrap…it looks like you ended up with a “adapt and overcome” situation to me. I occasionally think of all the dumb things I try that don’t end up working, feeling frustrated…but then remind myself that if we don’t try new things, how do we learn and improve? It’s all good experience, even if at the time it doesn’t seem pleasant

At the end of the day you still have a really nice set of cabinet doors you can be proud of. The only difference is you have just a little bit more time and money invested in them.

Thanks for sharing.
 

AZpilot

Well-known member
Joined
Sep 29, 2012
Messages
413
Location
Mesa, AZ
Dude! You want to know about stuff I have built wrong I have a two inch binder of college ruled paper single spaced of everything!
 
OP
R

rattle_snake

Well-known member
Joined
Jun 25, 2015
Messages
5,207
Location
Chandler, AZ
Unless you chopped the doors up and sold it for scrap…it looks like you ended up with a “adapt and overcome” situation to me. I occasionally think of all the dumb things I try that don’t end up working, feeling frustrated…but then remind myself that if we don’t try new things, how do we learn and improve? It’s all good experience, even if at the time it doesn’t seem pleasant

At the end of the day you still have a really nice set of cabinet doors you can be proud of. The only difference is you have just a little bit more time and money invested in them.

Thanks for sharing.

Dude! You want to know about stuff I have built wrong I have a two inch binder of college ruled paper single spaced of everything!

Thanks guys. Got a little burnt out on building all the doors just to have to go back and do them again. I decided to add the 1/2 strip to the short edges as well since I was there. I have completed all 6 vertical cabinet doors. The urethane glue seems to be working well. I think the hardboard is affected by moisture and not temperature. I still have 3 more horizontal doors to go and will get to them as they fail or time allows

Also added black lug nut handles and tweaked the gaps. So this set is back to minimally acceptable.

dd6c36ce00f7a58c0b7ff2ac7b14f214.jpg
 

Attachments

  • dd6c36ce00f7a58c0b7ff2ac7b14f214.jpg
    dd6c36ce00f7a58c0b7ff2ac7b14f214.jpg
    51.1 KB · Views: 2
Last edited:
OP
R

rattle_snake

Well-known member
Joined
Jun 25, 2015
Messages
5,207
Location
Chandler, AZ
The air conditioning project has officially started.
I purchased a pair of Daikin 1.5 ton mini split heat pumps and all the various installation components. I will be doing the install myself except for evac and pressure test.
The outdoor units will go next to air compressor, mainly because the sub panel is there making wiring short and easy. They will be stacked to minimize footprint. Construction of a rack has started using leftover fence pipe and uni-strut. Each unit is 29" tall so the pair on the rack will be almost 6' high. At some point, I will build a 2 sided vented cover to hide them.
I could have mounted them on the wall but stucco and heavy vibrating machinery don't go together well.
6e643973ed3ae5f17acd2c306c9e40eb.jpg
 

Attachments

  • 6e643973ed3ae5f17acd2c306c9e40eb.jpg
    6e643973ed3ae5f17acd2c306c9e40eb.jpg
    99.2 KB · Views: 2
Last edited:

AZpilot

Well-known member
Joined
Sep 29, 2012
Messages
413
Location
Mesa, AZ
The air conditioning project has officially started.
I purchased a pair of Daikin 1.5 ton mini split heat pumps and all the various installation components. I will be doing the install myself except for evac and pressure test.
The outdoor units will go next to air compressor, mainly because the sub panel is there making wiring short and easy. They will be stacked to minimize footprint. Construction of a rack has started using leftover fence pipe and uni-strut. Each unit is 29" tall so the pair on the rack will be almost 6' high. At some point, I will build a 2 sided vented cover to hide them.
I could have mounted them on the wall but stucco and heavy vibrating machinery don't go together well.
6e643973ed3ae5f17acd2c306c9e40eb.jpg


Yes!!! I have been waiting for a/c. You will love it. I love mine. My unit is a LG 24k heat pump.


Sent from my iPhone using Tapatalk
 

StormcrowAz

Well-known member
Joined
Nov 3, 2011
Messages
750
Location
Phoenix, AZ
Lug nut handles are cool, I like the re-purposing.

Air Conditioning? Putting my giant swamp cooler to shame. It just may be your turn to ****...
 
OP
R

rattle_snake

Well-known member
Joined
Jun 25, 2015
Messages
5,207
Location
Chandler, AZ
Yes!!! I have been waiting for a/c. You will love it. I love mine. My unit is a LG 24k heat pump.
I am lucky to be able to afford such luxuries. Extends shop season to 12 months. Once it's in, I'll be spoiled for sure.

Lug nut handles are cool, I like the re-purposing.
Air Conditioning? Putting my giant swamp cooler to shame. It just may be your turn to ****...
Used the same lugs on my garage cabinets. Was bummed to have to get a 20 pack but was able to use 6 more on these doors.
Swamps have their place (I have 2 of them now) but yes an A/C is on another level... worthy of suckage but have to get system running before said suckage can be properly bestowed. That said A/C ****:
f055ba5fe2ea50a6c5ab6e6f47def3bc.jpg

Somewhere back long ago in this thread I rambled on about keeping walls accessible for future expansion. Got to test it out. Took 5 min to remove the screws and sheets. Spent more time moving **** out of the way.
e2df1906404d87505c4c57a1988bd880.jpg
 

Attachments

  • f055ba5fe2ea50a6c5ab6e6f47def3bc.jpg
    f055ba5fe2ea50a6c5ab6e6f47def3bc.jpg
    84.8 KB · Views: 3
  • e2df1906404d87505c4c57a1988bd880.jpg
    e2df1906404d87505c4c57a1988bd880.jpg
    88.8 KB · Views: 3
OP
R

rattle_snake

Well-known member
Joined
Jun 25, 2015
Messages
5,207
Location
Chandler, AZ
Finished building the condenser rack. About half way through the project it occurred to me that the rack could NOT prevent maintenance access. I pulled the cover and made sure I could get to the wiring and such.
The legs will be buried 12" so it will sit lower than this.

c21ad1113392506fba15b11173dea77a.jpg

Moved the outdoor bench to new location. Going to add another air chuck over on this side but will have to move the hose hanger to do so.
1c287258310e5f40fc86ef56d7883bd8.jpg
 

Attachments

  • 1c287258310e5f40fc86ef56d7883bd8.jpg
    1c287258310e5f40fc86ef56d7883bd8.jpg
    141.9 KB · Views: 3
  • c21ad1113392506fba15b11173dea77a.jpg
    c21ad1113392506fba15b11173dea77a.jpg
    83.7 KB · Views: 3
Last edited:

jp828108

Well-known member
Joined
Jun 28, 2011
Messages
484
Location
Ohio
nice updates. Really like the way you did the walls to be easy to access and add stuff.
 
To avoid these ads, REGISTER NOW!
Top Bottom