To avoid these ads, REGISTER NOW!

ZMotorsports Shop Projects 2.0

To avoid these ads, REGISTER NOW!
OP
Z

zmotorsports

ALLIANCE MEMBER
Joined
Oct 20, 2009
Messages
21,470
Location
Northern Utah
Looking good Mike. Your welds are looking as if you weld every day.:thumbup:


Thank you Claude, coming from you that is a very flattering compliment.

It seems as though I’m never happy with my welds but if I welded daily maybe I could improve them some. Until this little project I actually haven’t welded aluminum in over a year and a half.

Thanks for following along Claude, I sure enjoy watching your thread and drooling over your projects.
 

Kiwi Canuck

Well-known member
Joined
Dec 13, 2014
Messages
156
Location
Langley BC
Tanks for posting this.

Do you ever find yourself starting a small project and realize half way through that it's a lot more work than it seemed at the outset, this project seems a bit like that and I'm not even doing it.

Look forward to seeing the final job, too bad it's going to be hidden away once done.

David.
 
OP
Z

zmotorsports

ALLIANCE MEMBER
Joined
Oct 20, 2009
Messages
21,470
Location
Northern Utah
Tanks for posting this.


I see what you did there. [emoji12]

As for “project creep”, I seem to have many projects that fit that category. I begin a project then it starts to morph a bit as it progresses. Sometimes it’s due to problems that arise that must be worked through, other times it’s because my vision changes as the project moves forward, however, this isn’t one of them. I knew going into this project that it was going to be a lot of welding and a lot of cutting and fitting. I also wanted a few things different than the plastic OEM tank and lastly I wanted it unique. Granted it’s in a closed engine bay but when I do open the engine hatch I want people to go “wow”.

Thanks for the comments and for following along on my various projects David.
 

fnieto

Well-known member
Joined
Aug 27, 2013
Messages
1,401
Location
Tucson,Arizona
Mike,
The surge tank looks great! I would have approached the the filler and bungs from the inside as well. Beautiful work amigo!

Paco
 
OP
Z

zmotorsports

ALLIANCE MEMBER
Joined
Oct 20, 2009
Messages
21,470
Location
Northern Utah
It takes a special kind of sickness to enjoy upholstery work ;)


It must be Steven, because I tried it once and that was enough for me. I’ll pay someone who is good at it rather than step outside of my area of expertise again and attempt that again. [emoji41]
 
Last edited:

johnyg

Well-known member
Joined
Nov 11, 2015
Messages
319
Location
boca raton fl
polish it and put it on the mantel. toyota wants 50 bucks for my plastic washer tank,now how much is that welder i need.great job!!!!
 
OP
Z

zmotorsports

ALLIANCE MEMBER
Joined
Oct 20, 2009
Messages
21,470
Location
Northern Utah
polish it and put it on the mantel. toyota wants 50 bucks for my plastic washer tank,now how much is that welder i need.great job!!!!


Yeah, when you think of it in terms like that it makes it sound ridiculous to build a tank from scratch, or many things for that matter. I guess a lot of what we do is because we can and to be different.

Thanks for stopping by.
 
OP
Z

zmotorsports

ALLIANCE MEMBER
Joined
Oct 20, 2009
Messages
21,470
Location
Northern Utah
Completed the coolant surge tank today and it is ready to go to polish.

Pressure testing it.
6fe23389378c0713a9b4b222863a1f7d.jpg

Mocked into position.
37c4d72367bf05f572e45acd65b30791.jpg

Thanks for looking.
 

Attachments

  • 6fe23389378c0713a9b4b222863a1f7d.jpg
    6fe23389378c0713a9b4b222863a1f7d.jpg
    743.2 KB · Views: 0
  • 37c4d72367bf05f572e45acd65b30791.jpg
    37c4d72367bf05f572e45acd65b30791.jpg
    705.6 KB · Views: 0
Last edited:
To avoid these ads, REGISTER NOW!

matt_i

Well-known member
Joined
Mar 14, 2008
Messages
10,752
Location
SE Michigan
Really great work there :thumbup: Definitely something you'll never have to work on again!

It brought back a memory when I welded a fitting on a leak test adapter for a guy, first thing out of his mouth was: how do you know it won't leak? I told him (and I knew he had no appreciation for it) that I could see the molten metal filling the gap, and if it leaked I would buy him Taco Bell for lunch....

Anyway, I know you can see the same thing, no worries whatsoever :)
 
OP
Z

zmotorsports

ALLIANCE MEMBER
Joined
Oct 20, 2009
Messages
21,470
Location
Northern Utah
Really great work there :thumbup: Definitely something you'll never have to work on again!

It brought back a memory when I welded a fitting on a leak test adapter for a guy, first thing out of his mouth was: how do you know it won't leak? I told him (and I knew he had no appreciation for it) that I could see the molten metal filling the gap, and if it leaked I would buy him Taco Bell for lunch....

Anyway, I know you can see the same thing, no worries whatsoever :)

Thanks Matt, I appreciate the comments and for following along.

I agree, you can tell watching the weld progress as your feeding the keyhole but with all of the welds and corners I wanted to throw some pressure at it and make absolutely certain it wasn't going to leak before polishing.

One of my favorite sayings comes to mind, "trust but verify".
 

jhn9840

Well-known member
Joined
Mar 11, 2007
Messages
1,189
Location
Northern Panhandle of WV
Mike, I just finished the shop tour video. All I can say is fantastic shop. Hope you enjoy using it as much as I did watching the video.

I've followed along on your projects here for a number of years and never realized you had a YouTube channel until a few weeks ago. I'll be watching more of them. Count me in as a small engine winterizer.

jhn9840
John
 
OP
Z

zmotorsports

ALLIANCE MEMBER
Joined
Oct 20, 2009
Messages
21,470
Location
Northern Utah
Mike, I just finished the shop tour video. All I can say is fantastic shop. Hope you enjoy using it as much as I did watching the video.

I've followed along on your projects here for a number of years and never realized you had a YouTube channel until a few weeks ago. I'll be watching more of them. Count me in as a small engine winterizer.

jhn9840
John

Thank you John. I appreciate you taking the time to follow along and now watch my videos. I hope you enjoy them.
 
OP
Z

zmotorsports

ALLIANCE MEMBER
Joined
Oct 20, 2009
Messages
21,470
Location
Northern Utah
I was hired to relocate a hose outlet on an aluminum radiator for a guy's rock crawler/buggy. He dropped it off and showed me where the outlet needed to be relocated to. Evidently he has changed power plants and I informed him that relocating a hose outlet is a relatively inexpensive mod compared to purchasing a new radiator, at least initially until he is 100% sure of the combination.

I was told this radiator has been in the buggy for a few years so some extra measures were taken to clean to tank prior to welding.

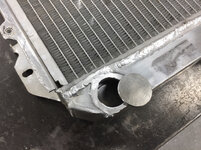
Here is how the radiator arrived to me and where the outlet needs to moved to.
46abf658ffa2c6ec07b706fe5ddff38c.jpg

I stuffed a rag into the outlet before beginning to cut to prevent debris from entering the radiator tank. I used a hack saw to minimize debris.
2b47f4d654ed7cfa396c226ac7824c47.jpg

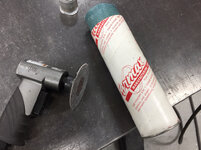
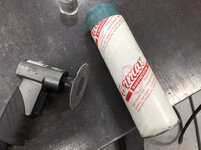
I use a grinder’s grease made by Formax out of Grand Rapids, MI. I coat my Roloc disks to prolong them and prevent them from loading up with aluminum as quickly.
364632ad4e3cea016c90ffd1d36f1e1e.jpg

I lightly dressed the area where I removed the spigot to prepare for welding a cap on it.
d100f7a274a7fe9e1556506bc107e90f.jpg

I cut a cover for the old opening from some .125” 5052 aluminum.
5d91f404cfcffa1d0dbae577ab600dc2.jpg

I then inverted the radiator to keep the tank on the bottom and used a hole saw to cut the new opening where I was instructed to do so.
8d595dc8a84cadbb763db395a15f2f99.jpg

Prior to prepping for the welding process I vacuumed the tank out and rinsed with water keeping the tank low so no debris would migrate into the core.

Outlet located into position and lightly clamped for tack welding.
843c50dd575806b9659617d704814804.jpg

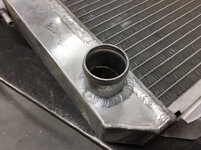
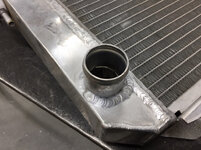
Outlet completely welded using 4043 TIG rod.
2b8d51d0437a871ff72a8e37991fa473.jpg

93f1074ef5fbf5ac5344393903269711.jpg

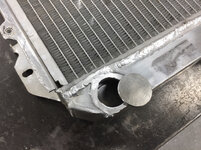
Cover weld completed.
0c1d4feb339534f1727f69ba7ad5b997.jpg

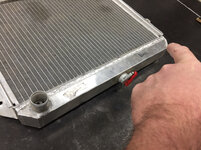
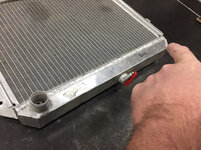
Radiator completed and ready to be picked up.
7eab92aeb349c6e1212223fe55ba7fbd.jpg

Thanks for looking.
 

Attachments

  • 8d595dc8a84cadbb763db395a15f2f99.jpg
    8d595dc8a84cadbb763db395a15f2f99.jpg
    901.3 KB · Views: 0
  • 843c50dd575806b9659617d704814804.jpg
    843c50dd575806b9659617d704814804.jpg
    751.1 KB · Views: 0
  • 2b8d51d0437a871ff72a8e37991fa473.jpg
    2b8d51d0437a871ff72a8e37991fa473.jpg
    785.5 KB · Views: 0
  • 93f1074ef5fbf5ac5344393903269711.jpg
    93f1074ef5fbf5ac5344393903269711.jpg
    922 KB · Views: 0
  • 0c1d4feb339534f1727f69ba7ad5b997.jpg
    0c1d4feb339534f1727f69ba7ad5b997.jpg
    817.2 KB · Views: 0
  • 5d91f404cfcffa1d0dbae577ab600dc2.jpg
    5d91f404cfcffa1d0dbae577ab600dc2.jpg
    849.9 KB · Views: 0
  • d100f7a274a7fe9e1556506bc107e90f.jpg
    d100f7a274a7fe9e1556506bc107e90f.jpg
    768 KB · Views: 0
  • 364632ad4e3cea016c90ffd1d36f1e1e.jpg
    364632ad4e3cea016c90ffd1d36f1e1e.jpg
    804.2 KB · Views: 0
  • 2b47f4d654ed7cfa396c226ac7824c47.jpg
    2b47f4d654ed7cfa396c226ac7824c47.jpg
    776.4 KB · Views: 0
  • 46abf658ffa2c6ec07b706fe5ddff38c.jpg
    46abf658ffa2c6ec07b706fe5ddff38c.jpg
    810.8 KB · Views: 0
  • 7eab92aeb349c6e1212223fe55ba7fbd.jpg
    7eab92aeb349c6e1212223fe55ba7fbd.jpg
    843.8 KB · Views: 0
Last edited:

shortykorte

Well-known member
Joined
Sep 1, 2014
Messages
8,039
Location
Tallahassee, Fl
First off isn't it going to leak with that big hole.:lol_hitti

Hope you get over your cold soon. Nice mod on radiator. Tell us more on the acetone squirt bottle and the interesting vacuum.
 
OP
Z

zmotorsports

ALLIANCE MEMBER
Joined
Oct 20, 2009
Messages
21,470
Location
Northern Utah
First off isn't it going to leak with that big hole.:lol_hitti


Hope you get over your cold soon. Nice mod on radiator. Tell us more on the acetone squirt bottle and the interesting vacuum.


Thank Shorty. Yeah, I feel like garbage. This cold crept up on me on Sunday afternoon and it’s fully kicking my **** today.

My acetone bottle is just a plastic bottle with long applicator tube that I picked up somewhere, can’t remember where. It works good for applying acetone to a rag without spilling out of a gallon can, much less waste this way.

The vacuum is made by Blue Point and uses compressed air to create a Venturi affect. This is my second one as I nearly wore my first generation version out. I purchased this one about ten years ago and my first one probably 25 years ago. I originally bought my first one to vacuum up debris from intake manifolds before removing them because they are nice to reach down between the intake runners and also one the intake is removed to vacuum up gasket material after removing. Since then I have found many other uses and it is nice for small tasks like this to avoid having to get the big shop-vac out.

Thanks for the comments Shorty.
 

JTH

Well-known member
Joined
May 4, 2012
Messages
167
Location
MO Ozarks
I made a little Venturi vacuum in A&P mechanic school. I also own 2 of the Snapon units. I bought it for the same job you did, cleaning intake runners. Used to loosen rockers so valves closed and vacd the heads also. The bag got pretty nasty after a few years so I got another to use for dry stuff. Wish I had your skills with tig, I'm practicing but not sure there's enough time left in life to dive into a job like that. Enjoy your thread and how organized you are!
 
OP
Z

zmotorsports

ALLIANCE MEMBER
Joined
Oct 20, 2009
Messages
21,470
Location
Northern Utah
I made a little Venturi vacuum in A&P mechanic school. I also own 2 of the Snapon units. I bought it for the same job you did, cleaning intake runners. Used to loosen rockers so valves closed and vacd the heads also. The bag got pretty nasty after a few years so I got another to use for dry stuff. Wish I had your skills with tig, I'm practicing but not sure there's enough time left in life to dive into a job like that. Enjoy your thread and how organized you are!


Thank you. I appreciate the comments.

I had to laugh at your comment about the bag getting nasty because the bag on my first vacuum is what pushed me to purchase another one. No matter how clean you tried to be with the intake manifolds off, coolant always found its way into the vacuum. I washed it a couple of times but it was pretty grungy. My new one only sees dry material to avoid a repeat. My wife resurrected the bag on the first one enough to use it for “questionable” jobs and my newer one for most everything else.

Thanks again for checking in on my projects thread and for commenting.
 
Last edited:
To avoid these ads, REGISTER NOW!
Top Bottom