
You are using an out of date browser. It may not display this or other websites correctly.
You should upgrade or use an alternative browser.
You should upgrade or use an alternative browser.
ZMotorsports Shop Projects 2.0
- Thread starter zmotorsports
- Start date
OP
zmotorsports
ALLIANCE MEMBER
Mike, I think I saw somewhere in your posts that you did a nice write up on rebuilding your tow bar. Could you point me in a direction to find it?
Dan, the rebuild of my old Roadmaster Sterling towbar was in my original Shop Projects Thread in my signature. The rebuild was on page 29, Post 564.
I also did a YouTube video of it on my channel and I have a link attached below.
I hope it is helpful.
OP
zmotorsports
ALLIANCE MEMBER
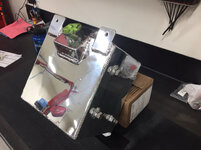
I picked up my coolant surge tank from my polisher today and finished up the installation into our coach.
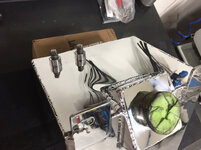
A few pictures of the polish job prior to adding fittings and sight glass.


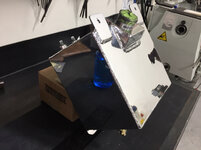
All fittings, coolant level sensor and sight glass installed ready for installation.

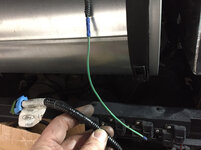
I traced the wire back in preparation to solder the pigtail onto the OEM harness and noticed they had a **** connector about 8” from the eyelet. That’s not too impressive so I opted to cut back further and solder & heat shrink the connections.


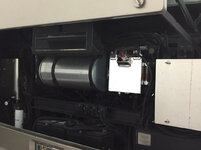
It is kind of hard to see but the Weatherpack connector is plugged into the coolant level sensor and routed up along the wire loom blending in with the OEM harness.

Completed pictures.


Thanks for looking.
A few pictures of the polish job prior to adding fittings and sight glass.
All fittings, coolant level sensor and sight glass installed ready for installation.
I traced the wire back in preparation to solder the pigtail onto the OEM harness and noticed they had a **** connector about 8” from the eyelet. That’s not too impressive so I opted to cut back further and solder & heat shrink the connections.
It is kind of hard to see but the Weatherpack connector is plugged into the coolant level sensor and routed up along the wire loom blending in with the OEM harness.
Completed pictures.
Thanks for looking.
Attachments
-
 d9e15c2f3a2c018afeb44207916473fe.jpg713.4 KB · Views: 0
 -
 cafe03f5cf9c96a9a17cf673e4562426.jpg612.6 KB · Views: 0
 -
 5b60b09ee25b3696ed9f5f91b04e7ccb.jpg693.5 KB · Views: 0
 -
 b3cc844bc21de1c106015a1f107023b3.jpg621.1 KB · Views: 0
 -
 4eb26ceef36d0e5bf7c1cdc8a02e7e65.jpg739.6 KB · Views: 0
 -
 aaa59bccacee54caef380337565d54de.jpg687.9 KB · Views: 0
 -
 05fd8b15348e1737054002c98ce47c7d.jpg727.2 KB · Views: 0
 -
 f3ac3b17092d3e868b972df8e2fa42ce.jpg788.8 KB · Views: 0
 -
 90b7aaaf185039915e7438c8cb78e40e.jpg667.8 KB · Views: 0
 -
 cd696cacfc4e77042eb4bfd6685d35fe.jpg694.3 KB · Views: 0
Last edited:
fnieto
Well-known member
Beautiful Mike! Well done my friend.
OP
zmotorsports
ALLIANCE MEMBER
That sure turned out purdy Mike, another well executed most excellent job. ")
A couple pages back when I asked if you pressure tested your tanks I wanted to share a somewhat funny story but just didn't have the time. A couple years back I was building a dedicated mile car. I built her to run at 140 degrees and everything and I mean everything had external HE's, 7 of them as a matter of fact as well as 4 separate fans.
Anyhow depending upon what system it was and obvious pressures it could see dictated how and at what pressure I would test at. Considering our blower set up was very capable of 30lbs and add to the fact the system utilized both internal and external water to air Heat exchangers I was adamant we test to 35. Reason being if anyone is wondering, I had made massive changes to the innerds of the intake manifold, the HE and the transfer tubing. Which if a leak occurred could possibly put the system under a fair amount of pressure.
So before mounting the tank in its home I wanted to test it by its self on the bench. The owner of the car was your typical more money than brains type and picked up the tank while I was dialing up the regulator. Somewhere around 20lbs that ******* blew a seam and went off like a damn bomb. No joke, it made a really good BOOM and scared the **** out of the owner.
Now here's the interesting part and the only reason I even over shared this story. The seam that split wasn't a welded seam. It was one of the brake edges. I'm not sure what grade aluminum was used by whoever made it but assume it was 6061 and they failed to anneal it before bending it up.
So the moral of the story is.......don't ever let me share another stupid long lame story while phone posting again. Lol
A couple pages back when I asked if you pressure tested your tanks I wanted to share a somewhat funny story but just didn't have the time. A couple years back I was building a dedicated mile car. I built her to run at 140 degrees and everything and I mean everything had external HE's, 7 of them as a matter of fact as well as 4 separate fans.
Anyhow depending upon what system it was and obvious pressures it could see dictated how and at what pressure I would test at. Considering our blower set up was very capable of 30lbs and add to the fact the system utilized both internal and external water to air Heat exchangers I was adamant we test to 35. Reason being if anyone is wondering, I had made massive changes to the innerds of the intake manifold, the HE and the transfer tubing. Which if a leak occurred could possibly put the system under a fair amount of pressure.
So before mounting the tank in its home I wanted to test it by its self on the bench. The owner of the car was your typical more money than brains type and picked up the tank while I was dialing up the regulator. Somewhere around 20lbs that ******* blew a seam and went off like a damn bomb. No joke, it made a really good BOOM and scared the **** out of the owner.
Now here's the interesting part and the only reason I even over shared this story. The seam that split wasn't a welded seam. It was one of the brake edges. I'm not sure what grade aluminum was used by whoever made it but assume it was 6061 and they failed to anneal it before bending it up.
So the moral of the story is.......don't ever let me share another stupid long lame story while phone posting again
. Lol
Last edited:
Ohmthis
Well-known member
Polishing looks really good. Great deal detail with tilting the filler neck. I'm sure that will help with spills. Was there a repair done to the radiator tank? I know we all are critical of our own welding, but the welds already on it were junk compared to yours. Great job also on using the hacksaw. Proves there is a RIGHT tool for every job.
bradleykd
Well-known member
The tank turned out really nice!
I'm surprised you don't do your own polishing. The barriers of entry are very low to be able to do a great job yourself and I think it is such a relaxing and rewarding thing to do. I probably wouldn't enjoy doing it by hand, but with a buffing wheel and a die grinder with buffer heads for smaller spots, it is not much work and has instant gratification.
I'm surprised you don't do your own polishing. The barriers of entry are very low to be able to do a great job yourself and I think it is such a relaxing and rewarding thing to do. I probably wouldn't enjoy doing it by hand, but with a buffing wheel and a die grinder with buffer heads for smaller spots, it is not much work and has instant gratification.
Boosted1
Well-known member
That tank and install look outstanding. Really nice job.
How are the sight glass tubes secured?
How are the sight glass tubes secured?
OP
zmotorsports
ALLIANCE MEMBER
That sure turned out purdy Mike, another well executed most excellent job.
A couple pages back when I asked if you pressure tested your tanks I wanted to share a somewhat funny story but just didn't have the time. A couple years back I was building a dedicated mile car. I built her to run at 140 degrees and everything and I mean everything had external HE's, 7 of them as a matter of fact as well as 4 separate fans.
Anyhow depending upon what system it was and obvious pressures it could see dictated how and at what pressure I would test at. Considering our blower set up was very capable of 30lbs and add to the fact the system utilized both internal and external water to air Heat exchangers I was adamant we test to 35. Reason being if anyone is wondering, I had made massive changes to the innerds of the intake manifold, the HE and the transfer tubing. Which if a leak occurred could possibly put the system under a fair amount of pressure.
So before mounting the tank in its home I wanted to test it by its self on the bench. The owner of the car was your typical more money than brains type and picked up the tank while I was dialing up the regulator. Somewhere around 20lbs that ******* blew a seam and went off like a damn bomb. No joke, it made a really good BOOM and scared the **** out of the owner.
Now here's the interesting part and the only reason I even over shared this story. The seam that split wasn't a welded seam. It was one of the brake edges. I'm not sure what grade aluminum was used by whoever made it but assume it was 6061 and they failed to anneal it before bending it up.
So the moral of the story is.......don't ever let me share another stupid long lame story while phone posting again
That's funny Cam.
Now I've had one that had a leak but I found it upon testing. I have had some friends and fellow racers have several leak that they didn't test and upon installation they found leaks. That is what I like to avoid. I've thankfully never had one come apart though, that would definitely scare the hell out of a person.
OP
zmotorsports
ALLIANCE MEMBER
Polishing looks really good. Great deal detail with tilting the filler neck. I'm sure that will help with spills. Was there a repair done to the radiator tank? I know we all are critical of our own welding, but the welds already on it were junk compared to yours. Great job also on using the hacksaw. Proves there is a RIGHT tool for every job.
Thanks for the comments, the guys I use do a great job polishing.
I really like the more angled filler neck as it has already been beneficial upon the first fill.
As for the radiator, it wasn't what I would call a high end unit like a Ron Davis or Griffin that I am more used to working with. According to the owner, this was a fairly inexpensive import but he wanted to try the spigot relocation before proceeding. Thanks for the comments about my welds, the original welds were not very impressive.
I appreciate you stopping by and checking on the projects.
OP
zmotorsports
ALLIANCE MEMBER
The tank turned out really nice!
I'm surprised you don't do your own polishing. The barriers of entry are very low to be able to do a great job yourself and I think it is such a relaxing and rewarding thing to do. I probably wouldn't enjoy doing it by hand, but with a buffing wheel and a die grinder with buffer heads for smaller spots, it is not much work and has instant gratification.
Thank you, I appreciate that.
The guys who do my polishing do a fantastic job. At my first shop I had a nice Baldor pedestal buffer that I used and had all of the compounds and various wheels but boy did it make a mess. In the early 90's when I built my last shop I sold my polishing equipment and swore I would never do that again due to the mess it makes and the residue it gets EVERYWHERE. That is a job I gladly pay someone else to perform and the shop I've been using for the past close to 20 years now does a fantastic job.
For me polishing was stressful due to the mess it creates. I look at painting much the same way. Although I really enjoyed it and found it very rewarding to take either a wrecked car, built custom street rod, rail, snowmobile and straighten panels, lay down primer, block the paint and clear and lastly do a cut and polish. I found that very rewarding and loved seeing that last step of polishing really bring the mirror finish out in a paint job. However, after my father passed and my mom sold the farm where I had my "dirty" shop and performed my paint and body work I pretty much got out of it as it makes a huge mess of shops as well and I swore at my last shop I would never paint inside of it much like the commitment I made here. I did paint a few small jobs at my last shop outside and even some fairly large sections of our last two motorhomes outside but I found it more stressful and less fun that when I had a designated place to do so.
Thanks for checking out my projects thread and taking the time to comment.
OP
zmotorsports
ALLIANCE MEMBER
That tank and install look outstanding. Really nice job.
How are the sight glass tubes secured?
Thank you.
The glass tube is pressed onto the aluminum block fittings and sealed with what looks like an o-ring. The aluminum blocks have banjo bolts that go through them and thread into the aluminum bungs that are welded in the tank and therefore allow the fluid to fill the sight tube.
Thanks again for following my projects thread.
Finallygotit
ALLIANCE MEMBER
Really nice job Mike! 
I should stop by for some welding pointers. My welds ****!

I should stop by for some welding pointers. My welds ****!
OP
zmotorsports
ALLIANCE MEMBER
Really nice job Mike!
I should stop by for some welding pointers. My welds ****!
Thanks Dan, I appreciate that. If you're ever in the area I would be happy to assist.
C_F
ALLIANCE MEMBER
The tank turned out great!
I don't blame you for farming out a polishing job that size, I usually do too. Metal Masters in SL has been my polisher of choice for the past 10 years or so.
I don't blame you for farming out a polishing job that size, I usually do too. Metal Masters in SL has been my polisher of choice for the past 10 years or so.
shortykorte
Well-known member
Ok ok enough about the fantastic fab work and polishing.
Where’s the SS hose for cap discharge and why isn’t the other tank polished. LOL.
Joking aside. A project to be proud of.
Sent from my iPhone using Tapatalk
Where’s the SS hose for cap discharge and why isn’t the other tank polished. LOL.
Joking aside. A project to be proud of.
Sent from my iPhone using Tapatalk
OP
zmotorsports
ALLIANCE MEMBER
The tank turned out great!
I don't blame you for farming out a polishing job that size, I usually do too. Metal Masters in SL has been my polisher of choice for the past 10 years or so.
That's funny, Metal Masters is who I have been using for nearly 20 years now. Mark and Scott are great guys and do quality work. On the wall inside the waiting area they used to have pictures of our purple sandrail, several of our sand drag quads and a couple of motorcycles that I've built on their display collage.
OP
zmotorsports
ALLIANCE MEMBER
Do you clearcoat or wax after the polish to protect it?
Sent from my iPhone using Tapatalk
I usually just hit the polished aluminum with a coat of polish a couple of times a year. I will just have to add it to my list of things to polish when I hit the wheels every so often.
OP
zmotorsports
ALLIANCE MEMBER
Ok ok enough about the fantastic fab work and polishing.
Where’s the SS hose for cap discharge and why isn’t the other tank polished. LOL.
Joking aside. A project to be proud of.
Sent from my iPhone using Tapatalk
Sorry Shorty, the stainless steel lines would have been way overkill, unlike the polishing.

Thanks for the comments and for stopping by my projects thread.
C_F
ALLIANCE MEMBER
That's funny, Metal Masters is who I have been using for nearly 20 years now. Mark and Scott are great guys and do quality work. On the wall inside the waiting area they used to have pictures of our purple sandrail, several of our sand drag quads and a couple of motorcycles that I've built on their display collage.
Haha, small world.
The last time I had them do a job for me was almost two years ago, and when I dropped off my stuff, the older guy (I never remember which one is who) offered to sell me the place. I think he was feeling a bit burned out that day.
OP
zmotorsports
ALLIANCE MEMBER
Haha, small world.
I haven't had anything chromed or polished in over a year and when I went down last Monday to drop my tank off Scott asked me where the hell I'd been. I had to admit he wasn't looking as good as the last time I saw him, looked a bit more frail than I remember. Mark is the one I usually deal with but he wasn't in either day last week.
Great guys and great work. I hope they keep going for many years yet but I know that isn't likely.
OP
zmotorsports
ALLIANCE MEMBER


OP
zmotorsports
ALLIANCE MEMBER
Saturday morning I had the wife’s Acura on the lift to service and rotate the tires.
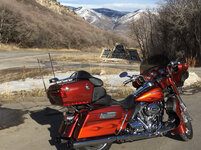
I then pulled the Toro ZTR into the shop in order to diagnose the bearing noise but with the temperature at 50 degrees in the afternoon it was too nice of a day to waste. The wife was with her aunts at a play so I hopped on the bike and went for a nice ride.
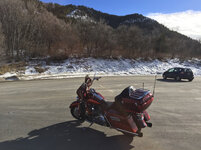
The reservoir still has a bit of ice on it.

I took the divide on the way home and stopped at the pullout to stretch and snapped a couple pictures.


Thanks for looking.
I then pulled the Toro ZTR into the shop in order to diagnose the bearing noise but with the temperature at 50 degrees in the afternoon it was too nice of a day to waste. The wife was with her aunts at a play so I hopped on the bike and went for a nice ride.
The reservoir still has a bit of ice on it.
I took the divide on the way home and stopped at the pullout to stretch and snapped a couple pictures.
Thanks for looking.
Attachments

Sweet bike Mike! I'm doing a little bartering project right now for a Harley. Been several years since I've seriously ridden on the street but I'm so looking forwards to it. I grew up riding and the wife rode with me for a few years before our first child. Then the deal became no more street bikes until the last kid is out of school. Well that day is long gone.
The best part is she has no idea this deal is going down. Boy is she gonna be surprised when I bring the new toy home. The other night a bagger came rolling past us and I told her that's what I want. She was like ya, that's cool........no negative vibes at all , so I think I'm safe
The best part is she has no idea this deal is going down. Boy is she gonna be surprised when I bring the new toy home. The other night a bagger came rolling past us and I told her that's what I want. She was like ya, that's cool........no negative vibes at all , so I think I'm safe
OP
zmotorsports
ALLIANCE MEMBER
Sweet bike Mike! I'm doing a little bartering project right now for a Harley. Been several years since I've seriously ridden on the street but I'm so looking forwards to it. I grew up riding and the wife rode with me for a few years before our first child. Then the deal became no more street bikes until the last kid is out of school. Well that day is long gone.
The best part is she has no idea this deal is going down. Boy is she gonna be surprised when I bring the new toy home. The other night a bagger came rolling past us and I told her that's what I want. She was like ya, that's cool........no negative vibes at all , so I think I'm safe
That’s awesome Cam.
Personally I never thought I would be a bagger guy because I’ve always ridden more stripped down bare knuckles style bikes. My wife was not very comfortable on my Wide Glide and commented that she would like us to get a touring bike once we got our son through college. One day my good friend and mentor stopped by my shop and mentioned he was thinking of selling his 2004 HD Ultra Classic. This was a few years before our son was done with college but when I mentioned it to the wife even though it was a bit earlier than we thought it would be and what a great deal he proposed, she said “get it”.
I had to admit that was a sweet bike and I loved the two of us riding on it. Two years ago I ended up selling both my 2010 HD Wide Glide as well as my 2004 HD Ultra Classic and purchased my 2010 Ultra CVO and we love it. I’ve tweaked the 110 cubic inch motor a tad and she runs like a champ and is a very comfortable bike to ride.
As for the whole bagger thing, I actually kind of like having the storage on the bike. For day trips and throwing some snacks or drinks in the saddlebags or even going out to dinner and having a place to put her take home on the bike.
Thanks for stopping by Cam and good luck in the bike. You’ll have to keep me posted on how it goes.
Last edited:
racer-john
Well-known member
Beautiful scenery, and the bike too.
OP
zmotorsports
ALLIANCE MEMBER
Beautiful scenery, and the bike too.
Thank you. It was a great ride.
Thanks for stopping by my projects thread.
fnieto
Well-known member
Beautiful bike Mike, are you running Rinehart exhaust? I luv the sound/performance of mine.
OP
zmotorsports
ALLIANCE MEMBER
Beautiful bike Mike, are you running Rinehart exhaust? I luv the sound/performance of mine.
Yes Paco, Rinehart exhaust system and Power Commander V tuning module. They both woke up the 110 more than I thought they would.
I agree, the sound coming out of those Rineharts is music to my ears, love the sound of them.
What bike do you have Paco?
rmack898
Well-known member
Replaced another steering gearbox tonight, this one on a friend’s 2006 Chevrolet 2500 Duramax, similar to mine.
What kind of steering box did you install Mike? OEM or aftermarket? If aftermarket, what brand?
I have needed a new box in my '05 2500HD for quite a long time but have been just living with it because the truck sees little use but I would like to get the front end of the truck fixed up. I need to rebuild the entire front suspension as I plan on keeping this truck forever.
OP
zmotorsports
ALLIANCE MEMBER
What kind of steering box did you install Mike? OEM or aftermarket? If aftermarket, what brand?
I have needed a new box in my '05 2500HD for quite a long time but have been just living with it because the truck sees little use but I would like to get the front end of the truck fixed up. I need to rebuild the entire front suspension as I plan on keeping this truck forever.
I've been using the remanned units from my local NAPA and have had great results. Haven't been able to locate a seal kit for the GMT800 series of GM trucks.
If you plan on keeping the truck I would recommend the Cognito steering components. They assist to keep the center steering link from flopping back and forth and therefore prematurely wearing out. I have had great results using their steering kit on these trucks as well as the FabTech heavy duty tie rods that are over an inch in diameter compared to the somewhat anemic OEM ones.
Seagoon
Well-known member
MikeI took the divide on the way home and stopped at the pullout to stretch and snapped a couple pictures.
.
I know what a pullout is but what's a "divide"? It's not a word we Brits use in terms of roads.
OP
zmotorsports
ALLIANCE MEMBER
Mike
I know what a pullout is but what's a "divide"? It's not a word we Brits use in terms of roads.
Sorry, it is also known as a "pass" as in mountain pass. We call it "the divide" where I live because it divides the North Ogden part of the Wasatch front from "the valley" which is on the other side of the mountain where the small towns of Liberty, Huntsville and Eden are located as well as Pine View Reservoir. That's considered the "ritzy" part of the area.
Technically it is called the North Ogden Divide but we've always just called it "the divide". In high school it was the quickest way to get from North Ogden/Pleasant view where my high school was located over into the valley where we usually partied. It is a very narrow 10% grade road with guardrails in only a few places and quite treacherous in winter driving conditions, we actually lost a couple kids from my graduating class that ended up going over in their car and were killed. There is a trail head pullout at the top where you can see down both sides fairly well and where the wife and I usually pull off and stretch our legs before heading down the other side.
Thanks for inquiring, I guess it was kind of assumptuous on my part but there seem to be quite a few garagejournal forum members that are familiar with the Ogden area and probably know exactly where I'm talking about.
C_F
ALLIANCE MEMBER
What a difference a day or two makes, regarding riding weather! That's great that you were able to get some wind in your hair for a while. I wish I had done the same.
OP
zmotorsports
ALLIANCE MEMBER
What a difference a day or two makes, regarding riding weather! That's great that you were able to get some wind in your hair for a while. I wish I had done the same.
Agreed. I have plenty of work to keep me busy in the shop but knowing this storm was coming in and how nice it was Saturday afternoon I figured the work would wait until the weather turned bad and I just couldn't waste the nice weather on Saturday. It sure felt good to take a ride and enjoy it.
Seagoon
Well-known member
Thanks for the explanation. I have absolutely no problem with you assuming local knowledge. I DO have a problem with us not having big enough mountains in the UK to have dividesSorry, it is also known as a "pass" as in mountain pass. We call it "the divide" where I live because it divides the North Ogden part of the Wasatch front from "the valley" which is on the other side of the mountain where the small towns of Liberty, Huntsville and Eden are located as well as Pine View Reservoir. That's considered the "ritzy" part of the area.
Technically it is called the North Ogden Divide but we've always just called it "the divide". In high school it was the quickest way to get from North Ogden/Pleasant view where my high school was located over into the valley where we usually partied. It is a very narrow 10% grade road with guardrails in only a few places and quite treacherous in winter driving conditions, we actually lost a couple kids from my graduating class that ended up going over in their car and were killed. There is a trail head pullout at the top where you can see down both sides fairly well and where the wife and I usually pull off and stretch our legs before heading down the other side.
Thanks for inquiring, I guess it was kind of assumptuous on my part but there seem to be quite a few garagejournal forum members that are familiar with the Ogden area and probably know exactly where I'm talking about.
But I still have fun riding our hills on my KTM
OP
zmotorsports
ALLIANCE MEMBER
Thanks for the explanation. I have absolutely no problem with you assuming local knowledge. I DO have a problem with us not having big enough mountains in the UK to have divides
But I still have fun riding our hills on my KTM
Yeah, I don't know if I could give up my mountains here and have "hills" in place of.

Seagoon
Well-known member
The good thing for us is it doesn't take long to get over the Channel and into some proper mountains in Europe, and they seem more "special" because we have to plan the trip.Yeah, I don't know if I could give up my mountains here and have "hills" in place of.