CF Av8or
Member
I thought I would take the opportunity to outline the method I used for applying my choice for a garage floor sealer, Euco Diamond Hard, so that it might help others in this endeavor.
By way of introduction, I am in the process of building my “dream” garage (oh and house, at the same time), and have finally had the opportunity to protect my concrete floor before I move in. Unfortunately, this has been a long-term project (going on 3 and a half years now), so during construction the garage spaces have been used to store some vehicles, park my tractor, and keep construction materials. The result of this is that the concrete was no longer a clean, virgin surface when I finally made the decision as to how to best treat it and then had the opportunity to do so.
I actually have two garages in this project, one being the parking space for the daily drivers, motor cycles and surfboards, etc, while the other is my working shop – to be used for auto restoration/maintenance, aircraft restoration, general fabrication and multiple other projects and abuses. The “parking” garage is 28 X 34 and the shop is 40 X 40. As an aside, above the parking garage is the workshop for the spouse’s woodworking and artistic projects and my model aircraft construction, while the living space is that bit above the shop side. Have I mentioned that I have a very cool wife, who is every bit as involved in the construction as I am (perhaps more, as I still have a few more months before retirement)?
Let me begin by describing why I finally decided on Euco Diamond Hard, which is a water-based, liquid, densifier and sealer for concrete. As I have already mentioned, my shop is meant to be a full-on working shop, which means it will see plenty of abuse through welding, metal cutting, spillage and leakage of every imaginable solvent, lubricant and chemical, and plenty of tool and parts dropping and dragging. As such, the last thing one would want for such a floor is a gucci, glittery and perfectly polished floor coating. Not that these aren’t impressive and beautiful, in the right application. The problem with these coatings is that, if abused, over time they can inevitably chip, peel or otherwise come off, leaving a less than attractive result. At least, this is what I have determined from my research and from the personal experience of friends with floor coatings. This is why, for my intended usage, I completely steered away from any kind of topical coating, regardless of how fantastic they look when first applied.
What I needed and wanted was a penetrating floor sealer that permeated the surface of the concrete and left no coating to come off in the future. In addition, I wanted it to further harden the concrete surface and seal the pores so that chemicals and solvents have a harder time entering and making a permanent home in my floor. There are a number of similar penetrating sealers on the market, but I went with Euco Diamond Hard (DH) for several reasons: it is stocked by a local supplier; is reasonably inexpensive; requires minimal prep of the concrete surface; it is easily applied by an amateur (once you know the technique - hence this post); makes for simple clean-up, as it is water-based; and importantly, because it is compatible with the Euclid Surflex, dry shake, surface hardener (in French Grey) I had applied to the floor when it was being machine trowelled to a very smooth finish.
I sealed the floor of my “parking” garage first. Unfortunately, the instructions provided by Euclid for application of DH leave some room for interpretation and my results were functionally satisfactory, but less than perfect aesthetically. I had uneven application, streak marks from the broom and foot prints from where I incorrectly stepped on and off the wetted surface. For the treatment of my shop floor, I made use of some very helpful posts on this forum and tweaked them a bit given my experience on the first garage.
So, please excuse the long-winded introduction, but here is the process which I used very successfully on my shop floor.
With the shop currently being used as a catch-all while construction is still in progress, I had to do the application in sections. The floor is divided into three bays defined by the control joints (cuts) in the concrete and the ceiling support columns, so each bay was sealed individually after everything was moved out or over into the other two bays.
Before sealing the floor, I cleaned out all the control joints and filled them with a Euclid polyurea control joint filler. A filler cannot be properly applied after the floor has been sealed, as the sealer will adversely affect the adhesion of the joint filler to the concrete.
The floor was first swept, then mopped with an industrial concrete cleaner solution. I tried to scrub out the oil drip and rust stains, but these were well soaked into the concrete and were not coming out. I followed by rinsing with a garden hose and then squeegeeing the water off the floor and out the garage door with a 3 ft wide squeegee. The wet floor was allowed to dry fully.
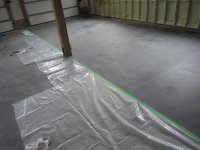
It is very important to realize that untreated portions of the floor must not be allowed to be wetted with DH until that portion of the floor is ready for a full application. In other words, don’t get the bottoms of your shoes wet with DH and then step away from where you are working. If this DH footprint is allowed to dry, the later application of DH over it will not hide the footprint. The same goes for broom marks, drips, etc. This is why, since I was sealing the floor in three sections, I masked-off the adjoining edge of the next section (with poly vapour barrier and masking tape), so as to keep the DH within the section being worked.
I conducted the application of DH using a 1 gallon pump sprayer. This is the run-of-the-mill, plastic, garden-type, pump-up sprayer you can pick up at most hardware stores. DH is water-based, so it should be compatible with most any sprayer (at least I believe so). The DH can also be simply poured onto the concrete and spread around with a broom or squeegee, but I find that the sprayer lays down a nice, controlled quantity of sealer, making it much easier to broom out evenly. The DH is sprayed out fairly generously. You can’t put too much on the surface, although this is ultimately wasteful, but you can certainly apply too little. This will result in dry spots that will need to be sprayed again before the wet edges dry out and leave visible marks.
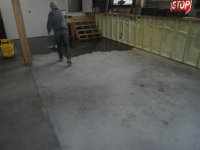
The application of the sealer is best accomplished as a two-person job. One person spraying the sealer and the second immediately following with a bristle broom to work the DH into the concrete and spread it evenly. My hard-working spouse did the spraying and I did the broom work. We worked back and forth, from one side of the floor section to the other, gradually working our way from the back wall to the garage door opening. All the time we were extremely careful not to step into the wet DH.
Once the entire floor section is wetted and broomed, this is the point at which I finally step onto the wet floor with my broom and continue to work the DH into the pores of the concrete throughout the slab, ensuring that any quicker drying spots are kept wet. From this point on, until I am ready for the next stage, I stay on the wet floor so as not to get footprints elsewhere on any dry concrete. The DH instructions say that the floor must be kept wet with DH for a minimum of 30 minutes to a maximum of 60 minutes. I like to let it soak in as much as possible, so I try to keep it wet for near an hour if I can. The warmer the ambient temperature the quicker it will want to dry out, so adjustments should be made accordingly. When I find the DH soaking into the concrete in areas that are more porous than others, I simply apply more DH and broom it in. Note, if the wet DH starts to gel (solidify) before you are ready to squeegee it off (more of a problem in warm conditions), you can spray water over it and broom this in to re-liquify the surface. Be careful, as the wet DH gets very slippery soon after it is applied, so you need to step carefully at this stage.
After the minimum 30 minute wetting period, it is time to squeegee and mop. I started at the far end of the slab and began squeegeeing the excess DH (that is all the DH that has not penetrated into the concrete) towards the front of the slab where the garage door is. I did this, staying on the wet side, working backwards. My helper, also working backwards immediately in front of me on the freshly squeegeed surface, started mopping with a fine-stranded mop to smooth out the inevitable squeegee streaks and drips. We continued this until we were out the garage door and all of the excess DH had been pulled outside onto the gravel in front of the garage entrance. The floor is then allowed to dry completely before any foot or wheeled traffic, as per DH instructions.
Because the power trowelling done by the concrete contractors was not perfectly uniform, I found that sections of the floor were more or less porous than others. The result is that some areas looked “dryer” than the surrounding shinier areas. As such, I decided to apply a second coat of DH using the exact same technique as above, with the exception that the concrete didn’t need to be cleaned first and I left the floor wet with DH for only just over 30 minutes, as it tended to gel up quicker on the second application.
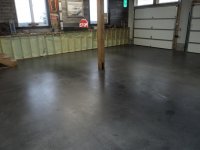
I will say that I was very happy with the results. Once cured, the DH gives the floor a slight sheen and darkens up the colour a little bit and looks fantastic. It is not slippery and dust no longer sticks to the floor making regular clean-up a breeze. Liquids now just bead up on the surface rather than soaking in as they did before. Once I start working in the new shop, I’ll have a better idea of DH’s chemical and oil staining resistance, but as the product specs indicate, every effort should be made to prevent oil and other chemicals from laying on the surface for very long to prevent permanent staining.
My apologies for the extremely long-winded description of my application process, but I thought that my experience would help other GJ’ers out there to prevent the errors I made on my first attempt, when it comes time for them to protect their garage floors.
By way of introduction, I am in the process of building my “dream” garage (oh and house, at the same time), and have finally had the opportunity to protect my concrete floor before I move in. Unfortunately, this has been a long-term project (going on 3 and a half years now), so during construction the garage spaces have been used to store some vehicles, park my tractor, and keep construction materials. The result of this is that the concrete was no longer a clean, virgin surface when I finally made the decision as to how to best treat it and then had the opportunity to do so.
I actually have two garages in this project, one being the parking space for the daily drivers, motor cycles and surfboards, etc, while the other is my working shop – to be used for auto restoration/maintenance, aircraft restoration, general fabrication and multiple other projects and abuses. The “parking” garage is 28 X 34 and the shop is 40 X 40. As an aside, above the parking garage is the workshop for the spouse’s woodworking and artistic projects and my model aircraft construction, while the living space is that bit above the shop side. Have I mentioned that I have a very cool wife, who is every bit as involved in the construction as I am (perhaps more, as I still have a few more months before retirement)?
Let me begin by describing why I finally decided on Euco Diamond Hard, which is a water-based, liquid, densifier and sealer for concrete. As I have already mentioned, my shop is meant to be a full-on working shop, which means it will see plenty of abuse through welding, metal cutting, spillage and leakage of every imaginable solvent, lubricant and chemical, and plenty of tool and parts dropping and dragging. As such, the last thing one would want for such a floor is a gucci, glittery and perfectly polished floor coating. Not that these aren’t impressive and beautiful, in the right application. The problem with these coatings is that, if abused, over time they can inevitably chip, peel or otherwise come off, leaving a less than attractive result. At least, this is what I have determined from my research and from the personal experience of friends with floor coatings. This is why, for my intended usage, I completely steered away from any kind of topical coating, regardless of how fantastic they look when first applied.
What I needed and wanted was a penetrating floor sealer that permeated the surface of the concrete and left no coating to come off in the future. In addition, I wanted it to further harden the concrete surface and seal the pores so that chemicals and solvents have a harder time entering and making a permanent home in my floor. There are a number of similar penetrating sealers on the market, but I went with Euco Diamond Hard (DH) for several reasons: it is stocked by a local supplier; is reasonably inexpensive; requires minimal prep of the concrete surface; it is easily applied by an amateur (once you know the technique - hence this post); makes for simple clean-up, as it is water-based; and importantly, because it is compatible with the Euclid Surflex, dry shake, surface hardener (in French Grey) I had applied to the floor when it was being machine trowelled to a very smooth finish.
I sealed the floor of my “parking” garage first. Unfortunately, the instructions provided by Euclid for application of DH leave some room for interpretation and my results were functionally satisfactory, but less than perfect aesthetically. I had uneven application, streak marks from the broom and foot prints from where I incorrectly stepped on and off the wetted surface. For the treatment of my shop floor, I made use of some very helpful posts on this forum and tweaked them a bit given my experience on the first garage.
So, please excuse the long-winded introduction, but here is the process which I used very successfully on my shop floor.
With the shop currently being used as a catch-all while construction is still in progress, I had to do the application in sections. The floor is divided into three bays defined by the control joints (cuts) in the concrete and the ceiling support columns, so each bay was sealed individually after everything was moved out or over into the other two bays.
Before sealing the floor, I cleaned out all the control joints and filled them with a Euclid polyurea control joint filler. A filler cannot be properly applied after the floor has been sealed, as the sealer will adversely affect the adhesion of the joint filler to the concrete.
The floor was first swept, then mopped with an industrial concrete cleaner solution. I tried to scrub out the oil drip and rust stains, but these were well soaked into the concrete and were not coming out. I followed by rinsing with a garden hose and then squeegeeing the water off the floor and out the garage door with a 3 ft wide squeegee. The wet floor was allowed to dry fully.
It is very important to realize that untreated portions of the floor must not be allowed to be wetted with DH until that portion of the floor is ready for a full application. In other words, don’t get the bottoms of your shoes wet with DH and then step away from where you are working. If this DH footprint is allowed to dry, the later application of DH over it will not hide the footprint. The same goes for broom marks, drips, etc. This is why, since I was sealing the floor in three sections, I masked-off the adjoining edge of the next section (with poly vapour barrier and masking tape), so as to keep the DH within the section being worked.
I conducted the application of DH using a 1 gallon pump sprayer. This is the run-of-the-mill, plastic, garden-type, pump-up sprayer you can pick up at most hardware stores. DH is water-based, so it should be compatible with most any sprayer (at least I believe so). The DH can also be simply poured onto the concrete and spread around with a broom or squeegee, but I find that the sprayer lays down a nice, controlled quantity of sealer, making it much easier to broom out evenly. The DH is sprayed out fairly generously. You can’t put too much on the surface, although this is ultimately wasteful, but you can certainly apply too little. This will result in dry spots that will need to be sprayed again before the wet edges dry out and leave visible marks.
The application of the sealer is best accomplished as a two-person job. One person spraying the sealer and the second immediately following with a bristle broom to work the DH into the concrete and spread it evenly. My hard-working spouse did the spraying and I did the broom work. We worked back and forth, from one side of the floor section to the other, gradually working our way from the back wall to the garage door opening. All the time we were extremely careful not to step into the wet DH.
Once the entire floor section is wetted and broomed, this is the point at which I finally step onto the wet floor with my broom and continue to work the DH into the pores of the concrete throughout the slab, ensuring that any quicker drying spots are kept wet. From this point on, until I am ready for the next stage, I stay on the wet floor so as not to get footprints elsewhere on any dry concrete. The DH instructions say that the floor must be kept wet with DH for a minimum of 30 minutes to a maximum of 60 minutes. I like to let it soak in as much as possible, so I try to keep it wet for near an hour if I can. The warmer the ambient temperature the quicker it will want to dry out, so adjustments should be made accordingly. When I find the DH soaking into the concrete in areas that are more porous than others, I simply apply more DH and broom it in. Note, if the wet DH starts to gel (solidify) before you are ready to squeegee it off (more of a problem in warm conditions), you can spray water over it and broom this in to re-liquify the surface. Be careful, as the wet DH gets very slippery soon after it is applied, so you need to step carefully at this stage.
After the minimum 30 minute wetting period, it is time to squeegee and mop. I started at the far end of the slab and began squeegeeing the excess DH (that is all the DH that has not penetrated into the concrete) towards the front of the slab where the garage door is. I did this, staying on the wet side, working backwards. My helper, also working backwards immediately in front of me on the freshly squeegeed surface, started mopping with a fine-stranded mop to smooth out the inevitable squeegee streaks and drips. We continued this until we were out the garage door and all of the excess DH had been pulled outside onto the gravel in front of the garage entrance. The floor is then allowed to dry completely before any foot or wheeled traffic, as per DH instructions.
Because the power trowelling done by the concrete contractors was not perfectly uniform, I found that sections of the floor were more or less porous than others. The result is that some areas looked “dryer” than the surrounding shinier areas. As such, I decided to apply a second coat of DH using the exact same technique as above, with the exception that the concrete didn’t need to be cleaned first and I left the floor wet with DH for only just over 30 minutes, as it tended to gel up quicker on the second application.
I will say that I was very happy with the results. Once cured, the DH gives the floor a slight sheen and darkens up the colour a little bit and looks fantastic. It is not slippery and dust no longer sticks to the floor making regular clean-up a breeze. Liquids now just bead up on the surface rather than soaking in as they did before. Once I start working in the new shop, I’ll have a better idea of DH’s chemical and oil staining resistance, but as the product specs indicate, every effort should be made to prevent oil and other chemicals from laying on the surface for very long to prevent permanent staining.
My apologies for the extremely long-winded description of my application process, but I thought that my experience would help other GJ’ers out there to prevent the errors I made on my first attempt, when it comes time for them to protect their garage floors.