
You are using an out of date browser. It may not display this or other websites correctly.
You should upgrade or use an alternative browser.
You should upgrade or use an alternative browser.
Above 1200 Sq/FT Restored 1930's Auto Shop
- Thread starter BB767
- Start date
Wokspaces above 1200 squarefeet.
D.J.
Well-known member
Really a nice rebuild, but I agree with e3pres PLEASE guy this is why you hear of people being KILLED in trench colapses!
LovelyWendie
________That hole is exactly deep enough to be a grave. Stay out of deep excavations!
LovelyWendie
Last edited:
Agreed Bull.... I second that
I sent Ryan a message and a link to this thread
Well Im gonna start with this............
This garage is amazing, beautiful and very well thought out. The attention to detail along with the passion of preservation is something i think we can all truly appreciatte.
I was really enjoying the photos until I got to the one that others are concerned about.
Its really quite crazy to get inside a hole like that with all thats around you. That hole could collapse leaving a person buried.
I lost a very dear friend in a tragic grain elevator accident and thats the first thing I thought of when I saw the photo.
As mentioned.............please be careful folks
FoMoCoPower
Well-known member
That is really freakin kool,very jealous!!
Very cool, is that a Porsche or VW engine in picture 8?
Nice! You did an amazing job and you got the bounty to go along with it! There's an old Dodge garage on I70 just east of Columbia, MO that I would love to own. It's part of a farm operation but they keep the building up. It's straight outta the 50's. I'll take some pics when we go to St. Louis next time.
Where is that located? I would like to take a peek.
69charged
Well-known member
AWESOME....awesome......not sure what else to say other than awesome!!!
my garage is messy but after seeing what you have done, it has given me the strength to continue on.
nice work. very nice
clarence
my garage is messy but after seeing what you have done, it has given me the strength to continue on.
nice work. very nice
clarence
colt zantop
Well-known member
one word.......AWESOME! I enjoyed the before pics as much, if not more, than the finished pics.....what a great build....one of the coolest I have seen on here!
Lowriser
Member
Beautiful job!
Shocker
Well-known member
I love it. Fantastic.
bb1970
Well-known member
Great job!! I would love to find a place like that to rehab and live in.
Rudyjr
Well-known member
Amazing work, beautiful job on everything!!
russlaferrera
Well-known member
Super Cool! Thanks for posting.
Chateau Slate 66
Well-known member
Just great! All your choices are right on the money. Thanks for posting the pics.
Mickey O
Well-known member
Holy ****! Awesome! More pics please.
Nighttrain
Well-known member
Great job of restoring the tools, signs, Pepsi machine etc. and placing them right back where they were. Has any of the remaining family stopped by to visit? I bet it would bring back a lot of memories even though your house keeping may be a little different from the prior tenants.
Thanks for sharing the build.
Thanks for sharing the build.
Lookin4'67Galaxieconv
Well-known member
Nice job, Thomas. Excellent job restoring the building while retaining the original flavor. And smart to add the carport over the front part. 
I would've loved to have taken time going through all that stuff in there!
Love the old Pepsi machine too.
I would've loved to have taken time going through all that stuff in there!
Love the old Pepsi machine too.
Last edited:
von zipper
Well-known member
well played!! very nice!
Cobra4B
Well-known member
Very cool 
thomask
Well-known member
What a great before and after.
You had a great team on this restoration.
Can you show us some more of the tools you found when you statrted cleaning out the original garage.
Thanks guy.
You had a great team on this restoration.
Can you show us some more of the tools you found when you statrted cleaning out the original garage.
Thanks guy.
ironheadtom
Well-known member
Awesome job...I can't begin to imagine the cool stuff you found along the way
AndrewBigA
Well-known member
wow one of the coolest gartages ive seen so far on the site. whats the square footage? how many cars fit in there? what do you use the garage for?
Last edited:
Nuit Damnant
Well-known member
GREAT!!! I love it! Do you have any rough floor plans of it? I'm always interested in how things like this are laid out. Helps me plan (read:dream) for the future
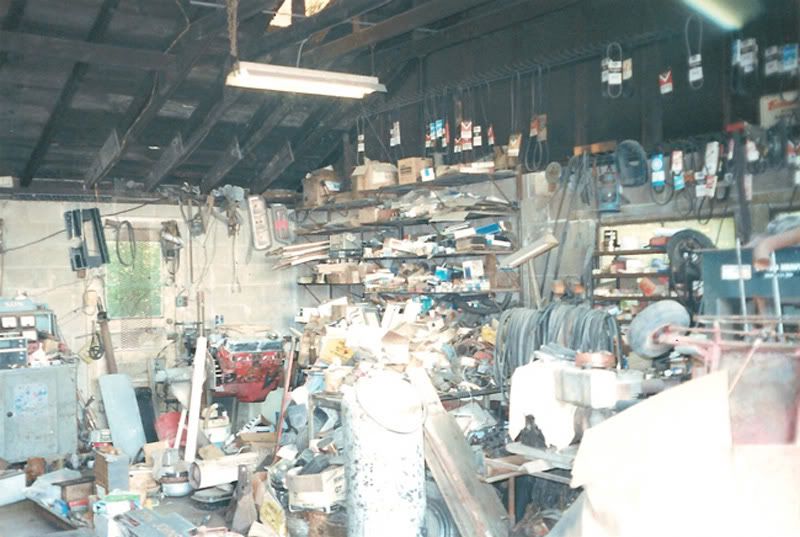
Some more back ground. I had been after the family for several years to sell the shop as I saw it just going down hill with each passing year. Finally the timing was right and I convinced them that if they waited much longer the shop would be lost. I would restore it and preserve the history and it would have made their Dad happy to see it survive. Hated to Iose all that history. Many of the area farmers needed Mr. Johnson's skill to repair their equipment, he could fix anything. It might not have looked pretty when he was done but it worked! I bought it all, everything on the property. I told them they didn't need to clean up anything. When I first bought it you couldn't see any of the buildings from the road, it was completely overgrown.

This is the path I cut through to get to the rear of the shop. You couldn't walk though it without a machete..... or a bush hog!

I eventually removed 278 tires from full size tractor to go kart size. Note the hole in the roof.

This is the reverse view looking back at the shop after I carved a trail.

Some of the 48 tons which was recycled. The shop is just to the left out of frame. On the 5 acres there were several other buildings, full of mostly true junk- junk. The one odd item was over 250 prune juice jars, with caps!

This is when it finally started to look promising. To the left you can see a post that is part of the carport I installed in the rear of the building, just like the one out front. There is an overhead door there as well.

And this view is just a couple of months old. The new barn will replace the tool shed and two car garage on the right. I'll tear them down next spring. That's where the items from the shop wound up that I'm sorting through.

And this is how it all ties together. Many family members have returned and they are in disbelief. They said that never in their lifetimes was the property ever cleaned up. It just always had random "stuff" strewn about and I guess they thought it always would. Inside the shop I wanted to keep areas in roughly the same use and with the same, though restored, machines or signage.
Thomas
This is the path I cut through to get to the rear of the shop. You couldn't walk though it without a machete..... or a bush hog!
I eventually removed 278 tires from full size tractor to go kart size. Note the hole in the roof.
This is the reverse view looking back at the shop after I carved a trail.
Some of the 48 tons which was recycled. The shop is just to the left out of frame. On the 5 acres there were several other buildings, full of mostly true junk- junk. The one odd item was over 250 prune juice jars, with caps!
This is when it finally started to look promising. To the left you can see a post that is part of the carport I installed in the rear of the building, just like the one out front. There is an overhead door there as well.
And this view is just a couple of months old. The new barn will replace the tool shed and two car garage on the right. I'll tear them down next spring. That's where the items from the shop wound up that I'm sorting through.
And this is how it all ties together. Many family members have returned and they are in disbelief. They said that never in their lifetimes was the property ever cleaned up. It just always had random "stuff" strewn about and I guess they thought it always would. Inside the shop I wanted to keep areas in roughly the same use and with the same, though restored, machines or signage.
Thomas
Last edited:
That last post showed the east side here's a peak at the treasure on the west side.

That is the frame wall I removed and replaced with block. The lean to shed is where welding stock, metal was stored.

If you look closely you'll see a 1937 Hudson Terraplane, without the body. Engine is to the right, foreground.

That makes it a little clearer.

I have the title for it, nothing was ever thrown away! In fact I have the titles for all 7 of the cars I found.

The car is complete, except for the body. Plugs are still in the head, starter,distributor, carb, fan,all pedals, drive shaft, rear end all of it. It's a fixer upper though.

You might call it the original 3-on-a-tree? You can see the block side of the shop in the background in some of the pictures. I remember that car being there as a little kid. It hasn't moved in decades. I am leaving it as every shop should have some yard art.
Thomas
That is the frame wall I removed and replaced with block. The lean to shed is where welding stock, metal was stored.
If you look closely you'll see a 1937 Hudson Terraplane, without the body. Engine is to the right, foreground.
That makes it a little clearer.
I have the title for it, nothing was ever thrown away! In fact I have the titles for all 7 of the cars I found.
The car is complete, except for the body. Plugs are still in the head, starter,distributor, carb, fan,all pedals, drive shaft, rear end all of it. It's a fixer upper though.
You might call it the original 3-on-a-tree? You can see the block side of the shop in the background in some of the pictures. I remember that car being there as a little kid. It hasn't moved in decades. I am leaving it as every shop should have some yard art.
Thomas
Last edited:
eborcim
Well-known member
250 prune juice jars with lids...sounds like there might be some backyard banking going on!
on the yard art!
on the yard art!D.J.
Well-known member

Last edited:
Laredo
Well-known member
I am truly inspired. Nice, very nice.
Some more inside pictures. This shows the lift room as it was being reborn so to speak. It was the most puzzling room since it had many different angles and roof lines I had to tie together. Wasn't really sure how it would turn out. The shop always had bare block walls inside and almost no heat. Certainly no insulation of any sort, a total loss system for sure.
Those shelves contained many NOS parts.

This is the same corner after it was emptied out. Notice how welding smoke has blackened the interior wood? I removed one of the doors that was in this room. You can see behind the ladder on the left the slightly different concrete block in the shape of a door. I found some blocks around the property and guessed they were left over from the time this room was enclosed. They matched pretty closely on the outside, the inside was covered up. The yellow line near the ceiling was the gas line. Each room has it's own furnace, hung from the ceiling so they don't take up floor space. and it's own thermostat which allows me to zone heat. You can also see one of the lift ramps on the floor, not painted yet.

Same corner months later.

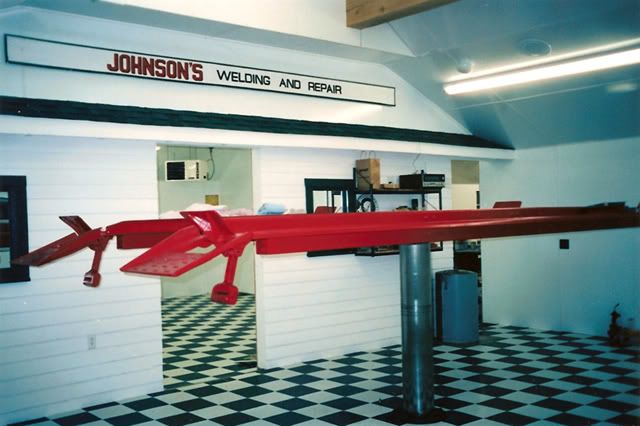
Here you can see the roof of the original shop and how the lift room roof was grafted to it. Since I was insulating and heating this space I had to build a stub wall over this space. That's the stub wall that eventfully I hung the restored sign from. You can also see that I'm beefing up the overhead wood beam they used to pull engines with. On the floor note the lift ramps and lift control cabinet.

That's the lift in the foreground in the "up" position, stub walls all done and insulated.
I know you've seen this picture before but this is nice to see it with the one above it, taken a few weeks before while being built.
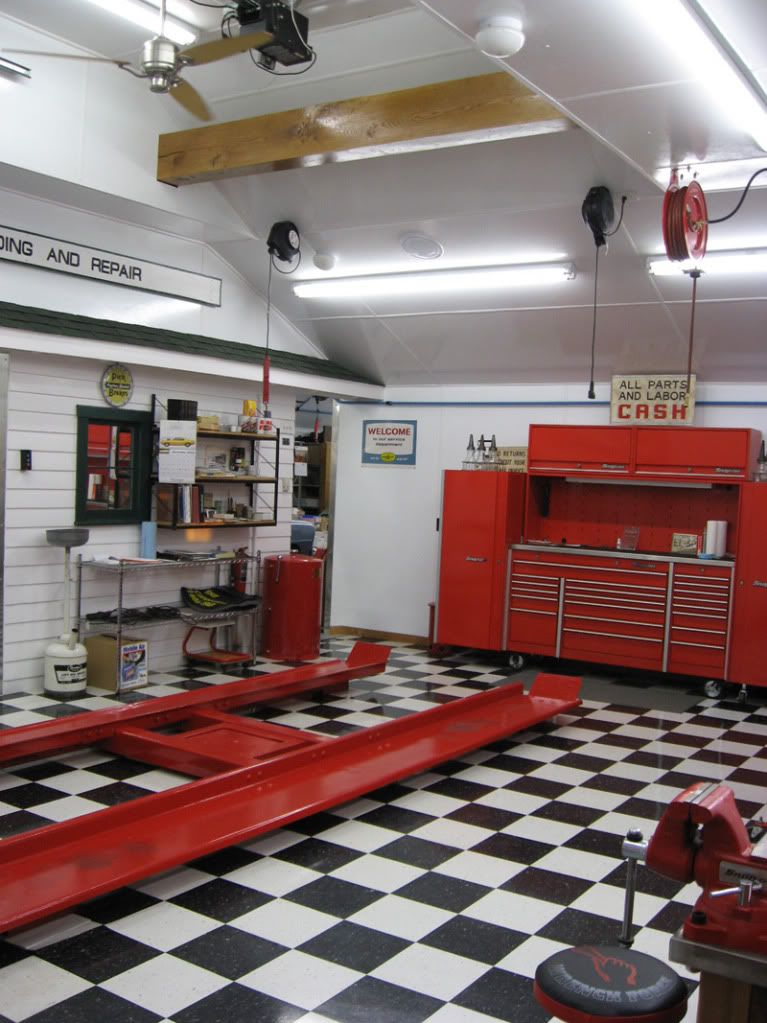
And this is how it turned out. The ceiling space is pretty busy with a lot going on up there. The overhead oak beam is from the same batch of oak that I used to frame the windows, doorways and base trim. Same stain and finish so it all ties together. It's goofy I know but that beam has 5 coats of finish, sanded between each one. It's as smooth as a baby's....
I knew it would be a focal point so I wanted it to look good. Yup, I over did it, but I like it and I like looking at it! The beam extends to the side load bearing walls and is fully functional if you ever wanted to use it to pull an engine, no worries! The incandescent light fixtures you see are used throughout the shop so if you come in at night and just need to pick something up you don't need to fire up the florescent lights.
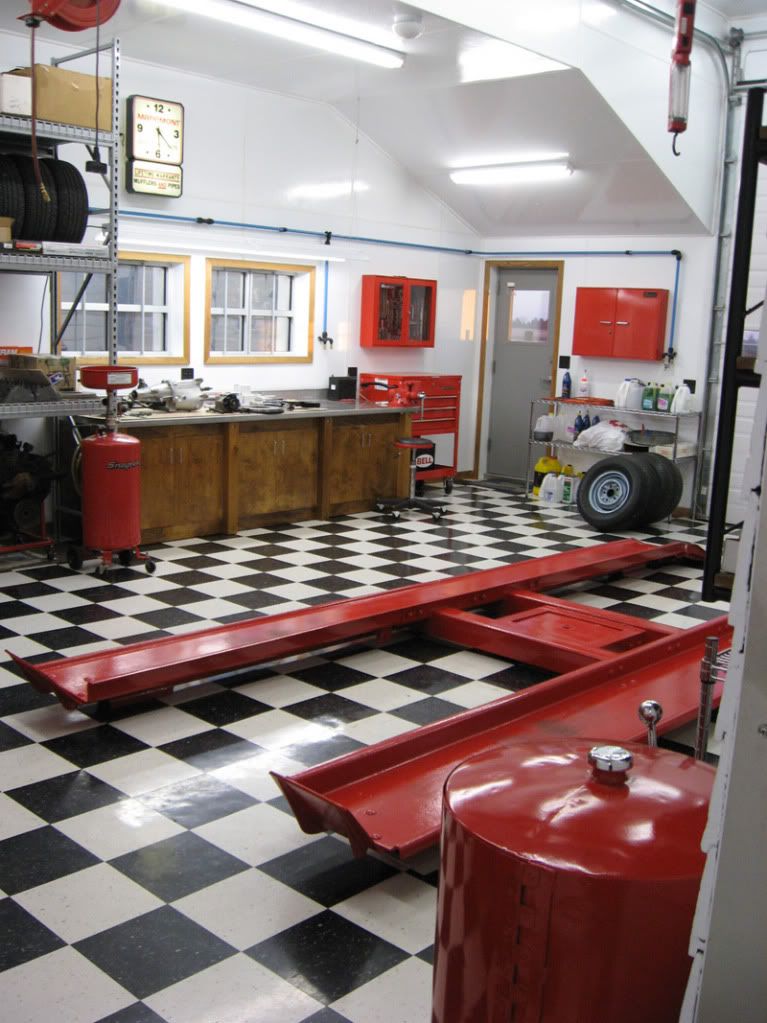
Reverse angle. Room from the other end. The blue line on the wall is my powder coated aluminum airline. Made in Germany, uses compression fittings so there is no air loss past them. The air line drops take air from the top of the horizontal line. That way any moisture in the line doesn't travel down it to your air tool. There's a drain at the end of each branch of line. Really a neat product. If you look closely at the lift control cabinet, you can see a seem across the top. That's where the backside reservoir meets the front half housing the pump and motor. Note the oak around the windows and door. This room is easily my favorite. It's visually very interesting to me.
I'll have more later. Thank you to everyone for your input. Sharing is what this is all about isn't it? As for questions, I will answer them, promise!
Thomas
Those shelves contained many NOS parts.
This is the same corner after it was emptied out. Notice how welding smoke has blackened the interior wood? I removed one of the doors that was in this room. You can see behind the ladder on the left the slightly different concrete block in the shape of a door. I found some blocks around the property and guessed they were left over from the time this room was enclosed. They matched pretty closely on the outside, the inside was covered up. The yellow line near the ceiling was the gas line. Each room has it's own furnace, hung from the ceiling so they don't take up floor space. and it's own thermostat which allows me to zone heat. You can also see one of the lift ramps on the floor, not painted yet.
Same corner months later.
Here you can see the roof of the original shop and how the lift room roof was grafted to it. Since I was insulating and heating this space I had to build a stub wall over this space. That's the stub wall that eventfully I hung the restored sign from. You can also see that I'm beefing up the overhead wood beam they used to pull engines with. On the floor note the lift ramps and lift control cabinet.
That's the lift in the foreground in the "up" position, stub walls all done and insulated.
I know you've seen this picture before but this is nice to see it with the one above it, taken a few weeks before while being built.
And this is how it turned out. The ceiling space is pretty busy with a lot going on up there. The overhead oak beam is from the same batch of oak that I used to frame the windows, doorways and base trim. Same stain and finish so it all ties together. It's goofy I know but that beam has 5 coats of finish, sanded between each one. It's as smooth as a baby's....
I knew it would be a focal point so I wanted it to look good. Yup, I over did it, but I like it and I like looking at it! The beam extends to the side load bearing walls and is fully functional if you ever wanted to use it to pull an engine, no worries! The incandescent light fixtures you see are used throughout the shop so if you come in at night and just need to pick something up you don't need to fire up the florescent lights.
Reverse angle. Room from the other end. The blue line on the wall is my powder coated aluminum airline. Made in Germany, uses compression fittings so there is no air loss past them. The air line drops take air from the top of the horizontal line. That way any moisture in the line doesn't travel down it to your air tool. There's a drain at the end of each branch of line. Really a neat product. If you look closely at the lift control cabinet, you can see a seem across the top. That's where the backside reservoir meets the front half housing the pump and motor. Note the oak around the windows and door. This room is easily my favorite. It's visually very interesting to me.
I'll have more later. Thank you to everyone for your input. Sharing is what this is all about isn't it? As for questions, I will answer them, promise!
Thomas
car99r
Well-known member
Philo, Illinois..........the "Center Of The Universe" as proudly stated on our water tower!!
I've done some drag racing at your strip in Charleston. My grandmother went to college at Eastern in 1908-1912.
Thomas

Very nice Thomas! I have been to Philo a few times. The wife has been wanting to come up there and check out the house they did on Extreme Home Makeover. I think you topped their show by miles! Maybe one weekend me and the misses will have to take a short road trip and check out both places.
nate379
Banned
Wow that is fawking nuts!
When the first couple pics loaded up I figured you had bulldozed the place and built something.
I can't even imagine how much time and money was involved!. It went from complete **** to an awesome shop, that's for sure!
When the first couple pics loaded up I figured you had bulldozed the place and built something.
I can't even imagine how much time and money was involved!. It went from complete **** to an awesome shop, that's for sure!
Very nice Thomas! I have been to Philo a few times. The wife has been wanting to come up there and check out the house they did on Extreme Home Makeover. I think you topped their show by miles! Maybe one weekend me and the misses will have to take a short road trip and check out both places.
You would be most welcome. Come when the weather is a bit more pleasant! I'm at the extreme south end of town and the TV house is at the extreme north end. Fine food at the Philo Tavern is found in the middle.
Thomas
Last edited:
MOPARHOUND!
Well-known member
WOW, what a thread.
So many dream about "fixing that old garage up some day".
You made your dream a reality.
So many dream about "fixing that old garage up some day".
You made your dream a reality.
tdkkart
Well-known member
It's just flippin' cool!!! One of those projects that everyone dreams about when we see those old dilapdated buildings. I really like the old hoist, glad you could save it.
Congrats!!!
Congrats!!!
Britwrench
Well-known member
Excellent planning, design and workmanship on restoration of a building many people would demolish.
I like block-type walls for shops too as there is actually somewhere to screw shelves to.
I like block-type walls for shops too as there is actually somewhere to screw shelves to.
CodeRedZ
Well-known member
awesome work