
You are using an out of date browser. It may not display this or other websites correctly.
You should upgrade or use an alternative browser.
You should upgrade or use an alternative browser.
Modifications to the HF 4 and 5 drawer service carts - what changes have you made?
- Thread starter ndnchf
- Start date

Motorman55
Well-known member
Here you go
Cool, thanks!
Hendricks433
Well-known member
- Joined
- Mar 4, 2017
- Messages
- 81
Cool, thanks!
My local HF said they sell out by Friday night so go early if you want one.
Shadowdog500
Well-known member
I got tired of my side shelf of my tool cart dropping when bumped today and came up with a super easy solution that only takes a few seconds using a magnet that will keep it from ever dropping again.
Here is a 2 minute video that shows what I did.
Hope this is helpful for others! Chris
Here is a 2 minute video that shows what I did.
Hope this is helpful for others! Chris
555
Well-known member
Looks like the 4 drawer is going to be discontinued. It is not in the current HF catalog and on line it is listed as "in store only".
Floridaboy
Well-known member
- Joined
- Feb 10, 2018
- Messages
- 51
I got tired of my side shelf of my tool cart dropping when bumped today and came up with a super easy solution that only takes a few seconds using a magnet that will keep it from ever dropping again.
Here is a 2 minute video that shows what I did.
Hope this is helpful for others! Chris
Looks good and not a ton to modify
Sent from my iPhone using Tapatalk
JuliusPepperwood
Well-known member
Does the 5 drawer cart detach from the rest of it so you could use it as a top chest for example? I ask because I’m looking for something to put in the bottom section of my bluepoint cart.
Also does someone have the dimensions of the 5 drawer section of the cart?
Also does someone have the dimensions of the 5 drawer section of the cart?
Last edited:
Does the 5 drawer cart detach from the rest of it so you could use it as a top chest for example? I ask because I’m looking for something to put in the bottom section of my bluepoint cart.
Also does someone have the dimensions of the 5 drawer section of the cart?
The 5 drawer section drops into the cart so you could conceivably do that. As soon as I finish my coffee I'll run downstairs and measure. I think the whole wheeled cart thing is the beauty of this especially when its so hard to get decent casters for this price. But to each his own.
verbalkint99
Well-known member
- Joined
- Jan 1, 2015
- Messages
- 122
Does the 5 drawer cart detach from the rest of it so you could use it as a top chest for example? I ask because I’m looking for something to put in the bottom section of my bluepoint cart.
Also does someone have the dimensions of the 5 drawer section of the cart?
People on this thread have combined 2 four drawer carts like that, don't remember seeing the 5 drawer ones done like that.
Does the 5 drawer cart detach from the rest of it so you could use it as a top chest for example? I ask because I’m looking for something to put in the bottom section of my bluepoint cart.
Also does someone have the dimensions of the 5 drawer section of the cart?
I just took another look. The drop in includes the top cover which is a much bigger footprint than the 5 drawers. It would not be doable. There are better middle drawer options.
Last edited:
People on this thread have combined 2 four drawer carts like that, don't remember seeing the 5 drawer ones done like that.
I did not see this. If this is the case it will also work for the 5 drawer.
78C-10
Banned
Man, the auto log out time for this forum is SHORT. I typed up a nice post only to lose it when I clicked "Preview Post".
As previously mentioned...I turned my 4 drawer cart into a drill press and grinder cart. I finally got the pictures off my phone and figured out how to attach them to show what I've done. The first two pictures are upside down. They are correct on my phone, on my computer, and I even tried opening them and rotating the around 360 before closing again. I have NO clue why they loaded upside down.
I use the drawers to store my socket set and wrenches. My flux core welder squeezes in the lower tray to add some extra weight down low. Stability is very good and I rarely move it out around. With the drawer lock disabled, one drawer liked to pop open too easily but after slightly squeezing the back of the slide that goes over the rubber bumper on the stationary part of the slide, it now stays closed.
To build the top I first removed the metal top and hinges. I didn't have any plans, just a rough idea of what I wanted. I used plywood scraps left over from building my kitchen cabinets. There are four longer carriage bolts in the corners to secure the frame plus the back frame piece sits on the metal around the lock buttons and there is another vertical plywood piece in the middle of the front frame piece for support. The lock buttons are depressed. The plywood grid was glued together to help support the plywood top from sagging under the drill press weight. Two full extension slides on the left side allow the grinder top section to move over to access the storage area. It's now a slightly taller area but also harder to access stuff under the right side. I keep old bits and rarely used accessories under the drill press.
Not pictured is a double sash window lock to keep the sliding grinder top secure. My brother got his knuckle caught in a grinder back in high school so I definitely didn't want to risk that section opening by itself. The grinder sits on oak dowels in case the drill press table needs to be lowered to accommodate thick, longer wood pieces. Also not shown is the 1/16" thick Maple edge that I glued on to hide the raw edges of the plywood top.
Looking back at the pictures I realize 14 months have passed since I built this. It still works/slides great. I have since enclosed the main workbench with plywood building five large drawers under the vice. Then I built doors (one long door folds in back upon itself) to enclose the right side and L-shape part that you can't see. My next garage project is to have a sub panel installed, rewire the garage, install insulation, and finally put up plywood, OSB, or drywall on the walls and ceiling. Then I'll be able to work further into the winter and be more comfortable during Summer. I need to tackle my last large home project and build a bathroom vanity as I remodel the upper bathroom.
That is awesome, nice job!


driftpin
Well-known member
Great product name!

Hendricks433
Well-known member
- Joined
- Mar 4, 2017
- Messages
- 81
Can't remember who did this setup but totally like it. Was under this post or maybe the tool cart post , but awesome in my book
Sent from my LGLS775 using Tapatalk


That’s awesome and want one. Getting my first 5 drawer on Friday with the $150 sale. Wonder how easy it is to make something like that with a second one.
Attachments


crazyjim30
Active member
- Joined
- Jul 25, 2017
- Messages
- 38
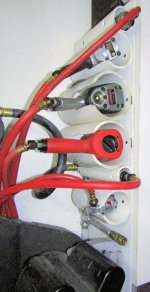
A couple of questions. First how did you attach the cans to the shelf? Second, where can I find that make/model shelf? Those are some nifty mods you've done. I hope to use some of them in the future.Here are the pics of my cart. The fork cans are attached to the shelf, the impacts are in them .
Sent from my Pixel XL using Tapatalk
Mikeske
Well-known member
If you are talking about the can shelf on the 5 drawer tool cart they come with it and is is attached to the support that also holds the drawers. 2nd the shelf is sold as a separate accessory by harbor freight.A couple of questions. First how did you attach the cans to the shelf? Second, where can I find that make/model shelf? Those are some nifty mods you've done. I hope to use some of them in the future.
Sent from my Pixel XL using Tapatalk
crazyjim30
Active member
- Joined
- Jul 25, 2017
- Messages
- 38
I'm talking about the tubes underneath the shelf that hold your drills. I believe that you referred to them as "fork cans".If you are talking about the can shelf on the 5 drawer tool cart they come with it and is is attached to the support that also holds the drawers. 2nd the shelf is sold as a separate accessory by harbor freight.
Sent from my Pixel XL using Tapatalk
PelicanPines
ALLIANCE MEMBER
I'm talking about the tubes underneath the shelf that hold your drills. I believe that you referred to them as "fork cans".
Sent from my Pixel XL using Tapatalk
I'm also interested in more detail on that modification. I can probably guess the details but it would be a wonderful addition here for everyone's benefit. It is definitely a great addition to the functionality of the cart.
jakemac
Well-known member
That’s awesome and want one. Getting my first 5 drawer on Friday with the $150 sale. Wonder how easy it is to make something like that with a second one.
IIRC, there was a bit of fabrication and lots of tinkering involved to get the small drawers in.
It wasn't a straight mashup.
I wanted red and black so I put mine together from the red cart and new black tool cart.
Does this mean that you also have a spare black and red cart hiding in the corner ?

Last edited:
IIRC, there was a bit of fabrication and lots of tinkering involved to get the small drawers in.
It wasn't a straight mashup.
Does this mean that you also have a spare black and red cart hiding in the corner ?
Yes sir lol, I was too lazy to paint the parts I wanted black so I sold the black with red cart
Two_Car_Garage
Active member
Blue and black and a full 90 degree lift in the lids. Might someone in HF's backroom been lurking on GJ?
Someday they may even offer all their chests and carts in the blue and black colors. And lets not forget the side shelves and matching colored towel holder and misc. accessories shelves.
One could hope.
Hi,
another new member just replying after a week lurk. I just went thru this massive thread (well I skipped some sections).
I am waiting for the sale and will likely be adding the "new" black 5 drawer one to my two car garage. Nice mods in this thread for sure.

Just for fun I contacted HF thru the website to inquire about additional colors on their cabinets because I don;t like the red color. They told me additional color are coming later this year (late spring/summer).
If you are interested in a cabinet in other color than red I recommend you contact them too so they know they are wanted.
{goes back to lurk mode}
smokeyburb
Well-known member
Welcome Two_car_garage. Be careful lurking. It's addictive...pretty soon you will find way more information and then start dreaming up new ways to improve your work space(s) and then you start looking for stuff to buy and collect and restore and it's super fun!
Take a few minutes to flesh out your member profile and tell us a bit more yourself.
Sent from my SCH-I545 using Tapatalk
Take a few minutes to flesh out your member profile and tell us a bit more yourself.
Sent from my SCH-I545 using Tapatalk
Dinguschop
Member
- Joined
- Mar 14, 2017
- Messages
- 5
A couple of questions. First how did you attach the cans to the shelf? Second, where can I find that make/model shelf? Those are some nifty mods you've done. I hope to use some of them in the future.
Sent from my Pixel XL using Tapatalk
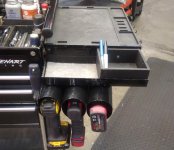
The big shelf is craftsman, I was walking through Sears one day and found it on clearance for $10. Here is a link to the shelf: https://www.craftsman.com/products/craftsman-plastic-side-shelf?taxon_id=2240
Attached to it is a metal Kobalt magnetic tray. I took the magnets off and attached it with a couple of bolts. Inside the tray is just a box made out of 1/4" plywood and painted with hi-temp grill paint (It dries flat black and seems to be pretty tough). I have made a bunch of these boxes of different shapes and sizes to organize my cart...I am a bit OCD when it comes to organization. Here is a link to the tray, which they evidently don't sell online anymore, but I am sure you can find something similar on amazon: https://www.lowes.com/pd/Kobalt-Magnetic-Tool-Tray/3076269
On the bottom of Kobalt tray I cut and attached three "fork cans" I riveted them to the bottom of the tray and riveted them to each other to make them a little more sturdy. I work for a Harley Davidson dealership and we go through a ton of these things. They are a stock part that comes on the front of Harley's above the fork sliders. Mine are stock ones that I modified and painted. Here is a link to the parts that I am talking about: https://www.denniskirk.com/509209.s...p7ACh3xiAdlEAQYAiABEgKE6vD_BwE&ad=45713335117
Hope this helps!
Attachments
Last edited:
crazyjim30
Active member
- Joined
- Jul 25, 2017
- Messages
- 38
It helps a lot. I appreciate your detailed response. Thanks.The big shelf is craftsman, I was walking through Sears one day and found it on clearance for $10. Here is a link to the shelf: https://www.craftsman.com/products/craftsman-plastic-side-shelf?taxon_id=2240
Attached to it is a metal Kobalt magnetic tray. I took the magnets off and attached it with a couple of bolts. Inside the tray is just a box made out of 1/4" plywood and painted with hi-temp grill paint (It dries flat black and seems to be pretty tough). I have made a bunch of these boxes of different shapes and sizes to organize my cart...I am a bit OCD when it comes to organization. Here is a link to the tray, which they evidently don't sell online anymore, but I am sure you can find something similar on amazon: https://www.lowes.com/pd/Kobalt-Magnetic-Tool-Tray/3076269
On the bottom of Kobalt tray I cut and attached three "fork cans" I riveted them to the bottom of the tray and riveted them to each other to make them a little more sturdy. I work for a Harley Davidson dealership and we go through a ton of these things. They are a stock part that comes on the front of Harley's above the fork sliders. Mine are stock ones that I modified and painted. Here is a link to the parts that I am talking about: https://www.denniskirk.com/509209.s...p7ACh3xiAdlEAQYAiABEgKE6vD_BwE&ad=45713335117
Hope this helps!
Sent from my Pixel XL using Tapatalk
Two_Car_Garage
Active member
Welcome Two_car_garage. Be careful lurking. It's addictive...pretty soon you will find way more information and then start dreaming up new ways to improve your work space(s) and then you start looking for stuff to buy and collect and restore and it's super fun!
Take a few minutes to flesh out your member profile and tell us a bit more yourself.
Sent from my SCH-I545 using Tapatalk
Yep, I know that feeling. I recently moved houses. Upgraded housing but downgraded garage space from 3 car to 2 car garage. I 've been dreaming for a bit on what to do tho improve my garage as it needs work. Looks like I am in the right place
Been drooling at a tool drawer or bench (new husky all blacked out models). But for now this tool cart will do to store my tools which are in moving boxes.
Other things/kids take always seem to take priority on where my money goes.

Tribalvision
Well-known member
On the bottom of Kobalt tray I cut and attached three "fork cans" I riveted them to the bottom of the tray and riveted them to each other to make them a little more sturdy. I work for a Harley Davidson dealership and we go through a ton of these things. They are a stock part that comes on the front of Harley's above the fork sliders. Mine are stock ones that I modified and painted. Here is a link to the parts that I am talking about: https://www.denniskirk.com/509209.s...p7ACh3xiAdlEAQYAiABEgKE6vD_BwE&ad=45713335117
Hope this helps!
They work good but are very pricey. I use pieces of pvc for my cordless guns. It's strong and very cheap to buy
here's one in my toolbox of my truck
Attachments

aka Larry
Well-known member
They work good but are very pricey. I use pieces of pvc for my cordless guns. It's strong and very cheap to buy
here's one in my toolbox of my truck
What size PVC?
Snakebyt
Well-known member
looks like 2 1/2, maybe 3"
Bob Heine
ALLIANCE MEMBER
Larry, it depends on the tool. I use 3" PVC for the small 12v impacts and drills. These are Craftsman Nextec 1/4" hex impact driver and 3/8" Drill.What size PVC?
The Porter Cable driver and drill also fit the 3" PVC.
I used all different sizes for these air tools. The two 1/2" impact wrenches are in 4" PVC, the two 3/8" impact wrenches are in 3" PVC, the 3/8" ratchet at the top is in 2" PVC and the 1/4" ratchet is in 1.5" PVC.
Attachments


225
Well-known member
Can't remember who did this setup but totally like it. Was under this post or maybe the tool cart post , but awesome in my book

What part # from HF is the bottom box?
Attachments


PelicanPines
ALLIANCE MEMBER
What part # from HF is the bottom box?
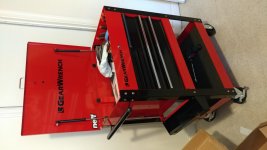
It's two 5 drawer carts... frankensteined together.
225, not my setup. This setup is from another member on here that i show as i think some said it couldn't be done, but as Pelican Pines stated. Its only 2- 5 drawer cart together part # 64061 or 61427. I did mod 2- 4 drawer cart together which i posted on here.
Sent from my LGLS775 using Tapatalk
Sent from my LGLS775 using Tapatalk
aka Larry
Well-known member
Larry, it depends on the tool. I use 3" PVC for the small 12v impacts and drills. These are Craftsman Nextec 1/4" hex impact driver and 3/8" Drill.
Thanks for the info. I'm thinking of attaching my drill and impact driver to the side of my 5-drawer HF cart with maybe some DIY version of this. I want the them parallel to the cart vs. perpendicular.

Crazyjake8493
Well-known member
Thanks for the info. I'm thinking of attaching my drill and impact driver to the side of my 5-drawer HF cart with maybe some DIY version of this. I want the them parallel to the cart vs. perpendicular.
I'm not sure about the 5-drawer cart, but for the 4-drawer Home Depot and Lowes sell 16x16" pieces of plastic or metal pegboard that fit perfectly in the sides. I used to hang my drills on power tool pegboard hooks on there while I had the cart at work.
mv213
Well-known member
Thanks for the info. I'm thinking of attaching my drill and impact driver to the side of my 5-drawer HF cart with maybe some DIY version of this. I want the them parallel to the cart vs. perpendicular.
Do you know who makes these hangers? They look great!
ptgarcia
Well-known member

Floridaboy
Well-known member
- Joined
- Feb 10, 2018
- Messages
- 51
You could still do perpendicular drill it in the side and not the top. I think the pvc style would keep more debris off of your tools. I work In a fab shop so we have tons of dust and grinding **** all the time
Sent from my iPhone using Tapatalk
Sent from my iPhone using Tapatalk
ThatSickRip
Well-known member
- Joined
- May 23, 2017
- Messages
- 763
I'm not sure about the 5-drawer cart, but for the 4-drawer Home Depot and Lowes sell 16x16" pieces of plastic or metal pegboard that fit perfectly in the sides. I used to hang my drills on power tool pegboard hooks on there while I had the cart at work.
Yep, I did the same. My experience was the metal pegboard from Lowes was a better fit than the plastic one from Home depot