To avoid these ads, REGISTER NOW!

HF tire changer hitch mount - no welding required

ndnchf

Well-known member
Joined
Jan 9, 2012
Messages
1,556
Location
Fredericksburg, Virginia
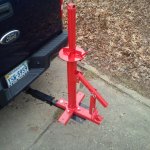
I bought an HF tire changer a while back and needed to mount it securely somehow. I've seen online where guys had welded together a receiver hitch mount with square tubing. I thought that was a great way to do it. Last week I was in the local HF store and spotted this receiver hitch vise mount. I thought that I might be able to mount the tire changer to that. It was under $20 with a coupon. That seemed like a bargain compared to going to the metal dealer for the 2" square tubing and plate, cutting, welding etc.

https://www.harborfreight.com/hitch-mount-vise-plate-66260.html

All I had to do was drill a few holes, get some longer 7/16" bolts and put it together. I made a spacer for the forward most bolt because there is a gap between the square tube and base. I just cut a piece of pipe for that.

I had a 12" hitch extension, so I used that to space it out enough to open the tailgate. It was simple to make from parts readilly available.

Next up to beef up the flimsy bead breaker.
 

Attachments

  • IMG_20180228_171011.jpg
    IMG_20180228_171011.jpg
    151.3 KB · Views: 388
To avoid these ads, REGISTER NOW!

scoot86

Active member
Joined
Nov 9, 2015
Messages
44
How do you hold the tire to break the bead seems like it would be akward
 
OP
N

ndnchf

Well-known member
Joined
Jan 9, 2012
Messages
1,556
Location
Fredericksburg, Virginia
I beefed up the bead breaker by welding on 1" angle iron to each side and adding two cross braces. Its rock solid now.
 

Attachments

  • TC2.jpg
    TC2.jpg
    119 KB · Views: 178
OP
N

ndnchf

Well-known member
Joined
Jan 9, 2012
Messages
1,556
Location
Fredericksburg, Virginia
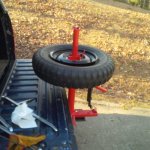
I changed my first tire using the hitch mount tire changer. I installed a tough old tube type 7.00x16" NDT tire on a rim as a spare for the old Willys Jeep. The tire changer and hitch mount worked just fine.
 

Attachments

  • NDT mtd.jpg
    NDT mtd.jpg
    116.2 KB · Views: 188

theoldwizard1

Well-known member
Joined
Feb 22, 2011
Messages
43,262
Location
SE MI
This is something that is long over due ! Too many people try to bolt those tire changer down to a pallet. Worst idea ever.
 

eyeball

Well-known member
Joined
Jul 14, 2011
Messages
407
This is something that is long over due ! Too many people try to bolt those tire changer down to a pallet. Worst idea ever.


It is a great idea but the pallet works for me... although it was not fun, I removed 5 BFG 33x12x15 MT/Rs and replaced them with 35” tires for my Jeep.

Unbolted it from the pallet and put it up in the attic until next time...


Sent from my iPad using Tapatalk
 
Last edited:
OP
N

ndnchf

Well-known member
Joined
Jan 9, 2012
Messages
1,556
Location
Fredericksburg, Virginia
I used the supplied long bar along with a couple tire irons to lever the bead into place. I had the added complication of putting a tube inside and not pinching it with the tire iron, and keeping the valve stem from falling back through the hole while doing it. But I got it done. The key is keeping the bead on the opposite side down in the depressed area of the rim. That allows more room to lever the bead into place. Also use a proper tire lubricant. I got some Ruglyde from NAPA, it works very well.
 

nh_yota

Well-known member
Joined
Mar 10, 2015
Messages
4,078
Location
Seacoast New Hampshire
I might need to do this.

Whenever I change a trailer tire I place it on the ground under the receiver on my Tacoma and wedge a bottle jack between the receiver and the bead. Sometimes the weight of the truck is enough to break the bead, other time I need to jump up and down in my truck bed.
 

Bad Eye Bill

Well-known member
Joined
Nov 15, 2017
Messages
5,033
Location
New Brunswick Canada
I used the supplied long bar along with a couple tire irons to lever the bead into place. I had the added complication of putting a tube inside and not pinching it with the tire iron, and keeping the valve stem from falling back through the hole while doing it. But I got it done. The key is keeping the bead on the opposite side down in the depressed area of the rim. That allows more room to lever the bead into place. Also use a proper tire lubricant. I got some Ruglyde from NAPA, it works very well.


I use one of these to keep the tube stem from disappearing. Also use it for pulling tubeless stems into the wheel, thread it on, then use long needle nose pliers under the horizontal bars and use the wheel lip as a fulcrum, pops them right in.

images
 
OP
N

ndnchf

Well-known member
Joined
Jan 9, 2012
Messages
1,556
Location
Fredericksburg, Virginia
I use one of these to keep the tube stem from disappearing. Also use it for pulling tubeless stems into the wheel, thread it on, then use long needle nose pliers under the horizontal bars and use the wheel lip as a fulcrum, pops them right in.

images

That's exactly what I used. At first I thought I'd put a hose clamp on it, but then remembered I had one of those tools. It worked perfectly. My big fear was pinching the tube. Fortunately, I only pinched my fingers, not the tube:lol:
 
To avoid these ads, REGISTER NOW!
OP
N

ndnchf

Well-known member
Joined
Jan 9, 2012
Messages
1,556
Location
Fredericksburg, Virginia
The beauty of this is that no welding is required. It just bolts together using parts from Harbor Freight. The only thing I had to make was a spacer for the forward-most mounting bolt so the bolt wouldn't crush the square tube. EZ Peazy, drill some holes, bolt it together and go. :3gears:
 

bubinga

Well-known member
Joined
Jul 26, 2014
Messages
12,744
Location
Bridgeport Ohio. (Across River From Wheeling WV)
I used the supplied long bar along with a couple tire irons to lever the bead into place. I had the added complication of putting a tube inside and not pinching it with the tire iron, and keeping the valve stem from falling back through the hole while doing it. But I got it done. The key is keeping the bead on the opposite side down in the depressed area of the rim. That allows more room to lever the bead into place. Also use a proper tire lubricant. I got some Ruglyde from NAPA, it works very well.
Yes, I keep it in the drop center.( The opposite bead)
My bar just keeps popping out.
 

MrGiggles

Well-known member
Joined
Dec 11, 2014
Messages
2,524
I could never get the bead install tool to work right with my HF changer.
They make it look easy on you tube, but I can't get it.
Was maybe going to look for a different install tool.

Sent from my MotoG3 using Tapatalk

I have never gotten it to work well either.. It works to get it started, but after 2/3rds of the way I just fold it over with tire spoons.
 

Jim c

Banned
Joined
Dec 19, 2017
Messages
200
You can purchase a manual bead breaker at northern for $150. And you can purchase a set of big-rig tire changing irons called “super serpent” on line foe $300. With those two things you can really change just about any tire fast and easy and you don’t need to mount anything. You can set those tools.right in the back of your truck for storage when you’re not using them.
 

bubinga

Well-known member
Joined
Jul 26, 2014
Messages
12,744
Location
Bridgeport Ohio. (Across River From Wheeling WV)
I have never gotten it to work well either.. It works to get it started, but after 2/3rds of the way I just fold it over with tire spoons.
we had a manual tire machine years ago at a gas station.
IIRC, and I'm pretty sure, there was more of a curve and longer, like more of a hook if you will, on the bar at the install end.
I don't remember having too much trouble with it.
There were a few like it reasonable came up on CL, $100-$150.00 something like that. I just never had the money when they came up.
EDIT,
added a picture, It was something like this.
May have had a pneumatic bead breaker . I'm not sure.
No, come to think of it, I think the bead breaker was just like this one.
Note the install end of the bar there too.
Ours was like that, even more of a curve to it too.
Looks like that bar there would work better than the HF one.
attachment.php
 

Attachments

  • tire machine.jpg
    tire machine.jpg
    28.6 KB · Views: 314
Last edited:

eyeball

Well-known member
Joined
Jul 14, 2011
Messages
407
I did something similar, wanted a receiver mount for a winch, looked at fabbing one up, as well as the factory made ones. it was a lot cheaper and easier using HF's Hitch Extender with Step Item #97685, around $20 with coupon. no welding, just drilled a few holes and some washers to space the winch and voila! I was even cheaper on the wiring, trailer plug doesn't carry enough amperage so I had to run cables straight to the battery. I took a few sets of old jumper cables and split the ends and crimped together to make them long enough. works great.


That’s a pretty bold move mounting a winch to a harbor freight hitch step. While the hitch extender is rated to 4000lbs. I would bet you dollars to donuts that 2” bead holding that step to the draw bar will only hold a small fraction of that.

I would not want to be anywhere in the vicinity when you fire up that winch. Doubly so if there is any side loading involved.
 

theoldwizard1

Well-known member
Joined
Feb 22, 2011
Messages
43,262
Location
SE MI
The slickest portable tool I have ever seen for braking down bead is the BeadBuster.

If you are willing to work on the ground with some tire lube and a couple of good tire spoons (irons), that is all you need. Removing tires from rims is more about TECHNIQUE and lube then it is about brute force.
 

bubinga

Well-known member
Joined
Jul 26, 2014
Messages
12,744
Location
Bridgeport Ohio. (Across River From Wheeling WV)
The slickest portable tool I have ever seen for braking down bead is the BeadBuster.

If you are willing to work on the ground with some tire lube and a couple of good tire spoons (irons), that is all you need. Removing tires from rims is more about TECHNIQUE and lube then it is about brute force.
that Tool looks Nice!
 
To avoid these ads, REGISTER NOW!
Top Bottom