To avoid these ads, REGISTER NOW!

Drywall - How Would You Fix This?

Augus7us

Well-known member
Joined
Jan 14, 2017
Messages
1,190
Location
Central Ohio
So the PO of my new home thought he was Bob Villa and sadly fell very short of this. In his efforts to finish my basement he left a drywall mess and I'm trying to figure out the best way to fix it.

In short he did not use tape, some areas he did not fill the tapered joints in and others he filled in completely and he did not sand 90% of it.

I now I can rip it all down and replace it but I'm working on other stuff and then I have to deal with disposal of all this. Plus the more money I spend on this the less I have to upgrade my shop.

That said I cringe at the thought of sanding all this down...

So what do you guys think?

attachment.php


attachment.php


attachment.php


attachment.php
 

Attachments

  • IMG_1171.jpg
    IMG_1171.jpg
    93.6 KB · Views: 1,332
  • IMG_1172.jpg
    IMG_1172.jpg
    144.9 KB · Views: 1,314
  • IMG_1173.jpg
    IMG_1173.jpg
    146.1 KB · Views: 1,308
  • IMG_1174.jpg
    IMG_1174.jpg
    114.6 KB · Views: 1,229
To avoid these ads, REGISTER NOW!

73surffisher

Well-known member
Joined
Sep 11, 2013
Messages
125
Location
Hampstead, MD
With no tape it will always crack no matter how much spackle / mud you put on it or how much you paint it, , you could sand it as flat as possible, apply a skim coat and feather out 12 in to either side

Good luck and keep us posted
 

WQ59B

Well-known member
Joined
Feb 18, 2010
Messages
762
Location
NJ
^ Basically agree.
Sand it flat, then proceed as if you're starting fresh: spackle/tape, numerous ever-widening coats of spackle, sand last coat.
 

Skiff Builder

Well-known member
Joined
Jun 7, 2016
Messages
1,782
Location
Southern NJ Coast
How large an area? Isolate with plastic and put a random orbit sander to it. Messy but won't take that long to get flat and start over.
Or.
1/4" drywall overlay and box extenders.
T&G pine or cedar.
Board and batten rough sawn.
Paneling.
Use it as shop space.

Did you buy the house sight unseen? If not you must have worked this into the purchase price?
 

The Cobbler

Super Moderator
Staff member
Joined
Oct 24, 2013
Messages
25,863
Location
Niagara Region, Ontario, Canada
the areas that aren't painted, wet the compound with water & scrape all that **** off.
the areas that are painted, scrape the paint off with a paint scraper , wet the compound and scrape it off
be patient.
tape properly
 

Pen & Wrench

Well-known member
Joined
Jan 12, 2015
Messages
658
Location
Huron, SD
I agree with the guys. I have had some really good dry wallers do work for me. The cracked joints they had to fix were because of improper taping, also from the previous owner.
 
OP
A

Augus7us

Well-known member
Joined
Jan 14, 2017
Messages
1,190
Location
Central Ohio
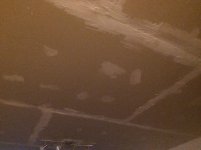
Sanding it is trivial if not painted; torture if painted.

With no tape it will always crack no matter how much spackle / mud you put on it or how much you paint it, , you could sand it as flat as possible, apply a skim coat and feather out 12 in to either side

Good luck and keep us posted

^ Basically agree.
Sand it flat, then proceed as if you're starting fresh: spackle/tape, numerous ever-widening coats of spackle, sand last coat.

Thanks guys, I think I'm going to have to **** it up and bring out my collection of hand sanders. Then give it a proper drywall job. And thanks to this house I've gotten fairly good at it :D

How large an area? Isolate with plastic and put a random orbit sander to it. Messy but won't take that long to get flat and start over.
Or.
1/4" drywall overlay and box extenders.
T&G pine or cedar.
Board and batten rough sawn.
Paneling.
Use it as shop space.

Did you buy the house sight unseen? If not you must have worked this into the purchase price?

My friend I could write many threads on getting this house... In short no I didn't get a discount or a good deal. Nor did I buy it sight unseen. Why you ask?

We have a lot of jobs here in Columbus and in the past five years it has grown even more and now attracts some large companies, in addition to the many existing already. Because of this about 2.5 years ago the influx of job seekers drove the housing market to insane levels. I started looking around this time. After 2 years of looking and loosing houses to bidding wars or being sold the first hour I settled for this one. I had to view it an hour before everyone else and offer full asking price knowing there were issues...

Fortunately they were all mostly cosmetic and to boot I now: Live outside the city on a couple of acres. The house is only 14 years old. I only have two neighbors near me. AND my first shop in the form of a 1200sq ft outbuilding woohoo.

So even though it sucked, I've remodeled a good deal of the house so far and moving from the city to out here is one of the best things I've ever done. And to boot Zillow predicts my house will gain about 9% my first year here and Bezos announced Columbus was a finalist city for Amazon's new HQ. So it could be worse, but let me tell you if you see signs of this and want to buy a house, don't wait like I did.

Hire a pro taper and tell them to make it paint ready... :)

I'm trying to be cheap so I can insulate and epoxy the new shop. Man is that **** expensive, but it sure does look good.

the areas that aren't painted, wet the compound with water & scrape all that **** off.
the areas that are painted, scrape the paint off with a paint scraper , wet the compound and scrape it off
be patient.
tape properly

Sadly all the walls are painted. My thought was to take my belt sander and use the wheel to grind another taper in where he actually filled them all the way in.

-Clint
 

MEngineer

Well-known member
Joined
Apr 13, 2015
Messages
345
Location
Everett, Wa
I have been doing my basement from new. If I did it again right now I would hire it out in a heartbeat. You will spend weeks doing what a pro can do in about 4 evenings.
 

03ranger

Well-known member
Joined
Mar 4, 2010
Messages
260
Location
Wickenburg, AZ
Use ¼” dry wall and cover the existing drywall. Using glue such as PL400 you can glue the ¼ drywall to the existing drywall without nailing or screwing. Many upper end home use ½’ drywall screwed and taped then covered with `1/4” drywall with minimal nailing or screwing, just enough to hold the drywall until the glue dries You will need to do tape the seams and the few screws holding the drywall. Note: if there are existing electrical outlets you will need to use electrical box extenders as needed.
 

wssix99

Well-known member
Joined
Mar 2, 2011
Messages
5,159
Location
Chicago, IL
belt sander will work, but prepare for major dust is all

I agree with the above and this.

Go to Harbor Freight and get one of their "disposable" sanders. Buy the best respirator you can find. Get a Tyvek suit. Gloves. Duct tape it all together. Then hermetically seal the room with plastic.

Sand. Then exit the room where someone special is waiting with a garden hose to spray you off. Toss the sander. (Unplug the sander before they hose you off! :shocking: )

When the dust settles, you'll be able to sweep up with a good shop vac and pick up where the PO should have started.
 

rcktsled

Well-known member
Joined
Nov 28, 2007
Messages
355
Location
909 for Life
That is a long wall (second photo) with no electrical receptacles. Is that a foundation wall? What is behind the drywall? Studs? Insulation? I wonder if that would meet code in your area.
 

Boomer343

Well-known member
Joined
Mar 19, 2012
Messages
519
Based on the job that was done on the drywall and based on my experience trying to fix old drywall I would be pulling the drywall and starting fresh.

I doubt there is proper blocking or electrical and it would also be a good time to redo the layout if need be.

Good luck with it.
 

RivennHewn

Well-known member
Joined
Jun 4, 2011
Messages
10,370
Location
PNW
belt sander will work, but prepare for major dust is all

My ******* neighbor borrowed my belt sander. Didn't tell me he was going to do drywall with it.

Wrecked it. Everything was packed tight with dust.

Great way to kill a tool.
 

MarkG

Well-known member
Joined
May 23, 2012
Messages
1,219
Location
Elgin, IL
Sand and tape as needed-----at least he didn't do the long wall joints, so you still even have the tapered edges to work with! I've worked on worse. A good taper can make that acceptable.

Sand it down where needed, but NOT into the paper! Then go from there, whether it's an additional 1,2,or 3 coats, tapering each out correctly and sanding correctly between coats. Not everyone can do this job. Depending on your skills, you might want to hire it done. I've fixed a lot of 'do-it-yourselfer's' taping jobs!
 
Last edited:
To avoid these ads, REGISTER NOW!

Norcal

Well-known member
Joined
Mar 16, 2008
Messages
13,753
I would be worried about what is underneath, making removing the **** drywall a desirable option, drywall is not cheap like it once was & after buying 8 sheets (4 greenboard & 4 regular) of 1/2" drywall + sundry items for a bathroom remodel costing around $120 this week brings that point home, but then you know what is underneath, funky drywall means the wiring is probably the same.
 

bugnut

ALLIANCE MEMBER
Joined
Jul 14, 2012
Messages
3,870
Location
Central Ohio
I am not one to worry but looking at that i'm in the school of take it out cause if the finish looks this good whats' behind it looks better! Then I could sleep without worrying.
 

ratdoggy

Well-known member
Joined
Mar 27, 2009
Messages
11,971
Location
Akron-Canton area OH
I have been doing my basement from new. If I did it again right now I would hire it out in a heartbeat. You will spend weeks doing what a pro can do in about 4 evenings.

A good drywall guy is worth every penny.
I did my basement by myself and hired a drywall guy to get me over the "hump" otherwise I'd still be messing around with it 4 years later...
I just couldn't get motivated
 

JRC3

Well-known member
Joined
Jun 30, 2014
Messages
12,481
Location
Southwestern OH
BTW why on earth would anyone not use tape?
Cheap,ignorant? I'm dumbfounded

The same reason they did't loosen two screws to take down a light fixture. I'd also bet that none of the receptacles or switches were loosened or removed while hanging sheets so they are gonna be loose. Hopefully shims and over-sized plates will do the job. I don't believe code allows more than a 1/8 gap between the box and drywall so that will need to be filled too, or at least use box extensions. Hard to contain an arc when there's a 1/2" gap around the box.


I would go rent a drywall sander. Or...I bought one of this on ebay two years ago for like 180 and it's been a champ. It seems to be a Festool knockoff made by Aleko. The light is awesome. They make many other less expensive models too. It comes with like a 15' hose that fits right to a shop vac hose. Use a bag in the shop vac and you're good to go.
 

Attachments

  • drywall.jpg
    drywall.jpg
    60 KB · Views: 676

jeffer949

Well-known member
Joined
Sep 8, 2017
Messages
80
The same reason they did't loosen two screws to take down a light fixture. I'd also bet that none of the receptacles or switches were loosened or removed while hanging sheets so they are gonna be loose. Hopefully shims and over-sized plates will do the job. I don't believe code allows more than a 1/8 gap between the box and drywall so that will need to be filled too, or at least use box extensions. Hard to contain an arc when there's a 1/2" gap around the box.


I would go rent a drywall sander. Or...I bought one of this on ebay two years ago for like 180 and it's been a champ. It seems to be a Festool knockoff made by Aleko. The light is awesome. They make many other less expensive models too. It comes with like a 15' hose that fits right to a shop vac hose. Use a bag in the shop vac and you're good to go.

If your going to use something like this you need to buy a dust deputy for your vacuum. I just finished some drywall and was not aware of them. I was cleaning my filter every 15 min. With the dust deputy doing wood dust clean up I have not cleaned my filter in a month of pretty heavy use.
 

rusty1

Well-known member
Joined
Feb 6, 2009
Messages
518
Location
No. Illinois
..I'd take it all down as I hate drywall, see what's under there, fix it, put up some nice Cedar boards or knotty Pine...
 

JRC3

Well-known member
Joined
Jun 30, 2014
Messages
12,481
Location
Southwestern OH
If your going to use something like this you need to buy a dust deputy for your vacuum. I just finished some drywall and was not aware of them. I was cleaning my filter every 15 min. With the dust deputy doing wood dust clean up I have not cleaned my filter in a month of pretty heavy use.

That's why I said to use a bag in the shop vac. I run a bag and a HEPA, works like a champ. I've really considered getting a cyclone attachment but I don't do enough drywall to justify it.

When I bought this sander I also bought the knock-off vac with the it. It had a cloth bag that had to be emptied and some mini cyclone compartments that had to be cleaned too. It was a waste of $100 and I much prefer my Rigid.
 

jeffer949

Well-known member
Joined
Sep 8, 2017
Messages
80
I had the hepa and bags before also. The bags along with the hepa filter restricted the air so much that even with it just running open the exhaust was hot which means your motor isn't getting cooled enough. Switched to the dust deputy, got rid of the bags and did keep the hepa just because I have it. Air is cool and I get much better suction and I dont have to clean filters or buy bags.
 

James-W

Well-known member
Joined
Feb 3, 2013
Messages
12,432
Location
Southeastern Wisconsin
I would be worried about what is underneath, making removing the **** drywall a desirable option, drywall is not cheap like it once was & after buying 8 sheets (4 greenboard & 4 regular) of 1/2" drywall + sundry items for a bathroom remodel costing around $120 this week brings that point home, but then you know what is underneath, funky drywall means the wiring is probably the same.
I agree with you completely. When you see a terrible drywall job the home owner did you have to wonder just how good the wiring is or even how well the wall itself was constructed. If you really want peace of mind then it would be best to rip all the drywall down, make sure everything is done correctly and if it isn't you need to fix it, then start over with new drywall and do it right. Yes, it will be more expensive this way, but you will sleep better at night knowing everything is done right and your house is not an accident just waiting to happen.
 

Brian_WK

Well-known member
Joined
Jun 30, 2015
Messages
1,177
Location
NE South Dakota
The same reason they did't loosen two screws to take down a light fixture. I'd also bet that none of the receptacles or switches were loosened or removed while hanging sheets so they are gonna be loose. Hopefully shims and over-sized plates will do the job. I don't believe code allows more than a 1/8 gap between the box and drywall so that will need to be filled too, or at least use box extensions. Hard to contain an arc when there's a 1/2" gap around the box.


I would go rent a drywall sander. Or...I bought one of this on ebay two years ago for like 180 and it's been a champ. It seems to be a Festool knockoff made by Aleko. The light is awesome. They make many other less expensive models too. It comes with like a 15' hose that fits right to a shop vac hose. Use a bag in the shop vac and you're good to go.

If your going to use something like this you need to buy a dust deputy for your vacuum. I just finished some drywall and was not aware of them. I was cleaning my filter every 15 min. With the dust deputy doing wood dust clean up I have not cleaned my filter in a month of pretty heavy use.

These 2 ideas combined are great especially if you are doing anything on the ceiling the only issue is the paint is going to wad the sanding discs up pretty bad.

If you get a carbide scraper like THIS LINK and a half dozen blades you can remove lots of material from the walls (you can do overhead but you will be pain for it(PUN)) This meathod will also remove excessive paint stipling and smooth it out.. Once you scrape the excess off fiber tape and feather to 12 inches like stated earlier. If the whole walls looks like **** skim coat, PVA Primer, then finish paint.

Brian
 

Dave in Mass

Well-known member
Joined
Jan 29, 2013
Messages
635
Location
Massachusetts
I would go with the 1/4 inch solution and since you recognize it is messed up, you won't make the mistake I made on my first house about 35 years ago.

Have a laugh at my expense....

When I bought my first house, we had a room with really old wallpaper that we couldn't scrape without gouging the walls. My brother showed me the 1/4" method of covering up. He helped me get all the sheets up, re-trim, do the outlets etc...

He left me with what he thought would be the simple part of doing the first coat of mudding the seams and corners and left me with a 5 gallon jug of joint compound. He didn't tell me that 5 gallon jug was for that room, and any other rooms we might need to do. He came back the next night and I had used about 1/3 of the bucket.

So I have done both the 1/4" cover up and massive sanding both at the same time. I quickly learned the "less is more" concept for joint compound.
 

JRC3

Well-known member
Joined
Jun 30, 2014
Messages
12,481
Location
Southwestern OH
1/4 cost more than 1/2 drywall and it seems to me it would sag. Why spend more than it would cost to replace it if replacing it better. Tearing the old down would probably take less time than trying to hit studding through and then dealing with the blemishes when you miss. That's my opinion, anyways.

Not saying 1/4" is wrong, but it seems wrong for this application.
 

DenisG

Well-known member
Joined
Jul 14, 2013
Messages
1,278
Location
Milwaukee
Find where the studs are with a stud finder. My bet is that for the pictures of those walls, the vertical joints between the drywall pieces are between studs. If that is true, no amount of taping and mudding will fix the problem.
 

James-W

Well-known member
Joined
Feb 3, 2013
Messages
12,432
Location
Southeastern Wisconsin
1/4 cost more than 1/2 drywall and it seems to me it would sag. Why spend more than it would cost to replace it if replacing it better. Tearing the old down would probably take less time than trying to hit studding through and then dealing with the blemishes when you miss. That's my opinion, anyways.

Not saying 1/4" is wrong, but it seems wrong for this application.
I am in total agreement. I just checked the cost and 1/2 inch drywall is $7.86 per sheet and 1/4 inch drywall is $8.86 per sheet. That price is for regular drywall. So why would anyone want to pay more and go thru the problem of finding the studs when they can rip down the old drywall and put up new drywall for less money? That seems like a no-brainer to me.
 

JRC3

Well-known member
Joined
Jun 30, 2014
Messages
12,481
Location
Southwestern OH
And 1/4 is a pain to deal with. It's flimsy to hold in place and it's hard to set the screws properly, I imagine even harder with a piece of 1/2 drywall sandwiched between. 1/4 is made for curves and the curve actually gives it its strength.
 

Milton Shaw

Well-known member
Joined
Feb 11, 2011
Messages
4,836
Tear down one or two sheets and see what kind of mess he left of the electrical, insulation etc behind the drywall. Decided from doing that what should be done with the rest of the rooms. If you find electrical junctions outside of boxes and boxes hidden in the walls. Tear it all down and eliminate the fire hazards before you have a fire. You might have plumbing/HVAC problems in the walls to. If a hacker messed up the drywall that bad, chances are everything behind the walls is a mess too. Pay the price once and wait a year or two on the shop knowing the house won't burn down from his mess.
 
To avoid these ads, REGISTER NOW!
Top Bottom