
MayerMR
Well-known member
Hey fellas,
I recently posted another vise restoration, a little Lakeside 3'' vise, and I'd like to think I learned some lessons from that exercise in insanity...I've moved onto bigger and better things. My most recent vise restoration is definitely both of those things...bigger and better...in almost every way.
So when I was wrapping up the little Lakeside vise restoration I came across this Wilton 1750 outside under a tarp at a local antique tool store. The vise had obviously lived outside (and uncovered) for a considerably longer time than its time there at the shop and was completely seized. It was also missing the front collar. The only part on the vise that *wasn't* seized was the main screw - that said, the handle WAS completely seized and it would not move a milimeter.

Truth be told, I wasn't even sure it was a Wilton when I purchased it, but the price was right and I thought it would be a fun challenge.
After getting her home, I gave her a liberal dose of PB Blaster on and off for about a week. One night I was feeling cheeky and decided I'd go out and see how much I could get apart. I was pleasantly surprised when I was able to get every piece (minus the jaws) removed without too too much trouble.

Though it all came apart pretty easily, I was left with a ram that was well and truly *stuck*. It was about this time that I had to go on a short work trip, so I dropped the whole thing in a 3-gal bucket of Evapo-rust for the duration of my trip. I don't know exactly what I was hoping for upon my return, but getting the ram to slide on out wasn't what I came home to.
I did, however, had a slightly less rusty vise...

My next step was to figure a way to loosen that darn ram. I got to thinking and into my head popped what I thought to be a great idea...I thought..."Why not use the weight of the vise to my advantage?", as I pictured a fence post driver.
Off to Home Depot I go with my deviously brilliant plan in mind...with the result below

I don't think I need to explain the concept further, but suffice it to say that it was a grand failure. The duct tape didn't stick as well as I'd hoped...I didn't think I needed much, really just wanted the PVC pipe to act as a guide for the large dowel. But yeah, that didn't work. The dowel seemed to absorb too much of the blows even before the duct tape failed.
That said, onto Plan B...which actually worked right away...ugh
After mounting the vise on my outside gardening/painting table and setting it on its side, I used a 2'' hitch ball which fit nicely onto the ram to evenly distribute each blow. After about 3 whacks with 3lb hammer I could see movement!
A few blows later and BAM success!

So a bit of a fast forward, for the sake of everyone's patience, I proceeded to wire wheel the whole vise and ground off the slag from the PO's messy welds. Additionally, I was able to remove the jaws, though one screw did decide to twist the head off. Luckily, I was able to extract the rest of the screw with the remaining threads.

I then filled the dings and uneven surface of the anvil with JB Weld.

After filing and sanding the JB Weld down the next day, I then primed with a couple of coats of etching primer:

Then I hit it with some Rustoleum Professional Performance Enamel in Safety Blue. Word to the wise here...on the can it says that you can handle in 2-3hrs and it's fully dry in 24hrs. While that may be try if you can get the paint on in the summer and leave the piece in the sun to fully cure, but if it's not that warm out or if it's humid, then you really need to way 2-3 DAYS before it's fully dry. I'd suggest >24hrs before even handling - you really can handle the piece sooner, but you run the risk of leaving fingerprints or marring the surface.

I couldn't resist putting the vise on the base, even though I hadn't painted the top of the base yet.
In the meantime, while the paint was curing, I had thrown the remaining bits in the Evapo-rust and hit them with the wire wheel. I was amazed at how badly the rust had eaten into the main screw. I considered replacing it, but honestly, even with the missing metal, I seriously doubt it'll be a problem. I do plan to have a buddy add some metal to the shaft with his welder, I'll then grind it back flat.

PS, is Evapo-rust not some amazing stuff? Look how it cleaned up that rusty iron!
I then decided that I wanted to fabricate an endcap for the vise, even though these (apparently) didn't originally come with one from the factory. After reading around, I found another person who found that a Dorman 1 5/8'' freeze plug ($0.88) fits the hole well with a little machining.
Here it is with a coating of etching primer:

I didn't have a lathe, so turning it down to size wasn't an option for me. But I do have a belt sander. What I did was sand down the outer diameter of the main screw nut by about 1mm so it would snugly fit the ID of the freeze plug. Once mounted, I still had some interference with the end cap, I fixed this by grinding just a little off the OD of the freeze plug until it would fit without interference.

Then it was time for the final top coat to get the areas I missed when painting the bottom parts of the vise

After a quick call to Wilton (who has great customer service, btw) I received a brand new aluminum decal tag.
I also needed to procure a new collar, which I sourced on eBay. It came with a thrust washer (which isn't used on the older Wilton 1750, btw) and three new 10-32 philips screws. I didn't want to use philips again, so I picked up some stainless 10-32 allen bolts from the local Lowes.
Next up was addressing the jaws...only one of the two was actually a real jaw. The other was a piece of flat stock. In order to rectify this, I decided my money was much better spent buying new, high quality jaws from Kevin at Wilton Vise Parts. I initially ordered aluminum soft jaws, but after speaking with Kevin, he convinced me that I would be much better served with a set of his smooth jawed hardened steel jaws.
http://www.wiltonviseparts.net/5-x-3-4-x-1-2-inch-thick-smooth-wilton-vise-jaws/
These jaws were $60 shipped, while other varieties available online are in the $40 range and are of lesser quality...generally with pretty poor reviews. That said, other than purchasing these jaws from Kevin, I have no other affiliation with him...just wanted to give him a plug!
So tonight when I got home, my new jaws were waiting for me and I gotta say, whew, these are some nice jaws. Very high quality and they fit perfectly.
Now it was time to do the finishing touches!
And here she is, fully recovered from her dark times!


I'm real happy with the way she turned out. I believe it's ready for another 40 yrs of work!
Up next is a recently acquired Athol 624 1/2...luckily, this one has led a much better life...
I recently posted another vise restoration, a little Lakeside 3'' vise, and I'd like to think I learned some lessons from that exercise in insanity...I've moved onto bigger and better things. My most recent vise restoration is definitely both of those things...bigger and better...in almost every way.
So when I was wrapping up the little Lakeside vise restoration I came across this Wilton 1750 outside under a tarp at a local antique tool store. The vise had obviously lived outside (and uncovered) for a considerably longer time than its time there at the shop and was completely seized. It was also missing the front collar. The only part on the vise that *wasn't* seized was the main screw - that said, the handle WAS completely seized and it would not move a milimeter.
Truth be told, I wasn't even sure it was a Wilton when I purchased it, but the price was right and I thought it would be a fun challenge.
After getting her home, I gave her a liberal dose of PB Blaster on and off for about a week. One night I was feeling cheeky and decided I'd go out and see how much I could get apart. I was pleasantly surprised when I was able to get every piece (minus the jaws) removed without too too much trouble.
Though it all came apart pretty easily, I was left with a ram that was well and truly *stuck*. It was about this time that I had to go on a short work trip, so I dropped the whole thing in a 3-gal bucket of Evapo-rust for the duration of my trip. I don't know exactly what I was hoping for upon my return, but getting the ram to slide on out wasn't what I came home to.
I did, however, had a slightly less rusty vise...
My next step was to figure a way to loosen that darn ram. I got to thinking and into my head popped what I thought to be a great idea...I thought..."Why not use the weight of the vise to my advantage?", as I pictured a fence post driver.
Off to Home Depot I go with my deviously brilliant plan in mind...with the result below
I don't think I need to explain the concept further, but suffice it to say that it was a grand failure. The duct tape didn't stick as well as I'd hoped...I didn't think I needed much, really just wanted the PVC pipe to act as a guide for the large dowel. But yeah, that didn't work. The dowel seemed to absorb too much of the blows even before the duct tape failed.
That said, onto Plan B...which actually worked right away...ugh
After mounting the vise on my outside gardening/painting table and setting it on its side, I used a 2'' hitch ball which fit nicely onto the ram to evenly distribute each blow. After about 3 whacks with 3lb hammer I could see movement!
A few blows later and BAM success!
So a bit of a fast forward, for the sake of everyone's patience, I proceeded to wire wheel the whole vise and ground off the slag from the PO's messy welds. Additionally, I was able to remove the jaws, though one screw did decide to twist the head off. Luckily, I was able to extract the rest of the screw with the remaining threads.
I then filled the dings and uneven surface of the anvil with JB Weld.
After filing and sanding the JB Weld down the next day, I then primed with a couple of coats of etching primer:
Then I hit it with some Rustoleum Professional Performance Enamel in Safety Blue. Word to the wise here...on the can it says that you can handle in 2-3hrs and it's fully dry in 24hrs. While that may be try if you can get the paint on in the summer and leave the piece in the sun to fully cure, but if it's not that warm out or if it's humid, then you really need to way 2-3 DAYS before it's fully dry. I'd suggest >24hrs before even handling - you really can handle the piece sooner, but you run the risk of leaving fingerprints or marring the surface.
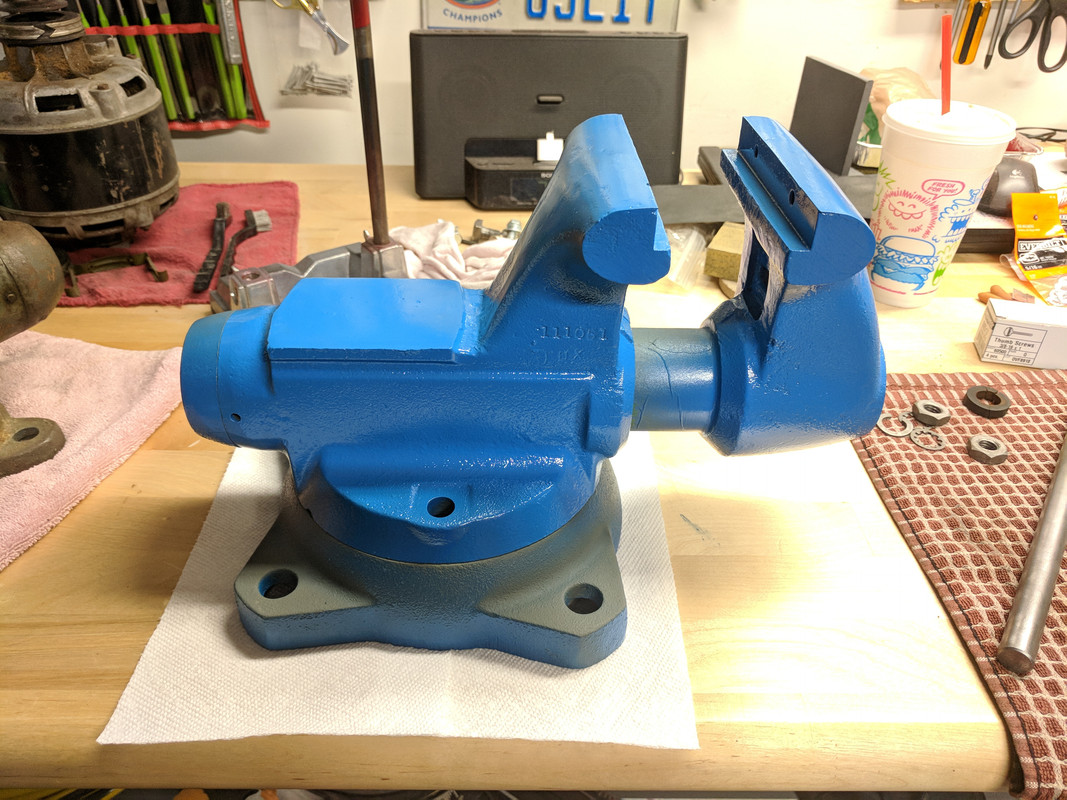
I couldn't resist putting the vise on the base, even though I hadn't painted the top of the base yet.
In the meantime, while the paint was curing, I had thrown the remaining bits in the Evapo-rust and hit them with the wire wheel. I was amazed at how badly the rust had eaten into the main screw. I considered replacing it, but honestly, even with the missing metal, I seriously doubt it'll be a problem. I do plan to have a buddy add some metal to the shaft with his welder, I'll then grind it back flat.
PS, is Evapo-rust not some amazing stuff? Look how it cleaned up that rusty iron!
I then decided that I wanted to fabricate an endcap for the vise, even though these (apparently) didn't originally come with one from the factory. After reading around, I found another person who found that a Dorman 1 5/8'' freeze plug ($0.88) fits the hole well with a little machining.
Here it is with a coating of etching primer:
I didn't have a lathe, so turning it down to size wasn't an option for me. But I do have a belt sander. What I did was sand down the outer diameter of the main screw nut by about 1mm so it would snugly fit the ID of the freeze plug. Once mounted, I still had some interference with the end cap, I fixed this by grinding just a little off the OD of the freeze plug until it would fit without interference.
Then it was time for the final top coat to get the areas I missed when painting the bottom parts of the vise
After a quick call to Wilton (who has great customer service, btw) I received a brand new aluminum decal tag.
I also needed to procure a new collar, which I sourced on eBay. It came with a thrust washer (which isn't used on the older Wilton 1750, btw) and three new 10-32 philips screws. I didn't want to use philips again, so I picked up some stainless 10-32 allen bolts from the local Lowes.
Next up was addressing the jaws...only one of the two was actually a real jaw. The other was a piece of flat stock. In order to rectify this, I decided my money was much better spent buying new, high quality jaws from Kevin at Wilton Vise Parts. I initially ordered aluminum soft jaws, but after speaking with Kevin, he convinced me that I would be much better served with a set of his smooth jawed hardened steel jaws.
http://www.wiltonviseparts.net/5-x-3-4-x-1-2-inch-thick-smooth-wilton-vise-jaws/
These jaws were $60 shipped, while other varieties available online are in the $40 range and are of lesser quality...generally with pretty poor reviews. That said, other than purchasing these jaws from Kevin, I have no other affiliation with him...just wanted to give him a plug!
So tonight when I got home, my new jaws were waiting for me and I gotta say, whew, these are some nice jaws. Very high quality and they fit perfectly.
Now it was time to do the finishing touches!
And here she is, fully recovered from her dark times!
I'm real happy with the way she turned out. I believe it's ready for another 40 yrs of work!
Up next is a recently acquired Athol 624 1/2...luckily, this one has led a much better life...
Last edited:


