
You are using an out of date browser. It may not display this or other websites correctly.
You should upgrade or use an alternative browser.
You should upgrade or use an alternative browser.
Finishing my garage
- Thread starter XcYZ
- Start date
What's that white stuff on the floor in the background?
We don't get that here in South Texas!
That's free air conditioning in Minnesota.

XcYZ,
The shelves are brilliant, so brilliant infact, I see some being fabricated in my garage. I really wish i could put into words how much I like those shelves and please take my "copy cat" attempt as a form of flattery.
Before i launch into my attempt i would like to pick your brain for a moment. I see you built them out of 2x6's, awesome, great minds think a like. I am curious as to how you attached them to the wall. Does each 2x6 coming off the wall attach to the studs, or did you drywall, build the shelves and screwed them into the wall? I am curious about the vertical supports going to the roof. Threw the dry wall to each roof truss, or dry wall with a cross 2x4 spanning the roof with the supports fastened to that?
Lastly, how deep are those shelves? I have terrible depth prospection with pictures.
Thank you again for sharing this GENIUS idea,
Scott
Thanks, glad you like it.

The 2x6's extend into the wall and are screwed to the studs. The vertical supports are screwed into the back of the face of the soffit so I could finish it off. There's a 2x4 that runs along the ceiling that's screwed to the bottom of the rafters so the vertical supports would have something to attach to. The vertical supports are spaced around 4 ft apart.
The depth of the soffit is 24". I designed it that way so I could simply cut a 4x8 sheet of plywood in half and not have any waste. I just had to notch out the plywood where the vertical 2x4 supports were. The height of the soffit opening is also 24". That was also based on being able to take a sheet of 5/8" MDF, cutting it in half and having 2 sliding doors ready to go. Well, that was the plan anyways. After adding the roller tracks and the 1x4 nailer for installing the trim to hide the tracks, the sliding soffit doors are about 22".
Now I have no plans on putting an engine block or transmission up there, but it's fantastic for stuff that I want to keep but only need on occasion. Right now, I have all my extra electrical supplies up there, along with a lot of original Camaro interior parts like the dash, window regulators, door panels, etc. Just tons of random stuff. The soffit also worked awesome for mounting my speakers. They're just laying on their side on the shelf. I just cut the openings in the sliding doors to match the speakers, then re-used the speaker grills to cover up the holes. To mount the grills, I just drilled 4 holes in each door that align to the mounting pegs of the grills and pressed them in. Works great and looks decent I think.
Attached is a pic of a grey plate that I used for a test. It matches the paint on the service door and window trim perfectly, so I ordered up everything I need for replacing all the receptacles, switches and covers in the same grey. Should look good I think. You can also see the last thing I need to do - paint and install the service door trim.
I should also note that I installed the recessed lights 18" out from the wall and NOT centered at 12". You can see that in the attached pic as well. I knew I'd be installing 12" deep wall cabinets, so I split the difference from where the face of the wall cabinets would be to the face of the soffit.
Attachments

caper150
Well-known member
Ummm Scott, where are the pics they took from a couple of weeks ago, they would go over very well here
BTW I don"t think I ever did tell you how good it looks, great job you'll have to do mine once the drywall is done, how do you feel about Ford Blue
BTW I don"t think I ever did tell you how good it looks, great job
you'll have to do mine once the drywall is done, how do you feel about Ford BlueHm, I was afraid that you might have built those directly off the 2x4 walls. I am trying to get approval for this idea right now, but I would be building the the other way I had mentioned. I think with 2x6 and 3 lag bolts to each vertical 2x4 i should be ok... but i still like how you did it better
Thank you for the explanation
Thank you for the explanation
Kevin54
MEMBER EMERITUS

The red is oversaturated in these pics, it's pretty much an exact match of the red that's on a Craftsman toolbox.
So the walls AND your Camaro are red? My monitor is showing more of an orange hue to it and I though the walls were done in the same color as the car. Hell...My bad, I thought the Camaro was orange. But in either color it still looks fantastic. I pretty much have my wife talked into doing the house garage in orange.
Yes, totally red. The paint on the walls is actually a true red base, nothing added to it.
I think the combination of the 3600K flourescents, the halogen recessed lights, and the flash on my camera makes it look on the orange side in a few of the pics. For comparison, here's a random shot without the flash.
I think the combination of the 3600K flourescents, the halogen recessed lights, and the flash on my camera makes it look on the orange side in a few of the pics. For comparison, here's a random shot without the flash.
Attachments
MThomas
Member
first class all the wa. Looks GREAT!!!!!!!!
ghnl
Well-known member
I agree - your garage looks great. I admit that at first I thought the red on the walls was too much. But after you added the black cabinets it became mostly a red accent above the cabinets. Now I think it is juussst right!
I agree - your garage looks great. I admit that at first I thought the red on the walls was too much. But after you added the black cabinets it became mostly a red accent above the cabinets. Now I think it is juussst right!
I agree, without the cabinets, countertops, toolbox, and other assorted equipment, the red to was too much. But with all those things in the garage, I really like it.
Ummm Scott, where are the pics they took from a couple of weeks ago, they would go over very well here
BTW I don"t think I ever did tell you how good it looks, great job
You mean like this pic? I haven't seen the newspaper deal yet, but I guess it's out now.
I think blue would have looked really good as it works well with the different shades of grey. Before I painted the red, I used that darker grey paint as the background/primer so I only needed to paint 2 coats. The tape I used is that brighter blue, and when the dark grey met the light grey with the 2" of medium blue, it looked really nice. I can e-mail you a crappy cell phone pic if you'd like.
BigDawgDavao
Well-known member
Nice ride and shop.
Just curious if you are on the Team Camaro forum? I don't recall coming across it over there yet, though I'm not that long a member there myself. There are some guys over there that would love to see what you've done with both the car and garage.
Aaron
Just curious if you are on the Team Camaro forum? I don't recall coming across it over there yet, though I'm not that long a member there myself. There are some guys over there that would love to see what you've done with both the car and garage.
Aaron
BigDawgDavao
Well-known member
Fair enough, if you got your reasons, who am I to stand in the way. Still, as a fellow Camaro guy and garage aficionado, you got a great car and shop. Mine (both car and shop) is still in the works and I only hope it turns out as well as yours.
Aaron
Aaron
Yellowmann
Active member
- Joined
- Jun 6, 2007
- Messages
- 26
Great job on the car and garage!!!
Thanks guys. I'll post up a few more pics once the grey receptacles, switches and covers are in.
Thanks again Aaron, I appreciate the kind words.
The epoxy is Wolverine Coatings from Alpha Garage. The color is light grey and the color flakes are black, white and medium grey. The surface mounted lights are four bulb T8 fixtures (6 fixtures for a total of 24 bulbs) and the recessed task lighting in the soffits are 50W halogen.
I'll post up a few more pics once the grey receptacles, switches and covers are in.Fair enough, if you got your reasons, who am I to stand in the way. Still, as a fellow Camaro guy and garage aficionado, you got a great car and shop. Mine (both car and shop) is still in the works and I only hope it turns out as well as yours.
Aaron
Thanks again Aaron, I appreciate the kind words.
Very nice!!! what epoxy floor coating did you use? and what type of lighting. Enjoy.
The epoxy is Wolverine Coatings from Alpha Garage. The color is light grey and the color flakes are black, white and medium grey. The surface mounted lights are four bulb T8 fixtures (6 fixtures for a total of 24 bulbs) and the recessed task lighting in the soffits are 50W halogen.
wrigh003
Well-known member
They're OK, I guess.
Just kidding. The car and shop are both great- hard to imagine how either could be done better. I am stealing that soffit shelf/ lighting idea!
Just kidding. The car and shop are both great- hard to imagine how either could be done better. I am stealing that soffit shelf/ lighting idea!

McDowell
Member
looks great man. overall a very impressive project, not to mention a VERY impressive Camaro.
jktruck150
Well-known member
OK, I have to admit, Nice garage, Nice car!! I am impressed. I wish my detail was that good and my shop with look a heck of a lot better! I think the lighting makes the difference in that place. I just wanted to say kudos to you!
CodeRedZ
Well-known member
wow love it, and love the camaro, i tried to rescue a 68 from rotting away but the guy won't sell it 

51rider
Well-known member
Superb job on the garage & the car is stunning
I'm gonna have to see if I can incorperate the soffit idea in my design.
I'm gonna have to see if I can incorperate the soffit idea in my design.
STORMEASTON
Well-known member
Go'in on the Power Tour this year?
wow love it, and love the camaro, i tried to rescue a 68 from rotting away but the guy won't sell it
Thanks! That 68 looks like it needs someone who cares. You hear it all the time - I'm going to restore it someday.
Superb job on the garage & the car is stunning
I'm gonna have to see if I can incorperate the soffit idea in my design.
The soffit storage works great. Now that I have everything back in the shop and using the space, I'm really happy with it. It really wasn't all that expensive, yet adds a ton of hidden space.
Go'in on the Power Tour this year?
Yep, at least the first 4 days again like last year.
CodeRedZ
Well-known member
Thanks! That 68 looks like it needs someone who cares. You hear it all the time - I'm going to restore it someday.
yup thats exactly what the guy said though its sat in the same spot for at least 5 years and it is pretty complete though missing the intake and valve covers from the engine and has house carpet in it lol
Rudyjr
Well-known member
Looks great! Do you have any more information on the source for the cabinets, and the model etc? I did a search on Dakota and came up empty. Thanks, Jim
yup thats exactly what the guy said though its sat in the same spot for at least 5 years and it is pretty complete though missing the intake and valve covers from the engine and has house carpet in it lol
House carpet... poor Camaro! lol
Looks great! Do you have any more information on the source for the cabinets, and the model etc? I did a search on Dakota and came up empty. Thanks, Jim
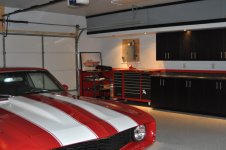
They're custom cabinets from Dakota Kitchen. I guess there's nothing real custom about them other than they're made to order, other than that, they're pretty much what you see is what you get. The outside is solid black, the insides are solid white. The uppers have 3 adjustable shelves and the lowers each have 1 adjustable shelf. They are extremely heavy duty. The stainless door handles are off a dealer on Ebay. They're 6" long and were just over $2 each.
Next spring I think I'm going to make some drawers with full extension slides for a few of the base cabinets. It would make storing and finding hardware a bit easier.
Here are a couple more shots of the cabinets.


CodeRedZ
Well-known member

BreBar21
Well-known member
The garage is ridiculously nice, but I'm in awe of the car! I love it. Stunning!
KNS Autosport
Well-known member
I love it, what an amazing Garage and beautiful Camaro
GregJW
Well-known member
Wow! Awesome garage and camaro!!
blackwolf944
New member
Beautiful. Both the garage and the Camaro. Just beautiful.
Crzydmnd72
Well-known member
- Joined
- Jun 3, 2007
- Messages
- 284
Subscribed! And your design inspired ideas for my tiny one car also.!
SShink
Member
Scott, love the thread and the Camaro. 
What area of MN do you live? (PM me if you don't want to make it public).
We recently had a detached 20 X 24' shop/mini-man cave built, and a lot of what you incorporated into your project fits with what I was thinking of doing. The only difference is yours is 4' wider and my inside ceiling height is just over 11' to the bottom of the rafters.
Could you post a couple of pics of the inside of the storage soffits that also show how they were constructed? Thanks.
Thanks guys!
I'm in the Rochester area.
I guess I don't have any pics of the soffit construction other than what I posted on page 1 of this thread. It's pretty straight forward, I basically just built a 2x6 shelf that's anchored to the wall studs and to the rafters. If you look at the very first pic on page 1, the one of the unfinished garage, you can see that I originally had a shelf that I built that was made out of 2x4's that ran the perimeter of the garage. It was just open and unfinished. The soffit idea just grew from that concept. I tore all the 2x4 shelving down though and rebuilt it out of 2x6's for additional strength and room for the recessed lights.
The doors are just plain 5/8 MDF that are mounted with rollers to the sliding closet door tracks. The tracks are mounted to a 1x4 so I had a nailer for the black trim that covers all the hardware. The trim is pre-primed MDF as well. It's all really low-buck, but once everything was painted, it looks decent.
I wouldn't put a block or transmission up there, but I have lots of stock 69 Camaro parts stored away. It's perfect for that.
Scott, love the thread and the Camaro.
What area of MN do you live? (PM me if you don't want to make it public).
We recently had a detached 20 X 24' shop/mini-man cave built, and a lot of what you incorporated into your project fits with what I was thinking of doing. The only difference is yours is 4' wider and my inside ceiling height is just over 11' to the bottom of the rafters.
Could you post a couple of pics of the inside of the storage soffits that also show how they were constructed? Thanks.
I'm in the Rochester area.
I guess I don't have any pics of the soffit construction other than what I posted on page 1 of this thread. It's pretty straight forward, I basically just built a 2x6 shelf that's anchored to the wall studs and to the rafters. If you look at the very first pic on page 1, the one of the unfinished garage, you can see that I originally had a shelf that I built that was made out of 2x4's that ran the perimeter of the garage. It was just open and unfinished. The soffit idea just grew from that concept. I tore all the 2x4 shelving down though and rebuilt it out of 2x6's for additional strength and room for the recessed lights.
The doors are just plain 5/8 MDF that are mounted with rollers to the sliding closet door tracks. The tracks are mounted to a 1x4 so I had a nailer for the black trim that covers all the hardware. The trim is pre-primed MDF as well. It's all really low-buck, but once everything was painted, it looks decent.
I wouldn't put a block or transmission up there, but I have lots of stock 69 Camaro parts stored away. It's perfect for that.
USMCBay
Well-known member
Wow~! I think a fly just landed on my tongue... (Eating my heart out...)
Great looking end result and THAT is one fine Camero...
Great looking end result and THAT is one fine Camero...
Cobra4B
Well-known member
Great garage for a great car... I followed you build up on LS1tech over the past couple of years Awesome idea on the shelves and recessed lighting. It's amazing how a little lighting like that can make a space look so much classier
Awesome idea on the shelves and recessed lighting. It's amazing how a little lighting like that can make a space look so much classier