To avoid these ads, REGISTER NOW!

Above 1200 Sq/FT Cleaning Up My Shop

Wokspaces above 1200 squarefeet.
OP
O

oldironfarmer

Well-known member
Joined
Jun 25, 2016
Messages
6,664
Location
Terlton, Oklahoma
Andy, Great work or should I say FUN on the casting process. It's been fun to watch and learn along with you. I did a little bit of aluminum casting in college and we also used foam as our model. I wasn't going to mention foam to you because I thought what you were doing was supposed to be better. So, I am still reading, watching and learning from you. We are far to swamped with packing and moving to our new/old house with new garage and studio but someday soon I still hope to visit. On order, 2 brooms, a hammer and anything else you may come up with. Also I hope to be able to contribute to the aluminum stock pile. We will see.
You have mostly rekindled my interest in casting too. I'm an artist/designer so I may be drawing and thinking through some design ideas.

I've missed so much in my life! No casting in HS (like my son) or college.:sad::sad: What was I thinking?

I'm trying to catch up.

Bring a little aluminum and watch a broom made to order. Or two. You're close enough to use my furnace to do a little casting.

I feel the same way. More I figure out the more I need to learn... or the more I learn, I realise the less I know.

The engineer's career: I learn more and more about less and less until when I retire I'll know everything about nothing.


Talking about TV... TV is is much more fun when you can watch Youtube in style. My wife had a good laugh watching Andy hooning in his show truck on the big screen! :D

I should be embarrassed but instead I'm tickled.

I always forget you guys have access to things at a scale we struggle to obtain. $5 gets me roughly 4m of nichrome here in NZ unless I find more obscure sources for it. Depending on the length I think the straightest cylinder would come from using a straight wire in a jig like a lathe but for short sections a round wire would be great. Setting the wire angle compared to the bed angle on the lathe would cut cones for days. Many guys make a hotwire setup like a bandsaw and cutting discs would just require a tack on the table like a circle cutting jig on a bandsaw. Alternative is to make two wooden(HDF/masonite works well if you sand the edges smooth) discs as profiles on the ends and follow it with the hotwire - this is basically how I cut the profiled core for my XPS core surfboards and glider wing cores. I'm starting to run out of cat skins(skinning the proverbial cat here)

I was thinking a bandsaw setup with a tilt table, then a hand held tool of some type for flexibility. I'm thinking about buying another soldering iron and abusing the element.

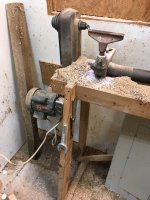
I have an old home build wood lathe that I sometimes use as a rotary fixture for things like this. Never had a motor fitted or used for actual wood either. First used it to make NERF rockets from solid poolnoodle(EPP) stock using thicker stainless TIG filler wire bent to the rocket profile(bit like a football shape with a tail coming out of it) and glued on EVA foam fins for fletches. Also cut spheres out of it that way to make cheaper NERF ammo for the guys who play scenario paintball(rocket launcers and bazookas). Different colours for different teams etc. Made some bullet shaped ones too but they had unpredicatble flight trajectories. Been toying with the idea to make a rifling tool and fixture to produce 2" rifled ABS barrels for them.

Hmmm, I have a very old home made wood lathe I need a use for. The guy who owned my broom machine made it probably in the thirties. Mostly wood, home made bearings, too, and it looks like it had some extensive use. His tools were all sharpened files.

My stainless wire hotwire cutter is 24V max and running a 750mm hotwire at around 12VAC if I recall. It is just a 24v stepdown transformer on the other side of a mains light dimmer. Cheap and easy and if I crank it up the wire glows which burns of the stuck foam gunk. :)

They make a really nice hotknife used for crafts that is basically a 1"x6" heated blade and used a lot for making foam patterns. I can try and find a link to one for you if you are interested. The other tool using a wire loop to scoop sections out of the surface like a clay texture tool. Used that a lot when making stuff for stage set and parade float type stuff. Probably not as usefull here unless you need to hollow out the styrene block when doing very large castings. Otherwise you can basically use anything you can make to work. My first polystyrene meat tray gliders were made using a needle heated over a candle.

Heated putty knife sounds like a hot idea.

I used to ad a little beeswax to my wax to make it sticky enough to use with foam. Again not having access to anyhting like modeling wax I concocted my own depending on what I wanted to do with it. Also found it easy to melt and cast the wax into different shapes to make up the components of the object before modeling it. Found if I painted the cooled but still molten beeswax onto the foam I could get other wax parts to stick to it better too. Nowadays we also have things like superglue - would have loved superglue as a kid. Though the plaster had to go on a bit thicker on the wax parts if I recall as the wax was its own release agent and the watery plaster had surface tension issues on it. I use to wait till it gets a bit gloupier before lathering it on.

My modeling wax is very sticky, I need to get a double boiler set up and try putting it on hot.

I'm told PLA(cheap 3D printing plastic) can be used like lost wax too. Though it leaves crud on the casting if poured direct. It can be burnt out of the mold in a furnace when doing investment style casting. It is very popular with investment casting crowd and another reason I'm keen on making a small electric furnace - other than being able to anneal, harden and temper things too.

I may try some lost PLA but I'm a foamie right now. I need to make an electric furnace as well. I think I can use my kiln controller to run it. Might just use some of the 100 ft of nichrome wire I received today.

That would be awesome though 3 months would fly by with all the stuff we'd get up to. You might run out of aluminium too fast and would definitely need a technical writer like Bob to document it for us on GJ.

I've got a lot of aluminum, and 250 gallons of propane...

You come up and Bob will accommodate us.


Almost Saturday here and might be time for a GJ update having started on my 3D printer build. :rocker:

I'm waiting to see that :rocker:

I give a vast deference to thoughtfully chosen names.

It takes a thoughtful person, and they seem to be disappearing:wtf:

Andy casting looks good and it is interesting to watch the lost foam.

Things a person learns as they watch.

Dwight

I always thought lost foam was very poor finish and full of inclusions.

I was wrong.

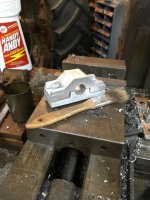
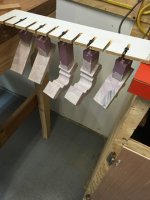
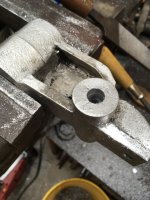
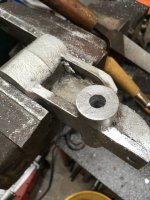
Cut my clamp and machined it today after spending most of the day with my wife. I am extremely pleased with the results.

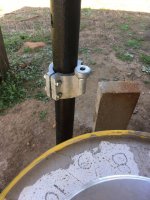
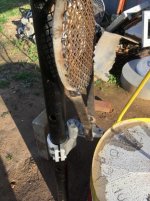
Here it is in place. There is some porosity in the top 1/8" of the boss. The rest seems clean.

attachment.php


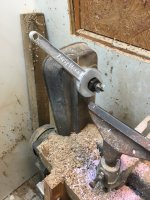
Put a 1/2" blind hole in it, the tray arm will pivot on that. Printed my name backward on the 3D printer then pressed it into the foam. It worked OK.
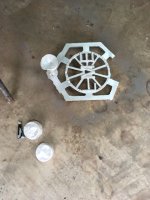
A glamor shot:

attachment.php


Drilled for 5/16" bolts with 3/4" spot faces. It tightens up very easily on the pipe.

attachment.php


I'll work on the cold seams on future work. I think wax will fix that, but they are all very shallow.

Thanks for stopping by!!
 

Attachments

  • IMG_3349.JPG
    IMG_3349.JPG
    109.6 KB · Views: 915
  • IMG_3350.JPG
    IMG_3350.JPG
    139 KB · Views: 920
  • IMG_3351.jpg
    IMG_3351.jpg
    60.5 KB · Views: 898
Last edited:
To avoid these ads, REGISTER NOW!

tym

Well-known member
Joined
Mar 5, 2016
Messages
2,433
Location
MA
A chunk of rail road that large would work well indeed. I’ve seen that steel sought after for making powerhammer dies, swages and hammer heads amongst other tooling. The older stuff especially as it used to be much better quality. I doubt you could use it up in your lifetime though even if you made a strike surface for every flat surface in your workshop!
I'm thinking I might have to locate a chunk of rail and copy this idea. I'd love to have a small anvil for some light work, but the prices for decent ones are NUTS.

Contrast this with a story an old-timer mechanic told me. He was offered a 200 lb anvil for free many years ago--provided he could carry it the 20-30 feet to his truck.

He found a way. ;)
 

dchance

Well-known member
Joined
Oct 3, 2016
Messages
614
Location
OKC
Andy the clamp looks great. I think that you work and designs are improving.

Dwight
 

jbmatth

Well-known member
Joined
Jun 3, 2013
Messages
5,684
Location
Northern Ok.
Andy,
The lost foam looks great, have you thought about doing any permanent molds out of steel?

I'm thinking I might have to locate a chunk of rail and copy this idea. I'd love to have a small anvil for some light work, but the prices for decent ones are NUTS.

Contrast this with a story an old-timer mechanic told me. He was offered a 200 lb anvil for free many years ago--provided he could carry it the 20-30 feet to his truck.

He found a way. ;)

That is how my grandfather picked up the anvil I have now, free if he could move it. I've had to carry it by hand a few times during moves, it never gets lighter but I now have a cherry picker set up all the time for tasks such as this. :bounce:
JB
 
OP
O

oldironfarmer

Well-known member
Joined
Jun 25, 2016
Messages
6,664
Location
Terlton, Oklahoma
I'm thinking I might have to locate a chunk of rail and copy this idea. I'd love to have a small anvil for some light work, but the prices for decent ones are NUTS.

Contrast this with a story an old-timer mechanic told me. He was offered a 200 lb anvil for free many years ago--provided he could carry it the 20-30 feet to his truck.

He found a way. ;)

Rail makes a pretty good anvil. And you can cut a horn into it if you grind a few hours you can wind up with a really nice anvil for light work.

A good anvil is worth a hernia. I suppose.

Andy, love the clamp and attention to detail..:thumbup:

Thank you!:bowdown:

Andy the clamp looks great. I think that you work and designs are improving.

Dwight

It is a learning process, thank you.

Nice looking casting but you have shattered my visions of the hand wrought clamp that could have been featured in the blacksmith's Bible some day. :dunno:

But the clamp is in the foundry. I would have forged something for the blacksmith shop. Maybe.

Andy,
The lost foam looks great, have you thought about doing any permanent molds out of steel?

That is how my grandfather picked up the anvil I have now, free if he could move it. I've had to carry it by hand a few times during moves, it never gets lighter but I now have a cherry picker set up all the time for tasks such as this. :bounce:
JB

Thank you!

I've not considered any permanent molds. Unless I get into something for volume production it would be a lot of work. If I had intended to make several of these I would have made a wooden pattern for sand casting. This is a good low volume process and I need the practice.

I'll give you $100 for your grandfather's anvil.
 

tym

Well-known member
Joined
Mar 5, 2016
Messages
2,433
Location
MA
Rail makes a pretty good anvil. And you can cut a horn into it if you grind a few hours you can wind up with a really nice anvil for light work.
I keep seeing all these spare rails alongside the track on the subway ride into the city and have been tempted to liberate a piece, but (a) it would take a lot of time/effort and (b) the city likely would not approve. LOL.
 
OP
O

oldironfarmer

Well-known member
Joined
Jun 25, 2016
Messages
6,664
Location
Terlton, Oklahoma
Hmmm, around here we don't even joke about taking railroad property.

I finally got my lathe wrench finished. This is what it is for, loosening the big nut to force the lathe center out, and aluminum is fully up to the task.

attachment.php


It replaces a 12" Crescent which will now be put to better use elsewhere.

attachment.php


I have a friend who used to run a fireworks factory. They used to use powdered aluminum but don't anymore. He thought I could melt it.

attachment.php


Now seriously, who doesn't like a pot full of liquid metal?

attachment.php


Since I have the warming tray mounting bracket finished, it was time to make the tray. That's some old Hastelloy wire mesh which is good for elevated temperature service.

attachment.php


Now I have to make the hinge to fold the tray out of the way and hold it level. I think it's another lost foam casting job, I don't plan to ever make another one. So I'm going to build a hot wire setup to cut foam smoothly.

Thanks for stopping by!!
 

Attachments

  • IMG_3352.JPG
    IMG_3352.JPG
    142.4 KB · Views: 734
  • IMG_3353.JPG
    IMG_3353.JPG
    131.1 KB · Views: 733
  • IMG_3354.JPG
    IMG_3354.JPG
    117.5 KB · Views: 731
  • IMG_3357.jpg
    IMG_3357.jpg
    55.8 KB · Views: 725
  • IMG_3359.JPG
    IMG_3359.JPG
    141.7 KB · Views: 733

tym

Well-known member
Joined
Mar 5, 2016
Messages
2,433
Location
MA
Hmmm, around here we don't even joke about taking railroad property.
And that was even one of my more appropriate jokes. ;)

I finally got my lathe wrench finished. This is what it is for, loosening the big nut to force the lathe center out, and aluminum is fully up to the task.

attachment.php
Love how your wrench turned out! Are you planning to make more?
 
OP
O

oldironfarmer

Well-known member
Joined
Jun 25, 2016
Messages
6,664
Location
Terlton, Oklahoma
And that was even one of my more appropriate jokes. ;)

Love how your wrench turned out! Are you planning to make more?

Thanks! I have two more but have not really found a use yet.

Andy, your lathe wrench has come up a treat.:bowdown:

I will bet you are very satisfied with the outcome..

Thank you! It's OK, but the casting could have been better, and the layout on the opening sucked. I cut the opening on center then finish milled to proper dimension on one side only and the entire opening looks way offcenter. Good enough for who it's for, I suppose.

This month I could do a better casting.

Thanks for stopping in!!
 
OP
O

oldironfarmer

Well-known member
Joined
Jun 25, 2016
Messages
6,664
Location
Terlton, Oklahoma
Andy is really cool! :thumbup::thumbup::thumbup:

Thank you! :bowdown:

I'm just having more fun than should be allowed.

Tonight I put together a hot wire cutter to cut foam to make patterns. Had a piece of Formica clad plywood left over from making the new sink cabinet. Cut part of it off and made a frame to hold the wire up. Frame is 3/4" oak and should be plenty strong.

attachment.php


At the top the wire goes through a hole across the head in a bolt which is help up by a spring and wing nut. The spring on the bolt is a little stiff but that is the best I could find in my junk. It seems to be working. The Nichrome wire grows a lot as it heats up so you have to have some way to take up the slack. At the bottom the wire is fixed to a small bolt in a well. I'm using my battery charger on 6v but am going to buy a 12v output transformer and control it with a dimmer switch to get a just a little more voltage.

It's not like a bandsaw. You just can't cut a straight line without a guide. I made a circle guide (screw in a bit of plywood) and need to make something to guide each cut. The I-beams came out OK but the arc in the one beam was freehand and not very smooth. I was able to cut a nice cylinder and peel a sliver off of it. You also have to keep moving. Cutting chills the wire which slows cutting but if you stop the wire heats rapidly and makes a larger cut.

More foam work tomorrow!:rocker:
 

Attachments

  • IMG_3361.JPG
    IMG_3361.JPG
    121.5 KB · Views: 646

Guster

Well-known member
Joined
Mar 11, 2012
Messages
1,543
Location
Auckland, New Zealand
Nice setup Andy! :thumbup:

Know just what you mean. All about constant pressure and speed. You push too hard and you get a curved kerf which can be very problematic with thicker foam cuts as a 25mm drag over 500mm cut follows a completely different path. Otherwise it may also stretch and snap the hot wire when it ‘freezes’ in the foam. Go too slow and you get a ragged cut as the radiated heat from the hotwire creates an inconsistent kerf. For repetitive cuts a template is your best bet and lets you focus on pressure and speed rather than staying on the line. The guys who cut +1m foam glider wing cores have a fancy setup that uses a fixed weight to pull the hotwire bow through the foam so the operator just has to keep the wire on the template with light down pressure. Another reason I prefer the stainless wire as feels like it stretches less with heat and more robust for the 750mm wide cuts I was making.

That bracket came out very nice. The idea to impress your name using a 3D logo was real smart! A few weeks ago you would have just blacksmithed one of those and now you are casting like a pro. You definitely seem to favour the lost foam technique. I think it helps not being so invested in a pattern. Now check out this setup… bit like my idea but he added a speed control motor to it like I always wanted to - http://www.dansworkshop.com/2008/03/hot-wire-foam-cutting/

Good to finally see what the wrench is for. Couldn’t for the life of me figure out what part on a wood lathe needed that. :headscrat

This has me quite excited about lost wax and investment process - https://www.machinablewax.com/product.php?product=52 No problems with PLA residue in the investment. I managed to get some cheap soft firebricks this weekend and have Kanthal coils on their way leaving me to buy a PID+SSR and make an enclosure for it all. I have a great idea to make a flask pot for pulling vacuum on the investment allowing me to use different sized flasks too. Since I have a degassing chamber I don’t need a fancy bell jar setup either.
 
OP
O

oldironfarmer

Well-known member
Joined
Jun 25, 2016
Messages
6,664
Location
Terlton, Oklahoma
Nice setup Andy! :thumbup:

Thank you!

Know just what you mean. All about constant pressure and speed. You push too hard and you get a curved kerf which can be very problematic with thicker foam cuts as a 25mm drag over 500mm cut follows a completely different path. Otherwise it may also stretch and snap the hot wire when it ‘freezes’ in the foam. Go too slow and you get a ragged cut as the radiated heat from the hotwire creates an inconsistent kerf. For repetitive cuts a template is your best bet and lets you focus on pressure and speed rather than staying on the line. The guys who cut +1m foam glider wing cores have a fancy setup that uses a fixed weight to pull the hotwire bow through the foam so the operator just has to keep the wire on the template with light down pressure. Another reason I prefer the stainless wire as feels like it stretches less with heat and more robust for the 750mm wide cuts I was making.

750mm? That's almost 3/4 of a meter!! I don't think I'll ever get there. My wire seems to stay tight, it sings nicely when plucked cold. On my shallow cuts it is pretty easy to find the point where the wire is not being forced, but you are keeping up with the melt. I think the ideal is just about the melt speed. It's tempting to add a foot pedal to vary the voltage so you can lower it on sharp corners. I've been trying to always use a guide board or template. Working on a centerless arc cutter for putting concave arcs into pieces to fit cylinders.

That bracket came out very nice. The idea to impress your name using a 3D logo was real smart!

Thanks! I really do like it but I think I can improve the finish easily with hot wire cutting. Took me a bit to figure out how to print the letters backward, I'm slow. It was too easy. I need to print a set deeper to get a little more relief.

I'm trying toilet wax ring wax for fillet wax now. I need to break down and buy some real casting wax.


A few weeks ago you would have just blacksmithed one of those and now you are casting like a pro. You definitely seem to favour the lost foam technique. I think it helps not being so invested in a pattern. Now check out this setup… bit like my idea but he added a speed control motor to it like I always wanted to - http://www.dansworkshop.com/2008/03/hot-wire-foam-cutting/

Well I really like sand casting. But each has it's place. You can't beat lost foam for a few pieces, but sand is repeatable. JB stopped by today and we were able to make his wife a trivet while he was here. He also left some aluminum castings and took a couple of discs. He has the only pictures of his visit..:(

I'm going to make a hot wire setup for my lathe. I think turning it by hand will work but I need to mount the wire on the tool post, and hinged so it can be fed in as the work is turning with a predetermined stop for each different cut. Right now I'm stabbing the blank on a nail in a piece of plywood and sliding it toward the hot wire to hit a stop for an accurate diameter.


Good to finally see what the wrench is for. Couldn’t for the life of me figure out what part on a wood lathe needed that. :headscrat

:bounce:

This has me quite excited about lost wax and investment process - https://www.machinablewax.com/product.php?product=52 No problems with PLA residue in the investment. I managed to get some cheap soft firebricks this weekend and have Kanthal coils on their way leaving me to buy a PID+SSR and make an enclosure for it all. I have a great idea to make a flask pot for pulling vacuum on the investment allowing me to use different sized flasks too. Since I have a degassing chamber I don’t need a fancy bell jar setup either.

It seems success is varied with the wax filament. But you can't do it until you try. My issue with investment is the dryout time. For the low precision stuff I'm doing foam and sand are working. If I get into things like car emblems lost wax is the way to go. I'd like to see your vacuum ideas.

After JB left I made a pattern for the mating hinge to the clamp on piece. I hope to cast it tomorrow.

attachment.php


The big cylinder mates to the existing clamp hinge, the horizontal cylinder is for the tray support arm pin, and the tab sticking out is the stop to hold the tray up. It may get a set screw to level the tray.

Thanks for the visits and encouragement!
 

Attachments

  • IMG_3369.JPG
    IMG_3369.JPG
    94.8 KB · Views: 510

drivesitfar

Well-known member
Joined
Oct 23, 2013
Messages
36,017
Location
Pacific Northwest
Handy Andy: sorry we didn't have time to stop on this trip back to see our kids, but hopefully some day in the near future i'll get to see you melt some metal, make a broom, tour that caboose, fab up some more parts for the Studakota or just watch you clean up.

we saw a lot of stockyards on the way and not sure i'm going to eat beef again. seeing 1000's of those calf pens that they use to keep the calves from exercising so VEAL can be so tender isn't a pretty picture after seeing yours run around and play.

is your bull still limping or is he running again like nothing happened? what does your vet say now that the bull isn't hamburger?

hope you have some more success in your forming methods cause i'm guessing you like melting metal and making stuff almost as much as anything.

cheers
 
OP
O

oldironfarmer

Well-known member
Joined
Jun 25, 2016
Messages
6,664
Location
Terlton, Oklahoma
Handy Andy: sorry we didn't have time to stop on this trip back to see our kids, but hopefully some day in the near future i'll get to see you melt some metal, make a broom, tour that caboose, fab up some more parts for the Studakota or just watch you clean up.

You know you're welcome anytime! Just bring some old clothes.

we saw a lot of stockyards on the way and not sure i'm going to eat beef again. seeing 1000's of those calf pens that they use to keep the calves from exercising so VEAL can be so tender isn't a pretty picture after seeing yours run around and play.

I doubt the stockyards you saw were for veal, veal calves are quite young and for the most part kept indoors. Stockyards are not a pretty place either, but they do look better than they smell.


is your bull still limping or is he running again like nothing happened? what does your vet say now that the bull isn't hamburger?

He is still limping, but a little less every week. The vet is very surprised. If I had 120 cows and 5 bulls like I used to I would not have kept him. The vet's advice was proper if you're trying to make money on cattle. If I miss even six calves because of him I would have paid for another bull. i haven't seen him breed but I'm pretty sure he is.

hope you have some more success in your forming methods cause i'm guessing you like melting metal and making stuff almost as much as anything.

cheers

You're right, melting metal has a bit of recreational value for me:willy_nil

This morning was cool and clear so while the mommas were eating I penned up all nine calves.

attachment.php


I called my son in law and he had time to come over and work calves. We ear tagged three heifers and castrated five little bulls. The mottled face heifer didn't need an ear tag, her face identifies her. I decided not to ear tag the steers. They'll go to market soon enough anyway.

Then I dunked the new pattern in the sand and poured it. The lost foam is too easy.

attachment.php


It will wire brush up clean. Here is where it goes.

attachment.php
 

Attachments

  • IMG_3370.jpg
    IMG_3370.jpg
    66.5 KB · Views: 406
  • IMG_3371.jpg
    IMG_3371.jpg
    57.9 KB · Views: 406
  • IMG_3372.JPG
    IMG_3372.JPG
    123.2 KB · Views: 406
To avoid these ads, REGISTER NOW!
OP
O

oldironfarmer

Well-known member
Joined
Jun 25, 2016
Messages
6,664
Location
Terlton, Oklahoma
While wire brushing and machining the pivot piece I saw a defect in the corner (upper left in the photo). I'm guessing I didn't get the sand vibrated in tight there.

attachment.php


When I got after it with a cold chisel it popped right off. Hmmm...

attachment.php


Here is how it fits into the scheme of things. You put bits of metal to be melted on the screen to preheat it before dropping into a hot crucible partly full of liquid metal. The screen can pivot sideways to allow access to the crucible below.

attachment.php


And it can be flipped up to stow. I put a set screw in the front bump stop to fine adjust the tray level. It turned out I didn't need that, but it is not in the way. The cross bar also rests on the swivel piece when in the up position.

attachment.php


Another view

attachment.php


And the last view. It now needs a handle to lift and swivel it with, but I wanted to wait until it was in place to verify the handle would not interfere with anything else.

attachment.php


I had planed to use the handle as a counterweight to keep the tray safely in the up position but it leans back enough it is very stable without the handle.

Thanks for stopping in for a visit!!
 

Attachments

  • IMG_3378.jpg
    IMG_3378.jpg
    60.8 KB · Views: 830
  • IMG_3377.jpg
    IMG_3377.jpg
    74.4 KB · Views: 828
  • IMG_3376.jpg
    IMG_3376.jpg
    61.9 KB · Views: 831
  • IMG_3375.jpg
    IMG_3375.jpg
    57.8 KB · Views: 833
  • IMG_3374.JPG
    IMG_3374.JPG
    120.9 KB · Views: 832
  • IMG_3373.JPG
    IMG_3373.JPG
    121.8 KB · Views: 836

realvc

Well-known member
Joined
Jan 7, 2011
Messages
394
Location
Lake Norrell, AR
Hey Andy, everything you do is good. To me some things are gooder than others. This most recent clamp/pivot casting thing is really, really good even the goodest. I don't know why but I like it more that the other things you have cast. It looks so functional and industrial and old school too.

You are an All American Craftsman on many levels and many skills.

Thanks again for taking time to share your thread with us.
 

jimreed2160

Well-known member
Joined
Aug 7, 2016
Messages
3,589
Location
Tallahassee FL
I am really enjoying your thread, Andy. And I am beginning to see a cycle. Andy builds machines and parts so he can build more machines and more parts. He has fun and we all enjoy watching. This stuff could go on forever. :rocker:
 

drivesitfar

Well-known member
Joined
Oct 23, 2013
Messages
36,017
Location
Pacific Northwest
Handy: Very nice work on not only the design, but also making the part too. WELL DONE SIR!!

I sold a few farms in my past and I think the little plastic houses that look like small septic tanks in the huge stockyards we drove by are for the calves so they don't move and it makes the veal more tender. sadly there were hundreds of them at several stockyards while the adults were walking around in mostly **** and mud. what was even stranger was there were more than a few road signs talking about PRO LIFE and not killing a fetus. GO FIGURE? :dunno:

you bet i'll have some jeans and a work shirt if I show up at your place and i'll also have gym clothes in case it's ZUMBA day.

keep up the great work and you have taken this forging a long way and i'm sure there are a lot more things to make and do so keep thinking cause that's what you are good at.

Jim: I vote your post the best post of the day so far cause you hit that nail on the head perfectly!! WELL DONE!!
 
OP
O

oldironfarmer

Well-known member
Joined
Jun 25, 2016
Messages
6,664
Location
Terlton, Oklahoma
Andy, awesome work yet again..:thumbup:

Thank you, Steve :bowdown:

Hey Andy, everything you do is good. To me some things are gooder than others. This most recent clamp/pivot casting thing is really, really good even the goodest. I don't know why but I like it more that the other things you have cast. It looks so functional and industrial and old school too.

You are an All American Craftsman on many levels and many skills.

Thanks again for taking time to share your thread with us.

Wow! I'm embarrassed by the accolades, but thank you!

I have to admit I really like the little casting too. It was easy and came out much better than I expected. And with a little practice it can be better. For instance the top piece cylinder is a little bulky. While in making one piece I don't need to save aluminum, I can see now that if the center of the cylinder were a reduced diameter I would like it better.

I see a new foundry building in your future! Nice work.

Oh I hope not! But my old friend keeps promising me some old foundry equipment he has so I may run out of space...

I am really enjoying your thread, Andy. And I am beginning to see a cycle. Andy builds machines and parts so he can build more machines and more parts. He has fun and we all enjoy watching. This stuff could go on forever. :rocker:

:lol_hitti Thank you very much Jim. I had not noticed that cycle, but I do like making tools the most. It is very gratifying that others get some enjoyment out of my struggles.

After my wife's trivet I have made three more.

attachment.php


Dang! I see in the picture Carol's (CAJ) A slipped and is crooked. The good news is I didn't notice it in real life so I'll wager she won't notice it either. The one on the right is painted now and ready for final cleanup. I get more time into these than I'd like but so far everyone likes them so I'll keep making them.

Very nice job Andy! :thumbup:

attachment.php


:beer:

Thank you very much!!:beer:

Andy, you are the man! :bowdown: :bowdown: :bowdown: :bowdown: :bowdown: :bowdown: :bowdown: :bowdown: :bowdown:

Aaarrrggghhh now my back hurts. I'm going to go lie down.

Thanks, Bob, but I only sent you $5 to promote my thread. That was a little over the top, don't you think?

THat's a pretty neat part you made! Maybe make a few of them and sell them on the foundry site?

Thank you!! Not sure about selling coals to Newcastle, however. A little bit like making tongs and selling them to blacksmiths. They really should be making their own. Those guys cast a lot of really neat things. I'm just elated I can cast some simple ones.

Handy: Very nice work on not only the design, but also making the part too. WELL DONE SIR!!

I sold a few farms in my past and I think the little plastic houses that look like small septic tanks in the huge stockyards we drove by are for the calves so they don't move and it makes the veal more tender. sadly there were hundreds of them at several stockyards while the adults were walking around in mostly **** and mud. what was even stranger was there were more than a few road signs talking about PRO LIFE and not killing a fetus. GO FIGURE? :dunno:

you bet i'll have some jeans and a work shirt if I show up at your place and i'll also have gym clothes in case it's ZUMBA day.

keep up the great work and you have taken this forging a long way and i'm sure there are a lot more things to make and do so keep thinking cause that's what you are good at.

Jim: I vote your post the best post of the day so far cause you hit that nail on the head perfectly!! WELL DONE!!

Thank you Drives!! The things that are starting to occur to me seem endless. How about an aluminum screwdriver rack? Boot scraper? Shelf brackets? If I had done this earlier my rotisserie would look a lot different. Reminds me of making stuff out of Popsicle sticks. You could make anything. One lady in Cleveland made a purse.:bounce:

I had a heart doctor appointment today, they said everything looked good but were going to order a Brinell test to see just how hard it is. I was not amused.

Thanks for the visits and all the kind comments. Since it looks like I'm going to do more lost foam casting I started a shaker screen to more efficiently screen out the burned clump between casts. And the lady at the pharmacy asked me to put some shelves on a pipe frame she bought. The example she showed me had the wood held on with conduit clamps. It's a small shelf, I'm thinking about making pillow block style castings to hold the shelves to the pipe. Just for practice. Thinking I've pushed boredom back a few days.:willy_nil
 

Attachments

  • IMG_3379.jpg
    IMG_3379.jpg
    71 KB · Views: 720
Last edited:

Guster

Well-known member
Joined
Mar 11, 2012
Messages
1,543
Location
Auckland, New Zealand
That hinge knuckle casting came out very nice and the trivets are getting better and better. :thumbup:

The little 'leak' is probably just a crack in the plaster or not enough sand to support it in that one spot like you said. I am impressed that it was possible to handle such a complex shape so well. Wonder what the physical limits of that process is. I've only ever done little bits this way. Open investment casting can hold well over a hundred kilograms of steel in one shot though they tend to support it in loose sand more for safety reasons. Even though it is more of a ceramic it is a good reminder that we overcomplicate a lot of this stuff too much sometimes(sneakily hides wife's metal bucket for later repurpose) :evil:

What do you glue your foam layers with?

My copper round stock turned up today. I'd originally asked for an offcut to make some spotwelder electrodes. This is a project I had planned to make some castings for. Luckily the project I need the spotwelder for can wait a little longer while I sort out some other stuff. <sigh> Almost Saturday.

PS. You also made me look up toilet-wax-ring as I was not aware of this type of toiletry. All the toilets I've seen(used) flush through the back/wall.

PPS. Still waiting for JB to post pictures
 
OP
O

oldironfarmer

Well-known member
Joined
Jun 25, 2016
Messages
6,664
Location
Terlton, Oklahoma
That hinge knuckle casting came out very nice and the trivets are getting better and better. :thumbup:

Many thanks! I'm still struggling with the small letters around the trivet rim but even with the filled openings they are pretty readable.

The little 'leak' is probably just a crack in the plaster or not enough sand to support it in that one spot like you said. I am impressed that it was possible to handle such a complex shape so well. Wonder what the physical limits of that process is. I've only ever done little bits this way.

I think the limit is more how far into the pour the metal will remain liquid enough to still vaporize the foam and fill. It also takes energy to vaporize the foam so that limits small sections more than a traditional open pattern mold. If the part is not too large and has some mass there is a lot that can be done, including complex interior shapes with no mud coating, that is, a complex core shape, just so long as you can get he loose sand rattled into it. It's amazing that you don't need a solid core with lost foam, just loose compacted sand. I haven't done that but it's on the way.

Open investment casting can hold well over a hundred kilograms of steel in one shot though they tend to support it in loose sand more for safety reasons. Even though it is more of a ceramic it is a good reminder that we overcomplicate a lot of this stuff too much sometimes(sneakily hides wife's metal bucket for later repurpose) :evil:

The foam is just too easy. You'll see when I reach the limit.

What do you glue your foam layers with?

I tried white wood glue, which works well, but bought a low temperature glue gun (which says for lace and foam) and that shortens the assembly time dramatically. But glue squeezeout is harder to clean up without damaging the foam than wood glue which can be wiped off. I tried spray adhesive but it ate the foam.


My copper round stock turned up today. I'd originally asked for an offcut to make some spotwelder electrodes. This is a project I had planned to make some castings for. Luckily the project I need the spotwelder for can wait a little longer while I sort out some other stuff. <sigh> Almost Saturday.

Good job for casting practice :bounce:

PS. You also made me look up toilet-wax-ring as I was not aware of this type of toiletry. All the toilets I've seen(used) flush through the back/wall.

I can see this thread is going into the toilet fast. Only our commercial toilets are wall mounted, with rear exit. Have you seen Dutch toilets? What a lesson in knowing what you're doing. They even hide the flush button/lever in clever ways. Don't want to make a big stink with our Dutch friends, though.

PPS. Still waiting for JB to post pictures

Me too! :sad: He did say it would be a while. :wtf:
 

Guster

Well-known member
Joined
Mar 11, 2012
Messages
1,543
Location
Auckland, New Zealand
Many thanks! I'm still struggling with the small letters around the trivet rim but even with the filled openings they are pretty readable.

I was just reading an article the other day about casting wall plaques and how traditionally, different fonts and font bedding(the side of the raised font straight vs fillet etc) are used when casting different materials. It was more about techniques(how to get the stippled backgrounds etc.) but it was interesting to realise you need to know your material limits when casting and how it affects detail like fonts. Should try and find it again.

I think the limit is more how far into the pour the metal will remain liquid enough to still vaporize the foam and fill. It also takes energy to vaporize the foam so that limits small sections more than a traditional open pattern mold. If the part is not too large and has some mass there is a lot that can be done, including complex interior shapes with no mud coating, that is, a complex core shape, just so long as you can get he loose sand rattled into it. It's amazing that you don't need a solid core with lost foam, just loose compacted sand. I haven't done that but it's on the way.

The foam is just too easy. You'll see when I reach the limit.

Looking forward to seeing that as this type of casting is rarely shown or discussed. :thumbup:

I tried white wood glue, which works well, but bought a low temperature glue gun (which says for lace and foam) and that shortens the assembly time dramatically. But glue squeezeout is harder to clean up without damaging the foam than wood glue which can be wiped off. I tried spray adhesive but it ate the foam.

I found PVA wood glue never dries properly as it is sealed off in the joint. The 3M tack spray works well provided you just dust it on else it will eat the foam too much. I’ve been sticking with Gorilla glue but I put some in a small dish and spray it with water so it foams up and then brush it on thinly. That way it is reacted(won’t foam out more), starts setting up faster and use less glue in the joint. I thought about glue gun glue but would like to resist having too much **** and in the casting. While the foam burns off fast I was also worried that slower burning stuff would create cavities or blow out. CA glue might be another alternative since you don’t need much.

Saturday eve here and then a four day weekend. Time for a list...
 
OP
O

oldironfarmer

Well-known member
Joined
Jun 25, 2016
Messages
6,664
Location
Terlton, Oklahoma
My lettering was printed in PLA and was micro-rough. I've tried smoothing it and now have damaged several letters so I need to reprint them and start over. My difficulty is in Fusion360 will not always extrude a letter with draft. It just gives an error message "extrusion failed". Got some more work to do there. A larger font would be better with the sand I'm using.

I'd be interested in the article on plaques.

Thanks for the tips on gluing. The low melt hot glue works pretty well but is stringy and is difficult to cut with a hot wire.

I've not seen any defects including using the toilet ring wax.

I did make a little sand shaker screen to separate the burned drywall mud from the sand. It has an air powered ******** underneath.

attachment.php
 

Attachments

  • IMG_3381.JPG
    IMG_3381.JPG
    131.5 KB · Views: 622

drivesitfar

Well-known member
Joined
Oct 23, 2013
Messages
36,017
Location
Pacific Northwest
Handy: your little screen set up looks like it works and I (we)'ll have to take your word for it that there is a ******** there helping it separate.

hope your SATURDAY was as good as mine is so far.

i'm guessing it rained maybe 2 inches here today, but at least it didn't snow which I'm thinking it might in your area soon from the weather report i'm getting from my daughter.

enjoy your rest day cause your SATURDAYS seem to be pretty busy.

cheers
 
OP
O

oldironfarmer

Well-known member
Joined
Jun 25, 2016
Messages
6,664
Location
Terlton, Oklahoma
Handy: your little screen set up looks like it works and I (we)'ll have to take your word for it that there is a ******** there helping it separate.

Better pictures on the way, and when I painted it the ******** got moved.

hope your SATURDAY was as good as mine is so far.

I've been really busy and we're still having freezes overnight. We have had double the record number of freezes in April, 8 vs 4.

i'm guessing it rained maybe 2 inches here today, but at least it didn't snow which I'm thinking it might in your area soon from the weather report i'm getting from my daughter.

enjoy your rest day cause your SATURDAYS seem to be pretty busy.

cheers

Thanks for stopping by Drives! We could stand two inches of rain.

I started making shelf clamps to clamp boards to pipe for shelving for the pharmacy. The pharmacist had bought pipe frames fro shelving and asked me to put boards on them. But they need clamps and some way to keep them upright. Here's some foam drying in the shop.

attachment.php


Made a trivet for my sister, LME

attachment.php


and poured a set of the pipe clamps for shelf support.

attachment.php


I plan for them to be overkill, and am going to cast the owner's family's names on the clamps.

Got a surprise from NZ.

attachment.php


Thanks Guster!! :bowdown::bowdown::bowdown::bowdown:

Very cool indeed.

I brushed up a set of brackets and got them ready to machine on the mill.

attachment.php


My sister is coming tomorrow to celebrate my birthday so I worked on her trivet today. A fair amount of hand filing to clean up my poor foundry skills.

attachment.php


I need to get into production as I need 24 of the pipe clamps for the shelving.

And I have a foundry forum guy I'm going to try to mill out some 3D plaques for as he had the models made and wanted to 3D print them but they did not come out good so we'll try routing them out. Cross your fingers. He is a Navy veteran and they are Navy emblems, from Florida so I'd like to do him a good job.

Thanks for stopping by guys!!
 

Attachments

  • IMG_3394.JPG
    IMG_3394.JPG
    128.9 KB · Views: 424
  • IMG_3393.JPG
    IMG_3393.JPG
    112.9 KB · Views: 422
  • IMG_3390.jpg
    IMG_3390.jpg
    63.1 KB · Views: 424
  • IMG_3389.JPG
    IMG_3389.JPG
    109.2 KB · Views: 424
  • IMG_3388.JPG
    IMG_3388.JPG
    95.6 KB · Views: 426
  • IMG_3395.jpg
    IMG_3395.jpg
    58.8 KB · Views: 421

bj383ss

Well-known member
Joined
Sep 29, 2011
Messages
3,166
Location
TX
My lettering was printed in PLA and was micro-rough. I've tried smoothing it and now have damaged several letters so I need to reprint them and start over. My difficulty is in Fusion360 will not always extrude a letter with draft. It just gives an error message "extrusion failed". Got some more work to do there. A larger font would be better with the sand I'm using.

I'd be interested in the article on plaques.

Thanks for the tips on gluing. The low melt hot glue works pretty well but is stringy and is difficult to cut with a hot wire.

I've not seen any defects including using the toilet ring wax.

I did make a little sand shaker screen to separate the burned drywall mud from the sand. It has an air powered ******** underneath.

attachment.php

Andy can you share more details about this sand shaker? I need to make something more efficient for sifting my sandblasting media.

Bret
 
To avoid these ads, REGISTER NOW!
Top Bottom