To avoid these ads, REGISTER NOW!

Poor Man's Retro Retreat -- in 440 square feet

danehoy

Member
Joined
Dec 13, 2009
Messages
19
That sounds great. I think it will open up your garage a lot. The butch block is very-much the style now. I think if you are looking to connect the butcher block to the garage more, consider adding a stained finish that matches the darker wood in the butchers block. it is simple and something that people should be able to appreciate even if they cannot put it into words when they see it.

Also, I had commented on the metal shelving which seemed taken out in a later picture. I agree with you that the tool chest will look better on the wall.
 
To avoid these ads, REGISTER NOW!
OP
J

Jack Olsen

Super Moderator
Staff member
Joined
Mar 22, 2009
Messages
6,678
Location
Los Angeles
Also, I had commented on the metal shelving which seemed taken out in a later picture. I agree with you that the tool chest will look better on the wall.
I made some progress on it this week. The tool cabinet is over in the corner now, and the main bench moved to the left about 30 inches to allow it to fit. I tore out the old wood cabinets and broad shelves below them and put in heavy steel cabinets with additional storage up above.

The plan was to continue the 'line' of the overhead portion all the way across the garage and to get the red tool cabinet out of the middle of things:

Phase+21260743610.jpg


Basically, I wanted to tear out everything you see along the left half of the rear wall:

2010-007.jpg


Here are two quick snapshots of what it looks like today:

GarageProgress021262047404.jpg


GarageProgress031262047417.jpg


Yes, it's an incredible mess right now. And a lot of it's not finished (you can see the clamps holding up the aluminum strip, for example). And I won't be able to work on it again until the new year. But I'm very happy with how it's starting to look.
 

WhatThaFrig

Well-known member
Joined
Dec 7, 2006
Messages
152
Nice work. I like how you turned the tall cabinets on their sides and re-hinged them. Plus I love the green. I am very envious of your garage. I'd love to have my one car closet to look like that.
 

Dan in Pasadena

Well-known member
Joined
Feb 18, 2009
Messages
13,103
Location
Pasadena, CA
Ok Jack,
I've got a few questions - again (sorry):

1. Are the 4'x6' cabinets the "2000 lbs" you mention renting a Home Depot truck for in your compressor thread? Was that hyperbole or are these things made out of 1/2" steel plate!:bounce: Seriously, were these gun safes or something else massive? Why not regular sheet metal storage cabinets?

2. Also, did you paint the insides? I have a couple of mismatching metal cabinets I will be "painting ala Jack Olsen" (Rustoleum or latex) and I don't especially want to paint inside them.

3. What's going on with your bench grinder? Does it just sit free on the bench top? Close up pix if you have a trick way to fasten it down? I used to have mine mounted to a 3/4" plywood "plate" on a 2x4 I'd chuck in my vise; now I have a dedicated HF stand - the perfect HF tool, can't break, low tech, cheap.

4. It looks like your toolboxes are NOT on casters. If so, why would you do that?

5. Last, SEEMS like you're losing overall storage space with these changes (though it looks better, I agree) or is it a net "push"?
 
OP
J

Jack Olsen

Super Moderator
Staff member
Joined
Mar 22, 2009
Messages
6,678
Location
Los Angeles
Questions are never a problem.

1. They're part of it. These ones are 760 pounds each. They're made of 12 gauge steel. There's one more -- it's going to replace the regular cabinet to the right of the steel bench. They're made by Strong Hold out of Wisconsin, and they're advertised as the strongest shelving you can buy. Each shelf is rated at 1900 pounds.

Why do I need them? Well, I don't. But I got the pair you see for a total of $207 on eBay. I liked the one I have under the big steel bench so much that I jumped at the chance to get more of them.

2. I didn't paint the insides. This is a garage, after all. One was grey and one had been painted blue on the outside, but both were grey on the inside. I'm fine with that. And I suspect that their paint will hold up better than mine.

3. The bench grinder can be moved between three different trailer hitch mounts I've got in the garage. While I was working on the main bench, I took it off and just set it somewhere.

4. I have the casters for the box. And even in its new position, it would be able to roll out. I might put them on. But I don't know that I would ever roll the whole thing anywhere. We'll see.

5. There's a slight net loss in storage space. But I'm getting an increase in floor space, and my bench is getting moved to a better position. I'm also happier with the new position for the tool chest.

And since I'm willing to admit that I'm a little obsessive, sometimes, I'll also confess that I just didn't like the look of the oversized cabinets and the cardboard boxes for storage. If they hadn't sagged and distorted over time, I might have tried to do it another way. But in the end, I decided I wanted to continue that aluminum line all the way across the room for a more horizontal look. Irrational? Maybe. But a garage is something you can make look exactly the way you want.
 
Last edited:

Dan in Pasadena

Well-known member
Joined
Feb 18, 2009
Messages
13,103
Location
Pasadena, CA
Hey, I've got NO issue with your "obsessiveness"...I share the same trait. Except in my case, I get "paralysis-by-analysis" (like right now) which holds me up until Ive got the ENTIRE picture in my mind...while the mess gets bigger and bigger. Then I finally try to do everything at once and trip over myself.

760 lbs EACH?! Holy Moly. "Trailer hitch mounts"? Like a Class III receiver? A metal 2x2 welded/bolted to things, or am I misunderstanding?
Totally agree on your tool box; looks much better there. I just got an intermediate box myself and frankly I'm too short at 5'-10" to see in the top clearly enough. I'm going to have to get a step of some kind.

I love your garage. Its an inspiration because frankly, its old and small like mine. I'm going to copy the older paint scheme - awesome.
 
OP
J

Jack Olsen

Super Moderator
Staff member
Joined
Mar 22, 2009
Messages
6,678
Location
Los Angeles
Thanks. Yes, they're dual mounts -- 2" each. You can see two of them in the pictures above, under the overhang of the bench. They're black, so they sort of get lost in the shadows. Some guys do it with a single square tube mount, but I wanted better resistance to twisting, since one of the things I use them for is a vise.

Moving those benches was so complicated that I might do a separate thread on it. But here's a shot of one of the tools I put together in order to make it possible.

LiftingStick1262061421.jpg
 

Dan in Pasadena

Well-known member
Joined
Feb 18, 2009
Messages
13,103
Location
Pasadena, CA
....Moving those benches was so complicated...

Ya think? At 760lbs apiece I can't imagine moving them with THREE guys much less by myself. Even with multiple guys a refrigerator dolly would be useless. It strikes me that a fork lift would be most appropriate. Tell us you didn't do this by yourself? You did say you weigh 160 lbs, right? I guess it wouldn't matter what you weighed anyway.
 

TX-WJ

Member
Joined
Oct 15, 2009
Messages
11
Outstanding work!!, simply amazing what you've done with the space, the light and color.

Now, could you post more pics of yourself? :lol_hitti, I kid, I kid.
 

cyclopsblown34

Well-known member
Joined
Jan 26, 2007
Messages
597
Location
Russellville, Missouri
Jack, your constantly evolving shop is an inspiration to us all. As for the Stronghold cabinets. I sell them to several customers and you nearly stole them for the price of shipping on one of them. Congratulations.
 
OP
J

Jack Olsen

Super Moderator
Staff member
Joined
Mar 22, 2009
Messages
6,678
Location
Los Angeles
Well, I'm a little bit closer.

If you can look past the mess (all the stuff that was stored had to be pulled out, as well as all the lumber from the shelves I took down), you can start to see where it's going. Today I fitted in the replacement cabinet that sits to the right of the steel workbench with the hammers above it.

Closer.jpg


Here's the old version, for reference. It's all clean and nice, but I don't like the jumble of cabinets as much. It's going to have a much more 'horizontal' look, now -- less like two bays sitting next to each other.

2010-018.jpg
 

Dan in Pasadena

Well-known member
Joined
Feb 18, 2009
Messages
13,103
Location
Pasadena, CA
Looks good Jack. I particulalry like the tool box moved to the back as it was a bit of a visual divide. The tall cabinets are just neater than the exposed file boxes which inevitably get soggy, or get mice in them.

One of the things I just noticed about your garage, no posters, old signs, etc. No historical Porsche posters? Sacrilege I tell you!:bounce:
 

1jjpop

Well-known member
Joined
Nov 24, 2009
Messages
481
Location
Central Iowa
I bought a lot[ 3 blocks from our house] with a 18' x 22' garage, after they tore down the old house, garage is located @ the back of the lot. Garage is 22 years old,I had to reroof, replace some siding, insulate, new wiring,paint & etc.I'am retired makes a good place to work on my toys & get out of the house. I LOVE IT.......
 

viper522

Well-known member
Joined
Oct 22, 2009
Messages
135
Location
SE FL
Just when I thought someone had it right and that I, too, could build out my garage and be done...he goes and changes everything - crushing my dreams of 'one and done'.
 

xpmcharly

Active member
Joined
Oct 23, 2009
Messages
40
Location
East Tennessee/US129
Great admiration on your garage space, best/most creative on here that I've seen. In one of your earlier posts, you mentioned what I call, " thinking with a pencil". I find this to be one of my most useful habits. I grew up in a country store in East Tennessee, and one of the things my grandmother taught mr was to add the items on a paper bag and place them in it. Believe me, I've had a few come back. I still find that my hand knows more than my brain.
 
OP
J

Jack Olsen

Super Moderator
Staff member
Joined
Mar 22, 2009
Messages
6,678
Location
Los Angeles
One of the things I just noticed about your garage, no posters, old signs, etc. No historical Porsche posters? Sacrilege I tell you!:bounce:
I have some Porsche posters in the house. But I've never really had the space for art on the garage walls -- or had Porsche art I'm willing to sacrifice to flying metal shavings and the other hazards of a shop.

I will admit to liking this type of sign, though:

SpeedShopTwo.jpg


But it seems a little weird (to me) to have a business-type sign for your own garage.

Just when I thought someone had it right and that I, too, could build out my garage and be done...he goes and changes everything - crushing my dreams of 'one and done'.
I know what you mean. (My wife knows it, too.) The first time through was so driven by time and budget that I made compromises. Now I've gone over each wall a second time. Hopefully, it'll stay 'done' this time.

Although...

I still have a plan for the front-of-garage desk/bench, and the recent thread about the Harbor Freight tool cabinets going on sale has made me think about a more storage-efficient undercarriage for that back-of-garage work bench.

I do want the thing to be done, but I have to admit I like the process of re-doing it.

In one of your earlier posts, you mentioned what I call, " thinking with a pencil". I find this to be one of my most useful habits. I grew up in a country store in East Tennessee, and one of the things my grandmother taught mr was to add the items on a paper bag and place them in it. Believe me, I've had a few come back. I still find that my hand knows more than my brain.
I know what you mean. If I'd sat down with a piece of paper before I started, I think I would have come up with something closer to where I ultimately ended up -- without so many steps in between. But then, a vision of the final version might have seemed like too much work for just a garage. Sometimes you have to trick yourself into doing it piece by piece. :)
 
To avoid these ads, REGISTER NOW!
OP
J

Jack Olsen

Super Moderator
Staff member
Joined
Mar 22, 2009
Messages
6,678
Location
Los Angeles
Progress has slowed down lately because of work stuff, but I got a little time yesterday and today to knock a work bench together.

Here's the sketch from yesterday morning:

01Sketch.jpg


I had to figure out how to bend the 2"x2" tubing:

02Bender.jpg


Then I just cut everything to match the sketch:

03SketchRealized.jpg


My welding was quick and ugly, but that's what grinders were invented for, right?

05BoxingItUp.jpg


Here it is in its basic shape with the butcher block sitting on top of it. I still need to do the grinding, filling and paint:

06ReadyForGrindingClose.jpg


The garage is still a complete mess, but the shape of the updated look is beginning to come together:

07ReadyForGrinding.jpg


(A few mornings ago, I painted the cabinet under the island in the same green as the others.)
 

DIYnotBUY

Active member
Joined
Nov 24, 2009
Messages
36
Location
Chapman, NE
Great garage you are a rare breed that can make something out of nothing!!I do have a question though. Where do you get the great butcherblock tops and about what do you shell out for them??
 
OP
J

Jack Olsen

Super Moderator
Staff member
Joined
Mar 22, 2009
Messages
6,678
Location
Los Angeles
Thanks.

I did it with the bend because most of the workbenches like this end up looking very utilitarian.

yhst-81563436181518_2084_31229674


That's not a big deal if the bench is up against a wall somewhere, but sitting where it faces out (like mine does), I thought it would end up bugging me if it had a by-the-numbers support structure underneath it.

It was fun to unpack that bender finally, too. I've got to get some dies made for it that will work with square tubing.
 
OP
J

Jack Olsen

Super Moderator
Staff member
Joined
Mar 22, 2009
Messages
6,678
Location
Los Angeles
Great garage you are a rare breed that can make something out of nothing!!I do have a question though. Where do you get the great butcherblock tops and about what do you shell out for them??
Thanks. I've got to admit, I really enjoy the process of taking something from a vague idea in my head to the point where it's real -- and almost too heavy for me to lift. I need to stop reinventing my garage one of these days, but projects like this are a lot of fun. (I've got plans for a new take on the wood bench in the back of the room, too.)

I got the butcher block for today's table second-hand off of Ebay. I paid $120, which is a lot for a used bench top, but it's 2" thick and it's solid Pennsylvania Maple. The one on the island is from Ikea. It's 39"x72" and 1-1/2" thick. It's Birch (they also stock Oak and Beech), and ran $190.

I'm thinking of staining both of them a darker shade and then putting a heavy polyurethane on top. I don't know why, but I think darker wood would fit better visually with the rest of the garage.
 

DIYnotBUY

Active member
Joined
Nov 24, 2009
Messages
36
Location
Chapman, NE
Thanks i really like the look keep in mind im an old skool 23 year old and when i build a bench top a completely even and level benchtop is something for rich folks haha!! I have mainly used 2x8, and 2x10s just for strength and well cost!! Im the scrap lumber king right now and i use what i got!! I do like the idea im thinking of making a rolling workbench 3'x6' or so and i was thinking that top might beat out my two pieces of 31/2 x18 pieces that i have (i know monster wood)but im not sure!!
 
OP
J

Jack Olsen

Super Moderator
Staff member
Joined
Mar 22, 2009
Messages
6,678
Location
Los Angeles
There's no shame in keeping it inexpensive and honest. The bench I had in the place before this one was just a piece of plywood on top of a wrought-iron bookcase frame that someone threw away. When I initially cleaned out and re-did the garage, my budget was $500 for everything. Most of the lighting still comes from $5 trouble lights.

You don't have to spend a lot to come up with a place where you can get a lot done. But I'll admit that I've been spending more lately (hey, I'm twice as old as you, so I've got a little bit of garage money socked away now) as I slowly replace my quick-and-cheap construction with stuff that's still pretty cheap, but slowly getting a little more permanent.
 

brockstar

Well-known member
Joined
Jul 14, 2008
Messages
244
Location
Cincinnati
Another enjoyable addition to your shop!

I appreciate your just do it attitude! I over analyze and never get anything done.

Your shop is so well put together, the Craftsman box is looking out of place! Time to think of a replacement or paint it green as well!
 

Dan in Pasadena

Well-known member
Joined
Feb 18, 2009
Messages
13,103
Location
Pasadena, CA
...Your shop is so well put together, the Craftsman box is looking out of place! Time to think of a replacement or paint it green as well!

:eek::eek::eek: Oh oh! Now you've done it. Now Jack is gonna show us all up by buidling his own SnapOn $5000 tool box out of $150 worth of stuff the rest of us couldn't make look like a sow's ear, much less the silk purse he'll make!:bounce:

Kidding aside, I'm going ot enjoy sitting back and seeing what he comes up with.
 

Dan in Pasadena

Well-known member
Joined
Feb 18, 2009
Messages
13,103
Location
Pasadena, CA
BTW to jack since I see you're online now; the curved 2x2 looks like you sliced relief cuts in it to get the curve or is that just waviness in the metal from the bending operation?

Oh and P.S. Tell us that bender wasn't a $50 find off CL please! I'd probably never use one enough to merit buying one, but that thing looks great. How long before you start thinking of a tubular framed, 911 bodied race car?
 
OP
J

Jack Olsen

Super Moderator
Staff member
Joined
Mar 22, 2009
Messages
6,678
Location
Los Angeles
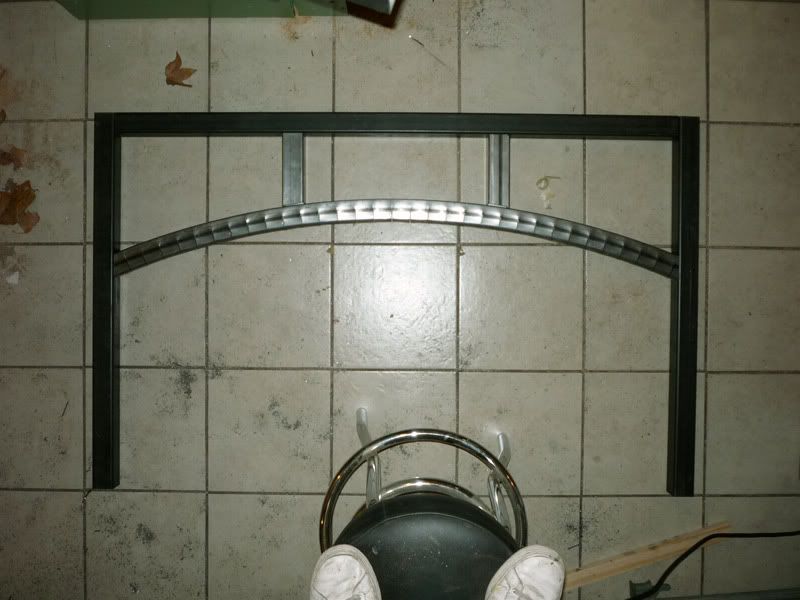
Hey, Dan. I cut half way through the tubing every inch and a half. In retrospect, I probably should have cut all the way through the sides, to prevent the pinched distortion appearing midway through the facing side of the tube. (Or I should have talked to someone who knows about this -- my approach might have been completely wrong.) But if this ends up looking terrible once it's painted, I can cut it out and try again. I've got extra tubing.

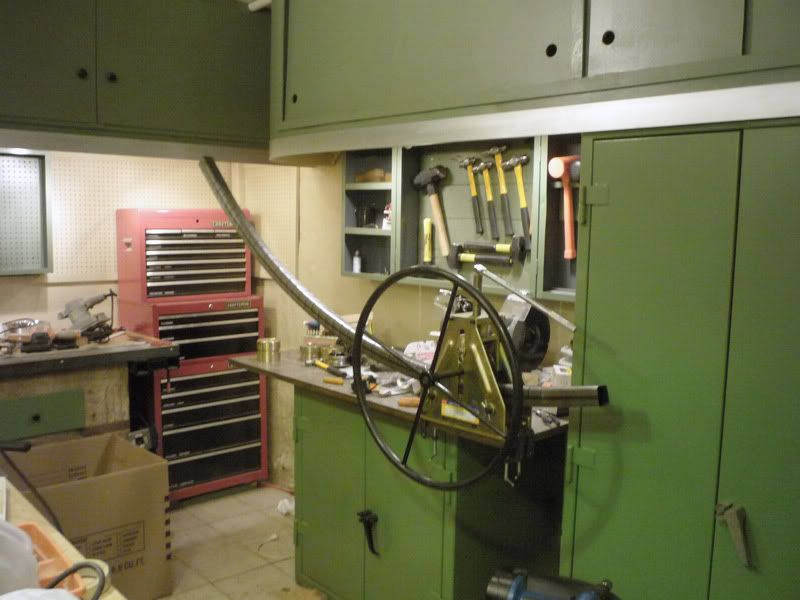
Without square tubing dies, I don't think this is the right application for the HF roll bender. Even with 16ga walls, this stuff is just too strong. I think for round tubing, or even smaller square tubing, it would work just fine.

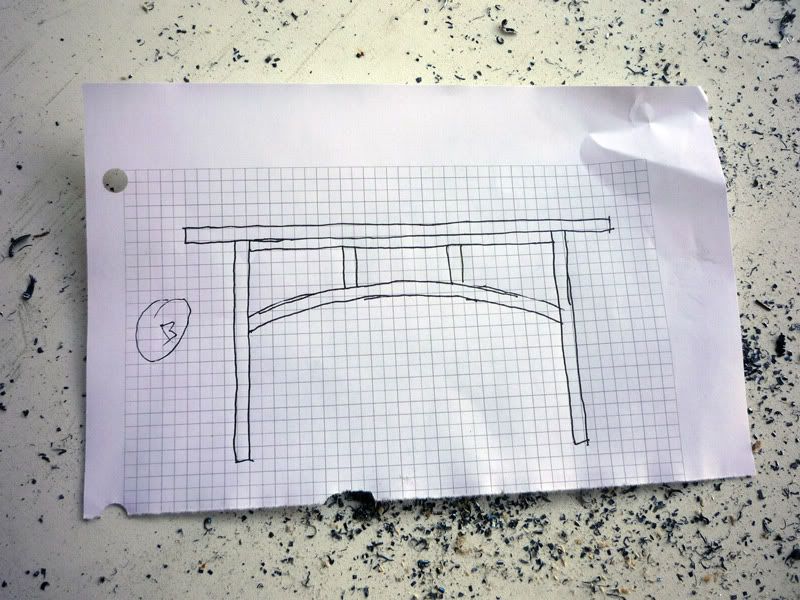
The HF roll bender is normally $179 -- but if you're patient, you'll find it marked down to $149. A 20%-off coupon knocks that down to $119, which is how I got it. My plan was (and is) to use it for a back yard deck and pergola thing I've got in mind. For that, I'll be bending 1" square tubing.

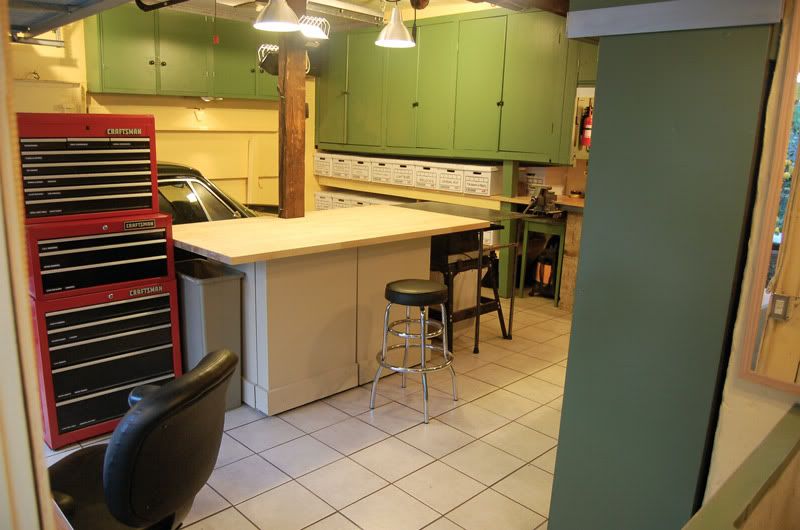
I don't really like seeing Craftsman's logo on my tool cabinets -- but I don't like logos. I don't mind the red color, though. If the entire garage ends up only green and tan, I think it might be going too far. (Well, you could make the argument that it's already a few steps down the 'too far' road. But I'm not going back.)

If I go with another red and black set of drawers under the wood-topped bench that's next to the Craftsman cabinet, then I think the red will look a little bit more 'on purpose.' The HF red cabinets are on sale this weekend, and I'm still trying to decide if I want to make that jump.
 

Dan in Pasadena

Well-known member
Joined
Feb 18, 2009
Messages
13,103
Location
Pasadena, CA
Personally I wouldn't worry about the waviness. But if it bothers, you could surface grind the whole visible side and even use a little Bondo to even out the appearence. But honestly, I like the regularity of the wave. It makes it obvious you built it yourself - a good thing - instead of buying a pre-packaged, powder coated, Taiwan made one at Costco. Nothing agianst buying a Costco item it's just that if you have the chops to make your own, I think that's cool and it's something I'd be proud of.

I'm with you on logo's. I take the emblems off my cars too when I can (Well, not the Porsche badges, but you couldn't without welding the holes shut). My 4x4 dually had a ton of them on it and I stripped them all off and swapped out the tacky inset plastic gold and chrome Chevy bowtie for a simple, stainless billet one.

In welding your bench, did you use flux core wire or use a gas bottle? I'm thinking for that heavy stock, flux core would be okay, am I correct?

P.S. I kinda like the unpainted look on this bench. I like seeing the heat effected zones near the welds, etc. I know clear its not consistent with your theme, but maybe black? Or are you planning green? Either way, it's a nice, nice piece of work.
 
Last edited:
OP
J

Jack Olsen

Super Moderator
Staff member
Joined
Mar 22, 2009
Messages
6,678
Location
Los Angeles
I used gas and .030 wire. Flux core would have worked just fine, but I wanted to see how the autoset feature worked on the new welder, and it's configured for solid wire.

With 110v welding, flux core lets you generate a little more heat than regular MIG, so you can stretch the limits of how thick a piece of metal you can weld. In this case, with 1/8" and 16ga steel, that wasn't a factor.

The undercarriage will probably be green. I've already got lots of the paint, and I do best when I keep my decisions simple. :)
 

alberto

Well-known member
Joined
May 28, 2007
Messages
756
I take the emblems off my cars too when I can (Well, not the Porsche badges, but you couldn't without welding the holes shut).

You can order them with badge delete (and no holes to fill). However, they charge you for the privilege (!)
 

rv56

Member
Joined
Jan 14, 2010
Messages
6
oh man Jack just seen this thread and love the garage and all I could say is
Will you marry me:) all kidding aside great job and brockstar i do the same thing by over analyzing and never get it done. Jack though has truly inspired me to get something going with my garage.
Good job Jack.
Ruben
 

ngrover

New member
Joined
Jan 14, 2010
Messages
4
Location
Calgary Alberta Canada
John Deere green? and John Deere yellow?

I'm shamelessly going to use this color scheme ;) ... love it. It has that "workshop" feel to it. White is to sterile/clinical for me.

Nice work!
 
To avoid these ads, REGISTER NOW!
Top Bottom