To avoid these ads, REGISTER NOW!

Quincy 325 Air compressor plumbing and electrical help

plasmon360

Member
Joined
May 13, 2018
Messages
13
Location
San Diego
Hello

New member here.

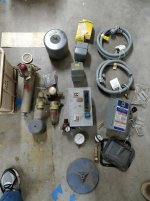
I had an opportunity to pick up an air compressor on craigslist. It seems to be project that was never finished. I paid 120 dollars for it.

It has following parts

1) Quincy 325 compressor (size 41/2 & 21/2 x 3, no idea what these are)
2) Baldor single phase motor (never wired, looks new)
3) 30 gallon manchester tank (seems new, there are ports that seem to be never opened).
4) two new belts
5) An Air hose
6) Shop fox mobile stand.

I am attaching the pictures.

I am newbie and was buying something else from the seller and he told he wants to get rid of this "compressor looking thing". He asked 150. I saw Baldor motor and thought it should be worth it. I negotiated for 120 dollars and had him deliver it to my house as I dont have a truck. Not sure how much is the tank and compressor worth.

History about this compressor. The seller got this pump and other tools as part of house sale. the guy who sold the house bought all the parts and seems to have never had time to assemble it.

I think the air compressor is a good shape (looks to be), while transporting some of the oil came from one of the port and it was clear (seems to be never hooked to the motor). I am thinking it will be a fun project to get it up running.

OK..now I want to ask your help with following questions.

1) There is no pumbing between air compressor and the tank. Where can I find a schematic (which I could not find by googling) that shows what plumbing needs to be done between the compressor and tank. An Ideal schematic will also help me figure out what additional parts do I need (like check valve, unloading valve?, safety valves, drain valves, outlet port) and their placement.

2) Electrical part. I am not sure what parts are needed to do the electrical part. Currently no wiring to the motor. I am guessing it needs a pressure switch, I was told by a friend it may also need a contactor (not sure if this needed). Again a schematic/explanation will help.

Some of these parts may be with the seller in his house, so I can pick up if they are needed. If I cannot find the parts at his place, I am trying to create a parts list so that I can evaluate if it is way over my budget before going on this project.

Any help will be greatly appreciated.

plasmon

View media item 83097View media item 83098View media item 83103View media item 83102View media item 83101View media item 83100View media item 83099
 
To avoid these ads, REGISTER NOW!
OP
P

plasmon360

Member
Joined
May 13, 2018
Messages
13
Location
San Diego
Thanks for the details. Appreciate it very much.

I took your picture and added some details to get some confirmation.

1) What is the function/names of Pipe 1, Pipe2 (why is it connected to tank), Pipe3, Pipe4?

2) What are the functions of unloading valves. What is the difference between the hydraulic unloader and intake unloader.

3) Can anyone confirm on the parts that are question marked.

I can make a new picture with the parts labelled so that others can benefit from it in future.

View media item 83105
 
Last edited:

dkmc

Well-known member
Joined
Jan 20, 2008
Messages
950
Location
NYS--Upstate in the corn fields
None of those pieces are compatible, unfortunately it's a total lost cause.
I'll dispose of all that properly if you ship it to my shop.

I think you might find you get some YOU **** comments on that one.
Yes, it's a great deal.
Nice score!
 

pcmeiners

Well-known member
Joined
Aug 13, 2009
Messages
7,952
Location
In the only town in Pennsylvania, Bloomsburg.
Beyond a great deal. A double **** for this 325. ROC should also be stamped on the end of the crank. The check valve for the 325 is internal to the pump, none needed externally. What you are looking at marked hydraulic unloader is part of the unloader system. The crankcase cover shown in the extra part may be a replacement as the original maybe a plate Quincy was having leaks develop from.

Qr series pictoral..

https://www.nuvair.com/brands/quincy/qr-25-compressors/
 
Last edited:

redmondjp

Well-known member
Joined
Nov 25, 2014
Messages
2,318
Location
Redmond, WA
First, check the side of the crankcase, underneath the dipstick, for the data plate. You should see "325" and then a two-digit number stamped into the plate in the next box on the same line. That two-digit number is your Record Of Change or ROC and it's like your serial number which tells you when the pump was made and to what revision. You need this number when you order parts.

Go to the Quincy website and download the "QR-25 Series Model 325" parts manual. I have a ROC 105 version of this pump. The document I downloaded is Manual No. 50215-105, July 2000 Edition. Note that the '-105' suffix is the ROC number.

Then, also download the "Quincy QR-25 Series Instruction Manual". This should answer most of your questions. The manual I downloaded is Manual No. 52201-105, June 1999 Edition. Again, the suffix is the ROC in this case.

Hope this helps!
 
Last edited:
OP
P

plasmon360

Member
Joined
May 13, 2018
Messages
13
Location
San Diego
Thank you redmondjp for your suggestions. Helped a lot.

The inspection plate that is installed on it is showing a record of change 7. I found a manual for ROC 7. It is from the 1950's.

However the inspection plate that is installated on the compressor seems to have a different color from rest of the compressor. I also picked up another inspection plate from the seller that matches the color of the rest of the compressor (see attached image). May be the person who started the project got his old compressor rebuilt but still wanted to have the old inspection plate stick to it.

I also got more parts like contactor, pressure relif valve, pressure switches..have to start hooking all of them.
 

Attachments

  • IMG_20180515_075844.jpg
    IMG_20180515_075844.jpg
    118.6 KB · Views: 137
  • IMG_20180514_210956.jpg
    IMG_20180514_210956.jpg
    134.3 KB · Views: 137
OP
P

plasmon360

Member
Joined
May 13, 2018
Messages
13
Location
San Diego
ROC should also be stamped on the end of the crank. The check valve for the 325 is internal to the pump, none needed externally.

[/url]

Thank you pcmeiners.

To look at the crank, I am assuming I should drain the oil and open the inspection plate right?

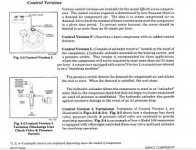
I am confused about the check valve requirement. From the instruction manual (52201-104), I see that the control version L variation requires a external check valve (Please see 2-3 in attached image). Can you please comment more on this.

Thanks again.
 

Attachments

  • control_versions_qr_325.jpg
    control_versions_qr_325.jpg
    20.3 KB · Views: 98

redmondjp

Well-known member
Joined
Nov 25, 2014
Messages
2,318
Location
Redmond, WA
Yeah, there's no way that your pump is a ROC 7 - that plate is from a much older pump. I will defer to others here with more experience to tell you what specifically to look for to determine the age, but I'd say you'd be more accurate with the ROC 105 documents that I listed above.
 

Strouty

Well-known member
Joined
Mar 21, 2010
Messages
38,224
Location
Southern Maine
Call Quincy, they are very helpful. Just so you know when people say "you ****" that is a good thing, just don't ever ask if "you ****" or try and solicit a "you ****" in any way.

That looks like a great lot of parts for that price, this is a lifetime compressor, you could upgrade the tank and motor for a much more powerful unit in the future if you need to.
 

pcmeiners

Well-known member
Joined
Aug 13, 2009
Messages
7,952
Location
In the only town in Pennsylvania, Bloomsburg.
"To look at the crank, I am assuming I should drain the oil and open the inspection plate right?" No opening the inspection plate or draining oil for that reason.
Numbers stamped at the end of the shaft the large pulley is attached too.

As to the check valve I am referring to the check valve inside the head preceding the exhaust/discharge port for the discharge air only. Many compressors have an external or a tank mounted check valve.

Ps Incredible buy, I picked up a 325, (2010) for $1600, stored much of that time, and considered that a good buy.
 
Last edited:

MacMcMacmac

Well-known member
Joined
Oct 21, 2014
Messages
1,591
Location
canada
Thanks for the details. Appreciate it very much.

I took your picture and added some details to get some confirmation.

1) What is the function/names of Pipe 1, Pipe2 (why is it connected to tank), Pipe3, Pipe4?

2) What are the functions of unloading valves. What is the difference between the hydraulic unloader and intake unloader.

3) Can anyone confirm on the parts that are question marked.

I can make a new picture with the parts labelled so that others can benefit from it in future.

View media item 83105

Pipe 1 takes air from the hydraulic unloader valve to the unloader towers. Pipe 2 take the control air from the tank to the hydraulic unloader.
Pipe 3 connects the crankcase breather valve to a port above the intake filter.
This is not a 325 in the photo, probably a 350 or a 370 so the crank breather is on the opposite side of the block to yours.

I cant really see pipe 4, but it is probably the vent line from the unloader to the port in the head above the inlet valve.
Hydraulic unloader, intake unloader, pressure switch, relief valve, auto drain, tank outlet and starter are all labeled correctly.

Thats not a check valve. It looks like a braided steel discharge line. The discharge line is labeled correctly.

Quincys can run without a check valve, but I would recommend one.

You need a replacement threaded pipe for your spin on oil filter.

The inspection cover is much older than the rest of the machine. If it were a 50's vintage, the fins on the intercooler would be square and there would be no provision for an oil filter.
 
Last edited:
OP
P

plasmon360

Member
Joined
May 13, 2018
Messages
13
Location
San Diego
"Numbers stamped at the end of the shaft the large pulley is attached too.

I see number 17 on the shaft that attaches to the large pulley (see attached image). So it may be ROC 17.

You need a replacement threaded pipe for your spin on oil filter.

The inspection cover is much older than the rest of the machine. If it were a 50's vintage, the fins on the intercooler would be square and there would be no provision for an oil filter.

I do not see a place where I can put the spin on oil filter. I have seen oil filter near the hydraulic unloader in some images of other quincy compressors , but I dont see any fitting that would accept an oil filter in my compressor (see attached image). Thanks for your comments. They cleared many of my doubts.
 

Attachments

  • IMG_20180515_204406.jpg
    IMG_20180515_204406.jpg
    100.8 KB · Views: 93
  • IMG_20180515_204325.jpg
    IMG_20180515_204325.jpg
    69.7 KB · Views: 96

Strouty

Well-known member
Joined
Mar 21, 2010
Messages
38,224
Location
Southern Maine
Call quincy and they will be able to tell you what manual to use. My oldest units were ROC 21, but I was told that I could reference ROC 104 for any parts and manuals.

251.937.5900 (8-5 M-F CST)
 

MacMcMacmac

Well-known member
Joined
Oct 21, 2014
Messages
1,591
Location
canada
I see number 17 on the shaft that attaches to the large pulley (see attached image). So it may be ROC 17.


I do not see a place where I can put the spin on oil filter. I have seen oil filter near the hydraulic unloader in some images of other quincy compressors , but I dont see any fitting that would accept an oil filter in my compressor (see attached image). Thanks for your comments. They cleared many of my doubts.

Interesting. I have never seen that style of oil pump without the filter.
 

The Tool Tyrant

ALLIANCE MEMBER
Joined
Dec 19, 2011
Messages
2,182
Location
Bonita, Ca. (San Diego)
Interesting. I have never seen that style of oil pump without the filter.

Yes, I have a couple of Quincy pumps sans oil filter. My 325 parts manual shows
two different 'bearing carrier groups', one with the filter provision (110816-001) and one without (110816).

FYI Plas, the 325 control group you have (two unloaders) is set-up for dual-run, ie, it will run in either 'start-stop' mode or 'continuous run' (load-unload).
Check the manual as you need a pilot valve and a valve to switch between the two. FYI, the pressure switch cut out pressure must be set approx. 8 psi higher than the pilot valve cut-out pressure.
Minimum speed for the 325 is 400 RPM. My book shows 3HP as the minimum for that pump, so I would not try to exceed 450 RPM with your motor as you don't want to burn it out.
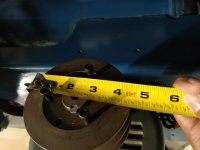
With a 16" driven sheave and a 1725 RPM motor, you would need a 4-1/8" drive sheave on the motor to produce 444 RPM. You may get some belt slippage with a drive sheave that small...Check with Quincy.
Someone else on here with a 3 HP motor driving a 325 pump may be able to give you more particulars or better yet, check with Quincy direct.

Oh, ya...and 'You ****!'
 
Last edited:
OP
P

plasmon360

Member
Joined
May 13, 2018
Messages
13
Location
San Diego
FYI Plas, the 325 control group you have (two unloaders) is set-up for dual-run, ie, it will run in either 'start-stop' mode or 'continuous run' (load-unload).
Check the manual as you need a pilot valve and a valve to switch between the two. FYI, the pressure switch cut out pressure must be set approx. 8 psi higher than the pilot valve cut-out pressure.
Minimum speed for the 325 is 400 RPM. My book shows 3HP as the minimum for that pump, so I would not try to exceed 450 RPM with your motor as you don't want to burn it out.
With a 16" driven sheave and a 1725 RPM motor, you would need a 4-1/8" drive sheave on the motor to produce 444 RPM. You may get some belt slippage with a drive sheave that small...Check with Quincy.

Thanks for your comments. It is good to know that it can be operated in dual mode. I will set up for start-stop for now and upgrade later to continious mode.

You were right on the money with respect to the motor drive sheave requirement. I measured the drive sheave diameter and it is near 4-1/8" . see attached picture.

I am preparing a list of questions to ask quincy. I will update here after I get the answers. After some cleanup, the compressor looks great. I am looking forward to listen to the first time this beauty will compress some air.

I am wondering what should be the rating of pressure relief valve that I should use. I have a pressure switch that turns on at 140 psi and turns off at 175 psi. The tank is rated for max 200 psi (as shown on tank nameplate). I have a spare pressure relief valve that is rated at 175 psi too. I was thinking of using this spare pressure relief valve on the tank. Is it OK to have both of them (pressure relief and pressure switch turn off) at the same pressure rating?
 

Attachments

  • IMG_20180516_091710.jpg
    IMG_20180516_091710.jpg
    119.2 KB · Views: 83
  • IMG_20180516_092140.jpg
    IMG_20180516_092140.jpg
    114.9 KB · Views: 124

The Tool Tyrant

ALLIANCE MEMBER
Joined
Dec 19, 2011
Messages
2,182
Location
Bonita, Ca. (San Diego)
I'd go with a 200 psi safety valve as the 175 will open when the pump gets to 175 +/- as they're not perfect.

I see you removed the motor adjustment plate. They make tensioning the belts much easier, but you may have to drill new mounting holes in the tank platform to allow correct belt alignment. Be sure to use a straight edge placed across the face of the pump pulley and spanning to the motor pulley to aid in correct belt alignment. This step is critical for belt and bearing longevity.
 
Last edited:
To avoid these ads, REGISTER NOW!

pcmeiners

Well-known member
Joined
Aug 13, 2009
Messages
7,952
Location
In the only town in Pennsylvania, Bloomsburg.
"I have a pressure switch that turns on at 140 psi and turns off at 175 psi."
Unless you have a reason for it, 175 and 140 are high. It just wastes energy for no reason. For most uses 110-125 working pressure would be fine, off at 140-150. Easily adjustable.

You should clean out the crankcase sump and the screen filter (remove large nut next to oil drain). You may end up needing to clean up the valves in the compressor head, if lucky they are clean, if not they may need some rust removed and, lapped and polished up.

As a note there are many videos on the web concerning QR series pump restorations/rebuilds.
 
OP
P

plasmon360

Member
Joined
May 13, 2018
Messages
13
Location
San Diego
I too was thinking that it is way high for my needs. To save money and not buy any additional parts, I was thinking of using this high turn-off pressure switch and then use a pressure regulator on the output of tank to 110 psi.

Now I know that it can be easily adjusted. I will take your suggestion and adjust the pressure switch to turn off at 140-150 psi max.

Regarding cleaning, I think this compressor was not used even once after rebuilt. The oil is like brand new and transparent like cooking oil. The seals seem to be all new. No dust in input filter. The only damage that might have happened is for the parts sitting still for years.

I am afraid I will probably damage it trying to restore/rebuid it. :)
 
Last edited:
OP
P

plasmon360

Member
Joined
May 13, 2018
Messages
13
Location
San Diego
I see you removed the motor adjustment plate. They make tensioning the belts much easier, but you may have to drill new mounting holes in the tank platform to allow correct belt alignment. Be sure to use a straight edge placed across the face of the pump pulley and spanning to the motor pulley to aid in correct belt alignment. This step is critical for belt and bearing longevity.

Thanks for this suggestion on the straight edge. I was seeing if I can get away without the alignment plate because I did not have a good drill bits to drill through steel. But I found that I was not getting the right alignment without the alignment plate. So time to buy some good drill bits.

You seem to be from San Diego and I too live in San Diego. Do you recommend any place that is good to buy compressor parts like valves, copper pipe, fittings? I went to Marshalls Industrial hardware on Miramar, they were expensive and was wondering if there is any retail/specialty place that would sell at a lower price. Would appreciate your answer.
 

The Tool Tyrant

ALLIANCE MEMBER
Joined
Dec 19, 2011
Messages
2,182
Location
Bonita, Ca. (San Diego)
Two PM's sent.

BTW, if you're only going to buy 1 set of drill bits, I suggest the DeWalt 29pc. 'Pilot point' drill bit set. It covers most all sizes needed to 1/2" and they drill the ROUNDEST holes you'll ever see with a twist type drill bit! You can even drill perfectly round holes in thin sheet metal whereas you would end up with a hole that looks more like a figure 8 with a standard bit.
 
Last edited:
OP
P

plasmon360

Member
Joined
May 13, 2018
Messages
13
Location
San Diego
Life has been busy since I posted the last update.

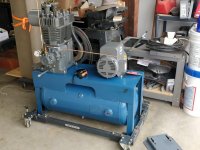
Recap from old posts: I basically got a Quincy compressor and motor (never used) but it was missing plumbing and electrical work. I received a lot of suggestions here and implemented them gradually. Appreciate it very much. :bowdown:

Please see the pictures of the latest build.

I am confident about the electrical wiring. I installed a safety switch, pressure switch, and contactor. I was able to run the motor by itself without the belts.

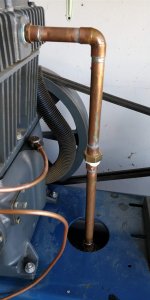
I installed the necessary plumbing. A plumber helped me with soldering of discharge pipe between the compressor and the tank.

I did the rest of the plumbing.

One of the suggestion was to change the oil. I checked the oil and it seems to be never used. Almost transparent like water. the level was also good.

Other suggestion was that this compressor does not need a check valve, so I have not installed any.

I also made sure the pulley and the wheel on the compressor are parallel.

I have not turned it ON. little nervous. :headscrat Before I turn it ON. I wanted to get some suggestions on plumbing If I am missing anything. I can post more pictures too.
 

Attachments

  • IMG_20190316_163214.jpg
    IMG_20190316_163214.jpg
    146.9 KB · Views: 141
  • IMG_20190316_164642.jpg
    IMG_20190316_164642.jpg
    76.9 KB · Views: 123
  • IMG_20190316_165002.jpg
    IMG_20190316_165002.jpg
    104.1 KB · Views: 113
  • IMG_20190316_163243.jpg
    IMG_20190316_163243.jpg
    83.1 KB · Views: 102
  • IMG_20190316_164655.jpg
    IMG_20190316_164655.jpg
    88.7 KB · Views: 102
  • IMG_20190316_164719.jpg
    IMG_20190316_164719.jpg
    100.4 KB · Views: 110
  • IMG_20190316_164913.jpg
    IMG_20190316_164913.jpg
    85.6 KB · Views: 109

dkmc

Well-known member
Joined
Jan 20, 2008
Messages
950
Location
NYS--Upstate in the corn fields
Big possibly the oil is non detergent, all the dirt is in the bottom of the crankcase. Remove the side cover and check for goo in the bottom. And CHANGE THE OIL! Use compressor oil not motor oil.
Also a possibility your hard copper air line will work harden from vibration and crack. The rest of it looks good.
 
Last edited:
OP
P

plasmon360

Member
Joined
May 13, 2018
Messages
13
Location
San Diego
Big possibly the oil is non detergent, all the dirt is in the bottom of the crankcase. Remove the side cover and check for goo in the bottom. And CHANGE THE OIL! Use compressor oil not motor oil.
Also a possibility your hard copper air line will work harden from vibration and crack. The rest of it looks good.

Thank you for your suggestions.

For now, I am anticipating the compressor will be used very sparingly. Probably few times a year primarily for spraying finish on woodworking projects. So I am assuming the hardening of copper will not be an issue in the near future.

Still not sure which record is mine. I see the manuals for record 106 and it recommends Quin-cip oil of type sae 10w, or sae 20 or sae 30.

How do I choose between them? any suggestion on that? also not sure how much quantity.

Appreciate your knowledge and willingness to help.
 
OP
P

plasmon360

Member
Joined
May 13, 2018
Messages
13
Location
San Diego
Just an FYI, most units use a flexible metal pipe-hose. The copper might be fine.
1.6 quarts according to the parts manual.

http://www.engineservicesupply.com/contentonly.aspx?file=pdf/325L PARTS BOOK.pdf

Oil weight depends on ambient temps. Unheated space? Use thinner oil. Out in the sun in the desert? Use.......take a guess.
:)

I checked the temp chart for different weights. I live in San Diego and the compressor will be in garage. Temp is above 10C. So I am expecting SAE 30 will workout.
 

dkmc

Well-known member
Joined
Jan 20, 2008
Messages
950
Location
NYS--Upstate in the corn fields
Put your lips together and suuuck!

Post a video of it running for the rest of us luckless wonders.

Low cost 'deals' on them can be hard to find. I found one last summer in tired but serviceable shape by checking CL a few times daily.
Also you have to be sure everyone and their Hair Dresser knows your looking for one!
 

The Tool Tyrant

ALLIANCE MEMBER
Joined
Dec 19, 2011
Messages
2,182
Location
Bonita, Ca. (San Diego)
One of the suggestion was to change the oil. I checked the oil and it seems to be never used. Almost transparent like water. the level was also good.

Other suggestion was that this compressor does not need a check valve, so I have not installed any.

Regarding the oil change...the large hex head plug to the right of the oil drain outlet is the 'oil strainer screen' Quincy recommends removing and cleaning it when doing an oil change. BTW, 30wt. is correct for San Diego.

Regarding not using a check valve. I don't understand why you would not install one as there is no good reason not to. :confused: If you ever need to work on the pump (valve job etc) you'll need to drain the receiver completely first. The check valve doesn't allow the compressed air in the receiver from returning to the pump.
 
Last edited:

01birddog

Member
Joined
Mar 14, 2019
Messages
14
Location
Abingdon, Virginia
None of those pieces are compatible, unfortunately it's a total lost cause.
I'll dispose of all that properly if you ship it to my shop.

I think you might find you get some YOU **** comments on that one.
Yes, it's a great deal.
Nice score!

I have three Quincy 325's and leaving in the morning to go just North of Nashville to pick up another. I wish i had some control over this but i don't.
 

pcmeiners

Well-known member
Joined
Aug 13, 2009
Messages
7,952
Location
In the only town in Pennsylvania, Bloomsburg.
"Regarding not using a check valve. I don't understand why you would not install one as there is no good reason not to. If you ever need to work on the pump (valve job etc) you'll need to drain the receiver completely first. "

You have a point, but how often do you work on a QR series and what is the issue of draining the tank for infrequent work on the pump, secondly almost all check valves are highly restrictive, with the exception of very expensive full flow check valves; as mentioned before QR units have a check valve built into the head.
 

The Tool Tyrant

ALLIANCE MEMBER
Joined
Dec 19, 2011
Messages
2,182
Location
Bonita, Ca. (San Diego)
"Regarding not using a check valve. I don't understand why you would not install one as there is no good reason not to. If you ever need to work on the pump (valve job etc) you'll need to drain the receiver completely first. "

You have a point, but how often do you work on a QR series and what is the issue of draining the tank for infrequent work on the pump, secondly almost all check valves are highly restrictive, with the exception of very expensive full flow check valves; as mentioned before QR units have a check valve built into the head.

Well yes, you are correct pc... :thumbup: although the QR series ARE super reliable and don't break down with proper maintenance... I did recently need to do a scheduled valve job on my 325. Being that it sits proudly atop a 120 gal. receiver, it was nice to do the valve job without draining down the receiver. :beer:
 

W-Cummins

Well-known member
Joined
Jan 9, 2006
Messages
1,642
Location
Iowa
"Regarding not using a check valve. I don't understand why you would not install one as there is no good reason not to. If you ever need to work on the pump (valve job etc) you'll need to drain the receiver completely first. "

You have a point, but how often do you work on a QR series and what is the issue of draining the tank for infrequent work on the pump, secondly almost all check valves are highly restrictive, with the exception of very expensive full flow check valves; as mentioned before QR units have a check valve built into the head.


That has to be the ( the loss of one tank of air) to be the last thing to "need" check valve for!


The real reason to want a check valve on a QR is because the output disk valve will leak if you don't run the pump regularly ( daily ) that keeps the disk area free of rust etc... When I run the 390 a few hours a day it holds the pressure over night but, if not using it for a few weeks and only a few cycles it will not hold the pressure over night. I have another compressor that I haven't run in over two years, with a check valve, and its still got 75psi in it!


William......
 

dkmc

Well-known member
Joined
Jan 20, 2008
Messages
950
Location
NYS--Upstate in the corn fields
I have three Quincy 325's and leaving in the morning to go just North of Nashville to pick up another. I wish i had some control over this but i don't.

Congrats on the addition to your FLEET.
Hope the 325 family does well
:bounce:

I hear ya brother :beer: I don't even want to state publicly how many Quincy's I own...or worse yet how many compressors period! :shocking:

I know man, what is it about compressors anyway??
:evil:
 
Last edited:
To avoid these ads, REGISTER NOW!
Top Bottom