
You are using an out of date browser. It may not display this or other websites correctly.
You should upgrade or use an alternative browser.
You should upgrade or use an alternative browser.
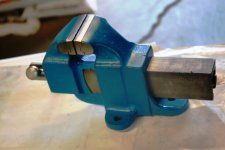
Morgan Chicago 380 6” Vise
- Thread starter Jaydb07
- Start date

Very nice score could you please post more pictures. I’ve got the smaller 4in version of your vise no 340b and also it’s called a swivel jaw vise. The vise was meant to hold tapered parts when the pin was pulled from the hole. I can’t get the catalog picture to load but your vise weighs 158lbs and opens 10 inches.

Sent from my iPhone using Tapatalk
Sent from my iPhone using Tapatalk
Last edited:
Very nice score could you please post more pictures. I’ve got the smaller 4in version of your vise no 340b and also it’s called a swivel jaw vise. The vise was meant to hold tapered parts when the pin was pulled from the hole. I can’t get the catalog picture to load but your vise weighs 158lbs and opens 10 inches.
Sent from my iPhone using Tapatalk
Thanks for the info! Yes I will add new pics soon.
Attachments

Very nice score could you please post more pictures. I’ve got the smaller 4in version of your vise no 340b and also it’s called a swivel jaw vise. The vise was meant to hold tapered parts when the pin was pulled from the hole. I can’t get the catalog picture to load but your vise weighs 158lbs and opens 10 inches.
Sent from my iPhone using Tapatalk
The static jaw is 13” tall.
Attachments

Shiftless
Well-known member
Maui
Well-known member
Spray the swivel pin with copious amounts of lubricant like WD-40, liquid wrench, etc. On the last swivel jaw vise I had where the pin was frozen in place I did this and gently tapped the head of the pin on the sides with a ball peen hammer. I did not hit it hard. Just tapped it to break the corrosion free. Then I sprayed it again and repeated the process a few more times. Then I took a single head lug nut wrench and placed the sharp tipped end underneath the head of the bolt and gently tapped down on the handle with the hammer. This produced an upward force on the pin. After about half a dozen taps it broke free and came right out.
Maui
Maui
gman007
Well-known member
I would be grateful for any and all advice re how I can remove the jaw-locking pin from the swivel jaw. It is seized and will not budge.
Jay
I have had good luck with Kroil but sometimes it does take some time and multiple applications. Some people soak the seized parts in transmission fluid or even diesel fuel. As a last resort application of heat and cold and then gentle taping usually will do the trick.
Rusty and fussed parts are always a PITA and it takes patience and persistence.
BTW, that is a a great specimen that you have, as old American 6" vises do not grow on trees! Nice find

If you need any help, it is best to post it on the vise repair thread
https://www.garagejournal.com/forum/showthread.php?t=252830
And if you are interested in vises in general, there is a vise thread where 100s if not 1000s of the vise nut cases like myself congregate there, here is the link
https://www.garagejournal.com/forum/showthread.php?t=44782
On both threads make sure you click on the last page to get to the latest posts as these are very large threads (specially the main vise thread which currently is currently 3243 pages long!)
KMScott
Well-known member
I am not a fan of a spray penetrant. Hard to get it in the rusted frozen taper pin. I like heat. First you have to remove the swivel base and see if there is a through hole to the bottom of the pin. It should have one since a tapered hole with no through hole is un common. Find a punch that fits and heat around the pin with a torch to swell the casting then let it cool then do it again several times if necessary. When the casting is hot then try pounding the pin out but not to hard. You do not want to break the swivel jaw or swell the pin bottom from pounding. If that does not work then read this posting that I used on a really stuck pin. Good luck. Let us know how you did it. Swivel pin Removal.
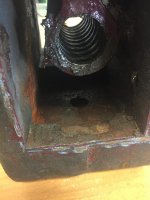
KM that is super helpful thank you. I assure you I want to get the swivel base off. I need to get a bigger socket to get the huge not out.
I gotta get this 1.5” nut off.... off to the store to buy that socket
Attachments
Maui
Well-known member
Jay, the lug nut wrench is just what I had on hand at the time. You could just as easily use a long handled slotted screwdriver. I did zero damage to my vise using this method, and was able to easily work the pin free.


I gotta get this 1.5” nut off.... off to the store to buy that socket
Ok got that solved. Also I see blue underneath. I read a post from a Morgan exec that said “all Morgans have been painted blue, similar to Federal Safety blue. Sure enough there it is.
KMScott
Well-known member
Here is a couple I restored and tried to match their color. I used Rust-Oleum Satin Lagoon.
First ya gotta get the pin out.
First ya gotta get the pin out.
Attachments


Here is a couple I restored and tried to match their color. I used Rust-Oleum Satin Lagoon.
First ya gotta get the pin out.
Ok well I now have access to the underside of the pin. But with the confined space of the inside of the static jaw how can I apply any percussion to it to pop it out the top?
Attachments
Shiftless
Well-known member
I would be grateful for any and all advice re how I can remove the jaw-locking pin from the swivel jaw. It is seized and will not budge.
The toughest one I ever tackled was this Reed 406. After many weeks of soaking in penetrating oil and tapping it regularly it was still stuck.
I ended up following advice from a few members, (Carla & KMScott) by drilling and tapping a 3/8 hole in the center of the pin to accept a grade 8 bolt. After fabricating a spacer and with the help of fellow GJ member jziggy, it finally popped out.
Of course, I was left with a hole in the pin but that makes for a handy way to fasten an eye bolt for a hanging handle to keep the pin nearby when not in use.
Attachments

Last edited:
The toughest one I ever tackled was this Reed 406. After many weeks of soaking in penetrating oil and tapping it regularly it was still stuck.
I ended up following advice from a few members, (Carla & KMScott) by drilling and tapping a 3/8 hole in the center of the pin to accept a grade 8 bolt. After fabricating a spacer and with the help of fellow GJ member jziggy, it finally popped out.
Of course, I was left with a hole in the pin but that makes for a handy way to fasten an eye bolt for a hanging handle to keep the pin nearby when not in use.
Now there’s a couple nice vises. Well today I tried Kroil and percussion from below with a brass rod. After hearing the body near the pin. No luck. Tomorrow I will try heating and cooling. I may try to fashion a “jack screw” to apply continuous pressure from below.
Sent from my iPhone using The Garage Journal mobile app
Shiftless
Well-known member
Thanks Jay,
I still have the baby bullet but I traded away the 406 for some cash and a VERY nice Craftsman 5197.
You’re smart in doing what you are doing for a while before going with my drill a big hole approach. Of course, If you are ready to fabricate a new pin, go ahead with the hole method. To many people, drilling out the middle of the locking pin leaves an unacceptable modification to the original vise even if it does solve the problem.
Attachments
Last edited:
Thanks Jay,
You’re smart in doing what you are doing for a while before going with my drill a big hole approach. Of course, If you are ready to fabricate a new pin, go ahead with the hole method. To many people, drilling out the middle of the locking pin leaves an unacceptable modification to the original vise even if it does solve the problem.
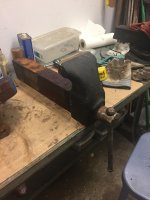
Yeah my whole enjoyment with these things is returning them to proper condition. So I try hard to not modify if possible. But I’m also not endlessly patient. So we’ll see! For now I am very happy at the condition of the vise and that I have it mostly disassembled.
Sent from my iPhone using The Garage Journal mobile app
I am not a fan of a spray penetrant. Hard to get it in the rusted frozen taper pin. I like heat. First you have to remove the swivel base and see if there is a through hole to the bottom of the pin. It should have one since a tapered hole with no through hole is un common. Find a punch that fits and heat around the pin with a torch to swell the casting then let it cool then do it again several times if necessary. When the casting is hot then try pounding the pin out but not to hard. You do not want to break the swivel jaw or swell the pin bottom from pounding. If that does not work then read this posting that I used on a really stuck pin. Good luck. Let us know how you did it. Swivel pin Removal.
Ok I am currently on version 3.0 of jack screw...and awaiting the “pop.” Also been heating and cooling. And Kroil.


Sent from my iPhone using The Garage Journal mobile app

KMScott
Well-known member
Don't forget light taps with a piece of copper or brass to create a shock. Tap on the sides of the swivel jaw, tops of the swivel jaw and not hard enough to dent but enough to shock the casting. It should go.
Aha. I have been tapping just the pin and not the jaw itself. Ok!
Sent from my iPhone using The Garage Journal mobile app
Sent from my iPhone using The Garage Journal mobile app
Shiftless
Well-known member
Theoretically the vibrations and shock waves will temporarily open up microscopic gaps where the penetrating oil gets into the seized areas. They usually turn out to be quite small.
Realize that a torch will burn away your penetrating oil.
With an oxy acetylene torch, it will go fast and you don’t need oil. Propane torch might not give quick enough heat or high enough temperature differential to take advantage of expansion differences in adjacent parts.
Bang away!
As Kevin said, use a copper or brass hammer to avoid denting surfaces.
Last edited:
Maui
Well-known member
If you use a torch you run a very real risk of cracking the casting. I wouldn’t do that.
If you use a torch you run a very real risk of cracking the casting. I wouldn’t do that.
A friend advises: weld something on the top of the pin; grab that thing with a slide hammer; use the hammer to jerk it out; cut the welded thing off the pin; grind the pin back to proper shape
Sent from my iPhone using The Garage Journal mobile app
The toughest one I ever tackled was this Reed 406. After many weeks of soaking in penetrating oil and tapping it regularly it was still stuck.
I ended up following advice from a few members, (Carla & KMScott) by drilling and tapping a 3/8 hole in the center of the pin to accept a grade 8 bolt. After fabricating a spacer and with the help of fellow GJ member jziggy, it finally popped out.
Of course, I was left with a hole in the pin but that makes for a handy way to fasten an eye bolt for a hanging handle to keep the pin nearby when not in use.
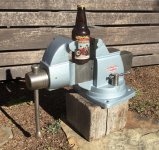
What’s that accessory part attached to the top of the main slide?[emoji51]
Sent from my iPhone using The Garage Journal mobile app
Voilá. After my friend Kevin Lawrence got the pin out using a low profile hydraulic press, my part was to apply Kroil, brass hammer, and attitude.


Sent from my iPhone using The Garage Journal mobile app
Sent from my iPhone using The Garage Journal mobile app
Will y’all please offer counsel re the best way for me to clean/prep all these swivel jaw mating surfaces?
Sent from my iPhone using The Garage Journal mobile app
Sent from my iPhone using The Garage Journal mobile app
KMScott
Well-known member
Will y’all please offer counsel re the best way for me to clean/prep all these swivel jaw mating surfaces?
I like to use stones. I keep them in a fine oil like lamp oil. Stones are like sanding paper, they have different grits from coarse to fine. I like using a soft stone around 220 grit like THESE. The oil keeps the stone clean and sharp by breaking down as you rub. This is all I use for cleaning the rust and deburring the little knicks. Stones keep the edges sharp, not like a wire wheel of sanding discs. On fitting and finding the high spots I use Persian Blue. Coating one surface the sliding the jaw support will show up as rub marks, clean and stone again till the rotating jaw slides with little hang ups. This is how I fit and clean swivel jaws. I also stone the taper pin hole after clamping the jaws together to clean the hole, the stones can be shaped on a bench grinder and will shape them self's pretty quick, I use the up and down strokes until the hole is all clean. Stoning takes a minimal amount off. I learned about stoning when I used to build Plastic Injection Molds. I would have .002 of steel left for polishing. Sandpaper that is wrapped around a flat stick works too but more cumbersome.
Attachments


I like to use stones. I keep them in a fine oil like lamp oil. Stones are like sanding paper, they have different grits from coarse to fine. I like using a soft stone around 220 grit like THESE. The oil keeps the stone clean and sharp by breaking down as you rub. This is all I use for cleaning the rust and deburring the little knicks. Stones keep the edges sharp, not like a wire wheel of sanding discs. On fitting and finding the high spots I use Persian Blue. Coating one surface the sliding the jaw support will show up as rub marks, clean and stone again till the rotating jaw slides with little hang ups. This is how I fit and clean swivel jaws. I also stone the taper pin hole after clamping the jaws together to clean the hole, the stones can be shaped on a bench grinder and will shape them self's pretty quick, I use the up and down strokes until the hole is all clean. Stoning takes a minimal amount off. I learned about stoning when I used to build Plastic Injection Molds. I would have .002 of steel left for polishing. Sandpaper that is wrapped around a flat stick works too but more cumbersome.
Ok I ordered those stones. Using a stone I had I gave it a try. Interesting and effective.

Sent from my iPhone using The Garage Journal mobile app
Ohmthis
Well-known member
You can make a pusher tool out of two bolts close to the hole diameter and a rod coupling of the same thread. Run both of the bolts onto the rod coupling and cut the head off of one bolt. Slide that headless shaft into the hole and use two wrenches to undo the top bolt from the coupling. This will put outward pressure on the pin. Spray the hole with a penetrating lube first. Be gentle and take your time. Good luck!