To avoid these ads, REGISTER NOW!

Got a Bendpak XPR-10AXLS lift installed today

Goose17

Well-known member
Joined
Mar 29, 2016
Messages
62
Today was lift install day... finally! I had been putting this off for a long time. I had to solve the delivery and weight issue (almost a couple thousand pounds). This thing is close to a couple thousand pounds shipped! If you accept delivery, YOU have to remove it from the delivery vehicle. I spoke with a Bendpak rep who gave me a local installer's info. For a fee, the installer took delivery of the lift and then came out and made it all happen. The fee was WELL worth it. This lift is MASSIVE and is seriously heavy. Plus, all of the drilling and cable/hose installation was best left to the professionals in my case.

I chose to go with a 2-post lift initially (I have another outlet wired for a possible 4-post lift addition). I went with this lift:

Super-Tall Two-Post Lift - High Rise Lift - XPR-10ASLX

It was their tallest 2-post lift. I'm not sure I'll need the extra height, but since I had the space, I went big. I also wanted the option to be able to lift stuff high enough to transfer to my loft (possibly from the back of my truck)

Now for pictures of the process...

First off, the 3 Cobras got relocated to the house garage:

24_BCF1_EE-2296-480_F-802_B-_FF002_FE65920.jpg


Once the installers arrived, we discussed options and decided the best option for me was to have the lift installed "backwards." This would allow me to back the vehicles into position vs. driving into the lift forward. The reasons I went with this option were:

1. I normally back all of my vehicles into the garage.
2. The lift motor is on the passenger side tower. Installing it "backwards" more closely aligned it with my 220 prewired power source.
3. By backing the vehicles into position, the mirrors never pass between the towers. This allowed me to use the narrow setting of the lift and still be able to lift my F-150.
4. By installing the lift backwards, it deconflicted with the door on the nearby wall.

Back to the process...

I pulled my truck into position and we mapped out an exact position of the lift:

726_F5212-_F90_A-4842-9317-5_BC97_F2_CFBF8.jpg


Since I have foam sprayed walls, the installer measured off the front garage door to find "square."

AD09485_F-_C526-402_A-_A002-6_A18_A395_FE97.jpg


Next was tackling the monster on the trailer. They expertly used an engine hoist:

84_C40_C54-006_B-410_D-87_D5-3_C5_E34_D23685.jpg


They pushed/pulled the lift into the garage while the heavy tower balanced. Fortunately the nylon wheels didn't mar my floor:

C7_EA59_A8-9765-4_D80-945_C-_A1_CB9_F9_FA5_AD.jpg


They put down cardboard to protect the floor... winning the battle:

21_AC7_F5_C-08_C0-4_E97-950_C-337_E7_E310_FE9.jpg


In with the second column/tower:

247_FB50_C-5_B07-49_F4-8968-064_FE7_ACE753.jpg


At this point, the columns were free-standing. With the above cross-beam in the narrow setting, they connected the 2 towers:

1026_A2_E6-_F8_CC-47_E0-9397-79_DD56119_B75.jpg


They assured me their measurements were good, but I still requested to drive my truck into position for one final check before we started drilling. They were right... the fit was perfect:

1_BB9_CB06-_C2_FF-4_CF3-_A2_DF-56802_B037_FE8.jpg


Next it was time to drill 12 anchor bolt holes. These are the massive anchor bolts that get hammered into position. They then crank on the nuts with a large driver and the anchor end part spreads and grabs the concrete. The installer dude said the instructions state to drill the holes just deep enough for the bolts, but he said they always drill completely through the slab. This allows them to hammer the anchor out the bottom (into the dirt) if any of them give them problems. More on that later...

69_AA7_AF4-_D8_CB-47_C8-_AFB9-2_B474_E4484_AA.jpg


One guy used a large hammer drill while the other sucked-up the dust with my shop vac:

3_D5_FFF27-_C579-4683-_B653-398_C86_F7_F1_A6.jpg


After checking for level, they inserted "U" shaped washers to level-out the columns:

8_BA86_AD2-720_E-42_E0-_BAB5-4_E500712_D6_CB.jpg


Seriously cranking down on the nuts that hold the lift:

DDA3857_A-8173-4_E49-8887-8_F0_BDA6_C5_A29.jpg


Drilling the other column bolts:

D9_B5_BFDF-5_D1_F-4764-_AA71-_C91_FD6_EA0_E07.jpg


Hammering the anchor bolts into position:

00197450-_A4_B1-44_EC-8_C85-7_A5_CE4103_D6_C.jpg
 
To avoid these ads, REGISTER NOW!
OP
G

Goose17

Well-known member
Joined
Mar 29, 2016
Messages
62
This is where we ran into a problem. Drilling hole #12 of 12 (the last freak'n one), they hit rebar. Their drill bit was a dual-purpose concrete/metal, but the driller ended up spending about 10-15 minutes drilling through the rebar. During this process, the hole got slightly elongated and the anchor bolt would not grab enough for them to be happy with it. They ended up hammering it out the bottom (into the dirt) and went with "plan-B." The options at this point are to move the lift and start drilling all new holes (HECK NO!) or use a 2-part epoxy with a new anchor bolt. We went with the epoxy option. They mixed the epoxy in the hole and hammered another (extra) anchor bolt into position. They will come back later to tighten the nut after the epoxy has cured.

Back to the process...

Checking column 2 for level in both axis... a magnetic level was handy!

02_B4_EE87-8211-47_BA-9726-_CC2575126039.jpg


Running cables and hydraulic lines:

BBBF4583-0_E97-4_BF3-_B961-9_C97220484_AD.jpg


Installing the motor and hydraulic fluid reservoir:

27_D7_C97_A-5627-4_B08-9848-_A363_BEF28_F3_E.jpg


Filling approximately 3 gallons of hydraulic fluid:

ECCC5_DDB-0_EE0-4127-8_D99-2_A70_E2_F35053.jpg


Installing the arms. Short ones in the front, long ones in the back:

B76_BC416-4401-4_D49-_BC18-333062_DB8_E19.jpg


Adjusting the arms so they go up uniformly:

72_E47_C76-_B589-4_A2_A-_AC84-_E9_F39_CB3_CC4_B.jpg


Screw-extending lift pads installed. They also have "stackable adapters" pictured lower-left:

B41_CAA1_A-_B566-41_D0-_BAEF-85_C29_C553850.jpg


The installers temporarily wired the lift to ensure everything functioned properly, but permanent wiring is up to me. They showed me what needs to be done, they just don't do it. I'm thinking of tackling it myself. I have a 30-amp breaker supplying 220 to raw wires in a box nearby. I plan to install a 220 plug in the box and then wire-up the lift with a plug that can be removed from the wall socket. The wiring also has to run through the safety shutoff circuit that is activated by a lever in the cross beam.

So, items that remain:

1. Wiring
2. Secure anchor bolt #12
3. Contact Bendpak for touch-up paint. It is common for these massive lifts to sustain battle scars during shipping and mine was no exception.

I look forward to lifting my first vehicle!
 

jchetty

Well-known member
Joined
Aug 18, 2005
Messages
431
Location
Central New Jersey
Wow, killer garage. I see a fox-body cobra, maybe a terminator, and who knows what else. Awesome garage. That floor is insane- great garage. Maybe one day I can get a teal cobra to park next to the Lightning.
 
OP
G

Goose17

Well-known member
Joined
Mar 29, 2016
Messages
62
Wow, killer garage. I see a fox-body cobra, maybe a terminator, and who knows what else. Awesome garage. That floor is insane- great garage. Maybe one day I can get a teal cobra to park next to the Lightning.

Thank you.

The cars are not normally covered. I just threw covers on them for this project.

17_C7956_B-_F57_A-42_ED-8540-3_B80_C4442_EC7.jpg
 

Jsf721

Well-known member
Joined
Dec 23, 2012
Messages
4,129
Location
LI, NY
Is that floor slippery when wet? Did you use any grip agent in the top clear. It looks amazing.
 
OP
G

Goose17

Well-known member
Joined
Mar 29, 2016
Messages
62
Is that floor slippery when wet? Did you use any grip agent in the top clear. It looks amazing.

The floor most likely would be slippery when wet. These cars don’t see rain and therefore the floor doesn’t get wet.

I did not use a grip agent in the top clear coat.
 

Garett

Well-known member
Joined
Nov 30, 2013
Messages
519
Location
BC Canada
The floors are fantastic.

Nice collection of mustangs. What’s your baddest fast car? More on the cars?
 

Lonnies Performance

Well-known member
Joined
Aug 20, 2017
Messages
267
Location
Pittsburgh, PA
Tell us more about the floor... What coating is on it.

I also hit rebar twice on mine, luckily it was just the edge, so it didn't egg out the hole since I did not drill all the way through.
 
OP
G

Goose17

Well-known member
Joined
Mar 29, 2016
Messages
62
The floors are fantastic.

Nice collection of mustangs. What’s your baddest fast car? More on the cars?

1989 Mustang GT vert I bought in ‘91. It’s the only one not on the road and is awaiting a full restoration. A mountain of parts has been accumulating for a couple years.

1993 Mustang Cobra (Teal Metallic) 11,000 miles and still on it’s original tires. A total time capsule. Car looks and drives like new.

2000 Cobra R, 1 of 300. I bought it in the Fall of 2016 with 750 miles on it. It’s my favorite car and stupid fun to drive. It currently has 1025 miles on it. Original irreplaceable tires are on the original rims and stored in black plastic bags.

2004 Mystichrome Terminator vert with 4,000 miles and on original tires. I bought this car last year to replace my 15,000 miles example that I sold shortly thereafter. This car is flawless.

2010 Mustang GT (not pictured). This is my 16 year old son’s pride and joy. We have done quite a bit of mods to it and he enjoys the heck out of it.

2011 Mustang GT 5.0 (not pictured). This is my 17 year old son’s pride and joy and is even more extensively modified. Both kids are driving a stick.

2011 Shelby GT500 with a 2.9L Whipple supercharger cranking out 750hp. I drive the snot out of this car and it currently sits with 32,000 miles. It is waaaay over powered and by far my fastest car.

2010 F-150 Super Crew Cab (not pictured). This is my “rain and airport” vehicle.

2010 Chevy Tahoe (wife) This is so no one can claim discrimination! :lol:
 
OP
G

Goose17

Well-known member
Joined
Mar 29, 2016
Messages
62
Tell us more about the floor... What coating is on it.

I also hit rebar twice on mine, luckily it was just the edge, so it didn't egg out the hole since I did not drill all the way through.

I had the floor done by a floor-dude.

He used a grinder to grind the new concrete. He then put a black epoxy primer down. Next was the base coat. It’s a blue metallic epoxy with a silver mist swirled into it. A combination of chemicals, a squeegee and a leaf blower moved the colors around. I wanted the floor to look like water. The dude hadn’t done a floor like this before, so there was a learning curve. The base coat is covered by a gloss clear coat. The first attempt didn’t go well and was sanded off. The second attempt went much better and I am happy with the end result.
 
OP
G

Goose17

Well-known member
Joined
Mar 29, 2016
Messages
62
if you don’t mind me asking, what did that floor cost you?

To be honest, I don’t recall the exact number. The guy gave me a super deal (compared to other quotes) and then used pictures of my place for his advertising. I had him do my 40x40 shop and then later do the back basketball area 40x22. It was somewhere around $8k +/- a couple grand for all of it. I was paying a lot of bills on the garage at the time and don’t recall his exact price.
 

Married2Vette2000

Well-known member
Joined
Jul 6, 2016
Messages
46
Location
Thousand Oaks, CA
Does the extra height on the columns actually let cars lift higher or is it taller so trucks or something with a tall roof can be lifted? Probably not as necessary for your Mustangs unless the arms go further up and you're a tall guy, to get underneath and work.
 

Garett

Well-known member
Joined
Nov 30, 2013
Messages
519
Location
BC Canada
Does the extra height on the columns actually let cars lift higher or is it taller so trucks or something with a tall roof can be lifted? Probably not as necessary for your Mustangs unless the arms go further up and you're a tall guy, to get underneath and work.

the lift height is the same 73-75" on the standard xpr-10 and the taller xpr-10-168" high bendpak lifts.

I now see from the post below that the xpr-10axls indeed does lift another 8.5" higher, than the other 2 models.
 
Last edited:

Daedalus

Well-known member
Joined
Sep 28, 2009
Messages
6,056
Love how we're all fixated on the floor. It is one of a kind, for sure. Reminds me of a bowling ball.

If the installer didn't do it, make sure you go back and hit the anchor nuts with a torque wrench. They usually torque to around 85-125 ft-lbs, but the number needs to come from the lift manufacturer (if spec'd) or the anchor manufacturer.

The reason the instructions say to not drill all the way through the slab is that doing so allows water and dirt to come up and get on the anchor. The anchors can't be guaranteed to perform the same, and any pre-load guaranty is void.
 
To avoid these ads, REGISTER NOW!

hasco

Well-known member
Joined
Oct 10, 2017
Messages
294
Reminds me of when i had my Eagle Lift installed in 2000.Two columns No above cables. My cables are on the floor with a plate over them (Ceiling not high enough)
Anyway a Lift is one of the Best investments one can make, Never looked back !
I did a blue Epoxy floor i got from lowes at the time .:beer:
 

cajunfirehawk

Well-known member
Joined
Nov 29, 2011
Messages
2,566
Location
Ms Gulf Coast
Killer Stangs, I think our led lights are hooked up exactly the same?
Kinda surprised no 4 post lift will all those cars...? Attached is my wifes garage queen, BTW what brand of car covers are those? excellent fit!
 

Attachments

  • fullsizeoutput_174d.jpg
    fullsizeoutput_174d.jpg
    153.6 KB · Views: 54
OP
G

Goose17

Well-known member
Joined
Mar 29, 2016
Messages
62
Killer Stangs, I think our led lights are hooked up exactly the same?
Kinda surprised no 4 post lift will all those cars...? Attached is my wifes garage queen, BTW what brand of car covers are those? excellent fit!

That’s a good looking Mach 1!

The car covers are all different. I have covers from Cover Craft and Cover King. They are the plush interior satin stretch type. The one on my 00R I got off eBay. I don’t normally cover my cars. My garage is usually pristine. I just covered them for this project.

My LED lights are 4’ Lights Of America plugged versions with 2 per plug. I have a bunch of them and the garage is well lit.

Thanks for the comments on my floor guys. It totally transformed the look of the garage.


Lift update: last night I did the wiring and it is ALIVE!
 

killahog

Well-known member
Joined
Aug 3, 2014
Messages
825
Location
Morrow County Ohio
Nice write up on the installation, i noticed something peculiar, in the third picture it appears as though the support across the top was attached before the lag bolts in the base's were installed. Is this actually the sequence they used? or am I missing something. The reason I ask is because I installed my XPR10ALP myself and did exactly what it appears your installers did, contrary to the sequence of steps in the supplied instructions. I am not implying they did anything wrong just pointing this out as I thought it might save someone else the headache of bolting the thing down and then struggling to get the cross bar on top lined up.
 

ford33

Well-known member
Joined
Feb 26, 2011
Messages
2,118
Location
Chicago, IL. USA
Thanks for posting a write up of the installation.

Super nice garage and cars. That floor is fantastic. It complements your orderly and clean space.
 
OP
G

Goose17

Well-known member
Joined
Mar 29, 2016
Messages
62
Nice write up on the installation, i noticed something peculiar, in the third picture it appears as though the support across the top was attached before the lag bolts in the base's were installed. Is this actually the sequence they used? or am I missing something. The reason I ask is because I installed my XPR10ALP myself and did exactly what it appears your installers did, contrary to the sequence of steps in the supplied instructions. I am not implying they did anything wrong just pointing this out as I thought it might save someone else the headache of bolting the thing down and then struggling to get the cross bar on top lined up.

If you are talking about the anchor bolts... yes! They connected the top brace before drilling/installing the anchor bolts. As for what the install instructions say... I have no idea! That’s what I paid the pros for! :D

My installer just came and torqued-down the last bolt that we used epoxy on. It held as hoped. He also confirmed my wiring and overhead safety switch are all good... it’s time to raise my first vehicle! :rocker:
 
OP
G

Goose17

Well-known member
Joined
Mar 29, 2016
Messages
62
Success!

I had to do a little project first... I ordered normal profile arms vs. low profile arms. The reason was after reading some reviews, I learned that although the low profile arms work better for sports cars, they don’t telescope as far as the normal profile arms and some owners mentioned they couldn’t lift their extended cab pickup trucks with the shorter arms.

I had to get the front of the Shelby higher to swing the arms under it from the rear. The asymmetric lift only allows the arms to swing in from the rear. You cannot move the front arm forward prior to getting the vehicle in place and then swinging it backwards into position. Soooooo.... I had some old wooden ramps I made awhile back. I cut up some rubber mats and glued them to the bottom. I left a rubber overhang on the front so the weight of the front tires would be on the rubber and keep the ramps from sliding on my smooth floor. These worked like a champ!

Glue drying:

F80_C56_F8-_B069-4_DEB-86_F3-_B4509_FA44_FF9.jpg


I got the Shelby close to the lift position, slid the ramps behind the front wheels and then backed the Shelby up to raise the front. I could then easily swing the front arms under the car.

0_E1197_CB-5_BFE-4234-_A0_CE-_EA4_D93_DADB4_C.jpg


750_AB170-3348-4720-_A525-48872_EF37_CC4.jpg


I used the pinch weld pucks on the rear and just the telescoping pads for the front. I plan to buy a second set of pinch weld pucks. The rear raised first and then the higher front made contact and the entire car raised smoothly and level. This is a picture at the lowest lock setting:

9_DD86_E61-8413-46_AC-_B15_F-_BC56412744_B6.jpg


There are multiple locks along the way as you raise. The idea is you use hydraulics to raise the vehicle, but then relieve the pressure by lowering the vehicle down to a mechanical lock while you work. You then raise it slightly, release the locks and lower the vehicle to the ground.

Slightly higher lock:

C38688_F2-1_CCC-47_DD-9_F0_B-6_BEDADD53006.jpg


Highest lock!

7_FED22_EA-57_F8-4_EB6-80_CE-19387231_AD79.jpg


F4_BB34_A4-5_E95-4_EED-8_BDF-484375_AE0850.jpg


2_BE84_CF6-_F69_F-465_C-_B2_A2-54_EF09_C87111.jpg


A “walk around.”


GasNSteering

Well-known member
Joined
Mar 6, 2009
Messages
87
Location
Zoo Jersey
Re: Got a Bendpak XPR-10AXLS lift installed toda

Goose17
Looks like we have twin GT Vert 89 Mustangs. Mine is Cabernet red, grey cloth 5 speed. Bought it new 7 14 1989. No white stripes around belt line though. Nice setup you have there.
 
OP
G

Goose17

Well-known member
Joined
Mar 29, 2016
Messages
62
Goose17
Looks like we have twin GT Vert 89 Mustangs. Mine is Cabernet red, grey cloth 5 speed. Bought it new 7 14 1989. No white stripes around belt line though. Nice setup you have there.

Very cool! I bought mine in ‘91 and daily-drove it for a long, long time. I put the white stripe on the car back in the 90s. This is my only vehicle I don’t drive. It’s awaiting a full restoration. Every time CJ Pony Parts has a sale, I load up on goodies and the parts mountain is BIG. I’ll tear into it in a couple years when my kids are all off to college. I plan to make it look like it just rolled off the assembly line. Lots of fun memories with that car.

Nice garage... nice cars.... great floor...:rocker:

Thank you sir!
 

protegeV

Well-known member
Joined
Apr 18, 2018
Messages
13,363
Location
DFW
Dammit, I really wanted to glean some info from this thread, but the pictures are all fubar
 

bhoth

Member
Joined
Jul 11, 2018
Messages
14
Location
Utah
Agreed, I can't see any of the pictures and I am in the middle of installing a Dannmar D10/CX myself.
 

protegeV

Well-known member
Joined
Apr 18, 2018
Messages
13,363
Location
DFW
I'm now reminded I have to check and see where my xpr-10axls is in transit. Was supposed to ship out 8/20, then delayed until 9/20. Haven't heard a peep about it recently...
 

protegeV

Well-known member
Joined
Apr 18, 2018
Messages
13,363
Location
DFW
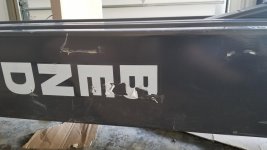
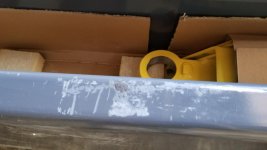
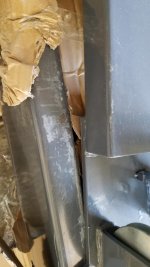
I noticed the last line of the OP mentioned shipping battle scars were typical. Well, they wouldn't be so typical if bendpak used more than what amounts to tissue paper sized cardboard and poorly secured tie straps.

I received my lift today and it's scratched and gouged everywhere. The worst damage is where the top bar was rubbing the lift columns because there was no packing material between them. The bendpak logo is fubar kn one side too. The freight company documented it and I contacted the retailer I purchased from. Cant wait to see what happens.

I get that it's just a big chunk of metal and these things are just cosmetic but for the price, I want to be the one to mark this thing up. It should be near flawless when new IMO.
 

Attachments

  • 20181003_161214.jpg
    20181003_161214.jpg
    96.6 KB · Views: 29
  • 20181003_161356.jpg
    20181003_161356.jpg
    77.4 KB · Views: 28
  • 20181003_160956.jpg
    20181003_160956.jpg
    61.3 KB · Views: 29

Diesel Dan

Well-known member
Joined
Jul 21, 2013
Messages
2,460
Location
TN
Both my Worth lifts had shipping scars.
Personally as long as it's scratched paint I'd rather deal with it than the $100s extra to completely crate a lift.
 

protegeV

Well-known member
Joined
Apr 18, 2018
Messages
13,363
Location
DFW
Both my Worth lifts had shipping scars.
Personally as long as it's scratched paint I'd rather deal with it than the $100s extra to completely crate a lift.

Considering the steel frame they ship it on it could not possibly cost a while lot extra to properly package it.

Most of the damage to mine is paint scrapes and scuffs but there are two deep gouges with curled up metal.

I've worked around lifts professionally for a long time and whenever a new one was installed they always looked PERFECT! They use different shipping methods for retail businesses as opposed to private sales??

Then again I've only used rotary professionally so maybe they just have higher standards to match their prices, lol
 
To avoid these ads, REGISTER NOW!
Top Bottom