

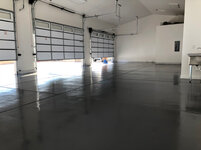
This past weekend I spent the days putting down Armorpoxy II.
I ordered the job on a pallet kit since I had 1700sqft of floor to do
, never did receive tracking info from them. Came about a week and a half later.
Instructions and videos are somewhat vague, would have though they had more detailed instructions or tips.
Didn’t know how many rollers, buckets, coverage, what to do with the acid etch.
First issue I ran into was letting the acid dry on the floor, no where did it say keep wet at all times. This created a white calcium film that I had to ultimately pressure wash off. Pretty tedious for a 1700sqft job.
Once I had the floor prepped and clean, I went to go make sure I had everything to lay down the epoxy. Kit was missing the drill mixer and bucket liners as stated on their site. Had to call them, they said just to use the bucket over again. I went out and bought a mixer and more buckets.
Now for the roller, I spoke with them and a roller is good for the entire base or topcoat as the epoxy won’t dry to it while working. Would have been nice to know that in the instructions.
Well got the base coat done, much easier to to the cracks and edges first.
Base went on smooth with not too much effort. Hardest part was just controlling how much you pour out of the bucket. It had a good hour of work time at least.
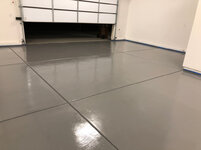
Let dry 24 hours and went onto the topcoat. One thing nice was the base and top are the same color, so any spots that got missed are covered up.
The top coat is much less viscous and easily went on. Only complaint was between batches the gray shade was slightly off so I can see the color difference.
I put in 1/2 can of the anti slip additive per mix. If I did it again, I would have put the full can. I didn’t know what to expect with the additive.
The floor is very slick, even in areas with a lot of additive. Hope it gets less as I wear it in..
Biggest complaint is this stuff has a strong odor, i suggest wearing a ventilator. I am in California, and there is no way the stuff was low voc like it was supposed to be.
Armorpoxy customer service was exceptional in answering all my questions that I had.
So overall inhad some minor issues, but nothing to cry about. Floor looks great. Can’t wait to start putting it to use. Call me crazy also for doing this all by myself. Took roughly 3 hours to lay down each coat.


I ordered the job on a pallet kit since I had 1700sqft of floor to do
, never did receive tracking info from them. Came about a week and a half later.
Instructions and videos are somewhat vague, would have though they had more detailed instructions or tips.
Didn’t know how many rollers, buckets, coverage, what to do with the acid etch.
First issue I ran into was letting the acid dry on the floor, no where did it say keep wet at all times. This created a white calcium film that I had to ultimately pressure wash off. Pretty tedious for a 1700sqft job.
Once I had the floor prepped and clean, I went to go make sure I had everything to lay down the epoxy. Kit was missing the drill mixer and bucket liners as stated on their site. Had to call them, they said just to use the bucket over again. I went out and bought a mixer and more buckets.
Now for the roller, I spoke with them and a roller is good for the entire base or topcoat as the epoxy won’t dry to it while working. Would have been nice to know that in the instructions.
Well got the base coat done, much easier to to the cracks and edges first.
Base went on smooth with not too much effort. Hardest part was just controlling how much you pour out of the bucket. It had a good hour of work time at least.
Let dry 24 hours and went onto the topcoat. One thing nice was the base and top are the same color, so any spots that got missed are covered up.
The top coat is much less viscous and easily went on. Only complaint was between batches the gray shade was slightly off so I can see the color difference.
I put in 1/2 can of the anti slip additive per mix. If I did it again, I would have put the full can. I didn’t know what to expect with the additive.
The floor is very slick, even in areas with a lot of additive. Hope it gets less as I wear it in..
Biggest complaint is this stuff has a strong odor, i suggest wearing a ventilator. I am in California, and there is no way the stuff was low voc like it was supposed to be.
Armorpoxy customer service was exceptional in answering all my questions that I had.
So overall inhad some minor issues, but nothing to cry about. Floor looks great. Can’t wait to start putting it to use. Call me crazy also for doing this all by myself. Took roughly 3 hours to lay down each coat.
Attachments

Last edited:


