
You are using an out of date browser. It may not display this or other websites correctly.
You should upgrade or use an alternative browser.
You should upgrade or use an alternative browser.
VISE REPAIR 101 all vise repairs, lubricants, sources for parts and the tricks to fix
- Thread starter drivesitfar
- Start date
You were correct, thanks! Everything removed de-rusted and lubed.
Still curious on the nut staking pin though, it seems a strange size , about 9/32". The removed one is far from straight and it seems like it would be very awkward to try and reuse it by inserting from inside the fixed jaw housing.
Still curious on the nut staking pin though, it seems a strange size , about 9/32". The removed one is far from straight and it seems like it would be very awkward to try and reuse it by inserting from inside the fixed jaw housing.
Outlawmws
Well-known member
Many replace the pin with a new soft pin; once installed its bent into the main nut to keep ir seated. No real pressure for opening the vise.
Personally I have always just straightened the pin and reinstalled.
Personally I have always just straightened the pin and reinstalled.
OP
drivesitfar
Well-known member
KEN: congrats on getting your swivel jaw apart. 
the pins holding the vise nut in place were bent at the factory to snug up it up. you don't want it super tight cause it was designed to have a little movement. some of the members here have posted their modified pins that really improved on the original design.
you'll find more modifications here on this thread if you want to improve on yours and I had a couple that I like that came improved from the factories. first one is a Craftsman 5197 that has slot to put the set pin holder in. the other two are Reed vises that have a screw with set pin.
as mentioned most of us just put in the old pin and either bend pin straight and rebend or some put back in bent pin.
good luck
BTW do you have any pictures you can post of the pin that was holding the swivel jaw in place cause i'm sure other members will come across this issue later?
Attachments

Thanks again for the help guys.
I'll knock the cross pin out again and post a picture.
I used my shop press to straighten out the pin (people really underestimate the usefulness of a press.)
Now I have another conundrum! I put the nut in straight side forward, sloped side toward the back - had to guess, but since my Hollands and Morgan both have it that way I assumed it was correct. Is it?
Anyway, now I can't seem to engage the screw into the nut! The nut does have a little bit of movement, and the screw has plenty as I haven't tightened up the screw locating collar yet. What have I got wrong here? There don't seem many variables other than maybe the nut is in backwards?

Outlawmws
Well-known member
Ken, sounds like the nut is in correct.
your doing great on the re-furb!
your doing great on the re-furb!
OP
drivesitfar
Well-known member
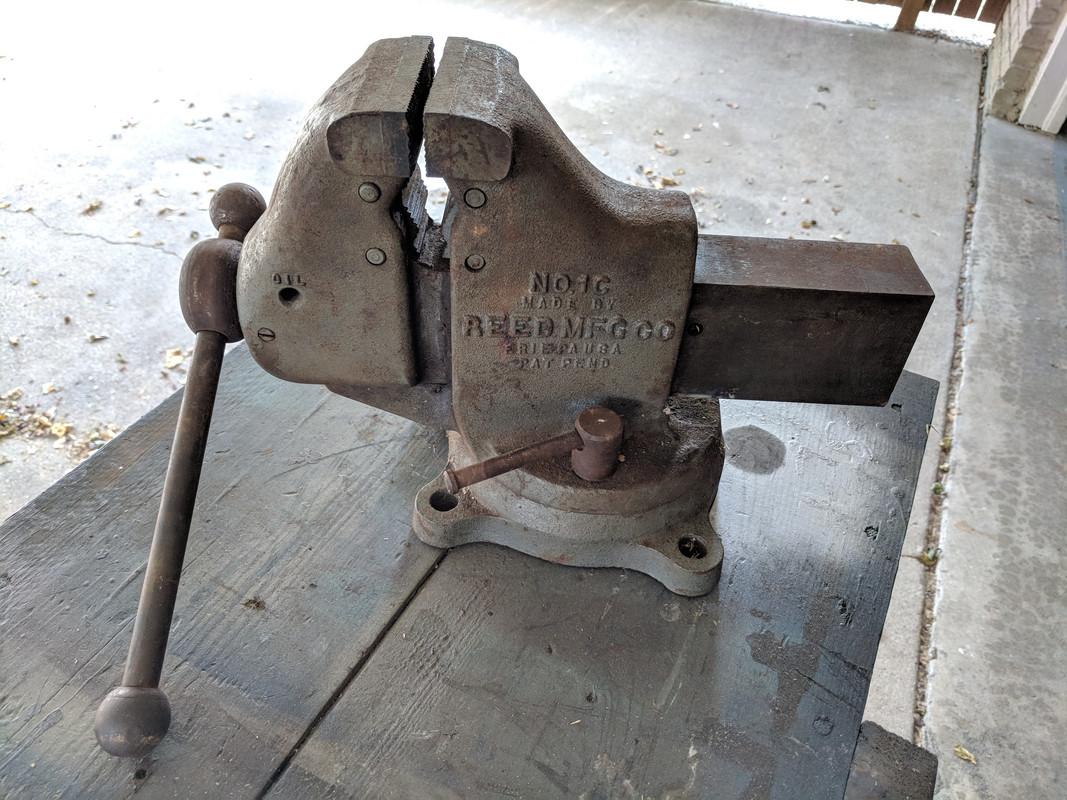
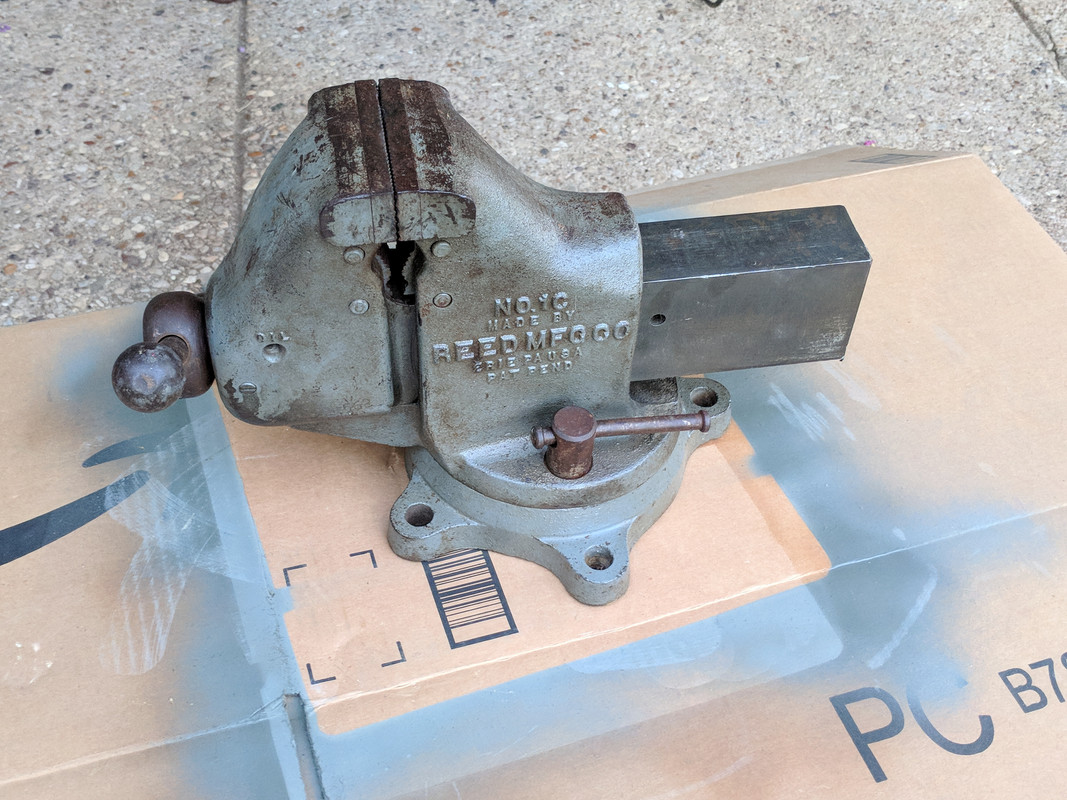
Zig: guessing about 40-50 pounds cause my reed 2c weighs 80 if that helps until another member sees your post that owns a 1c.
Anyone know the approx weight of a Reed 1C? I have a potential lead on a complete one in decent shape.
Looks like it has the swivel lockdown missing though - if it's the one I'm thinking of.
Ststephen7
Well-known member
Am I doing this right? Posting my vise repair question like this I mean?
I found a very cheap Columbian 504 non swivel vise. I thought it was in pretty good used shape except... it was missing the jaws. I'll try to post a couple of pictures... they are (I think called) U mount?
The jaws are 4". 1.25" top to bottom, and the raised part in the middle is .125" high and .625 wide. Hole spacing is 2.5" on center.
So... What options do I have? I found some 'Milwaukee' U mount jaws at McMaster for $72... a little pricey for me at the moment, and the listing did not give any real measurements (although I'm sure I could call and speak to someone).
I'm not attempting to restore this to original, so... I thought about brazing the 'recesses' up to the level of the middle part, and then finding some more affordable jaws and simply mount them in the middle. Any reason not to do that?
I have TIG and MIG, and an oxy torch, however I do not have a mill.
Other options?
Thank you in advance for your input!
Steve
Oregon rock crusher
Well-known member

OP
drivesitfar
Well-known member
Stephen: that’s a fairly common old columbian so you might put a post in the vide parts thread in general tools asking for jaws. Are the threads for the jaws still in good shape? Another option is to make a new pair of jaws out of wood, hard plastic or soft metals like aluminum or brass.
Welcome to GJ too!
Welcome to GJ too!
MayerMR
Well-known member
Anyone know the approx weight of a Reed 1C? I have a potential lead on a complete one in decent shape.
45.8lbs!
Attachments
chrisnazzy
Well-known member
I would think with one of the ends of the handle on the ground the weight would be off by a bit. Try centering and balancing the handle.45.8lbs!
Reed listed the weight on the 1C with cast in jaws at 54lbs. Not sure if the stated weight changed much on the later models like ours with flattened meatball and removable jaws.

Sent from my SM-G930P using Tapatalk
Attachments

MayerMR
Well-known member
I would think with one of the ends of the handle on the ground the weight would be off by a bit. Try centering and balancing the handle.
Reed listed the weight on the 1C with cast in jaws at 54lbs. Not sure if the stated weight changed much on the later models like ours with flattened meatball and removable jaws.
Sent from my SM-G930P using Tapatalk

Gah, great catch, I didn't even realize I did that. How dumb.
The 1C actually measures 56lbs.
Attachments

Ststephen7
Well-known member
Stephen: that’s a fairly common old columbian so you might put a post in the vide parts thread in general tools asking for jaws. Are the threads for the jaws still in good shape? Another option is to make a new pair of jaws out of wood, hard plastic or soft metals like aluminum or brass.
Welcome to GJ too!
I found that thread and will post a request... Thank you!
Ststephen7
Well-known member
You could always make some....A guy with a welder is up to the challenge. At least get you by until you need or find something better. Ed.
Yeah... I might have to do that. I was hoping for hardened real (cross hatched) jaws, and I might have to make due.
MayerMR
Well-known member
Am I doing this right? Posting my vise repair question like this I mean?
I found a very cheap Columbian 504 non swivel vise. I thought it was in pretty good used shape except... it was missing the jaws. I'll try to post a couple of pictures... they are (I think called) U mount?
The jaws are 4". 1.25" top to bottom, and the raised part in the middle is .125" high and .625 wide. Hole spacing is 2.5" on center.
So... What options do I have? I found some 'Milwaukee' U mount jaws at McMaster for $72... a little pricey for me at the moment, and the listing did not give any real measurements (although I'm sure I could call and speak to someone).
I'm not attempting to restore this to original, so... I thought about brazing the 'recesses' up to the level of the middle part, and then finding some more affordable jaws and simply mount them in the middle. Any reason not to do that?
I have TIG and MIG, and an oxy torch, however I do not have a mill.
Other options?
Thank you in advance for your input!
Steve
Yeah... I might have to do that. I was hoping for hardened real (cross hatched) jaws, and I might have to make due.
Stephen,
You might be able to get these Rock Island vise jaws made by member Kevin Scott (KMScott) to work. Or you could call him and see if he could make you some. I assure you, anything made or purchased from him will likely be the nicest part of your vise. I have them on one of mine and I can tell you; they make the vise.
http://www.benchvisejaws.com/rock-island-573-and-593-4-inch-serrated-vise-jaws/
Mr. Wonderful
Well-known member
I started in on the spray bombed Morgan 160 I picked up a couple weeks ago. I tried the oven cleaner followed by the pressure washer. I was surprised to see what looks like the original blue under all the dark blue. The vise was also black at some point as well. I am kind of liking the look that it has. Am I crazy? Any suggestions on how to preserve this look? BLO? Can it be dried with a heat gun? It's far too cold to sun cure it in the PNW.
Attachments


MayerMR
Well-known member
I started in on the spray bombed Morgan 160 I picked up a couple weeks ago. I tried the oven cleaner followed by the pressure washer. I was surprised to see what looks like the original blue under all the dark blue. The vise was also black at some point as well. I am kind of liking the look that it has. Am I crazy? Any suggestions on how to preserve this look? BLO? Can it be dried with a heat gun? It's far too cold to sun cure it in the PNW.
I think it looks cool too.
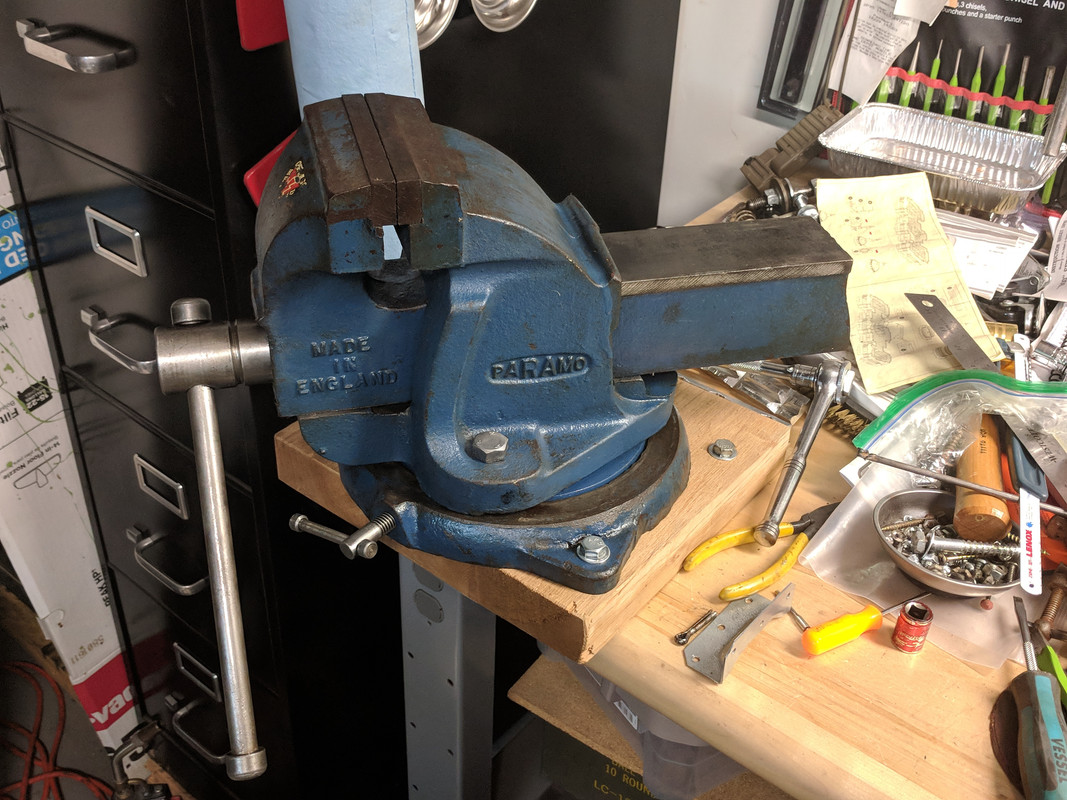
Set it up on blocks to get any area where you stripped the paint secured from touching anything (and sticking to it) while it dries. Give the oven cleaner a few days to dry up. Then, as you already mentioned, lightly coat the whole thing in BLO and let it dry for a couple more days. It drives really hard and will bring out that cool splotchy color pattern even more. Here is my Paramo and Reed before and after cleaning and BLO:
Mr. Wonderful
Well-known member
I think it looks cool too.
Set it up on blocks to get any area where you stripped the paint secured from touching anything (and sticking to it) while it dries. Give the oven cleaner a few days to dry up. Then, as you already mentioned, lightly coat the whole thing in BLO and let it dry for a couple more days. It drives really hard and will bring out that cool splotchy color pattern even more. Here is my Paramo and Reed before and after cleaning and BLO:
Mayer,
All of the oven cleaner is gone and everything is bone dry. I have heard others on here saying they used a smoker or an oven to dry the BLO. I will try the heat gun. Or will it dry at room temperature?
MayerMR
Well-known member
Mayer,
All of the oven cleaner is gone and everything is bone dry. I have heard others on here saying they used a smoker or an oven to dry the BLO. I will try the heat gun. Or will it dry at room temperature?
No need to speed it along really. It's got chemical driers in it that well let it set up and dry in about a day or so, depending on the temp and humidity. There is no harm in putting a finger on it and seeing it's it still tacky. When it's not tacky anymore then you're good go to. Just remember, a light coat or two will dry a lot faster than a single heavy coat.
That said, in the summer time when it's warm out I will wipe the items down with BLO and then sit them out in the sun. That will reduce the drying time significantly, but it's really not necessary.
Mr. Wonderful
Well-known member
No need to speed it along really. It's got chemical driers in it that well let it set up and dry in about a day or so, depending on the temp and humidity. There is no harm in putting a finger on it and seeing it's it still tacky. When it's not tacky anymore then you're good go to. Just remember, a light coat or two will dry a lot faster than a single heavy coat.
That said, in the summer time when it's warm out I will wipe the items down with BLO and then sit them out in the sun. That will reduce the drying time significantly, but it's really not necessary.
Ok, I'm going to give it a shot! Do you put it on the slide and all the parts? Or just the areas where you want to preserve the patina?
MayerMR
Well-known member
Ok, I'm going to give it a shot! Do you put it on the slide and all the parts? Or just the areas where you want to preserve the patina?
Everywhere. But it'll wear off where there is metal-to-metal contact and you'll need to refresh it periodically. Post pics after you have it done, I'd like to see how it turns out.
S/F,
-Matt
OP
drivesitfar
Well-known member
MR. W: you are getting a lot of good information from MR. I can add that yes it will dry on it's own, but i heard shaking the can of BLO especially if it's 30 years old like some of mine are will help. on a few occasions it didn't firm up for a month or two probably cause of the separation, but could have been the cool PNW winter.
here's my Reed 2c that i was going to strip, but sort of liked what was left of the old paint sort of like your big Morgan and it had 2 or 3 coats wiped on with a rag. since the rags can self combust and start a fire if you don't dispose of them properly or hang them to dry i'm going to brush on BLO in most cases from now on wood and old cast items.
with it getting cool in the evenings I like your idea of using a heat gun to speed up the drying a bit. on the metal to metal contact areas of the slide and maybe the swivel base if your vise has one i'd put on some oil or grease and avoid BLO on those parts.
also the reed 4c I have was sandblasted and had 3 coats of BLO put on it in Texas about 4 or 5 years ago and it's sat on my shelf of floor or bench since without any use or any more coats of BLO. I'm still waiting to build a stand for it once I get my woodshop built.
good luck and nice work on the 5196 for you friend. also now that you own a 5197 and you might not NEED ANOTHER ONE you know how to PM or email me.
cheers
Attachments


Oregon rock crusher
Well-known member
Yeah... I might have to do that. I was hoping for hardened real (cross hatched) jaws, and I might have to make due.
Before I had machining capability I made a couple sets of jaws using older files for the faces. You can weld to a file and depending on the style get a pretty aggressive jaw face. File faces hold up pretty well and bite hard. Not too easy to get mounting holes though...I think I annealed (blew a small hole) with a torch and finished with a burr for forming tapered mounting holes. Ed.
Outlawmws
Well-known member
Mr. W, A heat lamp in a semi enclosed area will help a LOT. large cardboard box (don't let the heat lamp get to close to that...) and let it run.
I've cured smaller parts under a small 40 watt "work light" (incandescent bulbs still have their place on occasion...)
I've cured smaller parts under a small 40 watt "work light" (incandescent bulbs still have their place on occasion...)
Ststephen7
Well-known member
New vise! I just picked up this Athol 614 today. It looks to me as if it was never put into use.
It does have a light coat of rust, and I would like to clean that off. I would probably either use electrolysis or Evaporust, unless there are things I don't know, and shouldn't use either (or both)?
Are either of these an ok option?
And... do I have to remove the screw from the jaw before rust remover? Or can I just throw in the whole assembly? I quick search here showed me a couple of threads about that 'spring' assembly if I have to (or should) remove it.
Anything else I should know about cleaning this thing up? The pin drives out from the bottom up, right?
Thank you,
Steve
Outlawmws
Well-known member
The Spring is Easy; Just get a piece of tubing that just slips over the screw, and notch it so it clears the pin. Use that to release the pressure and pull the pin with needle nose.
E tank or E-rust - either is fine, the E tank will probably remove the paint as well E-rust may not...
Nothing complex here, go for it!
E tank or E-rust - either is fine, the E tank will probably remove the paint as well E-rust may not...
Nothing complex here, go for it!
Mr. Wonderful
Well-known member
MayerMR
Well-known member
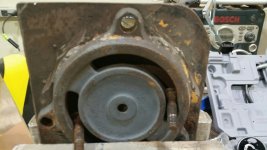
I now enter hour four of trying to free the cadet base from its welded prison!
You're obviously using an angle grinder to work the beads down - why is it taking so long? Also, if you accidentally cut any grooves or gouges into the base with the wheel, JB Weld is a great filler.
Mr. Wonderful
Well-known member
The welds are extreemly hard metal. I dont know what they used but I tried a milling bit to get into the "corners" by the mounting eyes and it just chatters on top. I got as close as possible with the angle grinder and I am trying to be more precise with the dremmel. Its very slow going. I dont want to crack this base.
MR. W: had 2 or 3 coats wiped on with a rag. since the rags can self combust and start a fire if you don't dispose of them properly or hang them to dry
Read earlier about hanging up rags after they are used for boiled linseed oil. I recommend putting them in a bucket of water first (whether you throw them out or not). I use a plastic 5 gallon bucket with lid and just keep it half full of water. I throw rags in there, then throw them away after they have soaked a week or so. When I take the rags out I change the water, sometimes squirting a little Dawn liquid detergent in the water to hopefully help clean slightly and keep out any bugs that don't like soapy water.
I had a workshop fire - would not wish that on anyone!
Last edited:
va.grouseman
Well-known member
Mr. W, that sounds like you were grinding stainless.---Stainless don't grind worth a darn.
dkroth
Well-known member
The welds are extreemly hard metal. I dont know what they used but I tried a milling bit to get into the "corners" by the mounting eyes and it just chatters on top. I got as close as possible with the angle grinder and I am trying to be more precise with the dremmel. Its very slow going. I dont want to crack this base.
Consider going in from the bottom with the angle grinder. Lots of dust and sparks but you'll be getting right at all your problem points directly.
.
Mr. Wonderful
Well-known member
Consider going in from the bottom with the angle grinder. Lots of dust and sparks but you'll be getting right at all your problem points directly.
.
I might try that next but that damn plate is at least 5/8" thick. Its going to **** going through that!
Mr. Wonderful
Well-known member

thin_concrete
Well-known member
Wow - this is the thread that inspired me to join this forum since I’ve been slowly collecting, restoring, and using old vises. I have a handful, starting from an old Walworth (c. 1878) to a Littlestown, Yost, Wilton, and others. I’m currently looking for an old Wilton dual woodworking and plumbers vise.
I hope to contribute to this community, but more importantly, learn from those of you with much more experience. Cheers!
I hope to contribute to this community, but more importantly, learn from those of you with much more experience. Cheers!
KMScott
Well-known member
That moment when you start to see smoke coming from the inside of your grinder cut. Its finally free and unbroken! It was almost not worth all the burns, metal slivers, and temptation to wedge a chisel under it......almost!
Nice job, those bases are rare. Tomorrow it will be worth it.