To avoid these ads, REGISTER NOW!

Shower body installed too deep. HELP!

frankd

Well-known member
Joined
Aug 5, 2014
Messages
677
Location
Long Island, NY
In reading through a bunch of threads over the years there's lost of talented folks on this forum so I was hoping one of you could help.
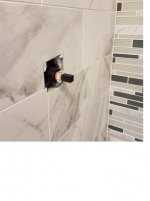
I'm towards the end of my bathroom remodel. I installed/grouted the tile... and when I went to install the shower faucet, I noticed that the shower body/valve assembly was installed too deep in the wall by about 1/4 inch. I'm going to call the plumber back tomorrow but I wouldn't be surprised if I never hear back from the guy...or he tries to blame it on me somehow.
I also reached out to Kohler and am waiting to hear back.
Has anyone ever done this or have any solutions? The only thing I can think of is to buy another valve handle and cut it apart to expose the female threaded shaft in the middle. I'd then somehow attach the threaded portion of that shaft to the end of my current shower valve handle to extend it by about 1/2" or so. Hopefully I can find a sleeve to fit over the whole thing and use some super strong glue/epoxy. Anyone have any other ideas? I attached pictures. The valve handle fits if I dont install the trip ring...but that's not really an option.
Another option I was thinking of is to see if Kohler makes any other shower faucets that use the same shower body/valve assembly and see if that would fit. I doubt that would work because the threaded part of the valve assembly is only sticking out by about an inch from the finished wall
 

Attachments

  • Valve 11.jpg
    Valve 11.jpg
    49.3 KB · Views: 290
  • Valve 22.jpg
    Valve 22.jpg
    80.4 KB · Views: 274
To avoid these ads, REGISTER NOW!
OP
F

frankd

Well-known member
Joined
Aug 5, 2014
Messages
677
Location
Long Island, NY
Not sure about Kohler , and I know it's no help, but Moen makes extensions, perhaps kohler does too

THANK YOU! You just saved me from putting my head through a wall. I called Kohler to ask if they make something like that and apparently this is a common issue. I was given the part number for a "Deep rough in kit". Found it on Amazon for $40. I should send the bill to my plumber!
 

redneckcharlie

Well-known member
Joined
Dec 26, 2009
Messages
125
This will be unpopular possibly. If you were the installer of the tile and underlayment the mounting depth of the mixer is on you. If you told him what depth to install it and its not correct, thats on him. The valve depth requirement is different netween brands, as well as what type of finish material your using. One of the easiest ways to avoid this is to not actually attach the mixer. If Im dealing with a client that hasnt decided on finish material but needs it roughed in we leave in lose. I actually attach the supply side down away from the mixer as well as up to the drop ear. That will allow you to either move the mixer in or out as needed to install your handle and trim after your finish material is installed. Your tile install looks really good from the pic you posted.
 
Last edited:

flat350

Well-known member
Joined
Jan 1, 2009
Messages
1,006
Location
illinois
This will be unpopular possibly. If you were the installer of the tile and underlayment the mounting depth of the mixer is on you. If you told him what depth to install it and its not correct, thats on him. The valve depth requirement is different netween brands, as well as what type of finish material your using. One of the easiest ways to avoid this is to not actually attach the mixer. If Im dealing with a client that hasnt decided on finish material but needs it roughed in we leave in lose. I actually attach the supply side down away from the mixer as well as up to the drop ear. That will allow you to either move the mixer in or out as needed to install your handle and trim after your finish material is installed. Your tile install looks really good from the pic you posted.


Any Plumber that has been doing it for a while would have asked what was going on the wall tile wise and roughed it in based on that wall thickness,leaving things loose in the wall for future adjustment is just inviting things to rattle later and yes I've probably roughed in literally thousands of valves over 40+ years
 
Last edited:
To avoid these ads, REGISTER NOW!

PoorOwner

Well-known member
Joined
Feb 10, 2007
Messages
5,032
Location
CA
you mean not recessed enough? Extensions not needed..

did it not occur you use to put a piece of tile next to the cartridge, before you tiled all of the shower
 

CJM8515

Well-known member
Joined
Mar 8, 2014
Messages
9,300
Location
NJ
I say if all else fails you get a piece of fancy tile that has nice ends on it or get a piece of tile and some sorta ends and glue them all in place to make up for it. Should look fairly nice when done.
 
OP
F

frankd

Well-known member
Joined
Aug 5, 2014
Messages
677
Location
Long Island, NY
This will be unpopular possibly. If you were the installer of the tile and underlayment the mounting depth of the mixer is on you. If you told him what depth to install it and its not correct, thats on him. The valve depth requirement is different netween brands, as well as what type of finish material your using. One of the easiest ways to avoid this is to not actually attach the mixer. If Im dealing with a client that hasnt decided on finish material but needs it roughed in we leave in lose. I actually attach the supply side down away from the mixer as well as up to the drop ear. That will allow you to either move the mixer in or out as needed to install your handle and trim after your finish material is installed. Your tile install looks really good from the pic you posted.

It's not often that I gut my bathroom so I wasnt aware of the tricks of the trade. I told the plumber that the shower wall would be tiled over 1/2" durock. I assumed he would have set the depth correctly. Luckily I was able to get a "deep rough in" adapter after speaking to the rep at Kohler. Annoyed that I have to shell out another $40 but it's better than the alternatives.
Thanks for the compliment on the tile. I was pleased with the results. The shower niche was a HUGE pain in the *** to tile.
 

danieldd

Well-known member
Joined
Dec 10, 2010
Messages
1,005
Location
Southern Tennesseee
Sounds like you have a solution in hand at the moment by using an extension.

I would have punched a hole in the wall behind the shower and relocated the shower valve to the appropriate distance so your existing handle would work. Then you just fix the drywall behind the shower valve and you're good to go...
 

Jackfre

Well-known member
Joined
Dec 26, 2010
Messages
4,410
Location
N CA
I had this happen on both my showers during our remodel and used the extensions from Kohler to solve the problem. PITN, but it works.
 

larry4406

Well-known member
Joined
Jan 27, 2006
Messages
19,177
Location
Northern Virginia
If you have access from the back side of the wall, cut it open, reposition diverter and final out the trim. Secure it in place, drywall repair, and paint.
 

rlitman

Well-known member
Joined
Oct 18, 2010
Messages
24,596
Location
Long Island
Any Plumber that has been doing it for a while would have asked what was going on the wall tile wise and roughed it in based on that wall thickness,leaving things loose in the wall for future adjustment is just inviting things to rattle later and yes I've probably roughed in literally thousands of valves over 40+ years

I agree, to a point. You shouldn't leave the valve or drop elbow loose in the wall permanently. But that doesn't mean you can't leave it loose temporarily.

I installed the rough in in a shower I just re-did in my house. In my case, the wall behind the valve was open, and we chose to leave it open until after the tile work was done to take advantage of this.

I nailed two blocks vertically to the studs to form a shelf that fixed the height. I then screwed the valve body to a notched 2x that ran horizontally which sat on those blocks, but left it all loose. When the time came to install the trim, I was able to adjust the valve depth to the exact position that I wanted (so the valve handles stuck out minimally), which turned out to be a touch more recessed than the instructions and plastic rough in cover indicated.
 
To avoid these ads, REGISTER NOW!
Top Bottom