To avoid these ads, REGISTER NOW!

High bay surface mounting

Fisherguy

Well-known member
Joined
Oct 31, 2011
Messages
191
Location
150 Mile House BC
Has anyone used the Maxlite - Surface Mount Kit - BLHE90-SMK to mount their Greenlight depot 2ft LED Linear High Bay - 110W - (UL+DLC) high bay lights?

Here's the links for each:
https://www.beeslighting.com/maxlite-high-bay-accessories/p/BLHE90-SMK

https://greenlightdepot.com/collections/led-high-bay/products/lhb-110w-with-lens-and-w-o-lens?variant=36041819012

I've never seen either one but from what I've seen the dimensions of the different high bays look pretty similar. Even if I have to drill the housingss to attach the brackets it seems like it would be a great way to mount the lights.
Thx
Will
 
To avoid these ads, REGISTER NOW!

Platonic Solid

Well-known member
Joined
Nov 29, 2014
Messages
3,587
Location
CT-USA
If the picture is accurate, you might have to install some rivnuts in the housing holes to permit bracket mounting.

linearhighbays110w2_1_1400x.jpg


If the Maxlite brackets don't fit (though they sure look like they would), Bees has more expensive ones that look identical to the Maxlite.

https://www.beeslighting.com/diva-light-high-bay-accessories/p/LHB-SMB2
 

woodbutcher80

Well-known member
Joined
Jan 21, 2018
Messages
139
Location
Northeast Ohio
you hung the frosted ones and not the OP's higher lumen ones? either way any info would be good. i know i want frosted lenses, and the OPs link doesnt say that in the description. but who knows. i emailed the company.

anyways, my ceiling is 2x10 joists right now since there is a room above, but i plan on hanging white metal roofing on the joists next weekend in preparation for the lights. i just need this week to finish up my wiring. im just leaving a 3-4ft bunny ear of 14/2 along the trusses for the lights. then when i put up the sheets of metal roofing with a drywall lift, ill just drill a 3/4in hole in the metal roofing, put in a rubber grommet to prevent chafing, rank the wire through the grommet and wire them up in the light housing. since i have 12ft i want them as close tot he ceiling as possible.
 
OP
F

Fisherguy

Well-known member
Joined
Oct 31, 2011
Messages
191
Location
150 Mile House BC
any updates with the brackets? also were the lenses frosted? it didnt say it in the description, and the below one does. i want frosted for sure, even though the below one has a little less lumen output than yours.

https://greenlightdepot.com/collect...r-high-bay-110w-ul-dlc?variant=14393292521515

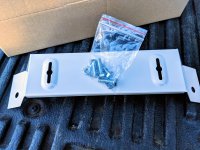
I emailed Bees Lighting to ask if the brackets came with the threaded inserts, they told me YES they do so I figured I was set. Unfortunately this was not the case, all you get is the brackets and 6mm mounting screws and washers.
mounting kit.jpg

The brackets fit perfectly though.
mounting bracket.jpg

Trying to track down some jack nuts to install in the fixtures to attach the brackets, holes in the lights are 3/8"


Fixture wires have good length except for the ground, guess I'll hafta marrette a chunk of green to it inside the fixture.
What do people do when connecting the wiring to the electrical box in the ceiling, do they put a piece of armor over the conductors like BX? Ok to run the low voltage dimmer circuit with the 120V AC?
fixture wiring.jpg


Yes the lenses are frosted.
 
Last edited:

woodbutcher80

Well-known member
Joined
Jan 21, 2018
Messages
139
Location
Northeast Ohio
Glad things worked out so far. The $75 High Bay lights I referenced above are actually their newest model I was told. I know they are slightly smaller in dimensions. Anyways, I ordered three just to play with and they came in today. They are bright little buggers. The hanging wires that they come with are actually pretty nice and will get the light fairly close to the ceiling. If I have time I'll take some pictures later.
Thanks for taking photos of the mounting brackets. I can tell you with certainty those would not work with my newer style light from Green Light Depot. My mounting screw holes are in a different location higher up on the light. Dimmers work great too.
 
OP
F

Fisherguy

Well-known member
Joined
Oct 31, 2011
Messages
191
Location
150 Mile House BC
Glad things worked out so far. The $75 High Bay lights I referenced above are actually their newest model I was told. I know they are slightly smaller in dimensions. Anyways, I ordered three just to play with and they came in today. They are bright little buggers. The hanging wires that they come with are actually pretty nice and will get the light fairly close to the ceiling. If I have time I'll take some pictures later.
Thanks for taking photos of the mounting brackets. I can tell you with certainty those would not work with my newer style light from Green Light Depot. My mounting screw holes are in a different location higher up on the light. Dimmers work great too.

So you're just using the wiring as it came, taking them into your electrical box in the ceiling? I'm not sure that's to code here.

Also, did you use the separate dimmers or the all in one dimmer/on-off switches?
 

woodbutcher80

Well-known member
Joined
Jan 21, 2018
Messages
139
Location
Northeast Ohio
Well you have couple options. By NEC code you have to have a work box to put the wires in. With my lights I have about six or seven inches to work with sticking out of the light. You can wire it like any other ceiling fan or ceiling light and just the connections and tuck them into a work box in a box in you're ceiling. If you need more wire from the lights, just connect some **** connectors to make it work and reach where you need it to in your building, but make sure the final connection with your garage wire is in a box. Or if the codes are loose by you, and you have a metal roof ceiling, you can just drill a hole in the metal roof ceiling, pop a rubber grommet so you don't have any chafing, and put your 14/2 wire into the makeshift work box in the light housing. Not that I would recommend that way...

As for a dimmer, since I will have 12 lights on one circuit and dimmer, and at .95 amps per light, I felt it would be better to have a light switch that could handle 14 amps and not get an all in one. So I just have a double Gang Box, with a basic 15 amp switch and a dimmer that was recommended here.
 
OP
F

Fisherguy

Well-known member
Joined
Oct 31, 2011
Messages
191
Location
150 Mile House BC
Thanks Jeremy,
I have plenty of length for the wires coming out of the fixture to reach an electrical box but I don't think it's to code here to have them running loose into the box in the ceiling, they'd need to be in conduit or flex or something. I might just connect them to a piece of BX in the fixture and connect the BX to the ceiling electrical box with the proper connectors.

I'm gonna have 8 lights, 2 rows of 4, not sure if I want to connect them all to 1 switch or 2, trying to track down an electrician so my son and I can start putting up the plywood over Christmas.
 
To avoid these ads, REGISTER NOW!

woodbutcher80

Well-known member
Joined
Jan 21, 2018
Messages
139
Location
Northeast Ohio
I like that idea. I just took typical metal work boxes and hung them on the joist right above the lights, ran my 14/2 and my 18/2 dimmer wire into those boxes, and then out of the box with 3/4 inch Greenfield and down to the lights. That way I only have 1 hole to pop for a knockout in the light.
 

Radix2

Well-known member
Joined
May 28, 2014
Messages
1,853
Location
the thumb!, MI
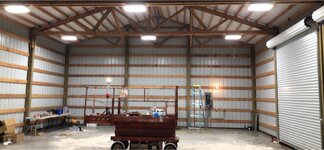
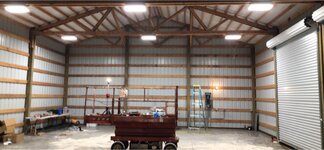
I think you guys are making it really hard on yourselves trying to directly mount to the ceiling inside boxes. It is about impossible to see around the light to work if you are close to the ceiling and hard to service. If you hook to the bales, you can hang just as close to the ceiling (my lights are about 3in from the ceiling), and it is a snap to take down to service or clean.

I found that 3 prong cords were less than SO cord, grommets, etc. So I went with a outlet in ceiling box and a wago luminair connector for the dimming.

Go up the scaffold and just plug in, work on the wiring on the bench were it is easy.

Cant see any hanger from the ground anyway, same height to the ceiling.

https://www.garagejournal.com/forum/showpost.php?p=6697293&postcount=244

after a couple years, there are a fair number of bugs in the lights.. might have to clean them out one of these days.
 

woodbutcher80

Well-known member
Joined
Jan 21, 2018
Messages
139
Location
Northeast Ohio
Hey there rad. That's what I decided on.. I really like the cable suspension system that it comes with. I'm just running. 12-18in of greenfield which is very flexible so if I need to do any maintenance on the light I can just lower it so it's 18 inches from the ceiling. The cable tensioning systems that they came with are pretty cool.
 

Radix2

Well-known member
Joined
May 28, 2014
Messages
1,853
Location
the thumb!, MI
Hey there rad. That's what I decided on.. I really like the cable suspension system that it comes with. I'm just running. 12-18in of greenfield which is very flexible so if I need to do any maintenance on the light I can just lower it so it's 18 inches from the ceiling. The cable tensioning systems that they came with are pretty cool.

Hi -mine just had the regular chain and s hooks.

at least I would caution anyone to just buy one of those brackets and try to put it up before committing to buying a dozen... them things aren't cheap!
 
OP
F

Fisherguy

Well-known member
Joined
Oct 31, 2011
Messages
191
Location
150 Mile House BC
I bought a metric rivnut tool off of Amazon for mounting some flanges to sheet metal.
Not too expensive and works great with the hand tool for doing just a few.

you may have to drill new holes if the ones in the fixture are not the correct size.

https://www.amazon.com/dp/B01NAGIY6X/?tag=atomicindus08-20

I bought some 1/4" RivNuts, (they fiy into the 3/8" holes of the lights) 50 for 12 bucks and was gonna install them like this:

I think you guys are making it really hard on yourselves trying to directly mount to the ceiling inside boxes. It is about impossible to see around the light to work if you are close to the ceiling and hard to service. If you hook to the bales, you can hang just as close to the ceiling (my lights are about 3in from the ceiling), and it is a snap to take down to service or clean.

I found that 3 prong cords were less than SO cord, grommets, etc. So I went with a outlet in ceiling box and a wago luminair connector for the dimming.

Go up the scaffold and just plug in, work on the wiring on the bench were it is easy.

Cant see any hanger from the ground anyway, same height to the ceiling.

https://www.garagejournal.com/forum/showpost.php?p=6697293&postcount=244

after a couple years, there are a fair number of bugs in the lights.. might have to clean them out one of these days.


I was gonna put the electrical boxes beside the lights so it would be easy to hang the light then connect the wiring.

Did you make the 3 prong cords for each light?
For the dimming it looks like you used some kinda cable?

BTW, brackets were $6 per pair, not sure what the difference is compared to the $15 ones Bees Lighting sells..?


Any pics of your Jeremy?
 

whitemamba

Well-known member
Joined
Jun 11, 2014
Messages
92
I am putting 24 of these up I just screwed in eye bolts and ran the hangers off of them.


c5818ce58c089558e86563c60b43475f.jpg
 

Attachments

  • c5818ce58c089558e86563c60b43475f.jpg
    c5818ce58c089558e86563c60b43475f.jpg
    188.1 KB · Views: 5

Radix2

Well-known member
Joined
May 28, 2014
Messages
1,853
Location
the thumb!, MI
I bought some 1/4" RivNuts, (they fiy into the 3/8" holes of the lights) 50 for 12 bucks and was gonna install them like this:


I was gonna put the electrical boxes beside the lights so it would be easy to hang the light then connect the wiring.

Did you make the 3 prong cords for each light?
For the dimming it looks like you used some kinda cable?

BTW, brackets were $6 per pair, not sure what the difference is compared to the $15 ones Bees Lighting sells..?


Any pics of your Jeremy?

I used these cords - https://www.parts-express.com/6-ft-ac-power-cord-black-18-3--110-100. $2.76, so with cheap duplex outlets, a low cost simple way to go.

I used wago luminaire connectors for the low voltage wires. https://www.amazon.com/dp/B003JUVGLK/?tag=atomicindus08-20

For the dimming, it is 16ga shielded alarm wire.

Good idea on spacing the boxes, some of the direct mount call for bolting right to a box, with the wiring directly above the center of the light. Incredibly hard to do imo.

Jeremy?
 
To avoid these ads, REGISTER NOW!
Top Bottom