To avoid these ads, REGISTER NOW!

Lean-to shed sanity check

BK777

Well-known member
Joined
Sep 4, 2017
Messages
69
Location
Pacific NW
I'm putting together plans for a pair of sheds on both gable ends of an existing shop. These will be my first large-ish external structures.

I have a little background in engineering, enough to know that there are rigorous methods for determining what is "good enough" but I also know projects like these are common enough that a little experience building things for a living or for yourself (and not having them fall down after many years) goes a long way. So long story short I'm sure I could take weeks to over analyze this but I'd rather not. I've done some research and think I have the bases covered. So hopefully I can present what I intend to do and get a few pointers from y'all.

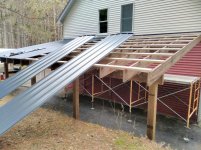
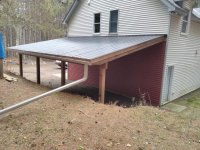
The two sheds are very similar except one is a little bigger and will go on a gravel pad where I will have to dig holes for the posts. The one below will be going on a concrete pad with post anchors already installed.

It's 9'x18. The intended usage is as an outdoor work space for a small scale agri business. So there will be a workbench in there & some shelving. Nothing that can't handle getting a little wet on occasion.

Here is one of the anchors:
rMxD6Ds_zpsacllq5x7.jpg


And the Sketchup:
rp6gyDV_zpsa62j74mg.jpg


Ledger - 2x8 PT
Posts - 4x4 PT
Nailer - 2x6 PT
Rafters - 2x6 PT on 24" centers
Purlins - 2x3
Roof - Suntuf Corrugated Polycarbonate with fairly low 1.5/12 pitch to avoid banging heads

The shop has T111 type siding with the typical gable overlapping the siding below. So I plan to use the Suntuf flashing between the overlap and ledger.

So, a few questions:

Does the choice of lumber and spacing look OK? This is the pacific NW, fair amount of rain and wind, not a lot of snow but I think local code is 25lbs for snow loading.

The Rafters will use straps on the ledger end. What's better on the nailer end? Birds mouths or something like the strap below?
prevent-hurricane-damage-roof-strongtie_9484568fd09298122ac57f50434272aa.jpg

I'm not a big fan of toenailing, partly because I can never seem to get it right. I'm fairly confident I can get the birds mouth cuts right. Seems like one method takes more time for a beginner and the other costs more $$. Does that pretty much sum up the debate?

Regarding the posts, I thought 6x6 would be overkill but probably should have gone with 4x6. I'm mainly worried about the crappy lumber these days which tends to warp (hopefully the front panels shown on the drawing will alleviate that and provide some lateral stability). Would it be OK for me to use 4x6 posts in those 4x4 anchors? If so, it would also provide more area to notch out for the nailer. Or am I stuck with 4x4?

Thanks for looking.
 
Last edited:
To avoid these ads, REGISTER NOW!

Ben W

Well-known member
Joined
Oct 20, 2008
Messages
67
Location
NY
The anchor and Sketchup images aren't showing up for me ... so, I can't see all your dimensions/layout.

You can check your rafters using an online tool: https://www.awc.org/codes-standards/calculators-software/spancalc

The rafter in the picture with the 'strap' that you attached has a birds-mouth as well. Its just an alternate way of tying it down. I'd toenail it or if you don't like nailing use screws instead.

Not even knowing your spacing, a 4x4 post is going to have more than adequate capacity. So yes to the 4x6.

I don't like that flat of a roof particularly with what sounds to be somewhat flimsy roofing.
 

Mr. Roboto

Well-known member
Joined
Dec 11, 2012
Messages
2,160
Location
New Hampshire
The hurricane tie you've shown should be used in conjunction with a birds mouth. The birds mouth gives you the surface area for the common rafter to sit on the top plate/beam to best disperse the load. The Simpson tie prevents uplift and is a better-than alternate to toenailing. A side benefit is they also make it easy to lay out your rafter spacing and set them.

Is your current shop you're attaching to also built on a slab? Or full foundation below the frost line?

Also, for what it's worth, I am not a fan of the set in place post base anchors. I've always used this type in conjunction with stainless steel hardware set in the concrete. They're stronger, and give you some added adjustability.

ABA44Z.05.jpg
 
Last edited:

EOC_Jason

Well-known member
Joined
Jun 25, 2012
Messages
11,388
Location
Bentonville, AR
I would go with the 4x6 too just because 4x4's will like to twist and warp. I see no reason you can't just center it in that existing anchor, or if it needs to be aligned on one edge I don't think it will matter once everything is connected.

You only have 10 rafters that will need that bracket and a birds-mouth cut, I would go with that, or at the very least use screws if you aren't going to use the bracket. That way if you have some strong winds it will help resist being pulled apart if just held by nails.
 
OP
B

BK777

Well-known member
Joined
Sep 4, 2017
Messages
69
Location
Pacific NW
The rafter in the picture with the 'strap' that you attached has a birds-mouth as well. Its just an alternate way of tying it down. I'd toenail it or if you don't like nailing use screws instead.


I don't like that flat of a roof particularly with what sounds to be somewhat flimsy roofing.

I used a handful of span calculators and, this one especially, is thumbs up or thumbs down (for my 2x6 24"OC 8' run) depending on the various inputs, some of which are a best guess. If I go with Doug Fir Larch, #2, L/240, 25lb snow, 10lb dead, I'm golden. It's the best guessing that bugs me...

Yes I can see the birds mouth now. That's a pretty secure rafter. So is it generally best to do both like that? We have covered deck (came with the house) that is about twice the size of my project and supported with posts at all 4 corners. It uses straps only, for better or worse.

The roof pitch is flatter than I would like but we can't go higher with the ledger due to the overhang/flashing and we can't go any lower with the nailer to avoid banging our heads. 1.5 is spec-ed in the Suntuf literature as an acceptable minimum. It is very lightweight but also very strong. When installed with correct fasteners, purlins and closures as I intend to do, it should be quite secure. I'm more concerned about the framing decisions. And to some degree the low pitch, given the high winds we sometimes get.

For the other side of the shop which will be a bit bigger (12x20), I plan to use 4x6 posts, 16" spacing and a 2/12 pitch. But otherwise it is more or less the same design.
 

Git

Well-known member
Joined
May 18, 2008
Messages
6,894
Location
S Cal
What your building is pretty common in S Cal - but we would call it a 'patio cover'. There are a number of pdf files available that indicate the proper way to build one. I know your building codes are different where you are, but you may learn something from looking at these


They usually spec out the size of the rafters, footers, beams, etc

https://www.sandiegocounty.gov/content/dam/sdc/pds/docs/pds078.pdf

Have you looked at the SunTuff docs:
https://www.palramamericas.com/docs/upload/F409-Suntuf-Install-Guide.pdf
 
Last edited:

ddawg16

Well-known member
Joined
Jul 11, 2008
Messages
21,005
Location
S. California
I agree with Mr Roboto on the anchors....main reason, easier to move....and the anchor bolt works just as well for the application.

I would go with 16" OC vs 24". The difference in added cost is minimal, and means less chances of any sagging.

Not sure I agree with your choice of roof.....not if you intend for it to last a really long time. I used the stuff once....the translucent stuff lets light in...but after about 2 years it looked like ****. And spiders love the stuff inside.


But otherwise, I think you're off to a good start.
 

BukitCase

Well-known member
Joined
Apr 11, 2017
Messages
1,075
Location
Oregon
Unless your span table SPECIFICALLY mentions PT lumber, I would UPSIZE the rafters one notch - PT lumber tends to be a little weaker than normal grades.

I've used those panels too; if you EVER need to get on top, I'd buy a sheet of at least 1/2" plywood or OSB, and rip it in half lengthwise - you do NOT want to put your body weight on those WITHOUT something to spread out the pressure.

Two halves of a sheet will let you sit/stand/lay on ONE while moving the other... Steve
 
OP
B

BK777

Well-known member
Joined
Sep 4, 2017
Messages
69
Location
Pacific NW
I agree with Mr Roboto on the anchors....main reason, easier to move....and the anchor bolt works just as well for the application.

I would go with 16" OC vs 24". The difference in added cost is minimal, and means less chances of any sagging.

Not sure I agree with your choice of roof.....not if you intend for it to last a really long time. I used the stuff once....the translucent stuff lets light in...but after about 2 years it looked like ****. And spiders love the stuff inside.


But otherwise, I think you're off to a good start.

This makes sense. Sadly I'm stuck with the anchors we have in place. I had to make a decision a couple months ago before the concrete guys showed up.

Yeah I may go with 16", even if it is overkill. I prefer over-engineering especially when the additional cost is minimal.

I will probably be back in the near future to ask about the anchors for the other shed which is somewhat larger and is going over gravel. I have to dig the holes for that one. Well... I'll have to snap a pic as the situation poses some different questions than the one on a slab.

Regarding the roof, we have the Suntuf on our chicken coop. Even poorly installed and almost flat it has held up pretty well. I think we'll have spiders & wasps in the rafters regardless of the roofing material.
 
OP
B

BK777

Well-known member
Joined
Sep 4, 2017
Messages
69
Location
Pacific NW
Unless your span table SPECIFICALLY mentions PT lumber, I would UPSIZE the rafters one notch - PT lumber tends to be a little weaker than normal grades.

I've used those panels too; if you EVER need to get on top, I'd buy a sheet of at least 1/2" plywood or OSB, and rip it in half lengthwise - you do NOT want to put your body weight on those WITHOUT something to spread out the pressure.

Two halves of a sheet will let you sit/stand/lay on ONE while moving the other... Steve

Actually the one linked above was pretty thorough. It asks about both wet conditions and incised lumber, I went with yes/yes. I'm now leaning towards 16"OC anyway, which adds a couple feet to the allowable span.

I absolutely will do that with the plywood, hopefully I can avoid climbing up there altogether by installing and securing one panel at a time.
 

Voi

Well-known member
Joined
Oct 10, 2010
Messages
5,142
Location
Western South Dakota

My Old Tools

Well-known member
Joined
Jun 4, 2014
Messages
5,437
Location
Hamrick Lake, TX
I did a similar one 20 feet long on the back of a metal building. I sunk 5 4x4 posts in the ground on 4' centers. I used a 2x6 ledger and 2x6 rafters on 24" centers. I used standard metal roofing. I just toenailed the rafters on each end, no brackets. It has been up for 15 years or so and been through several 80 mph thunderstorms. All the lumber was PT.
 
OP
B

BK777

Well-known member
Joined
Sep 4, 2017
Messages
69
Location
Pacific NW
I did a similar one 20 feet long on the back of a metal building. I sunk 5 4x4 posts in the ground on 4' centers. I used a 2x6 ledger and 2x6 rafters on 24" centers. I used standard metal roofing. I just toenailed the rafters on each end, no brackets. It has been up for 15 years or so and been through several 80 mph thunderstorms. All the lumber was PT.

Thanks, it's really helpful to hear about a similar design that has lasted a while.
 

jack stand

Well-known member
Joined
Feb 29, 2012
Messages
3,331
Location
Lakes Region Maine
I'm good with your plan 100%.
Keep in mind (with the open side) that roof uplift is your biggest concern with windy conditions. As drawn the only lateral "rack bracing" I see will be what ever you gain with the partial height wall. It looks like that might get 4x8 sheathing under the siding witch would do. Additionally, a pair of diagonal (even another 2x3) under your rafters either from the beam heading up or the ledger heading down would be something I would add.
 
To avoid these ads, REGISTER NOW!

mcbane

Well-known member
Joined
Jul 23, 2017
Messages
794
Location
California
Your sketch might not meet code for seismic in the Pacific Northwest (20% snow load added to dead loads for seismic analysis). That being said, if it were my structure and I didn’t need a permit I wouldn’t be losing any sleep over it.


Sent from my iPhone using Tapatalk
 

Ben W

Well-known member
Joined
Oct 20, 2008
Messages
67
Location
NY
Other than the posts, I wouldn't use PT lumber. Locally we seem to get #2 grade that's close to a #1 for non-PT lumber at the big box stores. Either that or the PT is so poor that the non-PT looks better and better.

For those calculators - you use the wet service condition if you're designing an open deck, not if its a covered rafter like you have. And in NY they typically don't need to incise for PT (and obviously not if you end up choosing non-PT). So both of your assumptions there are conservative. I also agree with the recommendation of going with the 16" OC.

With that post spacing, your single 2x6 'nailer' is probably the week link. Consider doubling it up. And either 'let' it into the post or use a handful of Ledgerloks to connect it to the post.
 
OP
B

BK777

Well-known member
Joined
Sep 4, 2017
Messages
69
Location
Pacific NW
Thanks everyone for the advice, I'll be making a few alterations and getting to work next week. It is true the posts are pretty far apart, I should have gone with 5 but I think I will be fine with 4x6 and some extra bracing as suggested.


I know I'm overthinking but that's kind of how I roll. Plus, over time I plan to build three of these, each bigger than the last. Then I'll be looking into constructing a pair of freestanding carports. But first thing's first...
 
OP
B

BK777

Well-known member
Joined
Sep 4, 2017
Messages
69
Location
Pacific NW
Here are some pics of the build. I have another one to do with some different problems so I'll likely start another thread if I can't find the answers.

Ledger board & hangers. I used GRK fasteners for the ledger board & nailer. Fortunately I had visibility to the interior framing so I could make sure they went into each stud. I had a hard time finding documentation on this usage -- they're generally made to go through rim joists for decks. But I got the really long ones (5/16" x 5 1/8") so they are definitely anchored. They were certainly better for a 2x4 stud than a big lag screw.

I found myself reluctant to nail & screw everything in 100% in case I needed to make adjustments. Obviously there's a potential safety issue there but it worked out pretty well. I used temporary screws in some cases (like hangers) and finalized with nails later on.

It's hard to see but the Suntuf flashing is there as well. I just had to run a sawsall underneath that piece of siding. I re-nailed it later. The flashing didn't want to lay flat so I had to screw it down at every ridge (about every 3 inches).
IMG_2314_zpsjleaqq7r.jpg


Here you can see the notched 4x6 posts. I used a doubled 2x6 nailer. Because Suntuf requires all the joists to line up with the ridges, I allowed for some adjustment at the nailer end. Which is good because I had to nudge things a lot. In the end I tweaked each joist & purlin as I was laying down each 26" piece of Suntuf. It worked out but there was more room for error than I realized.
IMG_2321_zpsjslwjz2e.jpg


Another angle, before the roof went up.
IMG_2317_zpsv38dlqx2.jpg


This was a result of using 10' lumber when I really should have purchased 12'. The nailer ended up just a bit short -- and again there isn't a lot of fudge room since the Suntuf has to line up. So that last joist is really sitting on one 2x6, with the 2nd one for show...
IMG_2330_zpsuh6pp1yd.jpg


All done (almost). I still need to put that siding or whatever across the front. That or add some bracing. But as it stands it feels quite solid. We've had some big wind in the last month and it doesn't budge or creak.
IMG_2324_zpslrqapizc.jpg
 
Last edited:

Augus7us

Well-known member
Joined
Jan 14, 2017
Messages
1,190
Location
Central Ohio
Looking good. Please keep posting photos of your progress. I plan on doing a lean to at some point on my building and your photos are helping me visualize the whole thing.

-Clint
 

GrayFlattop

Well-known member
Joined
Jan 18, 2018
Messages
1,039
Location
Chicago
I'd agree with most of the comments above. About the only thing I'd like to add is the flashing detailing where your roofing material meets the T-111 siding. Unless detailed properly - regardless of roofing type - that intersection will eventually leak. Don't talk yourself into using a bunch of caulk to "solve" that issue. It won't last and that point of attachment will hold water - eventually rotting the T-111. The rotting, wet T-111 will be calling out to any termites in the area and then you will have bigger problems. Go ahead and ask me how I know...

The only proper way to deal with this is to cut away a narrow strip of the siding above your ledger location and fit a piece of metal flashing up several inches - under the T-111 above - leaving enough of an overhang to direct water away from the wall and on to the roof.

This video give you the general idea - although the roofing material used is different.


Make sure that you hold the bottom edge of the T-111 - above the flashing a bit and also to finish the newly cut edge with paint.

For corrugated roofing material, they may sell a transition strip, but a gasket or caulk alone will not work for more than a few years.

About my only other comments would be the relatively low pitch and snow load and/or the direction of prevailing winds for driving rain toward that intersection. Your location is not specific enough to tell, but one or both of those issues may impact you.

I can't say I'm crazy about the clear roofing unless you are looking to start a greenhouse, but the low pitch rules out 3-tab shingles. Consider metal roofing and install a skylight that is compatible with your roof system.

Not sure what you are planning to store there, but I'd wager you end up putting in end walls and a door before long. You may want to plan for that when you frame things out.
 

bad_idea

Well-known member
Joined
Jun 11, 2011
Messages
4,332
Location
Pasquotank, NC
Looks great. I'm interested to see how you build the one in gravel. If you start another thread for that please put a link to it in this thread for continuity. I plan to build a lean to off the back of my shed and I am debating putting down a concrete slab or using pavers. Will be for grilling and entertaining.
 

manwithtools

ALLIANCE MEMBER
Joined
Aug 24, 2015
Messages
13,801
Location
Lebanon, TN
I'd agree with most of the comments above. About the only thing I'd like to add is the flashing detailing where your roofing material meets the T-111 siding. Unless detailed properly - regardless of roofing type - that intersection will eventually leak. Don't talk yourself into using a bunch of caulk to "solve" that issue. It won't last and that point of attachment will hold water - eventually rotting the T-111. The rotting, wet T-111 will be calling out to any termites in the area and then you will have bigger problems. Go ahead and ask me how I know...

The only proper way to deal with this is to cut away a narrow strip of the siding above your ledger location and fit a piece of metal flashing up several inches - under the T-111 above - leaving enough of an overhang to direct water away from the wall and on to the roof.

This video give you the general idea - although the roofing material used is different.


Make sure that you hold the bottom edge of the T-111 - above the flashing a bit and also to finish the newly cut edge with paint.

For corrugated roofing material, they may sell a transition strip, but a gasket or caulk alone will not work for more than a few years.

About my only other comments would be the relatively low pitch and snow load and/or the direction of prevailing winds for driving rain toward that intersection. Your location is not specific enough to tell, but one or both of those issues may impact you.

I can't say I'm crazy about the clear roofing unless you are looking to start a greenhouse, but the low pitch rules out 3-tab shingles. Consider metal roofing and install a skylight that is compatible with your roof system.

Not sure what you are planning to store there, but I'd wager you end up putting in end walls and a door before long. You may want to plan for that when you frame things out.

Check this section of post #22:

"It's hard to see but the Suntuf flashing is there as well. I just had to run a sawsall underneath that piece of siding. I re-nailed it later. The flashing didn't want to lay flat so I had to screw it down at every ridge (about every 3 inches)."
 

GrayFlattop

Well-known member
Joined
Jan 18, 2018
Messages
1,039
Location
Chicago
Check this section of post #22:

"It's hard to see but the Suntuf flashing is there as well. I just had to run a sawsall underneath that piece of siding. I re-nailed it later. The flashing didn't want to lay flat so I had to screw it down at every ridge (about every 3 inches)."

I didn't even notice that - good to know there is a pre-made solution. The OP need to make sure he includes this detail.
 

GarageGuy89

Well-known member
Joined
Jul 12, 2016
Messages
367
Location
Olalla, WA
I think that will outlast you. Looks like good craftsman ship on your part. Thumbs up!

Just to give you some piece of mind. Our carport is the same scenario as this, only a lot less beefy, built back in the 70's and about twice the size. It has 4x4's, a single 2x6 ledger/beam and rafters, and 1x3 firring strips. None of which is pressure treated, nailed everywhere, and only straps on the ledger that connects to the house. The posts are also just sitting on cinder blocks, no up lift security (have knocked them out with the tractor a few times :)...). I walk on the roof too...Also live in PNW and it has been standing the last 40+ years.

Makes you wonder how much safety factor is in building codes these days...
 

Dustball

Well-known member
Joined
Jun 25, 2011
Messages
2,081
Location
Hudson, WI
Hey, twinsies!

Difference between yours and mine is that mine has 2x10's everywhere, 6x6 posts, and steel roofing. Mine's 13 ft wide x 28 ft long.
 

Attachments

  • IMG_20171126_160229918.jpg
    IMG_20171126_160229918.jpg
    157 KB · Views: 93
  • IMG_20171203_153157500.jpg
    IMG_20171203_153157500.jpg
    151.7 KB · Views: 92
  • IMG_20171203_153030923.jpg
    IMG_20171203_153030923.jpg
    150.4 KB · Views: 86
OP
B

BK777

Well-known member
Joined
Sep 4, 2017
Messages
69
Location
Pacific NW
Hey, twinsies!

Difference between yours and mine is that mine has 2x10's everywhere, 6x6 posts, and steel roofing. Mine's 13 ft wide x 28 ft long.

Nice! This looks more like what I plan to do on the other side (thread pending). Can you say any more about what you did under the posts? Are those Sonotubes with anchors placed in the concrete?
 
OP
B

BK777

Well-known member
Joined
Sep 4, 2017
Messages
69
Location
Pacific NW
Here's a couple final pics, showing the wife's work area. It looks a bit low but I'm 6' tall and don't hit my head unless I stand too close to the nailer boards.

Things held up great over winter. For now I just put some 2x4 braces up in each corner. Honestly, the perimeter gets a little wet when it rains but we're doing fine w/o the sides or front. It helps that the roof overhangs quite a bit in the front. This is the north side of the building too. We get some really strong wind here but typically this side doesn't get the brunt of it.

IMG_2419.jpg

IMG_2420.jpg
 

kbs2244

Well-known member
Joined
Nov 11, 2006
Messages
14,065
Find out what your local code would call for and build to it.
They are based on local history and written conservatively.
If you have to meet it or not, if you build to it you will be safe.
 

Dustball

Well-known member
Joined
Jun 25, 2011
Messages
2,081
Location
Hudson, WI
Nice! This looks more like what I plan to do on the other side (thread pending). Can you say any more about what you did under the posts? Are those Sonotubes with anchors placed in the concrete?

Yes, 48" long tubes with anchors in the concrete. The holes are actually around 50" deep with the bottoms flared out.
 
To avoid these ads, REGISTER NOW!
Top Bottom