OP

You are using an out of date browser. It may not display this or other websites correctly.
You should upgrade or use an alternative browser.
You should upgrade or use an alternative browser.
The wet garage raise
- Thread starter Sparkynutz
- Start date


AZ Pete
Well-known member
do your wiring plans include any outlets oetside the garage, under the eaves, for future security lighting or cameras?
OP
Sparkynutz
Well-known member
Nope. Not a bad idea, but easy enough to add off the motion light already installed above man door or come out of the sub panel above garage door for anything I'd need facing the driveway. For the time being between my wife, I, and my neighbors someone is always around so anybody trying to steal something is pretty likely to get caught in the act. Also, anybody that knows me knows I'd gladly borrow out anything I own or let you work on your stuff at my house. If something goes missing then whoever has it probably needed it worse than I did.do your wiring plans include any outlets oetside the garage, under the eaves, for future security lighting or cameras?
Sent from my SM-G960U using Tapatalk
xtremek
Well-known member
Sounds like it's coming together really well.
OP
Sparkynutz
Well-known member
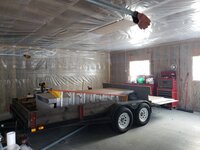
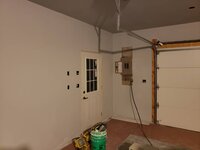
As it sits today. I'm ready to start hanging drywall. Might have a little fun working around the trailer tho not being able to open garage door to get it out. 


Sent from my SM-G960U using Tapatalk
Sent from my SM-G960U using Tapatalk
Attachments


rattle_snake
Well-known member
Oh the joys of drywall. Better than concrete I guess....
Glad to see that you rose above all the roadblocks and are in the home stretch of the project. Nice work.
Glad to see that you rose above all the roadblocks and are in the home stretch of the project. Nice work.
xtremek
Well-known member
That's a ton of drywall. All four walls and the ceiling? Are you going to use a drywall jack?
OP
Sparkynutz
Well-known member
That's only half of it on the trailer for ceiling and right wall. The rest is in other garage out of the way till I'm ready for it.That's a ton of drywall. All four walls and the ceiling? Are you going to use a drywall jack?
my neighbor behind me does drywall on the side and offered to let me use his lift and help last year when I started the project. After talking to him he said he did 24 drywall jobs last year most of them being whole houses. I'm lucky he offered because I was dreading doing it myself. I've only done a few rooms here and there at my old house and took me forever because I'm not very efficient with 10 steps mudding and sanding until it looks good enough for paint. If he's done that many jobs he has to be quicker than me. I'm helping him hang it and hes doing all the taping and mud for $350. Definitely worth it especially the ceiling I think.
Sent from my SM-G960U using Tapatalk
Jayman17
Well-known member
That's only half of it on the trailer for ceiling and right wall. The rest is in other garage out of the way till I'm ready for it.
my neighbor behind me does drywall on the side and offered to let me use his lift and help last year when I started the project. After talking to him he said he did 24 drywall jobs last year most of them being whole houses. I'm lucky he offered because I was dreading doing it myself. I've only done a few rooms here and there at my old house and took me forever because I'm not very efficient with 10 steps mudding and sanding until it looks good enough for paint. If he's done that many jobs he has to be quicker than me. I'm helping him hang it and hes doing all the taping and mud for $350. Definitely worth it especially the ceiling I think.
Sent from my SM-G960U using Tapatalk
Best money you will ever spend. Congrats, the place is looking great. You deserve to relax a bit now that the stress is over.

Jay
captain14
Well-known member
$350! That’s a great. Best money you ever spent.
ford33
Well-known member
That's money well spent. Let him do the skilled work and you will have a very nice base for priming and painting.
What colors and design are you going to put inside the garage? You've come this far and a nice looking interior would set it apart from a typical garage.
What colors and design are you going to put inside the garage? You've come this far and a nice looking interior would set it apart from a typical garage.
AZ Pete
Well-known member
you are doing a first class job. What are you going to do with all of your spare time, once done?
Sent from my iPad using Tapatalk
Sent from my iPad using Tapatalk
OP
Sparkynutz
Well-known member
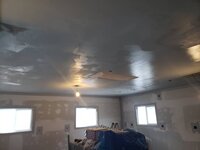
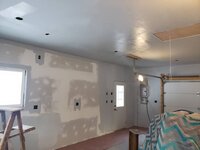
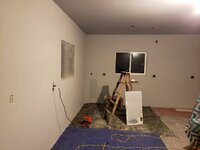
I just finished applying hopefully the last coat of mud. Tomorrow I finish sand and touch up any spots I missed.
As my luck has been I ended up doing more work myself than anticipated.
My neighbor helped hang 80% of drywall and then our schedules didnt match up so I ended up doing the rest myself.
Fast forward a few weeks and He came over and got all the taping done in about a week. It took a lot longer than I thought then the last few weeks hes been helping for about 3 hours here and there with me working on it 15+ hours a day trying to get things done. He was sick then working all around the holidays so he didnt have much time to spare. I had off work for 2-1/2 weeks so I had to take advantage of it. He mudded the corners and long runs on ceiling and I did the ceiling **** joints, screws, and everything on the walls. I paid him $100 the day the ceiling was done being hung and every time I ask if he needs any money he doesnt really answer. I hope hes reasonable when it comes time to pay in regards to his original quote. What he did do was a really good job and theres no way I could have finished as quickly as this without him. I am a little dissapointed it took a lot longer and more work than anticipated on my part tho. My electric bill has been out of site running electric heaters to keep garage 50+ degrees and probably would have been cheaper paying a real contractor to do it quicker than saving a buck and wasting it all on long drawn out heating costs and I could have spent more time with family instead of stuck working in garage all day. Fortunately my daughter visited me often and even helped a little. I did spend 1 entire day insulating the attic with the batts I had on hand then put the plywood down. It was a pain moving plywood being always in the way but was basicly my only option to have it up in attic before plastic and drywall because it wouldnt fit through the attic ladder hole otherwise. As soon as blow in insulation goes on sale I plan on blowing in 12" or so in remainder of attic. The batts only covered a couple feet past where the plywood is.
My dad was supposed to spray the primer and paint for me but now he said hes too busy and wouldn't be able to get to it for a few months. It looks like I'll be using brush and rollers. A good project to recruit my wife and kids help.
With the empty mud buckets handy I rounded up a bunch of my old leftover paint. Most white or close to it with some blue, green, tan, and grey but when it all mixed up it ended up a blueish grey color. If my estimates are correct I still need about 4 more gallons so I plan on buying a gallon of battleship grey and 3 gallons gloss white to add to the mix and lighten it up slightly.
I have 8 gallons of primer I got black friday dirt cheap and 2 gallons of flat light grey left from my old basement I plan to mix with it so hopefully one coat of finish paint will be enough if I saturate everything good with grayish primer first.
My neighbor was trying to talk me into texturing the walls to hide any imperfections before painting but I'm really sick of working on the walls. He said he'd do it for me but not for a few weeks because now hes busy working on a house. This will be a working garage and bound to get lots of dents and dings along the way. Less chance of holding dirt and dust the better and flat walls should be easier to patch when needed. I also can't see waiting any longer with my wife nagging me that her van still isn't in the garage because my tractor is in her spot. She has to scrape windows every morning before work and asked what the next project is because she has only been able to park in a garage one winter since we've been together just shy of 20 years. The sooner I get the paint done I can move all the toys into this garage and make her happy and hopefully keep it that way.
I honestly dont know how much I've spent fixing up this garage but if I count every nail, screw, 2x4, dirt, gravel, concrete etc I'd have to guess somewhere around $15k and might even be as high as $20k.
Crazy amount of money for a darn garage but it was too late to turn back a loooong time ago. Having a nice house with a decent yard and a decent size workshop was always one of my biggest dreams and I'm 99% there.
The only expenses I see left are-
A nice big ceiling fan ~$300
remaining insulation ~$300
cabinets and shelving ~$500
gas heater and piping ~$800 optional down the road.


Sent from my SM-G960U using Tapatalk
As my luck has been I ended up doing more work myself than anticipated.
My neighbor helped hang 80% of drywall and then our schedules didnt match up so I ended up doing the rest myself.
Fast forward a few weeks and He came over and got all the taping done in about a week. It took a lot longer than I thought then the last few weeks hes been helping for about 3 hours here and there with me working on it 15+ hours a day trying to get things done. He was sick then working all around the holidays so he didnt have much time to spare. I had off work for 2-1/2 weeks so I had to take advantage of it. He mudded the corners and long runs on ceiling and I did the ceiling **** joints, screws, and everything on the walls. I paid him $100 the day the ceiling was done being hung and every time I ask if he needs any money he doesnt really answer. I hope hes reasonable when it comes time to pay in regards to his original quote. What he did do was a really good job and theres no way I could have finished as quickly as this without him. I am a little dissapointed it took a lot longer and more work than anticipated on my part tho. My electric bill has been out of site running electric heaters to keep garage 50+ degrees and probably would have been cheaper paying a real contractor to do it quicker than saving a buck and wasting it all on long drawn out heating costs and I could have spent more time with family instead of stuck working in garage all day. Fortunately my daughter visited me often and even helped a little. I did spend 1 entire day insulating the attic with the batts I had on hand then put the plywood down. It was a pain moving plywood being always in the way but was basicly my only option to have it up in attic before plastic and drywall because it wouldnt fit through the attic ladder hole otherwise. As soon as blow in insulation goes on sale I plan on blowing in 12" or so in remainder of attic. The batts only covered a couple feet past where the plywood is.
My dad was supposed to spray the primer and paint for me but now he said hes too busy and wouldn't be able to get to it for a few months. It looks like I'll be using brush and rollers. A good project to recruit my wife and kids help.
With the empty mud buckets handy I rounded up a bunch of my old leftover paint. Most white or close to it with some blue, green, tan, and grey but when it all mixed up it ended up a blueish grey color. If my estimates are correct I still need about 4 more gallons so I plan on buying a gallon of battleship grey and 3 gallons gloss white to add to the mix and lighten it up slightly.
I have 8 gallons of primer I got black friday dirt cheap and 2 gallons of flat light grey left from my old basement I plan to mix with it so hopefully one coat of finish paint will be enough if I saturate everything good with grayish primer first.
My neighbor was trying to talk me into texturing the walls to hide any imperfections before painting but I'm really sick of working on the walls. He said he'd do it for me but not for a few weeks because now hes busy working on a house. This will be a working garage and bound to get lots of dents and dings along the way. Less chance of holding dirt and dust the better and flat walls should be easier to patch when needed. I also can't see waiting any longer with my wife nagging me that her van still isn't in the garage because my tractor is in her spot. She has to scrape windows every morning before work and asked what the next project is because she has only been able to park in a garage one winter since we've been together just shy of 20 years. The sooner I get the paint done I can move all the toys into this garage and make her happy and hopefully keep it that way.
I honestly dont know how much I've spent fixing up this garage but if I count every nail, screw, 2x4, dirt, gravel, concrete etc I'd have to guess somewhere around $15k and might even be as high as $20k.
Crazy amount of money for a darn garage but it was too late to turn back a loooong time ago. Having a nice house with a decent yard and a decent size workshop was always one of my biggest dreams and I'm 99% there.
The only expenses I see left are-
A nice big ceiling fan ~$300
remaining insulation ~$300
cabinets and shelving ~$500
gas heater and piping ~$800 optional down the road.
Sent from my SM-G960U using Tapatalk
Attachments


Growlertdi
Well-known member
The garage looks great. so much work and look at the reward.
The last pic of your helper is priceless.
The last pic of your helper is priceless.
Finallygotit
ALLIANCE MEMBER
Goal #1 for 2019, get your wife's van into the garage!
You know the saying..............
Like you said, 99% there.
You know the saying..............
Like you said, 99% there.
xtremek
Well-known member
The place looks great. I'm jealous.
OP
Sparkynutz
Well-known member
Just wait till this summer when I get everything situated and it's not just a mess. I'm a neat freak and everything out of place has been driving me nuts. I wish I had waited to move my toolboxes because I've only moved them back and forth 20+ times always in the way but with the snow moving them back to other garage is just about impossible.The place looks great. I'm jealous.
soon I'll have some better more organized pics to share.
Sent from my SM-G960U using Tapatalk
wssix99
Well-known member
I honestly dont know how much I've spent fixing up this garage but if I count every nail, screw, 2x4, dirt, gravel, concrete etc I'd have to guess somewhere around $15k and might even be as high as $20k.
Great job! I totally support leveraging child labor to defer the costs, as well! (That's how my wife and I started to learn to do this stuff.)
It's important to address all the small important details. We have been working to build a house we could "die in" but forgot to build a crypt... It's going to be too expensive to add that now, so one of us is going to have to move out before the other some day!
OP
Sparkynutz
Well-known member
From reading some of your threads I see you have been in the same boat if not much worse and more stressful than my minor garage issues. I'm thankful for being on the home stretch. I'd love to tackle a custom dream retirement home some day but afraid the amount of stress and headaches involved are most likely just not worth the reward. I hope your issues have turned around for you and things work out as well in the end as things have for me.Great job! I totally support leveraging child labor to defer the costs, as well! (That's how my wife and I started to learn to do this stuff.)
It's important to address all the small important details. We have been working to build a house we could "die in" but forgot to build a crypt... It's going to be too expensive to add that now, so one of us is going to have to move out before the other some day!
Sent from my SM-G960U using Tapatalk
OP
Sparkynutz
Well-known member


Finallygotit
ALLIANCE MEMBER
Reverse racoon eyes? Good that you spent some quality time with the kids.
jimmie jam
Well-known member
I admire your ability to think out and execute this entire project. You are heading into home plate now...well done!
Last edited:
Finallygotit
ALLIANCE MEMBER
I admire your ability to think out and execute this entire project. You are heading in to home plate now...well done!

xtremek
Well-known member
^What they said. Glad you let us follow along.
OP
Sparkynutz
Well-known member
Decent start on it so far. Tinted primer so hopefully one finish coat of gloss Grey is enough. Wish it was slightly lighter but it's very hard to tell what it will actually look like once real lighting is up.
I dont have the top coat paint yet so I still might make it slightly lighter. Hopefully darker primer doesnt show through tho.


Sent from my SM-G960U using Tapatalk
I dont have the top coat paint yet so I still might make it slightly lighter. Hopefully darker primer doesnt show through tho.
Sent from my SM-G960U using Tapatalk
Attachments


xtremek
Well-known member
Did I miss where you said what the final color(s) are going to be?
OP
Sparkynutz
Well-known member
After getting grey rimer on and a little better idea on what grey looks like as a whole and talking to my wife she thinks I should go just a little darker than it is now. I think lighter would help light reflect better I kinda like the idea of darker grey walls too.
For the most part the walls will be covered and ceiling will be more visible than anything. Going a lighter color on ceiling than walls would look nice but pain when it comes time to paint having to be more careful and cleaning brushes yet again.
I'm headed for paint shortly. I really like the color scheme in this picture. Wish I could recall who had it to give credit and because there were many other pics on his garage thread.
I plan on a similar gloss grey to his for walls and ceiling with a really dark grey almost black on the trim around windows and doors. My lighting in prior pictures is terrible and hard to tell what color it is. The primer on it now is pretty close but slightly lighter and more blueish. Depending on cabinets I end up buying or building I'd like to do similar color scheme with center panels same as walls with stiles, door surrounds same dark grey as trim.
I will be mounting pegboard in a few spots and a boards with hooks a couple other places painted this same dark color too.
My last garage 22'×22' had 3 florescent shop lights and two florescent spiral lights with walls and ceiling being almost this same exact grey too but flat paint from previous owner. I dealt with it for 17+ years and still got all kinds of things built and fixed so even if lighting isn't blinding bright it can't be any worse. Portable lights can always be used when needed too.
Sent from my SM-G960U using Tapatalk
wssix99
Well-known member
I hope your issues have turned around for you and things work out as well in the end as things have for me.
Thanks. It's kinda ironic how dream homes turn into nightmares while they are being built. We still have water issues and big leads around the edges of our roof. (Our fault - trying some pioneering *fail* finish details.) Hopefully we'll get dry and stable in the spring.
After getting grey rimer on and a little better idea on what grey looks like as a whole and talking to my wife she thinks I should go just a little darker than it is now. I think lighter would help light reflect better I kinda like the idea of darker grey walls too.
One thing you might do is go for both. You can keep some walls light grey and then go with a darker color (from the same family on the paint chip) on some of the other walls. This will give you some reflectivity and then also some of the darker color you all like. (You would probably go for the darker color on your work walls where you'd have your benches, etc. These areas would also have task lighting and also shouldn't need the reflected light as much.)
OP
Sparkynutz
Well-known member
Heres pics of finished primer and a barely darker grey test spot under the window I did last night when I got home with the paint. That will be finish color for walls and ceiling. I also picked up a can of the second darkest grey on the sample swatch the lighter grey came from to use on the trim. Great minds think alike! Talking with my wife when I got home she suggested using that dark grey color for pegboards and use black for the trim. I kinda like that idea too. Now she wants our entry way that dark grey color or a touch lighter. It's currently a barely lighter shade of grey than I'm using on garage walls.
Time to paint! Hope 6 gallons is enough.
It took somewhere around 6-1/2 gallons of primer


Sent from my SM-G960U using Tapatalk
Time to paint! Hope 6 gallons is enough.
It took somewhere around 6-1/2 gallons of primer
Sent from my SM-G960U using Tapatalk
Attachments

xtremek
Well-known member
For my old eyes, I need all of the light I can get. I have almost 40 4' fluorescent lights in my barn, and it isn't enough in some spots
wssix99
Well-known member
Heres pics of finished primer and a barely darker grey test spot under the window I did last night when I got home with the paint.
Looks like it smells wonderful!
OP
Sparkynutz
Well-known member
actually primer didnt smell like much of anything but the paint sure did. I wish I had listened to paint lady and bought one less can. I already figured it would take less paint than primer but I didnt expect it to be drastically less. I used about 6.5 gallons of primer and only about 3.5 gallons of paint. I was worried 5 wouldnt be enough so I got 6. My wife might get darker grey hallway after all with this leftover paint I can always have them make a gallon of it just a little darker for her.Looks like it smells wonderful!
Sent from my SM-G960U using Tapatalk
wssix99
Well-known member
My wife might get darker grey hallway after all with this leftover paint I can always have them make a gallon of it just a little darker for her.
Yea, you might check out the tint formulas on the mix label. If the darker colors have more of all the same tint colors/codes, you can take the paint you bought up to the "next level" by just adding the pigment deltas.
James-W
Well-known member
Super job on the garage!!!
OP
Sparkynutz
Well-known member
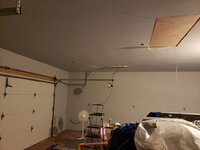
Well. Everything was going great and started moving stuff in then I looked in the attic. The uninsulated areas are completely saturated with water between the plastic vapor barrier and the back side paper of the ceiling drywall. The areas with insulation look dry. The last 3 days I have been battling what to do about it and how to dry it out. Temps have been in the teens and humidity around 70% which isn't helping either. I tried many things and hopefully my conclusion works this weekend when I have 2 entire days to devote to fixing the moisture. The way I intend to hopefully fix this is piping in dry air from a dehumidifier exhaust into center cavity of the vapor barrier with slits in plastic at all 4 corners for moist air to escape. Aside from slicing plastic every single cavity and drying with a towel and fans then do my best to retape without leaks this is the best I can come up with.
No matter how much I heat the attic it's just too cold and too vented to get the trapped water to turn back to vapor in order to dry out without insulating first to hopefully make my method wor warming up and trapping the heat under the plastic where the moisture is.
I pray it works or I'll end up slicing the plastic anyways and have insulation in the way to boot.
Lesson learned and hopefully someone else reads this and doesnt make same mistakes I did.
Don't mud an uninsulated garage in winter and heat with propane heater. The combination of the two or one or the other is just bad news for trapping moisture. I hope I can get it dried out before things get bad with mold or sagging drywall.
I'm back to using electric heat only to avoid adding any more moisture from the propane heat and dreading the electric bill even more now. I hope and pray it's not in triple digits but wouldnt be surprised running 8k watts of heaters, a dehumidifier and a bunch of fans almost nonstop most of the month.
If only I would have waited till spring and dealt with the hassle of moving **** twice it would have saved me an insane amount of money and headaches not dealing with the moisture. Hopefully some day it becomes the Dry Garage I really want it to be.
Sent from my SM-G960U using Tapatalk
xtremek
Well-known member
 Sorry to hear about this. I hope it works out quickly for you.
JohnnieMo
Well-known member
I’m not certain but I think any form of heat will create condensation. You just need to finish the insulation before adding any heat.
wssix99
Well-known member
Well. Everything was going great and started moving stuff in then I looked in the attic. The uninsulated areas are completely saturated with water between the plastic vapor barrier and the back side paper of the ceiling drywall.
I think you will have to deal with this all the time/no matter what. Your taping and propane may be accentuating the effect now, but heat rises and the vapor barrier is going to stop water. Even with the insulation, you can always get condensation there.
I have a similar condition under the flat roof in my house. We have a plastic membrane on the roof (acts like a vapor barrier) with foam insulation in the rafters and drywall under that. The concern is water condensing on the bottom of the membrane system and raining down on the drywall.
We took some round aluminum louvers, spray panted them matte white, (They blend in well with the ceiling white paint.) and installed them at strategic places across the ceiling. (They are available in many sizes.)
https://www.menards.com/main/buildi...ni-louver-pack-of-6/50003/p-1444423378938.htm
^If you put these at each end of your rafter bays, you might get enough circulation to keep vapors from condensing against your barrier. The catch would be cutting through the drywall and not slicing your plastic! You may also want to snake a rod or wire down the middle of the bays to raise up and tent the plastic just a hair so it doesn't sit directly on the drywall and air can circulate.
OP
Sparkynutz
Well-known member
Live and learn I guess. Good idea on the vents but like you said, without raising plastic there won't be enough gap to vent and not cutting plastic would be impossible.
Had I done this again next time I would have-
1. Use 2x3 furring strips flat ways with plastic above the strips to create an air gap between the plastic and ceiling power venting to outside somehow not to attic and not inside.
2. insulate after hanging but before mudding
3. Mud in late fall when its driest outside.
4. Rent or buy a heater with heat exchanger that isolates burning gas from heated air instead of propane that introduces lots of moisture.
5 Probably use osb or steel instead of drywall. mudding ***** and it's too darn easy to mess it up.
I've been getting barely any sleep stressed out that the ceiling will rot and fall down on my truck or tractor. Fortunately in my insomniatic brainstorming I came up with an even better way to remove most of the moisture.
I cut a small 3" or so slit in plastic about a foot out from the W on each side of the truss. I then black taped a 4ft 3/4" and a 5ft 1/2" clear poly tubing side to side inside the end of my shop vac hose. I taped a fiberglass driveway marker to the 1/2" hose so I could shove it in the cavity all the way to the far end easily and the larger 3/4" hose along side it for extra sucking. It took a little while to get a technique down but by the time I had 1/4 of the cavities dried out I really had a good rhythm down that dried them out much better than when I started. I rigged up a remote kechain switch to my jacket zipper my wife uses to turn Christmas lights on and off to operate the shop vac remotely while crawling around drying cavities. It worked awesome!
Unfortunately I was on limited time trying to finish it before work and with 3 cavities left out of 26 and no time to take a shower before work I accidently sucked a hunk of fiberglass into the 3/4" tube ending my good run and making me barely make it to work on time instead of late.
The 3 cavities left weren't too wet compared to rest and I had bathroom exhaust fans rigged up on each end blowing into very end cavities. I turned heat off, opened doors and windows then went to work. Hopefully with the extra air movement and equalized temps inside to attic the condensation stops until I have a chance to get preliminary insulating done this weekend.
The shop vac had atleast a gallon if not more water in it from 23 cavities.
I changed my plan and will now put 3-1/2" thick fiberglass batts rest of ceiling where I had no insulation before. Fiberglass breathes better and I will leave the slits in the plastic until spring or a nice warm dry day that I can move them to side, tape my slits and blow insulation over top of the whole thing. It's going to cost about $100 more to finish rest with batts instead of the blow in I had originally planned but ease of moving later will be more than worth it over blowing in now and trying to tape plastic with that dusty **** on everything.
I can also keep an eye on things better moving aside to dry if needed.
Hopefully with last of mud being applied 8 days ago and paint 5 days ago walls should be dry enough to not crack too awful bad or break from moisture in them freezing.
I blew in a few wet cavities yesterday with my big dehumidifier for a good 5 hours and barely got a drip of water. I had it set to continuous and level showed 30% humidity. Those cavities were the ones I didnt get done today with the vac.
The dehumidifier kept going into defrost and the bathroom fans I rigged up actually worked better so that's what I left running overnight from 3am when I went to bed.
I plan on buying another dehumidifier tomorrow along with the insulation to get things wrapped up. I hope this is the end of my bad luck and things turn back around.
Sent from my SM-G960U using Tapatalk