trytochaseme
Well-known member
I've wanted to pick up a snap on box for awhile as I haven't been the happiest with my kennedys. Now don't get me wrong the kennedys are quality especially for how cheap I got them but they are not without their flaws.
after not being able to convince myself to spend thousands on a snapon I decided I could turn my kenneys into something i would like even better for way less. follow me on this journey to see if I can somehow finish a project for once or abandon all hope halfway through.
first thing I started with was air supply. Being a machinist I'm using air tools all day long. it's not hard but I get annoyed by oiling my tools everyday so I wanted to have a built in oiler system for my air tools.
Inside the lower compartment on the left box is a lot of empty space so i decided to utilize it. I know it's messy now but I will neatly have it mounted to the side soon and clean up the hoses

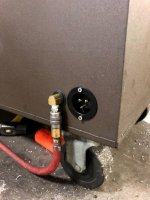
Here is the supply line in the back with a 90 bend so I can tuck the airline neatly under my box and away from being tripped on

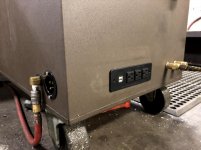
I have 2 outlets on the side and could easily add more but so far this has been plenty. Im contemplating adding a split before the oiler so I can have a clean air line also available


Next thing I wanted to do was add some power, first I put an inlet out back next to the air.

then I marked the hole for the side

I needed to make a second hole because the kennedy has a second layer about a inch back but thankfully it only needed to be big enough for the cable and not the whole unit.
all done!

I put another power strip inside so that I can have my battery charger in a drawer and I might also put a wireless charger for my phone on the inside of the top of my box so i can just set my phone on the top corner for it to charge.
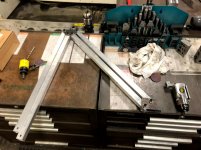
I've had several iterations of side shelves, all of which were sheet metal bent up in different ways but being able to carve metal however I please I decided it was time to do something better. Milled out of a hunk of scrap aluminum I saved a while back this turned out perfect. has spots to hold cat40 and cat50 holders to change out tools, along with spot for chuck keys, vise handle and a mini vise. I need to get a mini wilton to replace it with.


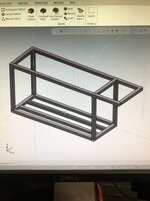
heres a teaser for whats next on the list!
anyone have any guesses?

theres much more to come!
after not being able to convince myself to spend thousands on a snapon I decided I could turn my kenneys into something i would like even better for way less. follow me on this journey to see if I can somehow finish a project for once or abandon all hope halfway through.
first thing I started with was air supply. Being a machinist I'm using air tools all day long. it's not hard but I get annoyed by oiling my tools everyday so I wanted to have a built in oiler system for my air tools.
Inside the lower compartment on the left box is a lot of empty space so i decided to utilize it. I know it's messy now but I will neatly have it mounted to the side soon and clean up the hoses
Here is the supply line in the back with a 90 bend so I can tuck the airline neatly under my box and away from being tripped on
I have 2 outlets on the side and could easily add more but so far this has been plenty. Im contemplating adding a split before the oiler so I can have a clean air line also available
Next thing I wanted to do was add some power, first I put an inlet out back next to the air.
then I marked the hole for the side
I needed to make a second hole because the kennedy has a second layer about a inch back but thankfully it only needed to be big enough for the cable and not the whole unit.
all done!
I put another power strip inside so that I can have my battery charger in a drawer and I might also put a wireless charger for my phone on the inside of the top of my box so i can just set my phone on the top corner for it to charge.
I've had several iterations of side shelves, all of which were sheet metal bent up in different ways but being able to carve metal however I please I decided it was time to do something better. Milled out of a hunk of scrap aluminum I saved a while back this turned out perfect. has spots to hold cat40 and cat50 holders to change out tools, along with spot for chuck keys, vise handle and a mini vise. I need to get a mini wilton to replace it with.
heres a teaser for whats next on the list!
anyone have any guesses?
theres much more to come!
Attachments
-
 IMG_1685.jpg143.9 KB · Views: 896
 -
 IMG_1684.jpg101.4 KB · Views: 895
 -
 IMG_1681.jpg73.6 KB · Views: 83
 -
 IMG_1680.jpg88.4 KB · Views: 888
 -
 IMG_1688.jpg149.8 KB · Views: 891
 -
 d8ce6c686fe7203555821acca903e4c6.jpg253.3 KB · Views: 0
 -
 87b6e1d7a62d5ab3b10eb85839f226cc.jpg194.2 KB · Views: 0
 -
 134e169feb8adf364a90516282e5c6e8.jpg175.8 KB · Views: 0
 -
 D5&title=Tool%20box%20mod%2Fhack%2Fcustomization...jpg77.4 KB · Views: 0
")