Thanks Gman, I’ve been hounding this guy for a few months and he finally gave in.Smitty strikes again and this time bigger than ever and a nice stand to boot. He is officially jointed the very exclusive 8" vise club! Congrats

Last edited:

Thanks Gman, I’ve been hounding this guy for a few months and he finally gave in.Smitty strikes again and this time bigger than ever and a nice stand to boot. He is officially jointed the very exclusive 8" vise club! Congrats
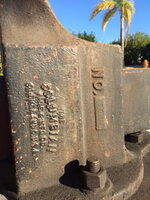
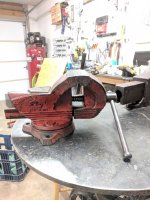
Just locked up this Columbian no. 508 on a heavy duty stand. The vise is in pretty good condition and the stand is massive.
Sent from my iPad using The Garage Journal mobile app

Lol. That’s the first thing I’m going to check tomorrow when I pick it ip. My guns are pretty stout though so I’m giving it a 50/50 chance.Can u do this with the Columbian 508?
I think my ridgid 608 is similar.
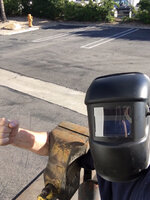
Hopefully he has a sense of humor.What's hard to tell from that photo is that wrench is lifting the 8 inch vise and its stand with just one arm ... he's a brute
Sent from my Moto G (5) Plus using Tapatalk
Pretty sure most folks don't mind being labeled as strong enough to hoist an 8 inch vise plus stand with one armHopefully he has a sense of humor.
Umm...I meant towards me for insinuating that my guns were bigger than his.Pretty sure most folks don't mind being labeled as strong enough to hoist an 8 inch vise plus stand with one arm
Sent from my Moto G (5) Plus using Tapatalk
What's hard to tell from that photo is that wrench is lifting the 8 inch vise and its stand with just one arm ... he's a brute
Sent from my Moto G (5) Plus using Tapatalk

Yeah I’m thinking the stand weighs 600 lbs easy. It needs a big railway vise, something in the 58/98 range.10-4 and hahaha, I get it now. Yeah, no offense meant to anyone. I can get the P98 around but it has to be in pieces. That stand you're getting looks like it is the perfect height for a big boy.
Sent from my Moto G (5) Plus using Tapatalk
Your pic was great, I saved it. I’ll be posting up tomorrow afternoon for sure when I get that bad boy.trijeff and i go back awhile....b4 the p98. he prolly blames me 4 that beast! at that time that ridgid set-up only weighed 1100#. alls good.


New guy, first post.
snip
I had found the gent in Colorado that makes them from tool steel and picked a set that was close enough. I machined the originals out (that was a pain), drilled and tapped for the jaw inserts. The intent was simply to get the vise back to point of putting it back to work and not a museum piece. I did not 'restore' it so much as 'rehabilitated' it. snip
New guy, first post.
Reed 204 I bought for next to nothing a while back. The jaw faces were badly hand-ground 'smooth'. Just not not straight, flat, parallel, or smooth.
Glass beaded the entire thing bare so I could inspect everything. Once I found that it was 'solid'. I started planning what to do. The main issue was the jaw faces.
I had found the gent in Colorado that makes them from tool steel and picked a set that was close enough. I machined the originals out (that was a pain), drilled and tapped for the jaw inserts. The intent was simply to get the vise back to point of putting it back to work and not a museum piece. I did not 'restore' it so much as 'rehabilitated' it.
The handle was bent in five directions and I got it nearly back to new. Close enough to not press my luck with further attempts to make it perfect.
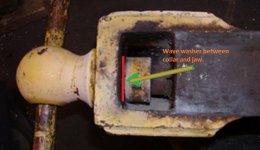
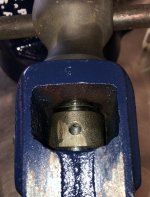
A pet peeve of mine is backlash. Years ago I tried wave or Belleville washers between the screw collar and the dynamic jaw. This has always worked well so, every vise I have (or had) since has been treated to this. This one has almost zero backlash. You turn the screw only a few degrees that the jaw moves. Turn the screw back the other way a few degrees, same. Also, the screw/handle is simply gun-blued and rubbed with WD40 Specialist Long Term Corrosion Inhibitor (because it was within reach when I decided it needed something). I'd like to figure out how to make Japanese lacquer and do that. For now, it works.
I got lucky and my mill work resulted in the faces being parallel/square. The body and swivel base were hand-fit and the screw shimmed to allow it to rotate without wobbling. The screw/slide move through their full travel without any change in the force required. Nickel anti-seize there.
It was first sprayed with an industrial bare-metal primer and allowed to cure a few days. Then some run of the mill Rustoleum gloss enamel (Navy). I figure that will be available for years in case it needs a quick respray. White paint pen for the lettering (wife).
It looks acceptable, works better than I could have hoped (even with my over-the-top fettling), and it currently in use in the garage where it will remain. It's a keeper, along with my dad's Morgan (Chicago) 335 and my Columbian 604 M2 (pinned, t-insert jaws).
SP3, that reed came out nice! Those jaws are from our own Dr Scott! (KMScott)
SP3, nice job on the cast jaw removal, one of the few that has done it and shown it here in the vise thread. I know what it takes to do it. Now you have a good user. Where did you put the belleville washers? I can only see them where the collar goes. Would love to see a picture of your washer stack setup. Nice job.
SP3
Welcome to GJ. Great restoration job, specially the cast jaw removal and replacement!
When I read your post that stated "I had found the gent in Colorado that makes them from tool steel ", I could not help but chuckle . By now you might know that you have crossed path with GJ own KMScott (Dr. Scott) the machinists extraordinaire who is a legend in the vise world.
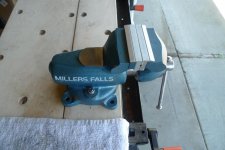
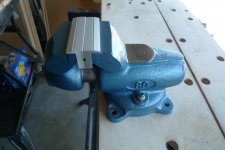
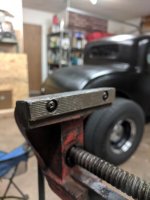
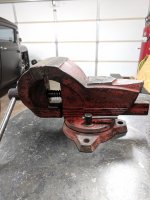
A few months ago, I found a Wilton Shop King someone had dunked in black paint. I set it aside for when I needed a project to keep me busy for a day. well, that was today. This one has 5" jaws and 5 1/2" opening span. Came out pretty good. I did notice this one has no hardy hole like most I have seen. Was that an option?


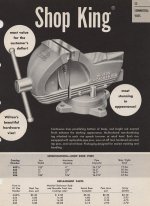

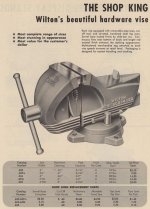

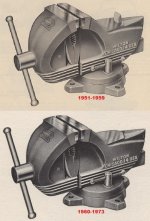
It wasn't an option, they changed the style in 1960. I dropped you some dated catalog scans so you can see the style and size changes over the years.
The Wilton Shop King vises are doing real well on eBay these days!

Can u do this with the Columbian 508?
I think my ridgid 608 is similar.

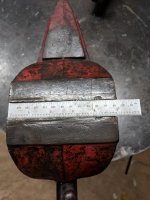
Actually I had to open my Columbian 508 up about a 1/2” for obvious reasons.
Sent from my iPad using The Garage Journal mobile app


Way to go SmittyActually I had to open my Columbian 508 up about a 1/2” for obvious reasons.
Here’s the Columbian 508 in as found condition. This vise was a daily user at a valve company, it sat right next to a huge vertical lathe. It has numerous battle scars but it’s in pretty good shape for all the work it’s seen. The vise has a double stamped casting on the Columbian logo. The base of the stand is 3/4” x 4’ x 4’ steel plate. I did some basic math on the whole stand and it worked out to about 680 lbs.
Thanks Gman, I paid five bills for the whole ball of wax. I’m calling the vise three and the stand two. 8” vises don’t come up very often so I had to jump on it.Smitty
Nice score, one handsome pair (vise and stand)
I’ve watched the video of the Ridged 608 numerous times, it’s museum quality for sure.nice, real nice!
Chub
I am not sure when you stated "Just tried and didn't do much to it" are you referring to Electrolysis or not. If you are, then depending on how rusty the item is, it might take several days rather than hours of continues Electrolysis to see results. The speed of processing will also depend on your setup such as how many sacrificial electrodes, what material etc you are using. Electrolysis in general needs patience and time (but no physical laboron your part).
Evapo-Rust has worked well for me, but for some the higher cost of it is a major consideration and specially if the vise is large, you might have to resort to tricks like stuffing the vise parts in sturdy and thick plastic bags to minimize the amount of Evapo-Rust that is needs to cover the entire piece. And just like Electrolysis, this method needs patience and time.
Wire brushing works fine but what I personally do not like about it is all the resulting rust dust. Plus it is a lot more work than some of the other methods. Also using this method, it is harder to remove rust from crevices and tight spots.
I do not like vinegar as one can easily over do it and end up with pitting.
As for blasting, I would not sand blast a vise which can damage the surface, but rather use softer blasting media such as glass bead blasting etc. And one needs proper setup (cabinet, ventilation etc)
For the record, I have used Wire brushing , vinegar, Electrolysis, Evapo-Rust and bead blasting.
It wasn't an option, they changed the style in 1960. I dropped you some dated catalog scans so you can see the style and size changes over the years.
The Wilton Shop King vises are doing real well on eBay these days!
Is this a York 80 that they made for Millers Falls?
I’ve watched the video of the Ridged 608 numerous times, it’s museum quality for sure.
Was referring to the scrubbing with a SOS pad. Did the vinegar method on some sockets and wrenches. Came out looking great with no pitting just blackness. Didn't end up with any pitting until I used a wire wheel on a bench grinder going 1750rpm to remove the black. Wire wheel on a old cordless drill did good but the battery died. I'm fine with taking my time and labor for those vises. First one and 2nd from father in law. So wire or Evapo-Rust would be the best? I'm iffy on the wire because of the pitting it caused on the sockets and wrenches but could do it by hand or cordless drill without the pitting. Pictures of them are on my page and I will be taking more pictures along the way that are better.

Thanks VA, you’re UPS guy will never know how close he came to the worst delivery of his life.Smitty, that stand is the epitome of stability.---You absolutely had to go for it.---Pity that thing wouldn't fit in a UPS van, cause I'd make you an offer you couldn't refuse.